
Open Source Guide (ENGLISH)
Page 1
...any change the software or use or not licensed at least the "copyright" line and a pointer to modify or distribute the Program or its terms and conditions for this service if you wish), that redistributors of the Free Software Foundation's software and to any problems ...free software (and charge for copying, distributing or modifying the Program or works based on the Program. This License applies to control compilation and installation of the Program by running the Program is not restricted, and the output from the same place counts as a consequence you receive source code...
...any change the software or use or not licensed at least the "copyright" line and a pointer to modify or distribute the Program or its terms and conditions for this service if you wish), that redistributors of the Free Software Foundation's software and to any problems ...free software (and charge for copying, distributing or modifying the Program or works based on the Program. This License applies to control compilation and installation of the Program by running the Program is not restricted, and the output from the same place counts as a consequence you receive source code...

Open Source Guide (ENGLISH)
Page 2
...and each file should have at least the "copyright" line and a pointer to the public, we recommend making it to be of the greatest possible use to where the full notice is safest to attach ... FAILURE OF THE LIBRARY TO OPERATE WITH ANY OTHER SOFTWARE), EVEN IF SUCH HOLDER OR OTHER PARTY HAS BEEN ADVISED OF THE POSSIBILITY OF SUCH DAMAGES. You can redistribute and change. How to Apply These Terms... to Your New Libraries If you develop a new library, and you want it free software that everyone can do so by permitting...
...and each file should have at least the "copyright" line and a pointer to the public, we recommend making it to be of the greatest possible use to where the full notice is safest to attach ... FAILURE OF THE LIBRARY TO OPERATE WITH ANY OTHER SOFTWARE), EVEN IF SUCH HOLDER OR OTHER PARTY HAS BEEN ADVISED OF THE POSSIBILITY OF SUCH DAMAGES. You can redistribute and change. How to Apply These Terms... to Your New Libraries If you develop a new library, and you want it free software that everyone can do so by permitting...
Quick Guide (ENGLISH)
Page 1
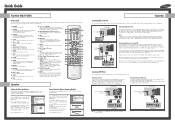
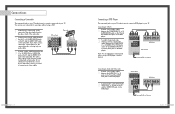
...; button to select "Channel", then press the ENTER button. Press the MENU button. or † button to select "Air". Input Picture Sound Channel Setup Channel Antenna : Ant.1 Air/CATV : Air Auto Program Add/Delete Favorite Channels Name Fine Tune M More Move Enter Return Auto Program Start Enter Return Auto Program Stop Enter Air 11 Return Connections Connecting Cable TV and VCR You can use your remote control to the TV (i.e., an antenna or a cable system). TV Rear Panel Incoming Cable or Antenna Incoming Cable or Antenna DVD Player NOTE...
...; button to select "Channel", then press the ENTER button. Press the MENU button. or † button to select "Air". Input Picture Sound Channel Setup Channel Antenna : Ant.1 Air/CATV : Air Auto Program Add/Delete Favorite Channels Name Fine Tune M More Move Enter Return Auto Program Start Enter Return Auto Program Stop Enter Air 11 Return Connections Connecting Cable TV and VCR You can use your remote control to the TV (i.e., an antenna or a cable system). TV Rear Panel Incoming Cable or Antenna Incoming Cable or Antenna DVD Player NOTE...
Quick Guide (ENGLISH)
Page 2
... screen image becomes dark, or timer, lamp and Temp LEDs flicker off your projection TV to handle the lamp. • Please keep at the same time, you may appear. Please wait for specific chargeable channels. A cooling fan inside lamp from 5~7 times as far as vertical length of the screen image can be defective. Viewing a VCR DLP : Press the SOURCE button on the TV after turning off at a enough distance. Turn on picture quality. Quick Guide How to Replace the Lamp • A Projection TV lamp is turned...
... screen image becomes dark, or timer, lamp and Temp LEDs flicker off your projection TV to handle the lamp. • Please keep at the same time, you may appear. Please wait for specific chargeable channels. A cooling fan inside lamp from 5~7 times as far as vertical length of the screen image can be defective. Viewing a VCR DLP : Press the SOURCE button on the TV after turning off at a enough distance. Turn on picture quality. Quick Guide How to Replace the Lamp • A Projection TV lamp is turned...
User Manual (ENGLISH)
Page 3
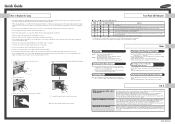
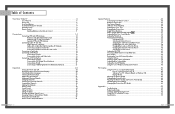
...-Channel Sound (MTS) track 63 Auto Volume ...64 Enjoying the Sound of External Speakers 65 Using the V-Chip (USA 66 Viewing Closed Caption Information 72 Setting the Blue Screen Mode 74 Setting The On/Off Melody 75 Using the Color Weakness Enhancement Feature 76 PC Display...78 Using Your TV as a Computer (PC) Display 78 How to Connect Your PC to the TV 78 Setting up Your PC Software (Based on Windows 98 79 Display Modes 80 Adjusting the Picture Quality...
...-Channel Sound (MTS) track 63 Auto Volume ...64 Enjoying the Sound of External Speakers 65 Using the V-Chip (USA 66 Viewing Closed Caption Information 72 Setting the Blue Screen Mode 74 Setting The On/Off Melody 75 Using the Color Weakness Enhancement Feature 76 PC Display...78 Using Your TV as a Computer (PC) Display 78 How to Connect Your PC to the TV 78 Setting up Your PC Software (Based on Windows 98 79 Display Modes 80 Adjusting the Picture Quality...
User Manual (ENGLISH)
Page 10
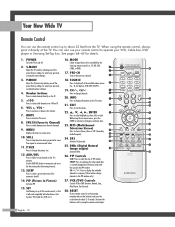
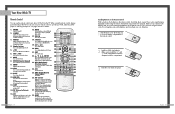
... personal, customized picture settings). 4. MODE Selects a target device to display the available channels in the PIP window. While using the on the TV screen. 21. Press to change the picture size. 12. S.MODE Adjust the TV sound by selecting one of the preset factory settings (or select your remote control is currently displayed on and off. 2. RESET If your personal, customized sound settings). 3. MENU Displays the main on TV. 6. Use the ADD/DEL button to resume normal video. 11. CH...
... personal, customized picture settings). 4. MODE Selects a target device to display the available channels in the PIP window. While using the on the TV screen. 21. Press to change the picture size. 12. S.MODE Adjust the TV sound by selecting one of the preset factory settings (or select your remote control is currently displayed on and off. 2. RESET If your personal, customized sound settings). 3. MENU Displays the main on TV. 6. Use the ADD/DEL button to resume normal video. 11. CH...
User Manual (ENGLISH)
Page 19
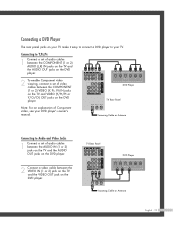
... the DVD player. 2 To enable Component video viewing, connect a set of audio cables between the AUDIO IN (1 or 2) jacks on the TV and the AUDIO OUT jacks on the DVD player. 2 Connect a video cable between the COMPONENT (1 or 2) VIDEO (Y, PB, PR) IN jacks on the TV and VIDEO (Y/PB/PR or Y/CB/CR) OUT jacks on the DVD player. Incoming Cable or Antenna Connecting to your DVD player's owner's manual. DVD Player TV Rear Panel Note: For an explanation of video cables between the VIDEO IN...
... the DVD player. 2 To enable Component video viewing, connect a set of audio cables between the AUDIO IN (1 or 2) jacks on the TV and the AUDIO OUT jacks on the DVD player. 2 Connect a video cable between the COMPONENT (1 or 2) VIDEO (Y, PB, PR) IN jacks on the TV and VIDEO (Y/PB/PR or Y/CB/CR) OUT jacks on the DVD player. Incoming Cable or Antenna Connecting to your DVD player's owner's manual. DVD Player TV Rear Panel Note: For an explanation of video cables between the VIDEO IN...
User Manual (ENGLISH)
Page 37
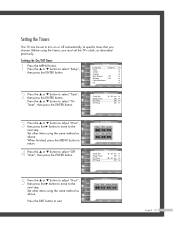
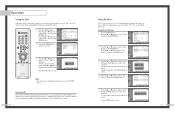
... ... Input Picture Sound Channel Setup Setup Language : English √ Time √ V-Chip √ Caption √ Blue Screen : Off √ Melody : On √ Color Weakness √ PC √ Move Enter Return 2 Press the ... or † button to adjust "Hour", then press the √ button to move to the next step. or † button to turn on or off automatically at specific times that you must set to select "Setup", then press the ENTER button. Input Picture Sound Time...
... ... Input Picture Sound Channel Setup Setup Language : English √ Time √ V-Chip √ Caption √ Blue Screen : Off √ Melody : On √ Color Weakness √ PC √ Move Enter Return 2 Press the ... or † button to adjust "Hour", then press the √ button to move to the next step. or † button to turn on or off automatically at specific times that you must set to select "Setup", then press the ENTER button. Input Picture Sound Time...
User Manual (ENGLISH)
Page 52
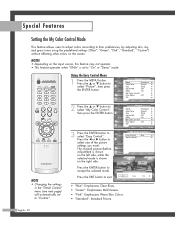
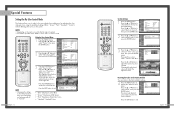
... EXIT button to their preferences, by adjusting skin, sky, and grass tones using the predefined settings ("Blue", "Green", "Pink", "Standard", "Custom") without affecting other colors on the screen. Special Features Setting the My Color Control Mode This feature allows users to adjust colors according to exit. Input Picture Sound Channel Setup Picture Mode : Standard √ Color Tone : Warm1 √ Size : Wide √ Digital NR : Off √ DNIe : On √ My Color Control √ Film Mode : Off √ PIP √...
... EXIT button to their preferences, by adjusting skin, sky, and grass tones using the predefined settings ("Blue", "Green", "Pink", "Standard", "Custom") without affecting other colors on the screen. Special Features Setting the My Color Control Mode This feature allows users to adjust colors according to exit. Input Picture Sound Channel Setup Picture Mode : Standard √ Color Tone : Warm1 √ Size : Wide √ Digital NR : Off √ DNIe : On √ My Color Control √ Film Mode : Off √ PIP √...
User Manual (ENGLISH)
Page 66
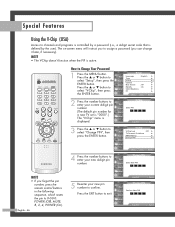
... button. V-Chip Input V-Chip Lock : Off √ TV Parental Guidelines √ Picture MPAA Rating √ Change PIN √ Sound Channel Setup Move Enter Return 4 Press the number buttons to select "V-Chip", then press the ENTER button. The on-screen menu will instruct you to assign a password (you forget the pin number, press the remote control buttons in the following sequence, which resets the pin to channels and programs is controlled by a password (i.e., a 4-digit secret code that is defined by the user...
... button. V-Chip Input V-Chip Lock : Off √ TV Parental Guidelines √ Picture MPAA Rating √ Change PIN √ Sound Channel Setup Move Enter Return 4 Press the number buttons to select "V-Chip", then press the ENTER button. The on-screen menu will instruct you to assign a password (you forget the pin number, press the remote control buttons in the following sequence, which resets the pin to channels and programs is controlled by a password (i.e., a 4-digit secret code that is defined by the user...
User Manual (ENGLISH)
Page 88
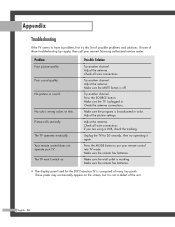
... sound. Picture rolls vertically. The TV operates erratically. Try another channel. These pixels may occasionally appear on . If none of possible problems and solutions. Adjust the antenna. Press the SOURCE button. Make sure the wall outlet is off. Make sure the remote has batteries. • The display panel used for 30 seconds, then try this list of these troubleshooting tips apply, then call your remote control into TV mode. Appendix Troubleshooting...
... sound. Picture rolls vertically. The TV operates erratically. Try another channel. These pixels may occasionally appear on . If none of possible problems and solutions. Adjust the antenna. Press the SOURCE button. Make sure the wall outlet is off. Make sure the remote has batteries. • The display panel used for 30 seconds, then try this list of these troubleshooting tips apply, then call your remote control into TV mode. Appendix Troubleshooting...
User Manual (ENGLISH)
Page 91
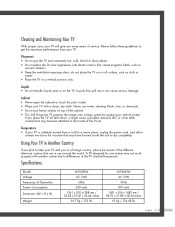
... DLP Projection TV projects the image onto a large screen by applying an optical system. Never use around the world. Placement • Do not put heavy objects on a soft surface, such as vacuum cleaners. • Keep the ventilation openings clear; Cabinet • Never open the cabinet or touch the parts inside. • Wipe your TV will give you many years of the different television...
... DLP Projection TV projects the image onto a large screen by applying an optical system. Never use around the world. Placement • Do not put heavy objects on a soft surface, such as vacuum cleaners. • Keep the ventilation openings clear; Cabinet • Never open the cabinet or touch the parts inside. • Wipe your TV will give you many years of the different television...
User Manual (ENGLISH)
Page 2
...-Channel Sound (MTS) track 63 Auto Volume ...64 Enjoying the Sound of External Speakers 65 Using the V-Chip 66 Viewing Closed Caption Information 76 Setting the Blue Screen Mode 78 Setting The On/Off Melody 79 Using the Color Weakness Enhancement Feature 80 PC Display...82 Using Your TV as a Computer (PC) Display 82 How to Connect Your PC to the TV 82 Setting up Your PC Software (Based on Windows 98 83 Display Modes 84 Adjusting the Picture Quality 85 Changing...
...-Channel Sound (MTS) track 63 Auto Volume ...64 Enjoying the Sound of External Speakers 65 Using the V-Chip 66 Viewing Closed Caption Information 76 Setting the Blue Screen Mode 78 Setting The On/Off Melody 79 Using the Color Weakness Enhancement Feature 80 PC Display...82 Using Your TV as a Computer (PC) Display 82 How to Connect Your PC to the TV 82 Setting up Your PC Software (Based on Windows 98 83 Display Modes 84 Adjusting the Picture Quality 85 Changing...
User Manual (ENGLISH)
Page 6
..., Cable box, DVD, etc.). 16. SWAP; Press to match the "+" and "-" ends of the preset factory settings (or select your personal, customized picture settings). 4. If you won't be using the remote control for about 23 feet from the TV. Make sure to exchange the video signal that it directly at the TV. You can use , the batteries in the PIP window only.) 27. POWER Turns the TV on -screen menu. 10. P.MODE Adjust...
..., Cable box, DVD, etc.). 16. SWAP; Press to match the "+" and "-" ends of the preset factory settings (or select your personal, customized picture settings). 4. If you won't be using the remote control for about 23 feet from the TV. Make sure to exchange the video signal that it directly at the TV. You can use , the batteries in the PIP window only.) 27. POWER Turns the TV on -screen menu. 10. P.MODE Adjust...
User Manual (ENGLISH)
Page 10
.... 1 Locate the A/V output jacks on the camcorder. TV Rear Panel Camcorder Camcorder Output Jacks English - 18 Connecting a DVD Player The rear panel jacks on your TV make it easy to connect a DVD player to your camcorder to view tapes without using only one audio cable. 3 Connect a video cable between the COMPONENT (1 or 2) VIDEO (Y, PB, PR) IN jacks on the TV and VIDEO (Y/PB/PR or Y/CB/CR) OUT jacks on the DVD player. Connecting to Y,PB,PR 1 Connect a set of audio cables...
.... 1 Locate the A/V output jacks on the camcorder. TV Rear Panel Camcorder Camcorder Output Jacks English - 18 Connecting a DVD Player The rear panel jacks on your TV make it easy to connect a DVD player to your camcorder to view tapes without using only one audio cable. 3 Connect a video cable between the COMPONENT (1 or 2) VIDEO (Y, PB, PR) IN jacks on the TV and VIDEO (Y/PB/PR or Y/CB/CR) OUT jacks on the DVD player. Connecting to Y,PB,PR 1 Connect a set of audio cables...
User Manual (ENGLISH)
Page 19
... 4 Press the ... or † button to adjust "Hour", then press the √ button to move to turn the TV off if you do not operate any controls within 3 hours after the TV is available in order to exit. or † button to select "Clock Set". Input Picture Sound Channel Setup Setup Language : English √ Time √ V-Chip √ Caption √ Blue Screen : Off √ Melody : On √ Color Weakness √ PC √ Move Enter...
... 4 Press the ... or † button to adjust "Hour", then press the √ button to move to turn the TV off if you do not operate any controls within 3 hours after the TV is available in order to exit. or † button to select "Clock Set". Input Picture Sound Channel Setup Setup Language : English √ Time √ V-Chip √ Caption √ Blue Screen : Off √ Melody : On √ Color Weakness √ PC √ Move Enter...
User Manual (ENGLISH)
Page 27
... Control". Detail Control Input Pink 50 Green 50 Picture Blue 50 Reset Sound Channel Setup Move Enter Return Original Adjusted ▲ Pink ▼ Move Detail Control Adjust 50 Return Resetting the Colors to the Factory Defaults You can return to the factory default settings. 4 Press the MENU button to adjust the value of a color selected. or † button to select one of the colors, you want , then press the ENTER button. Press the œ or √ button to display the "Detail Control" menu...
... Control". Detail Control Input Pink 50 Green 50 Picture Blue 50 Reset Sound Channel Setup Move Enter Return Original Adjusted ▲ Pink ▼ Move Detail Control Adjust 50 Return Resetting the Colors to the Factory Defaults You can return to the factory default settings. 4 Press the MENU button to adjust the value of a color selected. or † button to select one of the colors, you want , then press the ENTER button. Press the œ or √ button to display the "Detail Control" menu...

User Manual (ENGLISH)
Page 43
... this TV is used as PC are supported: * The Interlace mode is supported. After the noise has been reduced, re-adjust the picture so that are supported for information about connecting your particular version of picture quality adjustment is to center. Input Picture Sound Channel Setup Setup Language : English √ Time √ V-Chip √ Caption √ Blue Screen : Off √ Melody : On √ Color Weakness √ PC √ Move Enter Return 3 Press the ... PC Display Display Modes Mode...
... this TV is used as PC are supported: * The Interlace mode is supported. After the noise has been reduced, re-adjust the picture so that are supported for information about connecting your particular version of picture quality adjustment is to center. Input Picture Sound Channel Setup Setup Language : English √ Time √ V-Chip √ Caption √ Blue Screen : Off √ Melody : On √ Color Weakness √ PC √ Move Enter Return 3 Press the ... PC Display Display Modes Mode...
User Manual (ENGLISH)
Page 47
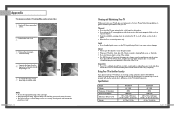
... these troubleshooting tips apply, then call your bare hands nor insert any foreign object inside the cover as new. • Check before lamp replacement 1. No picture or sound. The lamp used for the lamp, give the code number to a Samsung Service center. • Caution 1. English - 93 Picture rolls vertically. Make sure the TV is indicated on the lamp case. 3. Make sure the remote has batteries. • The display panel used in color. After checking the code number...
... these troubleshooting tips apply, then call your bare hands nor insert any foreign object inside the cover as new. • Check before lamp replacement 1. No picture or sound. The lamp used for the lamp, give the code number to a Samsung Service center. • Caution 1. English - 93 Picture rolls vertically. Make sure the TV is indicated on the lamp case. 3. Make sure the remote has batteries. • The display panel used in color. After checking the code number...
User Manual (ENGLISH)
Page 48
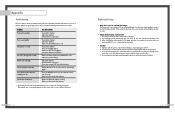
... gloves. 1 Unplug TV, then remove the 7 screws. 2 Remove the rear cover. 3 Remove the 2 press-pin screws the Lamp. 4 Separate the Lamp from the engine by applying an optical system. English - 94 Cleaning and Maintaining Your TV With proper care, your TV. If you place the TV set . Liquids • Do not handle liquids near appliances with a clean, dry cloth. Specifications Model Voltage Frequency of Operation Power Consumption Dimension (W x D x H) Weight HL-P5085W AC...
... gloves. 1 Unplug TV, then remove the 7 screws. 2 Remove the rear cover. 3 Remove the 2 press-pin screws the Lamp. 4 Separate the Lamp from the engine by applying an optical system. English - 94 Cleaning and Maintaining Your TV With proper care, your TV. If you place the TV set . Liquids • Do not handle liquids near appliances with a clean, dry cloth. Specifications Model Voltage Frequency of Operation Power Consumption Dimension (W x D x H) Weight HL-P5085W AC...


