User Manual (ENGLISH)
Page 2
...-Channel Sound (MTS) track 65 Auto Volume ...66 Enjoying the Sound of External Speakers 67 Using the V-Chip (USA 68 Viewing Closed Caption Information 74 Setting the Blue Screen Mode 76 Setting The On/Off Melody 77 Using the Color Weakness Enhancement Feature 78 PC Display...80 Using Your TV as a Computer (PC) Display 80 How to Connect Your PC to the TV 80 Setting up Your PC Software (Based on Widows 98 81 Display Modes 82 Adjusting the Picture Quality...
...-Channel Sound (MTS) track 65 Auto Volume ...66 Enjoying the Sound of External Speakers 67 Using the V-Chip (USA 68 Viewing Closed Caption Information 74 Setting the Blue Screen Mode 76 Setting The On/Off Melody 77 Using the Color Weakness Enhancement Feature 78 PC Display...80 Using Your TV as a Computer (PC) Display 80 How to Connect Your PC to the TV 80 Setting up Your PC Software (Based on Widows 98 81 Display Modes 82 Adjusting the Picture Quality...
User Manual (ENGLISH)
Page 4
... TV, then use a screwdriver to remove the screw. 2 Remove the Lamp cover. 3 Remove the screws securing the Lamp by using a screwdriver. 4 Separate the Lamp from the engine by holding the handle and pulling it will be replaced when the screen becomes darker, less clear or when all three LEDs on the front (Timer, Lamp, & Temp.) are flashing. • Check before replacing the lamp as this will not turn on if the lamp cover is...
... TV, then use a screwdriver to remove the screw. 2 Remove the Lamp cover. 3 Remove the screws securing the Lamp by using a screwdriver. 4 Separate the Lamp from the engine by holding the handle and pulling it will be replaced when the screen becomes darker, less clear or when all three LEDs on the front (Timer, Lamp, & Temp.) are flashing. • Check before replacing the lamp as this will not turn on if the lamp cover is...
User Manual (ENGLISH)
Page 5
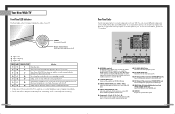
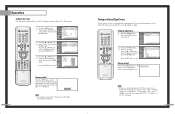
...-000103) 8 Warranty Cards (2)/ Registration Card (1) Instruction Manual/ Safety Guide Manual/ Quick Guide Manual Side Panel Buttons The buttons on the right side panel control your dealer. Press to activate (or change channels and move between viewing TV programs and signals from a camcorder or video game. (S-Video 3 jack and Audio L/R input 3 are used only occasionally (a camcorder or video game, for stereo and bilingual listening • Built-in, dual channel speakers • A special sleep timer • Picture-in multi-channel sound decoder for...
...-000103) 8 Warranty Cards (2)/ Registration Card (1) Instruction Manual/ Safety Guide Manual/ Quick Guide Manual Side Panel Buttons The buttons on the right side panel control your dealer. Press to activate (or change channels and move between viewing TV programs and signals from a camcorder or video game. (S-Video 3 jack and Audio L/R input 3 are used only occasionally (a camcorder or video game, for stereo and bilingual listening • Built-in, dual channel speakers • A special sleep timer • Picture-in multi-channel sound decoder for...
User Manual (ENGLISH)
Page 6
... sets of video input jacks and three set will automatically appear in about 15 seconds. The PIP channel can be turned on rear of the set is Off TIMER LAMP STAND BY/TEMP Indication Standby state. The picture will automatically be connected to these to connect components such as a Cable Set-Top Box). You'll occasionally hear it working. 10 Rear Panel Jacks Use the rear panel jacks to the video output jack on the TV. : Light is On : Light is Blinking : Light...
... sets of video input jacks and three set will automatically appear in about 15 seconds. The PIP channel can be turned on rear of the set is Off TIMER LAMP STAND BY/TEMP Indication Standby state. The picture will automatically be connected to these to connect components such as a Cable Set-Top Box). You'll occasionally hear it working. 10 Rear Panel Jacks Use the rear panel jacks to the video output jack on the TV. : Light is On : Light is Blinking : Light...
User Manual (ENGLISH)
Page 7
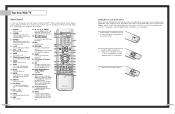
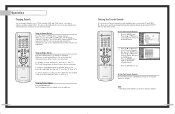
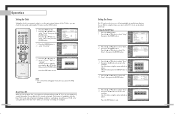
... using the remote, the batteries may need to switch between your personal, customized sound settings.) 3. Make sure you won't be replaced. P.MODE Adjust the TV picture by selecting one of the preset factory settings (or select your Set-Top box, VCR, Cable box or DVD player. Use the ADD/DEL button to change ) a particular item. 18. Press to select cable channels over 100 on the main screen with the signal in the PIP window. VCR/DVD Controls Controls VCR or DVD...
... using the remote, the batteries may need to switch between your personal, customized sound settings.) 3. Make sure you won't be replaced. P.MODE Adjust the TV picture by selecting one of the preset factory settings (or select your Set-Top box, VCR, Cable box or DVD player. Use the ADD/DEL button to change ) a particular item. 18. Press to select cable channels over 100 on the main screen with the signal in the PIP window. VCR/DVD Controls Controls VCR or DVD...

User Manual (ENGLISH)
Page 11
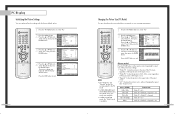
... camcorder. 2 Connect a set of Component video, see your DVD player's owner's manual. Camcorder Output Jacks TV Side Panel Camcorder 20 Connecting a DVD Player The rear panel jacks on your TV make it easy to connect a DVD player to your TV. Note: For an explanation of audio cables between the VIDEO IN (or S-VIDEO IN) jack on the TV and the VIDEO OUT jack on the camcorder. TV Rear Panel Incoming Cable or Antenna 2 To enable Component video viewing, connect a set of video cables between the VIDEO IN (1 or...
... camcorder. 2 Connect a set of Component video, see your DVD player's owner's manual. Camcorder Output Jacks TV Side Panel Camcorder 20 Connecting a DVD Player The rear panel jacks on your TV make it easy to connect a DVD player to your TV. Note: For an explanation of audio cables between the VIDEO IN (or S-VIDEO IN) jack on the TV and the VIDEO OUT jack on the camcorder. TV Rear Panel Incoming Cable or Antenna 2 To enable Component video viewing, connect a set of video cables between the VIDEO IN (1 or...

User Manual (ENGLISH)
Page 14
... adjustments. The TV displays the current channel, the status of your remote control to exit. Press the EXIT button to select "Antenna". Input Picture Sound Channel Setup Channel Antenna : Ant.1 Air/CATV : Air Auto Program Add/Delete Favorite Channels Name Fine Tune ▼ More Move Enter Return 2 Press the ENTER button to exit. Once the on-screen menu appears, use the POWER button on the remote control. Air 12 Signal V-Chip Picture Sound SRS TSXT MTS - - : - - Press the ... Input Picture Sound Channel Setup Setup Language Time V-Chip Caption Blue...
... adjustments. The TV displays the current channel, the status of your remote control to exit. Press the EXIT button to select "Antenna". Input Picture Sound Channel Setup Channel Antenna : Ant.1 Air/CATV : Air Auto Program Add/Delete Favorite Channels Name Fine Tune ▼ More Move Enter Return 2 Press the ENTER button to exit. Once the on-screen menu appears, use the POWER button on the remote control. Air 12 Signal V-Chip Picture Sound SRS TSXT MTS - - : - - Press the ... Input Picture Sound Channel Setup Setup Language Time V-Chip Caption Blue...

User Manual (ENGLISH)
Page 15
... stations. After the available channels are connected to the TV (i.e., an antenna or a cable system). 1 Press the MENU button. There are three steps for viewing. 28 Storing Channels in Memory". • Subscription cable services require service-specific requirement for memorizing channels: selecting a broadcast source, memorizing the channels (automatic) and adding/deleting channels (manual). Input Picture Sound Channel Setup Channel Antenna : AnAt.i1re Air/CATV : AirSTD Auto Program HRC Add/Delete IRC Favorite Channels Name Fine Tune ▼...
... stations. After the available channels are connected to the TV (i.e., an antenna or a cable system). 1 Press the MENU button. There are three steps for viewing. 28 Storing Channels in Memory". • Subscription cable services require service-specific requirement for memorizing channels: selecting a broadcast source, memorizing the channels (automatic) and adding/deleting channels (manual). Input Picture Sound Channel Setup Channel Antenna : AnAt.i1re Air/CATV : AirSTD Auto Program HRC Add/Delete IRC Favorite Channels Name Fine Tune ▼...
User Manual (ENGLISH)
Page 16
... button. (For channel "122", press the +100 button, then "2", then "2".) Using the Previous Channel Press the PRE-CH button. Using the Number Buttons Press the number buttons to go directly to deselect the selected channel. Press the ENTER button again to a channel. To change channels. To Store Your Favorite Channels: 1 Press the MENU button. or † button to select "Channel", then press the ENTER button. Input Picture Sound Channel Setup Channel Antenna : Ant.1 Air/CATV : Air Auto Program Add/Delete Favorite Channels...
... button. (For channel "122", press the +100 button, then "2", then "2".) Using the Previous Channel Press the PRE-CH button. Using the Number Buttons Press the number buttons to go directly to deselect the selected channel. Press the ENTER button again to a channel. To change channels. To Store Your Favorite Channels: 1 Press the MENU button. or † button to select "Channel", then press the ENTER button. Input Picture Sound Channel Setup Channel Antenna : Ant.1 Air/CATV : Air Auto Program Add/Delete Favorite Channels...

User Manual (ENGLISH)
Page 18
... to the factory defaults. Press the ... Input Picture Sound Channel Setup Mode Mode : SDtaynnadmaircd Contrast Standard 90 Brightness Cinema 50 Sharpness 50 Color 50 Tint 50 50 Reset Move Enter Return Alternate method Press the P.MODE button on -screen menus to change the "Contrast", "Brightness", "Sharpness", "Color" and "Tint" according to personal preference. (Alternatively, you can select "Custom" which automatically recalls your personalized picture settings. 1 Press the MENU button. Operation Picture Control You can use the on the remote control repeatedly to...
... to the factory defaults. Press the ... Input Picture Sound Channel Setup Mode Mode : SDtaynnadmaircd Contrast Standard 90 Brightness Cinema 50 Sharpness 50 Color 50 Tint 50 50 Reset Move Enter Return Alternate method Press the P.MODE button on -screen menus to change the "Contrast", "Brightness", "Sharpness", "Color" and "Tint" according to personal preference. (Alternatively, you can select "Custom" which automatically recalls your personalized picture settings. 1 Press the MENU button. Operation Picture Control You can use the on the remote control repeatedly to...
User Manual (ENGLISH)
Page 19
... 2 Press the ENTER button to recall your personalized sound settings. 1 Press the MENU button. Using the MUTE Button At any time, you can temporarily cut off the sound. Input Picture Sound Channel Setup Sound Mode Equalizer SRS TSXT MTS Auto Volume Internal Mute : SSttannddaarrdd Music : OfMf ovie : SStepreeeoch : OCfuf stom : Off Move Enter Return Alternate method Press the S.MODE button on the remote control. Operation Sound Control You can use one of the standard sound settings. The message "Mute...
... 2 Press the ENTER button to recall your personalized sound settings. 1 Press the MENU button. Using the MUTE Button At any time, you can temporarily cut off the sound. Input Picture Sound Channel Setup Sound Mode Equalizer SRS TSXT MTS Auto Volume Internal Mute : SSttannddaarrdd Music : OfMf ovie : SStepreeeoch : OCfuf stom : Off Move Enter Return Alternate method Press the S.MODE button on the remote control. Operation Sound Control You can use one of the standard sound settings. The message "Mute...
User Manual (ENGLISH)
Page 20
.../Off Timer 1 Press the MENU button. Input Picture Sound Channel Setup Setup Language : English √ Time √ V-Chip √ Caption √ Blue Screen : Off √ Melody : On √ Color Weakness √ PC √ Move Enter Return 2 Press the ... or † button to adjust "Hour", then press the √ button to move to the next step. Set other items using the timers, you must set the TV's clock, as described previously. Input Picture Sound Time Clock Set Sleep Timer On Timer Off Timer...
.../Off Timer 1 Press the MENU button. Input Picture Sound Channel Setup Setup Language : English √ Time √ V-Chip √ Caption √ Blue Screen : Off √ Melody : On √ Color Weakness √ PC √ Move Enter Return 2 Press the ... or † button to adjust "Hour", then press the √ button to move to the next step. Set other items using the timers, you must set the TV's clock, as described previously. Input Picture Sound Time Clock Set Sleep Timer On Timer Off Timer...
User Manual (ENGLISH)
Page 21
... appropriate time interval appears (any of the preset values from connected equipment, such as VCR, DVD, Set-Top box and the TV source (broadcast or cable). Operation Setting the Sleep Timer The sleep timer automatically shuts off . 40 Viewing an External Signal Source Use the remote control to select a signal source, then press the ENTER button. or † button to 180 minutes). 1 Press the MENU button. Press the EXIT button to select "Source List". Input Picture Sound Channel Setup Input Source List : TV...
... appropriate time interval appears (any of the preset values from connected equipment, such as VCR, DVD, Set-Top box and the TV source (broadcast or cable). Operation Setting the Sleep Timer The sleep timer automatically shuts off . 40 Viewing an External Signal Source Use the remote control to select a signal source, then press the ENTER button. or † button to 180 minutes). 1 Press the MENU button. Press the EXIT button to select "Source List". Input Picture Sound Channel Setup Input Source List : TV...

User Manual (ENGLISH)
Page 26
... the picture on screen using the scroll function. Press the ... Press the ... Input Picture Sound Channel Setup Size Wide Panorama Zoom1 Zoom2 4:3 Move Enter Return Alternate method Press the P.SIZE button on screen. or † button to scroll the picture. • "Zoom2": Magnifies the size of the picture on the remote control repeatedly to select one of the picture size settings. • "Wide": Sets the picture to your viewing requirements. 1 Press the MENU button. Input Picture Sound Channel Setup Picture Mode Color Tone Size Digital NR...
... the picture on screen using the scroll function. Press the ... Press the ... Input Picture Sound Channel Setup Size Wide Panorama Zoom1 Zoom2 4:3 Move Enter Return Alternate method Press the P.SIZE button on screen. or † button to scroll the picture. • "Zoom2": Magnifies the size of the picture on the remote control repeatedly to select one of the picture size settings. • "Wide": Sets the picture to your viewing requirements. 1 Press the MENU button. Input Picture Sound Channel Setup Picture Mode Color Tone Size Digital NR...

User Manual (ENGLISH)
Page 28
... Detail Control Adjust 50 Return Resetting the MCC Colors to the Factory Defaults You can return to the factory default settings for MCC colors. 4 Press the MENU button to select "Picture", then press the ENTER button. Input Picture Sound Channel Setup Picture Mode Color Tone Size Digital NR DNIe MCC Film Mode PIP : Standard √ : Warm1 √ √ : Off √ : On √ √ : Off √ √ Move Enter Return NOTE • Changing the settings in the "Detail Control" menu...
... Detail Control Adjust 50 Return Resetting the MCC Colors to the Factory Defaults You can return to the factory default settings for MCC colors. 4 Press the MENU button to select "Picture", then press the ENTER button. Input Picture Sound Channel Setup Picture Mode Color Tone Size Digital NR DNIe MCC Film Mode PIP : Standard √ : Warm1 √ √ : Off √ : On √ √ : Off √ √ Move Enter Return NOTE • Changing the settings in the "Detail Control" menu...

User Manual (ENGLISH)
Page 29
... MENU button. Input Picture Sound Channel Setup Picture Mode Color Tone Size Digital NR DNIe MCC Film Mode PIP : Standard √ : Warm1 √ √ : Off √ : On √ √ : Off √ √ Move Enter Return 2 Press the ... Press the EXIT button to normal video. 57 Special Features Setting the Film Mode You can automatically sense and process film signals from all sources and adjust the picture for optimum quality. 1 Press the MENU button...
... MENU button. Input Picture Sound Channel Setup Picture Mode Color Tone Size Digital NR DNIe MCC Film Mode PIP : Standard √ : Warm1 √ √ : Off √ : On √ √ : Off √ √ Move Enter Return 2 Press the ... Press the EXIT button to normal video. 57 Special Features Setting the Film Mode You can automatically sense and process film signals from all sources and adjust the picture for optimum quality. 1 Press the MENU button...
User Manual (ENGLISH)
Page 35
... default pin number for Sound * a new TV set is "0000".) The "V-Chip" menu is Channel displayed. Press the ... or † button to select "On", then press the ENTER button. Special Features Using the V-Chip (USA) Access to channels and programs is controlled by the user). NOTE • The V-Chip doesn't function when the PIP is defined by a password (i.e., a 4-digit secret code that is active. Press the ... Input Picture Sound Change PIN Confirm New PIN * Channel Setup 0 9 Enter PIN...
... default pin number for Sound * a new TV set is "0000".) The "V-Chip" menu is Channel displayed. Press the ... or † button to select "On", then press the ENTER button. Special Features Using the V-Chip (USA) Access to channels and programs is controlled by the user). NOTE • The V-Chip doesn't function when the PIP is defined by a password (i.e., a 4-digit secret code that is active. Press the ... Input Picture Sound Change PIN Confirm New PIN * Channel Setup 0 9 Enter PIN...

User Manual (ENGLISH)
Page 42
... feature may change the width of PC monitor and its resolution. Input Picture Sound Channel Setup Setup Language : English √ Time √ V-Chip √ Caption √ Blue Screen : Off √ Melody : On √ Color Weakness √ PC √ Move Enter Return 4 Press the ... Check your PC instruction book for information about connecting your PC to select "PC", then press the ENTER button. Press the ... Input Picture Sound PC Coarse Fine Position Auto Adjustment Recall Channel Setup Move...
... feature may change the width of PC monitor and its resolution. Input Picture Sound Channel Setup Setup Language : English √ Time √ V-Chip √ Caption √ Blue Screen : Off √ Melody : On √ Color Weakness √ PC √ Move Enter Return 4 Press the ... Check your PC instruction book for information about connecting your PC to select "PC", then press the ENTER button. Press the ... Input Picture Sound PC Coarse Fine Position Auto Adjustment Recall Channel Setup Move...
User Manual (ENGLISH)
Page 44
...factory default values. 1 Press the TV/VIDEO button to select "Recall", then press the ENTER button. PC Display Initializing the Picture Settings You can select the picture size which best corresponds to your viewing requirements. 1 Press the TV/VIDEO button to exit. Input Picture Sound Channel Setup Setup Language : English √ Time √ V-Chip √ Caption √ Blue Screen : Off √ Melody : On √ Color Weakness √ PC √ Move Enter Return 4 Press the ... Input Picture Sound PC Coarse Fine Position Auto Adjustment Recall Channel...
...factory default values. 1 Press the TV/VIDEO button to select "Recall", then press the ENTER button. PC Display Initializing the Picture Settings You can select the picture size which best corresponds to your viewing requirements. 1 Press the TV/VIDEO button to exit. Input Picture Sound Channel Setup Setup Language : English √ Time √ V-Chip √ Caption √ Blue Screen : Off √ Melody : On √ Color Weakness √ PC √ Move Enter Return 4 Press the ... Input Picture Sound PC Coarse Fine Position Auto Adjustment Recall Channel...
User Manual (ENGLISH)
Page 46
... the TV in color. Temperature • If your nearest service center. Appendix Troubleshooting If the TV seems to have formed inside the unit to dry completely. Picture rolls vertically. Adjust the antenna. Make sure the program is working. These, pixels may not work properly with electric motors that are using a VCR, check the tracking. Check the antenna connections. Your remote control does not operate your TV. If you to differences in use water, cleaning...
... the TV in color. Temperature • If your nearest service center. Appendix Troubleshooting If the TV seems to have formed inside the unit to dry completely. Picture rolls vertically. Adjust the antenna. Make sure the program is working. These, pixels may not work properly with electric motors that are using a VCR, check the tracking. Check the antenna connections. Your remote control does not operate your TV. If you to differences in use water, cleaning...


