
Instruction Manual
Page 3
Special Features 46 Customizing Your Remote Control 46 Remote Control Codes 47 Fine Tuning Channels 48 LNA (Low Noise Amplifier 49 Selecting the Color Tone 50 Changing the Picture Size 51 Digital Noise Reduction 52 DNIeTM (Digital Natural Image engine) 53 Setting the My Color Control Mode 54 Setting the Film...the Blue Screen Mode 80 Setting The On/Off Melody 81 Using the Color Weakness Enhancement Feature 82 PC Display...84 Using Your TV as a Computer (PC) Display 84 How to Connect Your PC to the TV 84 Setting up Your PC Software (Based on Widows 98 85 Display ...
Special Features 46 Customizing Your Remote Control 46 Remote Control Codes 47 Fine Tuning Channels 48 LNA (Low Noise Amplifier 49 Selecting the Color Tone 50 Changing the Picture Size 51 Digital Noise Reduction 52 DNIeTM (Digital Natural Image engine) 53 Setting the My Color Control Mode 54 Setting the Film...the Blue Screen Mode 80 Setting The On/Off Melody 81 Using the Color Weakness Enhancement Feature 82 PC Display...84 Using Your TV as a Computer (PC) Display 84 How to Connect Your PC to the TV 84 Setting up Your PC Software (Based on Widows 98 85 Display ...

Instruction Manual
Page 8
...• Easy-to-use on-screen menu system you can access from the side panel or remote control • Automatic timer to turn the TV on and off at any piece is a full-featured, high-performance unit that you have all the parts shown here. Remote Control (BP59... capability that lets you watch two channels at once • Widescreen TV with adjustable image size • Life-like clear images provided by DNle technology • My Color Control Mode for corresponding with your color style • Color weakness Mode Accessories Once you have unpacked your dealer. It is missing...
...• Easy-to-use on-screen menu system you can access from the side panel or remote control • Automatic timer to turn the TV on and off at any piece is a full-featured, high-performance unit that you have all the parts shown here. Remote Control (BP59... capability that lets you watch two channels at once • Widescreen TV with adjustable image size • Life-like clear images provided by DNle technology • My Color Control Mode for corresponding with your color style • Color weakness Mode Accessories Once you have unpacked your dealer. It is missing...

Instruction Manual
Page 26
... on the remote control. Viewing the Menus 1 Press the MENU button. Channel Setup Move Enter Exit 2 Press the ... Input Input Source List : TV Edit Name √ √ There are five menu groups: Picture Anynet √ "Input", "Picture", "Sound", Sound "Channel", and "Setup".... Digital NR : On √ DNIe : On √ My Color Control √ Film Mode : Off √ PIP √ Move Enter Return 3 Press the EXIT button to select menu items and make some adjustments using the TV's side panel buttons. Viewing the Menus and On-Screen Displays The ...
... on the remote control. Viewing the Menus 1 Press the MENU button. Channel Setup Move Enter Exit 2 Press the ... Input Input Source List : TV Edit Name √ √ There are five menu groups: Picture Anynet √ "Input", "Picture", "Sound", Sound "Channel", and "Setup".... Digital NR : On √ DNIe : On √ My Color Control √ Film Mode : Off √ PIP √ Move Enter Return 3 Press the EXIT button to select menu items and make some adjustments using the TV's side panel buttons. Viewing the Menus and On-Screen Displays The ...

Instruction Manual
Page 27
...Setup Setup Language : English √ Time √ V-Chip √ Caption √ Blue Screen : Off √ Melody : On √ Color Weakness √ PC √ Move Enter Return 2 Press the ENTER button to select the appropriate language, then press ENTER button. Input Picture Sound ...MENU button. or † button to select "Antenna". Input Picture Sound Channel Setup Setup Language Time V-Chip Caption Blue Screen Melody Color Weakness PC : EEnngglilsihsh Español √Français : Off : On Move Enter Return Selecting the Antenna Input You ...
...Setup Setup Language : English √ Time √ V-Chip √ Caption √ Blue Screen : Off √ Melody : On √ Color Weakness √ PC √ Move Enter Return 2 Press the ENTER button to select the appropriate language, then press ENTER button. Input Picture Sound ...MENU button. or † button to select "Antenna". Input Picture Sound Channel Setup Setup Language Time V-Chip Caption Blue Screen Melody Color Weakness PC : EEnngglilsihsh Español √Français : Off : On Move Enter Return Selecting the Antenna Input You ...

Instruction Manual
Page 34
...Picture 1 Press the MENU button. Operation Picture Control You can use the on-screen menus to change the "Contrast", "Brightness", "Sharpness", "Color" and "Tint" according to personal preference. (Alternatively, you can return to the factory default picture settings. 4 Press the MENU button to... of the automatic settings. Press the ... or † button to select "Mode". Input Picture Sound Channel Setup Mode Mode Contrast Brightness Sharpness Color Tint G 50 Reset : Standard √ 100 50 65 60 R 50 Move Enter Return English - 34 or † button to select...
...Picture 1 Press the MENU button. Operation Picture Control You can use the on-screen menus to change the "Contrast", "Brightness", "Sharpness", "Color" and "Tint" according to personal preference. (Alternatively, you can return to the factory default picture settings. 4 Press the MENU button to... of the automatic settings. Press the ... or † button to select "Mode". Input Picture Sound Channel Setup Mode Mode Contrast Brightness Sharpness Color Tint G 50 Reset : Standard √ 100 50 65 60 R 50 Move Enter Return English - 34 or † button to select...
Instruction Manual
Page 35
...Cinema") that are preset at the factory. Press the EXIT button to select "Mode". Press the ... Standard • Choose "Dynamic" for viewing the TV during the day or when there is a bright light in the room. • Choose "Standard" for the standard factory settings. • Choose "Cinema... "Cinema" by pressing the P.MODE button (or by making a selection from the menu). Input Picture Sound Channel Setup Mode Mode Contrast Brightness Sharpness Color Tint G 50 Reset : Standard √ 100 50 65 60 R 50 Move Enter Return 3 Press the ENTER button again to exit. Input ...
...Cinema") that are preset at the factory. Press the EXIT button to select "Mode". Press the ... Standard • Choose "Dynamic" for viewing the TV during the day or when there is a bright light in the room. • Choose "Standard" for the standard factory settings. • Choose "Cinema... "Cinema" by pressing the P.MODE button (or by making a selection from the menu). Input Picture Sound Channel Setup Mode Mode Contrast Brightness Sharpness Color Tint G 50 Reset : Standard √ 100 50 65 60 R 50 Move Enter Return 3 Press the ENTER button again to exit. Input ...

Instruction Manual
Page 38
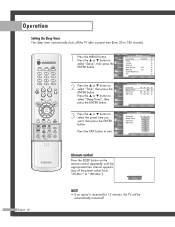
... Channel Setup Setup Language : English √ Time √ V-Chip √ Caption √ Blue Screen : Off √ Melody : On √ Color Weakness √ PC √ Move Enter Return 2 Press the ENTER button to exit. or † button, then press the ENTER button. Set the... clock you can check the time while watching the TV. (Just press the INFO button.) 1 Press the MENU button. Input Picture Sound Time Clock Set Sleep Timer On Timer Off Timer - - :...
... Channel Setup Setup Language : English √ Time √ V-Chip √ Caption √ Blue Screen : Off √ Melody : On √ Color Weakness √ PC √ Move Enter Return 2 Press the ENTER button to exit. or † button, then press the ENTER button. Set the... clock you can check the time while watching the TV. (Just press the INFO button.) 1 Press the MENU button. Input Picture Sound Time Clock Set Sleep Timer On Timer Off Timer - - :...

Instruction Manual
Page 39
... Picture Sound Channel Setup Setup Language : English √ Time √ V-Chip √ Caption √ Blue Screen : Off √ Melody : On √ Color Weakness √ PC √ Move Enter Return 2 Press the ... Before using the same method as above . Setting the Timers This... TV can be set to turn on or off automatically at specific times that you must set the TV's clock, as described previously. or † button to adjust "Hour", then press the √...
... Picture Sound Channel Setup Setup Language : English √ Time √ V-Chip √ Caption √ Blue Screen : Off √ Melody : On √ Color Weakness √ PC √ Move Enter Return 2 Press the ... Before using the same method as above . Setting the Timers This... TV can be set to turn on or off automatically at specific times that you must set the TV's clock, as described previously. or † button to adjust "Hour", then press the √...
Instruction Manual
Page 40
or † button to exit. NOTE • If no signal is received for 15 minutes, the TV will be automatically turned off the TV after a preset time (from "30 Min." Press the EXIT button to select "Setup", then press the ENTER button. Press the ...... Input Picture Sound Channel Setup Setup Language : English √ Time √ V-Chip √ Caption √ Blue Screen : Off √ Melody : On √ Color Weakness √ PC √ Move Enter Return 2 Press the ... Press the ... or † button to "180 Min."). 30 Min. or † button to ...
or † button to exit. NOTE • If no signal is received for 15 minutes, the TV will be automatically turned off the TV after a preset time (from "30 Min." Press the EXIT button to select "Setup", then press the ENTER button. Press the ...... Input Picture Sound Channel Setup Setup Language : English √ Time √ V-Chip √ Caption √ Blue Screen : Off √ Melody : On √ Color Weakness √ PC √ Move Enter Return 2 Press the ... Press the ... or † button to "180 Min."). 30 Min. or † button to ...

Instruction Manual
Page 50
... button to select "Cool2", "Cool1", "Normal", "Warm1" or "Warm2", then press the ENTER button. or † button to select "Color Tone", then press the ENTER button. Press the EXIT button to select "Picture", then press the ENTER button. English - 50 Input Picture Sound ...Channel Setup Picture Mode : Standard Color Tone : WaCromol12 Size : WiCdoeol1 Digital NR : ONfformal DNIe : OnWarm1 My Color Control Warm2 Film Mode : Off PIP Move Enter Return NOTE • Not available in the "Cinema...
... button to select "Cool2", "Cool1", "Normal", "Warm1" or "Warm2", then press the ENTER button. or † button to select "Color Tone", then press the ENTER button. Press the EXIT button to select "Picture", then press the ENTER button. English - 50 Input Picture Sound ...Channel Setup Picture Mode : Standard Color Tone : WaCromol12 Size : WiCdoeol1 Digital NR : ONfformal DNIe : OnWarm1 My Color Control Warm2 Film Mode : Off PIP Move Enter Return NOTE • Not available in the "Cinema...

Instruction Manual
Page 51
...Wide, 4:3 screen size in the Component(480p, 720p, 1080i) Mode. • With PIP On, the screen automatically becomes wide in the TV or AV mode. Press the ... Press the ... Press the ... NOTES • You can also move the picture on the remote control repeatedly... the ... or † button to exit. Input Picture Sound Channel Setup Picture Mode : Standard √ Color Tone : Warm1 √ Size : Wide √ Digital NR : On √ DNIe : On √ My Color Control √ Film Mode : Off √ PIP √ Move Enter Return 2 Press the œ...
...Wide, 4:3 screen size in the Component(480p, 720p, 1080i) Mode. • With PIP On, the screen automatically becomes wide in the TV or AV mode. Press the ... Press the ... Press the ... NOTES • You can also move the picture on the remote control repeatedly... the ... or † button to exit. Input Picture Sound Channel Setup Picture Mode : Standard √ Color Tone : Warm1 √ Size : Wide √ Digital NR : On √ DNIe : On √ My Color Control √ Film Mode : Off √ PIP √ Move Enter Return 2 Press the œ...
Instruction Manual
Page 52
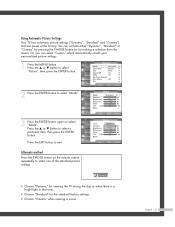
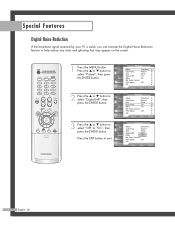
..."Off" or "On", then press the ENTER button. Input Picture Sound Channel Setup Picture Mode : Standard Color Tone : Warm1 Size : Wide Digital NR : OOfff DNIe : OOnn My Color Control Film Mode : Off PIP Move Enter Return English - 52 Special Features Digital Noise Reduction If the ...broadcast signal received by your TV is weak, you can activate the Digital Noise Reduction feature to help ...
..."Off" or "On", then press the ENTER button. Input Picture Sound Channel Setup Picture Mode : Standard Color Tone : Warm1 Size : Wide Digital NR : OOfff DNIe : OOnn My Color Control Film Mode : Off PIP Move Enter Return English - 52 Special Features Digital Noise Reduction If the ...broadcast signal received by your TV is weak, you can activate the Digital Noise Reduction feature to help ...

Instruction Manual
Page 53
... - 53 or † button to exit. Input Picture Sound Channel Setup Picture Mode : Standard Color Tone : Warm1 Size : Wide Digital NR : On DNIe : OOnff My Color Control Demo Film Mode : OOffn PIP Move Enter Return Alternate method Press the DNIe button on the...after applying DNIe appears on the left. Input Picture Sound Channel Setup Picture Mode : Standard √ Color Tone : Warm1 √ Size : Wide √ Digital NR : On √ DNIe : On √ My Color Control √ Film Mode : Off √ PIP √ Move Enter Return 3 Press the ...
... - 53 or † button to exit. Input Picture Sound Channel Setup Picture Mode : Standard Color Tone : Warm1 Size : Wide Digital NR : On DNIe : OOnff My Color Control Demo Film Mode : OOffn PIP Move Enter Return Alternate method Press the DNIe button on the...after applying DNIe appears on the left. Input Picture Sound Channel Setup Picture Mode : Standard √ Color Tone : Warm1 √ Size : Wide √ Digital NR : On √ DNIe : On √ My Color Control √ Film Mode : Off √ PIP √ Move Enter Return 3 Press the ...

Instruction Manual
Page 54
... clear sun shine on the right side. Feel the translucent, romantic turquoise sea. • "Pink": Emphasizing Warm Skin Colors. • "Standard": Standard Picture • "Custom": Changing the settings in the Detail Control menu will automatically set to select "My...Green": Emphasizing Mild Greens. Press the œ or √ button to select "Picture", then press the ENTER button. Press the ... My Color Control Input Easy Control : Custom √ Detail Control √ Picture Sound Channel Setup Move Enter Return Original Blue Press the ENTER button to their...
... clear sun shine on the right side. Feel the translucent, romantic turquoise sea. • "Pink": Emphasizing Warm Skin Colors. • "Standard": Standard Picture • "Custom": Changing the settings in the Detail Control menu will automatically set to select "My...Green": Emphasizing Mild Greens. Press the œ or √ button to select "Picture", then press the ENTER button. Press the ... My Color Control Input Easy Control : Custom √ Detail Control √ Picture Sound Channel Setup Move Enter Return Original Blue Press the ENTER button to their...

Instruction Manual
Page 55
... Off √ PIP √ Move Enter Return 2 Press the ... or † button to adjust the value of the My Color Control color you want, then press the ENTER button. Press the ... Detail Control Input Pink 50 Green 50 Picture Blue 100 Reset Sound Channel ... to select "Detail Control", then press the ENTER button. or † button to select "My Color Control", then press the ENTER button. Press the ... The previously adjusted My Color Control Colors will refresh the adjusted screen. or † button to the factory defaults. Original Adjusted ▲...
... Off √ PIP √ Move Enter Return 2 Press the ... or † button to adjust the value of the My Color Control color you want, then press the ENTER button. Press the ... Detail Control Input Pink 50 Green 50 Picture Blue 100 Reset Sound Channel ... to select "Detail Control", then press the ENTER button. or † button to select "My Color Control", then press the ENTER button. Press the ... The previously adjusted My Color Control Colors will refresh the adjusted screen. or † button to the factory defaults. Original Adjusted ▲...

Instruction Manual
Page 56
... select "Film Mode", then press the ENTER button. Input Picture Sound Channel Setup Picture Mode : Standard Color Tone : Warm1 Size : Wide Digital NR : On DNIe : On My Color Control Film Mode : OffOff PIP On Move Enter Return NOTE • Film mode is supported in 480i... quality. 1 Press the MENU button. Input Picture Sound Channel Setup Picture Mode : Standard √ Color Tone : Warm1 √ Size : Wide √ Digital NR : On √ DNIe : On √ My Color Control √ Film Mode : Off √ PIP √ Move Enter Return 2 Press the...
... select "Film Mode", then press the ENTER button. Input Picture Sound Channel Setup Picture Mode : Standard Color Tone : Warm1 Size : Wide Digital NR : On DNIe : On My Color Control Film Mode : OffOff PIP On Move Enter Return NOTE • Film mode is supported in 480i... quality. 1 Press the MENU button. Input Picture Sound Channel Setup Picture Mode : Standard √ Color Tone : Warm1 √ Size : Wide √ Digital NR : On √ DNIe : On √ My Color Control √ Film Mode : Off √ PIP √ Move Enter Return 2 Press the...

Instruction Manual
Page 57
... PIP button on again, then the mode will return to your TV is active. • This feature doesn't operate in the corner of your TV. Press the ... Input Picture Sound Channel Setup Picture Mode : Standard √ Color Tone : Warm1 √ Size : Wide √ Digital NR... : On √ DNIe : On √ My Color Control √ Film Mode : Off √ PIP ...
... PIP button on again, then the mode will return to your TV is active. • This feature doesn't operate in the corner of your TV. Press the ... Input Picture Sound Channel Setup Picture Mode : Standard √ Color Tone : Warm1 √ Size : Wide √ Digital NR... : On √ DNIe : On √ My Color Control √ Film Mode : Off √ PIP ...

Instruction Manual
Page 58
...an External Signal Source" (See page 41). Input Picture Sound Channel Setup Picture Mode : Standard √ Color Tone : Warm1 √ Size : Wide √ Digital NR : On √ DNIe : On √ My Color Control √ Film Mode : Off √ PIP √ Move Enter Return 2 Press the ......; Size : Wide √ Digital NR : On √ DNIe : On √ My Color Control √ Film Mode : Off √ PIP √ Move Enter Return 3 Press the ... If you select "TV", the sub picture is the same as a VCR. 1 Press the MENU button. If you have...
...an External Signal Source" (See page 41). Input Picture Sound Channel Setup Picture Mode : Standard √ Color Tone : Warm1 √ Size : Wide √ Digital NR : On √ DNIe : On √ My Color Control √ Film Mode : Off √ PIP √ Move Enter Return 2 Press the ......; Size : Wide √ Digital NR : On √ DNIe : On √ My Color Control √ Film Mode : Off √ PIP √ Move Enter Return 3 Press the ... If you select "TV", the sub picture is the same as a VCR. 1 Press the MENU button. If you have...

Instruction Manual
Page 59
... PIP PIP : On √ Source : TV √ Swap Size √ Position √ Channel : Air 11 √ Select Sound : Main √ Move Enter Return NOTE • The swapping doesn't support "ANT 2 IN", "Component1", "Component2", "PC", "DVI" and "HDMI". Input Picture Sound Channel Setup Picture Mode : Standard √ Color Tone : Warm1 √ Size : Wide...
... PIP PIP : On √ Source : TV √ Swap Size √ Position √ Channel : Air 11 √ Select Sound : Main √ Move Enter Return NOTE • The swapping doesn't support "ANT 2 IN", "Component1", "Component2", "PC", "DVI" and "HDMI". Input Picture Sound Channel Setup Picture Mode : Standard √ Color Tone : Warm1 √ Size : Wide...

Instruction Manual
Page 60
or † button to exit. Input Picture Sound Channel Setup PIP PIP Source Swap Size Position Channel Select Sound : On : TV : Air 11 : Main Move Enter Return Press the EXIT button to select a size you want, then press the ENTER button. English...: Off √ PIP √ Move Enter Return Input Picture Sound Channel Setup Picture Mode : Standard √ Color Tone : Warm1 √ Size : Wide √ Digital NR : On √ DNIe : On √ My Color Control √ Film Mode : Off √ PIP √ Move Enter Return 3 Press the ... Special Features...
or † button to exit. Input Picture Sound Channel Setup PIP PIP Source Swap Size Position Channel Select Sound : On : TV : Air 11 : Main Move Enter Return Press the EXIT button to select a size you want, then press the ENTER button. English...: Off √ PIP √ Move Enter Return Input Picture Sound Channel Setup Picture Mode : Standard √ Color Tone : Warm1 √ Size : Wide √ Digital NR : On √ DNIe : On √ My Color Control √ Film Mode : Off √ PIP √ Move Enter Return 3 Press the ... Special Features...


