
Instruction Manual
Page 2
... Connecting a Cable Converter Box 19 Connecting a Cable Converter Box and a VCR 19 Connecting a Camcorder 20 Connecting a DVD Player 21 Connecting to Y,PB,PR 21 Connecting to Audio and Video Jacks 21 Connecting a DTV Set-Top Box 22 Connecting to Y,PB,PR 22 Connecting to DVI (Digital Visual Interface 22 Connecting to R,G,B 23 Connecting to HDMI (High Definition Multimedia Interface 23 Operation ...26 Turning the TV On and Off 26 Viewing the Menus and On-Screen Displays 26 Selecting the Menu Language 27 Selecting the Antenna Input...
... Connecting a Cable Converter Box 19 Connecting a Cable Converter Box and a VCR 19 Connecting a Camcorder 20 Connecting a DVD Player 21 Connecting to Y,PB,PR 21 Connecting to Audio and Video Jacks 21 Connecting a DTV Set-Top Box 22 Connecting to Y,PB,PR 22 Connecting to DVI (Digital Visual Interface 22 Connecting to R,G,B 23 Connecting to HDMI (High Definition Multimedia Interface 23 Operation ...26 Turning the TV On and Off 26 Viewing the Menus and On-Screen Displays 26 Selecting the Menu Language 27 Selecting the Antenna Input...

Instruction Manual
Page 3
...-Channel Sound (MTS) track 65 Auto Volume ...66 Enjoying the Sound of External Speakers 67 Using the V-Chip 68 Viewing Closed Caption Information 78 Setting the Blue Screen Mode 80 Setting The On/Off Melody 81 Using the Color Weakness Enhancement Feature 82 PC Display...84 Using Your TV as a Computer (PC) Display 84 How to Connect Your PC to the TV 84 Setting up Your PC Software (Based on Widows 98 85 Display Modes 86 Adjusting the Picture Quality 87 Changing...
...-Channel Sound (MTS) track 65 Auto Volume ...66 Enjoying the Sound of External Speakers 67 Using the V-Chip 68 Viewing Closed Caption Information 78 Setting the Blue Screen Mode 80 Setting The On/Off Melody 81 Using the Color Weakness Enhancement Feature 82 PC Display...84 Using Your TV as a Computer (PC) Display 84 How to Connect Your PC to the TV 84 Setting up Your PC Software (Based on Widows 98 85 Display Modes 86 Adjusting the Picture Quality 87 Changing...
Instruction Manual
Page 6
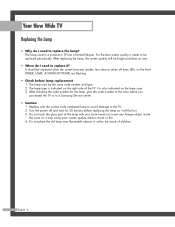
... correct code numbered lamp to avoid damage to a Samsung Service center. • Caution 1. Turn the power off and wait for the lamp, give the code number to the store where you purchased the TV or to the TV. 2. For the best screen quality it will be replaced when the screen becomes darker, less clear or when all three LEDs on the front (TIMER, LAMP, & STAND BY/TEMP) are flashing. • Check before lamp replacement 1. Do...
... correct code numbered lamp to avoid damage to a Samsung Service center. • Caution 1. Turn the power off and wait for the lamp, give the code number to the store where you purchased the TV or to the TV. 2. For the best screen quality it will be replaced when the screen becomes darker, less clear or when all three LEDs on the front (TIMER, LAMP, & STAND BY/TEMP) are flashing. • Check before lamp replacement 1. Do...

Instruction Manual
Page 8
...-to-operate remote control • Easy-to-use on-screen menu system you can access from the side panel or remote control • Automatic timer to turn the TV on and off at any piece is a full-featured, high-performance unit that you have all the parts shown here. Remote Control (BP59-00075A)/ AAA Batteries (4301-000103) English - 8 Warranty Cards (2)/ Registration Card (1) Instruction Manual/ Safety Guide Manual/ Quick Guide Manual/ Anynet Manual Your New Wide TV List of...
...-to-operate remote control • Easy-to-use on-screen menu system you can access from the side panel or remote control • Automatic timer to turn the TV on and off at any piece is a full-featured, high-performance unit that you have all the parts shown here. Remote Control (BP59-00075A)/ AAA Batteries (4301-000103) English - 8 Warranty Cards (2)/ Registration Card (1) Instruction Manual/ Safety Guide Manual/ Quick Guide Manual/ Anynet Manual Your New Wide TV List of...

Instruction Manual
Page 10
... operating normally. Auto Timer ON/OFF has been set and the set is too high, the power will automatically appear in about 15 seconds. A cooling fan inside lamp from overheating. Check if the ventilation hole on the rear of the set is Off TIMER LAMP STAND BY/TEMP Indication Standby state. English - 10 Lamp cover on in about 25 seconds. The picture will shut off. Indicator Light Key : Light is On : Light is Blinking : Light is not properly shut. Lamp...
... operating normally. Auto Timer ON/OFF has been set and the set is too high, the power will automatically appear in about 15 seconds. A cooling fan inside lamp from overheating. Check if the ventilation hole on the rear of the set is Off TIMER LAMP STAND BY/TEMP Indication Standby state. English - 10 Lamp cover on in about 25 seconds. The picture will shut off. Indicator Light Key : Light is On : Light is Blinking : Light is not properly shut. Lamp...

Instruction Manual
Page 11
... DVI output. ˝ HDMI (High Definition Multimedia Interface) VIDEO/AUDIO INPUT jack Connect to the HDMI jack for repair and software upgrades. This jack is available only in RF, Video and S-Video modes. ˆ COMPONENT1, 2 jacks (Y, PB, PR, L, R) Use these jacks to connect the component video/audio signals from VHF/UHF antennas or your TV. Note: It is for device with HDMI output. Ô Anynet Please refer to the Anynet Owner's Instruction. Rear Panel Jacks Use the rear panel jacks to connect...
... DVI output. ˝ HDMI (High Definition Multimedia Interface) VIDEO/AUDIO INPUT jack Connect to the HDMI jack for repair and software upgrades. This jack is available only in RF, Video and S-Video modes. ˆ COMPONENT1, 2 jacks (Y, PB, PR, L, R) Use these jacks to connect the component video/audio signals from VHF/UHF antennas or your TV. Note: It is for device with HDMI output. Ô Anynet Please refer to the Anynet Owner's Instruction. Rear Panel Jacks Use the rear panel jacks to connect...

Instruction Manual
Page 12
... favorite channels. 24. POWER Turns the TV on -screen menu. 9. S.MODE Adjust the TV sound by the Samsung remote control (i.e., TV, STB, VCR, CABLE, or DVD). 12. MODE Selects a target device to exchange the video signal that it directly at the TV. MTS (Multichannel Television Stereo) Press to select a preset time interval for automatic shutoff. 22. SLEEP Press to choose Stereo, Mono or SAP (Secondary Audio Program). 19. PIP (Picture In Picture) Activates PIP. 23. DNIe (Digital Natural Image engine) Activates...
... favorite channels. 24. POWER Turns the TV on -screen menu. 9. S.MODE Adjust the TV sound by the Samsung remote control (i.e., TV, STB, VCR, CABLE, or DVD). 12. MODE Selects a target device to exchange the video signal that it directly at the TV. MTS (Multichannel Television Stereo) Press to select a preset time interval for automatic shutoff. 22. SLEEP Press to choose Stereo, Mono or SAP (Secondary Audio Program). 19. PIP (Picture In Picture) Activates PIP. 23. DNIe (Digital Natural Image engine) Activates...
Instruction Manual
Page 21
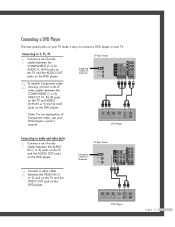
... TV and VIDEO (Y/PB/PR or Y/CB/CR) OUT jacks on the DVD player. Note: For an explanation of video cables between the COMPONENT (1 or 2) AUDIO (L, R) IN jacks on the TV and the AUDIO OUT jacks on the DVD player. TV Rear Panel Incoming Cable or Antenna DVD Player English - 21 DVD Player Connecting to audio and video jacks 1 Connect a set of Component video, see your TV. Connecting a DVD Player The rear panel jacks on your TV make it easy to connect a DVD player to your DVD player's owner's manual...
... TV and VIDEO (Y/PB/PR or Y/CB/CR) OUT jacks on the DVD player. Note: For an explanation of video cables between the COMPONENT (1 or 2) AUDIO (L, R) IN jacks on the TV and the AUDIO OUT jacks on the DVD player. TV Rear Panel Incoming Cable or Antenna DVD Player English - 21 DVD Player Connecting to audio and video jacks 1 Connect a set of Component video, see your TV. Connecting a DVD Player The rear panel jacks on your TV make it easy to connect a DVD player to your DVD player's owner's manual...

Instruction Manual
Page 26
... use the POWER button on the remote control. Input Input Source List : TV Edit Name √ √ There are five menu groups: Picture Anynet √ "Input", "Picture", "Sound", Sound "Channel", and "Setup". The information displayed varies according to select menu items and make some adjustments using the TV's side panel buttons. Once the on-screen menu appears, use the selected items. Use the ENTER button to exit. The main menu is displayed. Access the on-screen menu system by pressing the MENU button on the front panel...
... use the POWER button on the remote control. Input Input Source List : TV Edit Name √ √ There are five menu groups: Picture Anynet √ "Input", "Picture", "Sound", Sound "Channel", and "Setup". The information displayed varies according to select menu items and make some adjustments using the TV's side panel buttons. Once the on-screen menu appears, use the selected items. Use the ENTER button to exit. The main menu is displayed. Access the on-screen menu system by pressing the MENU button on the front panel...

Instruction Manual
Page 28
... ... Input Picture Sound Channel Setup Channel Antenna : AntA.1ir Air/CATV : AirSTD Auto Program HRC Add/Delete IRC Favorite Channels Name Fine Tune ▼ More Move Enter Return Press the EXIT button to select "Air". or † button to exit. Operation Memorizing the Channels Your TV can begin memorizing the available channels, you must specify the type of signal source that exists in Memory". • Subscription cable services require service-specific...
... ... Input Picture Sound Channel Setup Channel Antenna : AntA.1ir Air/CATV : AirSTD Auto Program HRC Add/Delete IRC Favorite Channels Name Fine Tune ▼ More Move Enter Return Press the EXIT button to select "Air". or † button to exit. Operation Memorizing the Channels Your TV can begin memorizing the available channels, you must specify the type of signal source that exists in Memory". • Subscription cable services require service-specific...

Instruction Manual
Page 31
... Press the EXIT button to another. Press the ... To View Your Favorite Channels: Press the FAV.CH button repeatedly to jump from one favorite channel to exit. or † button to quickly and easily find frequently watched channels by pressing the FAV.CH button on the remote control. English - 31 Input Picture Sound Channel Setup Channel Antenna : Ant.1 Air/CATV : Air Auto Program Add/Delete Favorite Channels Name Fine Tune...
... Press the EXIT button to another. Press the ... To View Your Favorite Channels: Press the FAV.CH button repeatedly to jump from one favorite channel to exit. or † button to quickly and easily find frequently watched channels by pressing the FAV.CH button on the remote control. English - 31 Input Picture Sound Channel Setup Channel Antenna : Ant.1 Air/CATV : Air Auto Program Add/Delete Favorite Channels Name Fine Tune...

Instruction Manual
Page 34
.... Input Picture Sound Channel Setup Mode Mode Contrast Brightness Sharpness Color Tint G 50 Reset : Standard √ 100 50 65 60 R 50 Move Enter Return 3 Press the ... The previously adjusted picture settings will be reset to select "Reset", then press the ENTER button. Operation Picture Control You can use the on-screen menus to change the "Contrast", "Brightness", "Sharpness", "Color" and "Tint" according to personal preference. (Alternatively, you can return to the factory default picture settings. 4 Press the MENU button...
.... Input Picture Sound Channel Setup Mode Mode Contrast Brightness Sharpness Color Tint G 50 Reset : Standard √ 100 50 65 60 R 50 Move Enter Return 3 Press the ... The previously adjusted picture settings will be reset to select "Reset", then press the ENTER button. Operation Picture Control You can use the on-screen menus to change the "Contrast", "Brightness", "Sharpness", "Color" and "Tint" according to personal preference. (Alternatively, you can return to the factory default picture settings. 4 Press the MENU button...
Instruction Manual
Page 35
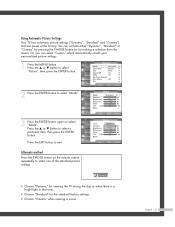
... select a particular item, then press the ENTER button. You can select "Custom" which automatically recalls your personalized picture settings. 1 Press the MENU button. English - 35 Press the ... Press the ... or † button to exit. Using Automatic Picture Settings Your TV has automatic picture settings ("Dynamic", "Standard" and "Cinema") that are preset at the factory. Input Picture Sound Channel Setup Mode Mode Contrast Brightness Sharpness Color Tint G 50 Reset : Standard √ 100 50 65 60...
... select a particular item, then press the ENTER button. You can select "Custom" which automatically recalls your personalized picture settings. 1 Press the MENU button. English - 35 Press the ... Press the ... or † button to exit. Using Automatic Picture Settings Your TV has automatic picture settings ("Dynamic", "Standard" and "Cinema") that are preset at the factory. Input Picture Sound Channel Setup Mode Mode Contrast Brightness Sharpness Color Tint G 50 Reset : Standard √ 100 50 65 60...

Instruction Manual
Page 37
... select a particular item, then press the ENTER button. Input Picture Sound Channel Setup Sound Mode Equalizer SRS TSXT MTS Auto Volume Internal Mute : SSttannddaarrdd Music : OfMf ovie : SStepreeeoch : OCfuf stom : Off Move Enter Return Alternate method Press the S.MODE button on the remote control repeatedly to select one of a particular item. Standard • Choose "Standard" for the standard factory settings. • Choose "Music" when watching music...
... select a particular item, then press the ENTER button. Input Picture Sound Channel Setup Sound Mode Equalizer SRS TSXT MTS Auto Volume Internal Mute : SSttannddaarrdd Music : OfMf ovie : SStepreeeoch : OCfuf stom : Off Move Enter Return Alternate method Press the S.MODE button on the remote control repeatedly to select one of a particular item. Standard • Choose "Standard" for the standard factory settings. • Choose "Music" when watching music...

Instruction Manual
Page 39
... the next step. Input Picture Sound Channel Setup Setup Language : English √ Time √ V-Chip √ Caption √ Blue Screen : Off √ Melody : On √ Color Weakness √ PC √ Move Enter Return 2 Press the ... Set other items using the timers, you must set to turn on or off automatically at specific times that you choose. Press the ... or † button to the next step. or † button to adjust "Hour", then press...
... the next step. Input Picture Sound Channel Setup Setup Language : English √ Time √ V-Chip √ Caption √ Blue Screen : Off √ Melody : On √ Color Weakness √ PC √ Move Enter Return 2 Press the ... Set other items using the timers, you must set to turn on or off automatically at specific times that you choose. Press the ... or † button to the next step. or † button to adjust "Hour", then press...

Instruction Manual
Page 41
... ... Input Picture Sound Channel Setup Source List TV AV1 AV2 AV3 S-Video1 S-Video2 S-Video3 ▼ More Move Enter Return Alternate method Press the SOURCE button on the TV's side panel. English - 41 Viewing an External Signal Source Use the remote control to select an external signal source. NOTE • When you can choose between the following sets of jacks: "AV1", "AV2", "S-Video1", "S-Video2", "Component1", "Component2", "PC", "DVI", or "HDMI" on the TV's rear panel...
... ... Input Picture Sound Channel Setup Source List TV AV1 AV2 AV3 S-Video1 S-Video2 S-Video3 ▼ More Move Enter Return Alternate method Press the SOURCE button on the TV's side panel. English - 41 Viewing an External Signal Source Use the remote control to select an external signal source. NOTE • When you can choose between the following sets of jacks: "AV1", "AV2", "S-Video1", "S-Video2", "Component1", "Component2", "PC", "DVI", or "HDMI" on the TV's rear panel...

Instruction Manual
Page 54
... Blues. Special Features Setting the My Color Control Mode My Color Control allows users to adjust colors to according to select one of the picture settings you want. My Color Control Input Easy Control : Custom √ Detail Control √ Picture Sound Channel Setup Move Enter Return Original Blue Press the ENTER button to select "Easy Control". Input Picture Sound Channel Setup Picture Mode : Standard √ Color Tone : Warm1 √ Size : Wide √ Digital NR : On √ DNIe : On √ My Color Control √ Film Mode : Off √ PIP...
... Blues. Special Features Setting the My Color Control Mode My Color Control allows users to adjust colors to according to select one of the picture settings you want. My Color Control Input Easy Control : Custom √ Detail Control √ Picture Sound Channel Setup Move Enter Return Original Blue Press the ENTER button to select "Easy Control". Input Picture Sound Channel Setup Picture Mode : Standard √ Color Tone : Warm1 √ Size : Wide √ Digital NR : On √ DNIe : On √ My Color Control √ Film Mode : Off √ PIP...

Instruction Manual
Page 68
... instruct you to confirm. Setup 0 9 Enter PIN Return Picture Enter PIN (The default pin number for Sound * a new TV set is "0000".) The "V-Chip" menu is active. Re-enter your new 4-digit pin number. NOTE • The V-Chip doesn't function when the PIP is Channel displayed. Press the ... or † button to channels and programs is controlled by a password (i.e., a 4-digit secret code that is defined by the user). Special Features Using the V-Chip Access to select "Change...
... instruct you to confirm. Setup 0 9 Enter PIN Return Picture Enter PIN (The default pin number for Sound * a new TV set is "0000".) The "V-Chip" menu is active. Re-enter your new 4-digit pin number. NOTE • The V-Chip doesn't function when the PIP is Channel displayed. Press the ... or † button to channels and programs is controlled by a password (i.e., a 4-digit secret code that is defined by the user). Special Features Using the V-Chip Access to select "Change...

Instruction Manual
Page 94
... you are using a VCR, check the tracking. Make sure the remote has batteries. • The display panel used for 30 seconds, then try this list of possible problems and solutions. Poor sound quality. Check the antenna connections. Press the MODE button to have a problem, first try operating it again. These, pixels may occasionally appear on . Try another channel. Check all wire connections. Press the SOURCE button. Adjust the picture settings. Adjust the antenna. If none...
... you are using a VCR, check the tracking. Make sure the remote has batteries. • The display panel used for 30 seconds, then try this list of possible problems and solutions. Poor sound quality. Check the antenna connections. Press the MODE button to have a problem, first try operating it again. These, pixels may occasionally appear on . Try another channel. Check all wire connections. Press the SOURCE button. Adjust the picture settings. Adjust the antenna. If none...

Instruction Manual
Page 95
... inside of the cabinet. • This DLP TV projects the image onto a large screen by applying an optical system. If you to a foreign country, please be aware of the different television systems that create magnetic fields, such as cloth or paper. • Place the TV in use water, cleaning ... TV near or on a soft surface, such as vacuum cleaners. • Keep the ventilation openings clear; Liquids • Do not handle liquids near appliances with another system due to differences in Another Country If you many years of Operation Power Consumption Dimension (W x D x H) Weight ...
... inside of the cabinet. • This DLP TV projects the image onto a large screen by applying an optical system. If you to a foreign country, please be aware of the different television systems that create magnetic fields, such as cloth or paper. • Place the TV in use water, cleaning ... TV near or on a soft surface, such as vacuum cleaners. • Keep the ventilation openings clear; Liquids • Do not handle liquids near appliances with another system due to differences in Another Country If you many years of Operation Power Consumption Dimension (W x D x H) Weight ...


