Samsung HL-T5087S Support Question
Samsung HL-T5087S Support Question
Find answers below for this question about Samsung HL-T5087S - 50" Rear Projection TV.Need a Samsung HL-T5087S manual? We have 2 online manuals for this item!
Question posted by 59wfo3 on March 2nd, 2016
Where Is The Color Wheel On My Hlt5087sx/xaa Tv
Current Answers
Answer #1: Posted by ALICAROS on March 5th, 2016 10:11 AM

Member since:
March 1st, 2016 Points: 4,070
Just need to change your bulb? Read this: how to change your Samsung DLP Lamp.
I've got one of the early models of the Samsung 43" DLP Television sets. We've been through a lot together, but it's just a fantastic picture. I love it.
Thankfully, I purchased the extended warranty for 4 years, because I've been through 3 lamps. However, as always, something went wrong after the warranty expired. It started a few months ago, a buzzing sound. It started out pretty soft, like someone was holding a very thin wire in the blades of a running fan. As weeks passed, that sound increased, and finally it became an all-out scream (just in time for the World Cup).
Inside this television are only two moving parts that could cause that sound, the cooling fan and the color wheel. I know about the color wheel because I've seen it talked about over and over again on the Internet. I think the service guy may have mentioned it once or twice when he was here replacing the lamp. With all that mention, clearly this thing has issues. And, I can see the fan, and it doesn't spin at the same time that this sound is produced.
What's a color wheel? I'm not sure exactly it's purpose, but it has a small motor and it spins at about 9000 RPM. The older model Samsung televisions are plagued with the problem where the bearings in this little motor go and starts to sound like a banshee, or at least what I imagine a screaming banshee to sound like. Anyway, it's pretty bad.
It needed to be replaced. There was no longer any putting it off. I happened to mention it to a BestBuy sales-kid and asked him where I should have it fixed. He said I could just call a local Samsung authorized repair shop, or "you could just repair it yourself." The words echoed in my mind. I never considered that possibility and I dreaded the thought of my television being picked up or dropped off and gone for weeks. When I got home, I went online and found a few forums where guys shared that they successfully replaced their own color wheels and that it wasn't that difficult. Say no more...
If you have the same problem and are thinking about fixing it yourself, it really isn't that difficult. If you've ever taken your PC apart, this is not much different... The process involves about 20 screws, 5 or 6 cables to unplug, and of course put it all back. The toughest part about these projects is knowing what to take out and where to look for the part you're replacing. The first time, I took out quite a bit more screws and cables than necessary. I did it again to write this article and now you don't need to think about all that.
Compatible Samsung Models- BP96-00250A
- HLM507
- HLN4365W1X/XAA
- HLN467WX
- HLM4365
- HLM507WX
- HLN4365WX
- HLN467WX/XAA
- HLM4365WX
- HLM617
- HLN4365WX/XAA
- HLN5065
- HLM437
- HLM617WS
- HLN437
- HLN5065W
- HLM437W
- HLM617WS/XAA
- HLN437W
- HLN5065W1X
- HLM437WX
- HLM617WX
- HLN437W1X
- HLN5065W1X/XAA
- HLM5065
- HLN4365
- HLN437W1X/XAA
- HLN5065WX
- HLM5065W
- HLN4365W
- HLN437WX
- HLN5065WX/XAA
- HLM5065WX
- HLN4365W1X
- HLN467
- HLN507
- HLN507W
- HLN567WX/XAA
- HLN617WX/XAA
- HLP5063WX/XAA
- HLN507W1X
- HLN617
- HLP4663W
- HLP5674W
- HLN507WX
- HLN617W1X
- HLP4674W
- HLP5674WX/XAA
- HLN507WX/XAA
- HLN617W1X/XAA
- HLP4674WX/XAA
- HLR4677WX/XAA
- HLN567
- HLN617WX
- HLP5063W
- HLR5677WX/XAA
- HLN567W
- HLN617WX/XA
- HLP5063WX/XA
- L62A
- HLN567WX
My television is model Samsung HLM4365WX and the color wheel part number for that is BP96-00250A. This color wheel is used in many, many Samsung televisions, but you should confirm that your model is on the compatibility list.
New: where to buy You can get a great price at and they have some fast shipping options. If your model doesn't match mine, just search their database to make sure you get the correct part.
The Repair JobRequirements:
- Philips screwdriver, not too small and at least 5 inches long. There's one screw that's a reach.
- Tiny (jewler's) screwdriver. You may not need this. I needed it to get a connector off.
- Tweezers. I needed them to get to a few screws in tight places.
- Compressed air. I didn't have this, but I wish I did. It's dusty in there.
- Pen and paper. I took copious notes. If you do anything that I don't talk about here, you should write it down. I carefully documented every cable that I unplugged and every part I removed. Thank God I did that.
- 1-2 hours (first time I did this, it took 90 minutes. Second time 60 minutes, with photography)
- Nerves of steel and air conditioning. Don't drip sweat into your television.
Notes:
- In this document, left and right are "stage-left" and "stage-right", or the left and right sides of the set as you look at the back, facing your sofa.
- Almost all of the screws are identical. You can safely keep them all in the same cup, or pile on the table, or carpet, or wherever you store the screws.
- Don't touch anything that looks like light will shine through it, like the projector lens or the colorwheel itself.
- DON'T rely on this document entirely. Pay close attention and take notes or digital pictures.
- If you were just watching your TV, your projector lamp will be HOT. Let it cool down.
- Remove the back panel from the television set. The panel runs the entire width of the bottom rear of the set. There's no need to remove the access panel for the lamp. That'll come off with the panel. There are 14 screws.
- Remove the projector lamp. This may be unnecessary, but (a) it let's you see your target (the color wheel) and (b) it just seems like the safe thing to do. It's easy. Just unscrew the two brass screws holding it in. It's on the right side of the TV. The screws won't come out, just pull them out with the whole unit by pulling on the handle and sliding it straight out. Carefully store it somewhere safe.
- Remove the panel on the left side by removing two screws holding it in place. Carefully slide it and the attached PC board out a few inches until cables stop you. You won't actually need to remove any cables from this board to get at the color wheel. (Of course I removed most of them the first time.)
- Carefully note how the power cable is positioned in the set, and the route it takes out the back. Once you have done that, pull the power cord out of it's notch in the bottom of the case. It's blocking the next part that has to slide out.
- Remove the center panel. Remove the two screws in the bottom that have larger heads than the rest. You don't need to take off the regular sized screws that fasten the back panel to the base. They'll all slide out together. Remove the top two screws that hold the panel to the plastic case.
Center panel. The two screws on the bottom have larger heads than the rest. Remember that these go here. There are two more screws on the bottom that hold the vertical panel to the base. No need to remove them. If you do, things get a bit floppy.
- Slide out the center unit slowly, just a few inches and take a peek inside as you do. It's a snug fit, so you'll need to ease out both the top and bottom at the same time. Some things to notice as you do this. Look at how the projector lens is fitted inside a foam sheath. You'll need to put that back later, so take a good look.
There are a few cables on the left side restricting it. You'll need to unplug these:
- blue/brown two-wire power cable. You'll need to unplug this from the main set.
- blue/white cable connecting to the left side. Squeeze the plug to unlatch it and remove it from the center unit that you're removing.
- Sensor switch on the right side. Unscrew this from the tv case bracket.
This arrow is pointing to two of the cables. Follow the brown/blue one to the other end to unplug it. Right behind this arrow is the white connector for the white/blue cable.
Here's one of the screws that are different. Remember to use the smaller brass screw here later.
Now you can slide the center panel and all the parts behind it out of the television. If you didn't remove any cables on the left panel, you'll have to swing everything over to the left to clear the television.
Note: Steps 7-9 are removing the bad color wheel. I suggest doing these steps carefully, as if you were going to need to use this color wheel again. You never know if you may need to reverse what you've done.
Before doing step 7, read the entire step. There is two ways to do it.
- Locate the color wheel cover. It's got a small green circuit board on top of it with a black/blue wires connected to it. Remove that plug. Also, and this is the trickiest part, remove the two cables coming from the color wheel. One is a copper-colored ribbon cable. That will just slide out easily. The other is a cable with two white and one blue wire. This one is tricky to remove, so you'll need to ease it out. I pried it out with a jeweler's screwdriver. DO NOT just pull on the wires.
Note: A reader made the following excellent suggestion to avoid breaking the white connector on the end of the blue/white/white wire:
Having replaced quite a few of these colorwheels as a Samsung service tech, I have found that you do not have to remove the blue/white wire from the DMD board (avoiding the risk of damage to the optical engine) There is enough slack in the wire to route it around the cover when removing it. You can then unplug the wire from the old colorwheel and plug it in the new one (the plastic tab will break off the old connector when you go to remove it,but it will still fit snugly on the new colorwheel) Using this method I have had no problems reusing the old connecting cable
Color wheel cover view from top-down. This part has three screws and slides straight up.
- Unscrew the color wheel cover. There are three screws holding it in place. One to the rear of the set, and two in front. The one to the rear is tucked way in, so I just unscrewed them and carefully left them in place and pulled them out with the cover. Slide the cover straight up, exposing the color wheel. As you do, note where the color wheel wires go -- out the gap in the front.
- Remove the bad color wheel. The color wheel is held in place with three screws. Remove the screws and the color wheel. The color wheel may be stuck in place with the foam tape, but that'll give with a small tug. To remove the wheel cleanly, I lifted the front edge and slid it toward the front.
- Insert the new colorwheel. It can be tricky to do this without touching the wheel, or bumping the wheel into the case. (This is where you need the nerves of steel). Once you get the proper angle, it will slide into place. Don't force it -- remember, this thing needs to spin at 9000 RPM, it's probably pretty sensitive. At first, I tried to put it in place with the screws already in the holes. This didn't allow me to slide it in properly. Lesson learned: put it in without the screws and then hold the screws in place with tweezers, if necessary.
- Put the color wheel cover back on with the wires out the space facing the front of the case. Make sure the wires reach their destinations, and screw in the cover. Three screws. Attach the three connectors. The metal contacts on the ribbon cable face the rear.
- Put all the guts back in place. Slide the center unit back in. Without touching the projector lens, open up the slice in the foam so it wraps around the projector lens, and slide it in the rest of the way. The center unit can only go in on it's track, so again, don't force anything. Connect the two wires you removed on the left side. They should only go in one way. Did I mention don't force anything? Screw the sensor switch onto the bracket on the right.
- Put the power cable in it's slot. Just the way you noted on the way out.
- Slide the left PC board and panel back in place. There are two screws that hold it in place that you screw in now, the rest hold on the access panel.
- Put the projector lamp back in place and screw it into place. I forgot to do this both times.
- Put the access panel back on and screw it in (14 screws)
- Plug in the television, say a prayer, and turn it on.
If things don't work as expected, like the TV doesn't turn on you probably missed putting a connection back. 99.9% of the time this is the case. The other .1% is that the new color wheel is bad or something else is defective.
If the red and blue colors on your set seem to be reverse
Related Samsung HL-T5087S Manual Pages

Samsung Knowledge Base Results
We have determined that the information below may contain an answer to this question. If you find an answer, please remember to return to this page and add it here using the "I KNOW THE ANSWER!" button above. It's that easy to earn points!-
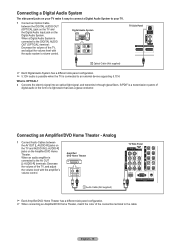
Using Anynet+ With A Home Theater SAMSUNG
... the other HDMI connections (HDMI 2, HDMI 3, etc.). an optical cable from the Digital Audio Out on the back of the TV to HDMI 1 on the rear of the Anynet+ Television (LN40A750) HDMI When you need an HDMI cable and a Digital Optical cable. Using Anynet+ With A Home Theater STEP 2. Although we... -
SCH-I920 - How To Set Camera Settings SAMSUNG
... the season Fireworks: To take a picture of fireworks Candle Light: To take a picture of dawn Night Shot: Use this for shooting still images at night or in other dark conditions Text: Use this for example, children. Sports: To take a picture of sunsets Dusk & Indoors: To take a picture of vivid colors associated with misty mood Scene... -
General Support
... additional assistance, or to increase the amount of green in the other modes are not affected. How Do I Fix The Color On My DLP TV? If, for example, you select the Dynamic picture mode, and change the contrast setting, you change the contrast for example, Dynamic, Standard, Movie, etc. The Mode drop down...
Similar Questions

Displays check Fan #1 on the tv screen. Please illustrate location of fan # 1 and how to replace it ...

My 50" DLP tv has audio, but no picture.

I have had my 50 in tv for 7 years and it just started to click off while watching it, and the front...

my samsung HLS5686wx/xaa tv has the dreaded white dots all over it. what part do i get to fix it mys...
