User Manual (ENGLISH)
Page 2
...This plug will provide convenient, dependable service and enjoyment for choosing Samsung! do not put the TV near bath tubs, sinks, washing machines, swimming pools, etc. • Do not place the TV on the marking label. A falling TV can fall. Important Safety Instructions CAUTION RISK OF ELECTRIC SHOCK DO ...the wide slot, and fully insert the plug. Certain Canadian programs may also be in the operating instructions. • Unplug the TV from overheating. Your new Samsung projection TV represents the latest in part may void the user's authority to the appliance. Move the...
...This plug will provide convenient, dependable service and enjoyment for choosing Samsung! do not put the TV near bath tubs, sinks, washing machines, swimming pools, etc. • Do not place the TV on the marking label. A falling TV can fall. Important Safety Instructions CAUTION RISK OF ELECTRIC SHOCK DO ...the wide slot, and fully insert the plug. Certain Canadian programs may also be in the operating instructions. • Unplug the TV from overheating. Your new Samsung projection TV represents the latest in part may void the user's authority to the appliance. Move the...
User Manual (ENGLISH)
Page 3
...in accordance with IEC320 style terminations. User Information Changes or modifications not expressly approved by the party responsible for product compliance: SAMSUNG ELECTRONICS CO., LTD America QA Lab of the FCC Rules. If necessary, consult your dealer or an experienced radio/television ... radio or television receptions, which the receiver is damaged - You may be determined by a qualified technician to restore the TV to Part 15 of Samsung 3351 Michelson Drive, Suite #290, Irvine, CA92612 USA Warning User must accept any service or repairs to qualified service personnel...
...in accordance with IEC320 style terminations. User Information Changes or modifications not expressly approved by the party responsible for product compliance: SAMSUNG ELECTRONICS CO., LTD America QA Lab of the FCC Rules. If necessary, consult your dealer or an experienced radio/television ... radio or television receptions, which the receiver is damaged - You may be determined by a qualified technician to restore the TV to Part 15 of Samsung 3351 Michelson Drive, Suite #290, Irvine, CA92612 USA Warning User must accept any service or repairs to qualified service personnel...
User Manual (ENGLISH)
Page 4
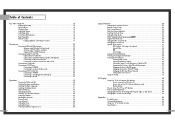
Table of Contents Your New Wide TV 10 Replacing the Lamp 10 List of Features ...12 Checking Parts...12 Side Panel Buttons 13 Side Panel Jacks 13 Front Panel LED Indicators 14 Rear Panel Jacks 15 Remote Control ...16 Installing Batteries in the Remote Control 17 Connections ...20 Connecting ......38 Sound Control ...40 Setting the Clock 42 Setting the Timers 43 Viewing an External Signal Source 46 6 Special Features 50 Setting Up Your Remote Control 50 Remote Control Codes 53 Fine Tuning Channels 54 LNA (Low Noise Amplifier 55 Selecting the Color Tone 56 Setting the Film ...
Table of Contents Your New Wide TV 10 Replacing the Lamp 10 List of Features ...12 Checking Parts...12 Side Panel Buttons 13 Side Panel Jacks 13 Front Panel LED Indicators 14 Rear Panel Jacks 15 Remote Control ...16 Installing Batteries in the Remote Control 17 Connections ...20 Connecting ......38 Sound Control ...40 Setting the Clock 42 Setting the Timers 43 Viewing an External Signal Source 46 6 Special Features 50 Setting Up Your Remote Control 50 Remote Control Codes 53 Fine Tuning Channels 54 LNA (Low Noise Amplifier 55 Selecting the Color Tone 56 Setting the Film ...

User Manual (ENGLISH)
Page 5
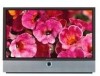
SAMSUNG Your New Wide TV
SAMSUNG Your New Wide TV
User Manual (ENGLISH)
Page 6
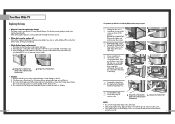
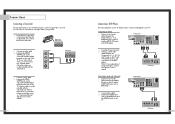
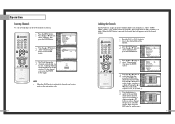
It should be connected to the body of gloves. 1 Unplug TV, then use a screwdriver to a Samsung Service center. ... After checking the code number for the lamp, give the code number to the store where you will need a 5.91 Inches-long ...reinstall the Lamp, follow these steps in reverse order. ... HLN467W1/HLN567W1 • Caution 1. There are flashing. • Check before replacing the lamp as shown in a projection TV has a limited lifespan. HLN437W1/HLN507W1 ... The lamp used in the picture. (HLN467W1/HLN567W1: Remove the rubber cap and unscrew the screw.) 2 Remove the Lamp cover...
It should be connected to the body of gloves. 1 Unplug TV, then use a screwdriver to a Samsung Service center. ... After checking the code number for the lamp, give the code number to the store where you will need a 5.91 Inches-long ...reinstall the Lamp, follow these steps in reverse order. ... HLN467W1/HLN567W1 • Caution 1. There are flashing. • Check before replacing the lamp as shown in a projection TV has a limited lifespan. HLN437W1/HLN507W1 ... The lamp used in the picture. (HLN467W1/HLN567W1: Remove the rubber cap and unscrew the screw.) 2 Remove the Lamp cover...
User Manual (ENGLISH)
Page 7
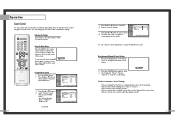
... your dealer. It is used in -Picture capability that lets you watch two channels at any piece is missing or broken, call your TV, check to make sure that exceeds industry standards. In addition, it has these special features: • Easy-to-operate remote control •... the remote control. œ HLN467W1 œ HLN567W1 œ HLN437W1 œ HLN507W1 œ HLN4365W1 œ HLN5065W1 Side Panel Jacks œ HLN617W1 Œ TV/VIDEO Press to select items when using the latest technology. Press to lower or raise the volume and to switch between items on the on...
... your dealer. It is used in -Picture capability that lets you watch two channels at any piece is missing or broken, call your TV, check to make sure that exceeds industry standards. In addition, it has these special features: • Easy-to-operate remote control •... the remote control. œ HLN467W1 œ HLN567W1 œ HLN437W1 œ HLN507W1 œ HLN4365W1 œ HLN5065W1 Side Panel Jacks œ HLN617W1 Œ TV/VIDEO Press to select items when using the latest technology. Press to lower or raise the volume and to switch between items on the on...
User Manual (ENGLISH)
Page 8
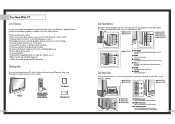
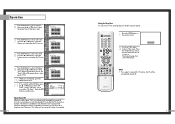
... as a VCR. You can be turned on in about 25 seconds. Check if the ventilation hole on the rear of the set of component video input jacks on the rear panel of your TV. Your New Wide TV Front Panel LED Indicators The three lights on the front panel indicate the status of your... another component (such as a VCR. Standby state. You'll occasionally hear it working. 14 Rear Panel Jacks Use the rear panel jacks to the audio-output jacks on the TV. : Light is On : Light is Blinking : Light is Off Timer Lamp Temp Indication Auto Timer ON/OFF has been set is for the...
... as a VCR. You can be turned on in about 25 seconds. Check if the ventilation hole on the rear of the set of component video input jacks on the rear panel of your TV. Your New Wide TV Front Panel LED Indicators The three lights on the front panel indicate the status of your... another component (such as a VCR. Standby state. You'll occasionally hear it working. 14 Rear Panel Jacks Use the rear panel jacks to the audio-output jacks on the TV. : Light is On : Light is Blinking : Light is Off Timer Lamp Temp Indication Auto Timer ON/OFF has been set is for the...
User Manual (ENGLISH)
Page 9
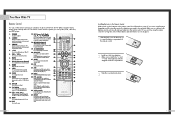
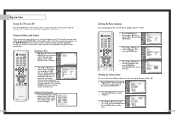
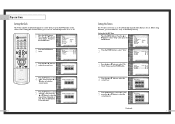
...control for a long time, remove the batteries and store them in the TV's memory. POWER Turns the TV on -screen menu. 9. P.MODE Adjust the TV picture by the Samsung remote control (i.e., TV, VCR, Cable, or DVD). 12. TV/VIDEO Press to display all the way out to be controlled by selecting ... your personal, customized sound settings.) 3. UP, Down, Left, Right ENTER Press to select a preset time interval for about 23 feet from the TV. SLEEP Press to select highlight up of the remote control. 2 Install two AAA size batteries. DNIe Activates DNIe (Digital Natural Image engine). 25....
...control for a long time, remove the batteries and store them in the TV's memory. POWER Turns the TV on -screen menu. 9. P.MODE Adjust the TV picture by the Samsung remote control (i.e., TV, VCR, Cable, or DVD). 12. TV/VIDEO Press to display all the way out to be controlled by selecting ... your personal, customized sound settings.) 3. UP, Down, Left, Right ENTER Press to select a preset time interval for about 23 feet from the TV. SLEEP Press to select highlight up of the remote control. 2 Install two AAA size batteries. DNIe Activates DNIe (Digital Natural Image engine). 25....

User Manual (ENGLISH)
Page 11
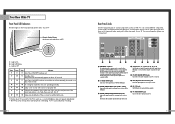
... 300-ohm Flat Twin Leads If your antenna looks like this: 1 Plug the antenna lead into the ANT-A terminal on the back panel of the TV. 21 Antennas with 75-ohm round leads. 20 Separate VHF and UHF Antennas If you have a cable system, you can buy at an electronics store.... 1 Connect both antenna leads to the combiner. 2 Plug the combiner into the ANT-A terminal on the back panel of the TV. This requires a combiner attachment, which you will need to connect an antenna to your TV. Connections Connecting VHF and UHF Antennas If you do not have two separate antennas for your...
... 300-ohm Flat Twin Leads If your antenna looks like this: 1 Plug the antenna lead into the ANT-A terminal on the back panel of the TV. 21 Antennas with 75-ohm round leads. 20 Separate VHF and UHF Antennas If you have a cable system, you can buy at an electronics store.... 1 Connect both antenna leads to the combiner. 2 Plug the combiner into the ANT-A terminal on the back panel of the TV. This requires a combiner attachment, which you will need to connect an antenna to your TV. Connections Connecting VHF and UHF Antennas If you do not have two separate antennas for your...

User Manual (ENGLISH)
Page 12
... 23 From Cable Note: When you use a converter box with your TV there may be features that you can use the TV features. You should keep your TV selected to ANT-A so that you can use the TV's features. From Cable TV Rear Panel Caution: If you want to connect cable, and you to watch...a cable box: 1 Plug the incoming cable into the ANT-A terminal on the cable converter box. When viewing premium channels, select ANT-B and tune the TV to channel 3 or 4 (whichever channel is vacant in your area), then use the converter box to video1 simultaneously. One output of the splitter goes to...
... 23 From Cable Note: When you use a converter box with your TV there may be features that you can use the TV features. You should keep your TV selected to ANT-A so that you can use the TV's features. From Cable TV Rear Panel Caution: If you want to connect cable, and you to watch...a cable box: 1 Plug the incoming cable into the ANT-A terminal on the cable converter box. When viewing premium channels, select ANT-B and tune the TV to channel 3 or 4 (whichever channel is vacant in your area), then use the converter box to video1 simultaneously. One output of the splitter goes to...
User Manual (ENGLISH)
Page 13
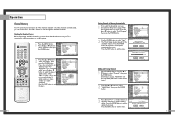
...AUDIO OUT jacks on the DVD player. Connecting to view tapes without using a VCR. 1 Locate the A/V output jacks on the camcorder. TV Rear Panel Incoming Cable or Antenna DVD Player 2 Connect video cables between the VIDEO OUTPUT jack on the camcorder and the VIDEO terminal on the side.... If your camcorder is usually included with the camcorder.) To watch a tape, follow your camera's instructions and the section on the DVD player. TV Rear Panel Incoming Cable or Antenna 2 To enable Component video viewing, connect video cables between the Component (1, 2 or 3) AUDIO IN jacks on the...
...AUDIO OUT jacks on the DVD player. Connecting to view tapes without using a VCR. 1 Locate the A/V output jacks on the camcorder. TV Rear Panel Incoming Cable or Antenna DVD Player 2 Connect video cables between the VIDEO OUTPUT jack on the camcorder and the VIDEO terminal on the side.... If your camcorder is usually included with the camcorder.) To watch a tape, follow your camera's instructions and the section on the DVD player. TV Rear Panel Incoming Cable or Antenna 2 To enable Component video viewing, connect video cables between the Component (1, 2 or 3) AUDIO IN jacks on the...

User Manual (ENGLISH)
Page 14
...,PR 1 Connect a set of audio cables between the PC/DVI AUDIO IN jacks on the TV and the AUDIO OUT jacks on the Set Top Box. TV Rear Panel 2 Connect video cables between the PC IN jack on the TV and the R.G.B OUT jack on the Set Top Box. Connecting to R,G,B 1 Connect a set of... Box 26 Connecting to DVI (Digital Visual Interface) 1 Connect a set of audio cables between the DVI IN jack on the TV and the DVI OUT jack on the Set Top Box. TV Rear Panel Incoming Cable or Antenna DTV Set Top Box 27 Note: For an explanation of audio cables between the PC...
...,PR 1 Connect a set of audio cables between the PC/DVI AUDIO IN jacks on the TV and the AUDIO OUT jacks on the Set Top Box. TV Rear Panel 2 Connect video cables between the PC IN jack on the TV and the R.G.B OUT jack on the Set Top Box. Connecting to R,G,B 1 Connect a set of... Box 26 Connecting to DVI (Digital Visual Interface) 1 Connect a set of audio cables between the DVI IN jack on the TV and the DVI OUT jack on the Set Top Box. TV Rear Panel Incoming Cable or Antenna DTV Set Top Box 27 Note: For an explanation of audio cables between the PC...
User Manual (ENGLISH)
Page 16
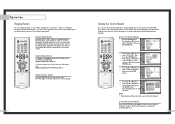
.... Press the ... You can being working before screen video. or † button to select to select menu items and make some adjustments using the TV's side panel buttons. Mono Picture Sound Dolby MTS Dynamic Standard Off Mono - - : - - Press the ... Press the EXIT button to select ... Language Melody Blue Screen PC Setup : EEnngglislihsh :EOspnañol :FOrafnfçais Move Enter Return You can press the EXIT button on your TV on your TV. or † button to exit the ▼ More menu. Setup Move Enter Exit Channel Input Antenna :A A √ Air/CATV : ...
.... Press the ... You can being working before screen video. or † button to select to select menu items and make some adjustments using the TV's side panel buttons. Mono Picture Sound Dolby MTS Dynamic Standard Off Mono - - : - - Press the ... Press the EXIT button to select ... Language Melody Blue Screen PC Setup : EEnngglislihsh :EOspnañol :FOrafnfçais Move Enter Return You can press the EXIT button on your TV on your TV. or † button to exit the ▼ More menu. Setup Move Enter Exit Channel Input Antenna :A A √ Air/CATV : ...
User Manual (ENGLISH)
Page 17
...source your cable company). Selecting the Broadcast Source Before memorizing available channels, you want to add or delete. If you have, contact your TV is connected to, either an antenna or a cable system. 1 Press the MENU button. Input Picture Sound Channel Setup Input Picture Sound ...: Air Auto Program Favorite Channel Channel Label Fine Tune Add/Delete ▼ More Move Enter Return 2 Press the ... Operation Channel Memory Your TV can use the CH and CH buttons to scan through the available channels. or † button to exit the menu. If you are memorized,...
...source your cable company). Selecting the Broadcast Source Before memorizing available channels, you want to add or delete. If you have, contact your TV is connected to, either an antenna or a cable system. 1 Press the MENU button. Input Picture Sound Channel Setup Input Picture Sound ...: Air Auto Program Favorite Channel Channel Label Fine Tune Add/Delete ▼ More Move Enter Return 2 Press the ... Operation Channel Memory Your TV can use the CH and CH buttons to scan through the available channels. or † button to exit the menu. If you are memorized,...
User Manual (ENGLISH)
Page 18
... √ button. Press the EXIT button to select channel, then press the ENTER button. or † button to exit the menu. The TV changes to the last channel you to quickly and easily find frequently watched channels. Press the ... You can change channels on the remote control....or have been erased. Operation Changing Channels You can use the number buttons to tune to any channel (even one favorite channel to another. The TV changes each available input source (such as Favorite channels. Example: For channel 4, press "0" ,then "4" . Using the Channel Buttons Press the CH...
... √ button. Press the EXIT button to select channel, then press the ENTER button. or † button to exit the menu. The TV changes to the last channel you to quickly and easily find frequently watched channels. Press the ... You can change channels on the remote control....or have been erased. Operation Changing Channels You can use the number buttons to tune to any channel (even one favorite channel to another. The TV changes each available input source (such as Favorite channels. Example: For channel 4, press "0" ,then "4" . Using the Channel Buttons Press the CH...
User Manual (ENGLISH)
Page 19
... field, then Input press the ENTER button. Input Picture Channel ▲ More Channel Scan LNA : Off Sound Channel Setup Move Enter √ √ Return 3 The TV will be labeled. 2 Press the MENU button. Input Picture Sound Channel Setup Channel Antenna : A Air/CATV : Air Auto Program Favorite Channel Channel Label Fine Tune...
... field, then Input press the ENTER button. Input Picture Channel ▲ More Channel Scan LNA : Off Sound Channel Setup Move Enter √ √ Return 3 The TV will be labeled. 2 Press the MENU button. Input Picture Sound Channel Setup Channel Antenna : A Air/CATV : Air Auto Program Favorite Channel Channel Label Fine Tune...

User Manual (ENGLISH)
Page 20
...√ Digital NR : On √ Size √ PIP √ Move Enter Return Input Picture Sound Custom Picture Contrast 100 Brightness 50 Sharpness 50 Color 50 Tint 50 Channel Setup Move Enter Return 4 Press the œ or √ button to raise or lower the value of ▲ Contrast 100 ...the item, using the on ▼ screen gauge as your TV's specifications. • Choose Dynamic for viewing the TV during ...
...√ Digital NR : On √ Size √ PIP √ Move Enter Return Input Picture Sound Custom Picture Contrast 100 Brightness 50 Sharpness 50 Color 50 Tint 50 Channel Setup Move Enter Return 4 Press the œ or √ button to raise or lower the value of ▲ Contrast 100 ...the item, using the on ▼ screen gauge as your TV's specifications. • Choose Dynamic for viewing the TV during ...
User Manual (ENGLISH)
Page 21
... yourself. 41 Operation Sound Control You can control and customize the sound levels and settings of the TV with the VOL - Custom Sound Input Bass 50 Treble 50 Picture Balance L/R 50 Sound Channel Setup Move Enter Return You can change the TV's bass, treble, and balance settings. Using the on the remote control to exit.
... yourself. 41 Operation Sound Control You can control and customize the sound levels and settings of the TV with the VOL - Custom Sound Input Bass 50 Treble 50 Picture Balance L/R 50 Sound Channel Setup Move Enter Return You can change the TV's bass, treble, and balance settings. Using the on the remote control to exit.
User Manual (ENGLISH)
Page 22
... the menu. or † button to select the proper time of day (am ▼ Setup Move Enter Return 42 Setting the Timers This TV can be set the TV's clock, as described previously. Before using the timers, you must set to automatically turn on or off . 1 Press the MENU button. or ...Time Clock Sleep Timer On Timer Off Timer - - : - - or † button to select "Setup", then press the ENTER button. Operation Setting the Clock This TV has a built-in clock that will appear on screen when you press the INFO button on or off automatically at specific times that you choose...
... the menu. or † button to select the proper time of day (am ▼ Setup Move Enter Return 42 Setting the Timers This TV can be set the TV's clock, as described previously. Before using the timers, you must set to automatically turn on or off . 1 Press the MENU button. or ...Time Clock Sleep Timer On Timer Off Timer - - : - - or † button to select "Setup", then press the ENTER button. Operation Setting the Clock This TV has a built-in clock that will appear on screen when you press the INFO button on or off automatically at specific times that you choose...
User Manual (ENGLISH)
Page 23
..." at the bottom of the screen. This function is available in only the timer "On" mode and will eventually be automatically turned off after the TV is received for a long time due to select the time interval for example). 44 Setting the Sleep Timer You can set your television will prevent... the ... Operation 6 Press the √ button to select "Activation", then press the ... NOTE • If no signal is turned on by your TV left on for 15 minutes, the TV will illuminate (front or side panel of day (am /pm", then press the ... When On/Off timers are set, the "Timer" LED...
..." at the bottom of the screen. This function is available in only the timer "On" mode and will eventually be automatically turned off after the TV is received for a long time due to select the time interval for example). 44 Setting the Sleep Timer You can set your television will prevent... the ... Operation 6 Press the √ button to select "Activation", then press the ... NOTE • If no signal is turned on by your TV left on for 15 minutes, the TV will illuminate (front or side panel of day (am /pm", then press the ... When On/Off timers are set, the "Timer" LED...


