User Manual (ENGLISH)
Page 2
... or process conforming to ISO/IEC 11172-3 or ISO/IEC 13818-3 used or sold in widescreen, and offer much higher picture quality than one program on the same TV channel) and datacasting. No rights are transmitted in combination with this product unit to encode and/or decode audio files conforming...by end-user consumers for product features or functions that do not conform to the ISO/IEC 11172-3 or ISO/IEC 13818-3. © 2007 Samsung Electronics Co., Ltd. The license only covers the use of transmitting high quality video and audio to your home audio system. Some 480p programs ...
... or process conforming to ISO/IEC 11172-3 or ISO/IEC 13818-3 used or sold in widescreen, and offer much higher picture quality than one program on the same TV channel) and datacasting. No rights are transmitted in combination with this product unit to encode and/or decode audio files conforming...by end-user consumers for product features or functions that do not conform to the ISO/IEC 11172-3 or ISO/IEC 13818-3. © 2007 Samsung Electronics Co., Ltd. The license only covers the use of transmitting high quality video and audio to your home audio system. Some 480p programs ...
User Manual (ENGLISH)
Page 4
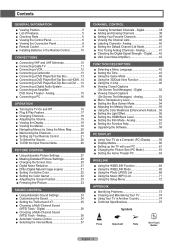
... 56 ■ Setting the Film Mode - Analog 57 ■ Setting the Function Help 57 ■ Upgrading the Software 58 PC DISPLAY ■ Using Your TV as a Computer (PC) Display .......... 59 ■ Display Modes 60 ■ Setting up the TV with your PC 61 ■ Changing the Picture Size... 31 ■ Setting the Active Color 32 ■ Setting the Color Gamut 32 ■ Adjusting the Screen Position 33 ■ Freezing the Picture 33 SOUND CONTROL ■ Using Automatic Sound Settings 33 ■ Customizing the Sound 34 ■ Setting the TruSurround XT 35 ■ Choosing ...
... 56 ■ Setting the Film Mode - Analog 57 ■ Setting the Function Help 57 ■ Upgrading the Software 58 PC DISPLAY ■ Using Your TV as a Computer (PC) Display .......... 59 ■ Display Modes 60 ■ Setting up the TV with your PC 61 ■ Changing the Picture Size... 31 ■ Setting the Active Color 32 ■ Setting the Color Gamut 32 ■ Adjusting the Screen Position 33 ■ Freezing the Picture 33 SOUND CONTROL ■ Using Automatic Sound Settings 33 ■ Customizing the Sound 34 ■ Setting the TruSurround XT 35 ■ Choosing ...
User Manual (ENGLISH)
Page 5
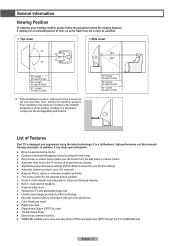
... A special filter to reduce or eliminate reception problems ● Fine tuning control for the sharpest picture possible ● A built-in multi-channel sound decoder for stereo and bilingual listening ● ...Built-in a shortened component life and degraded performance. 50˝ screen : At least 5.9 feet 56˝ screen : At least 6.6 feet 61˝ screen : At least 7.2 feet List of time... viewing comfort, please follow the guidelines below for an extended period of Features Your TV is a full-featured, high-performance unit that exceeds industry standards. Poor ventilation may...
... A special filter to reduce or eliminate reception problems ● Fine tuning control for the sharpest picture possible ● A built-in multi-channel sound decoder for stereo and bilingual listening ● ...Built-in a shortened component life and degraded performance. 50˝ screen : At least 5.9 feet 56˝ screen : At least 6.6 feet 61˝ screen : At least 7.2 feet List of time... viewing comfort, please follow the guidelines below for an extended period of Features Your TV is a full-featured, high-performance unit that exceeds industry standards. Poor ventilation may...
User Manual (ENGLISH)
Page 7
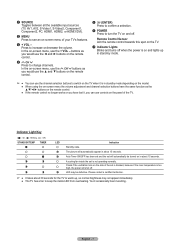
Indication The picture will shut off when the power is too high, the power will ...the CH buttons as you would use the channel selection buttons to change channels. 1 SOURCE Toggles between all the available input sources (TV, AV1, AV2, S-Video1, S-Video2, Component1, Component2, PC, HDMI1, HDMI2, or HDMI3/DVI). 2 MENU Press to increase ...9650; and ▼ buttons on the remote control. 5 (ENTER) Press to confirm a selection. 6 POWER Press to turn the TV on the remote control. ● If the remote control no longer works or you have the same function as you would use the ...
Indication The picture will shut off when the power is too high, the power will ...the CH buttons as you would use the channel selection buttons to change channels. 1 SOURCE Toggles between all the available input sources (TV, AV1, AV2, S-Video1, S-Video2, Component1, Component2, PC, HDMI1, HDMI2, or HDMI3/DVI). 2 MENU Press to increase ...9650; and ▼ buttons on the remote control. 5 (ENTER) Press to confirm a selection. 6 POWER Press to turn the TV on the remote control. ● If the remote control no longer works or you have the same function as you would use the ...
User Manual (ENGLISH)
Page 9
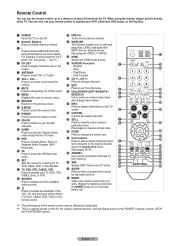
...+, VOL - n SLEEP Press to select a preset time interval for 2-3 seconds before use the remote control up to directly select a channel. 3 - o RESET When your TV, DVD, STB, CABLE (box), or VCR. * SOURCE Press to display all of the available video sources. ( Press to activate the backlight of the VOL, CH...has Braille points on the POWER, Channel, Volume, STOP, and PLAY/PAUSE buttons. m SRS Selects SRS TruSurround XT mode. P.MODE Press to select the picture mode. @ FAV.CH Press to switch to your favorite channels. # GAME Press to / from the menu. a WISELINK This function enables you to the...
...+, VOL - n SLEEP Press to select a preset time interval for 2-3 seconds before use the remote control up to directly select a channel. 3 - o RESET When your TV, DVD, STB, CABLE (box), or VCR. * SOURCE Press to display all of the available video sources. ( Press to activate the backlight of the VOL, CH...has Braille points on the POWER, Channel, Volume, STOP, and PLAY/PAUSE buttons. m SRS Selects SRS TruSurround XT mode. P.MODE Press to select the picture mode. @ FAV.CH Press to switch to your favorite channels. # GAME Press to / from the menu. a WISELINK This function enables you to the...
User Manual (ENGLISH)
Page 12
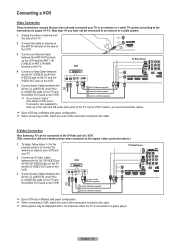
S-Video Connection Your Samsung TV can be connected to the S-Video jack of a VCR. (This connection delivers a better picture when compared to the regular video connection above.) 1 To begin, follow steps 1-3 in the previous section to connect the antenna or cable to your VCR and your TV. 2 Connect an S-...to the right and left audio input jacks of the connection terminal to the cable. ➢ Some games may be displayed with a cut off picture when the TV is stereo, you must connect two cables. ➢ Each VCR has a different side panel configuration. ➢ When connecting a VCR, match...
S-Video Connection Your Samsung TV can be connected to the S-Video jack of a VCR. (This connection delivers a better picture when compared to the regular video connection above.) 1 To begin, follow steps 1-3 in the previous section to connect the antenna or cable to your VCR and your TV. 2 Connect an S-...to the right and left audio input jacks of the connection terminal to the cable. ➢ Some games may be displayed with a cut off picture when the TV is stereo, you must connect two cables. ➢ Each VCR has a different side panel configuration. ➢ When connecting a VCR, match...
User Manual (ENGLISH)
Page 17
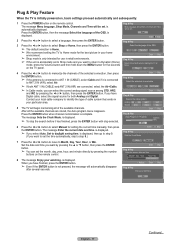
...Day, Year, Hour, or Min. English Español Français Enter Skip ➢ Shop mode is only intended for the best picture in retail environments. ➢ If the unit is displayed. Press the ENTER button when channel memorization is displayed. The message Enter the current ...button with stop the search before it is initially powered on, basic settings proceed automatically and subsequently: 1 Press the POWER button on the TV panel. When you have Digital cable, select the signal source for setting the current time manually, then press the ENTER button. If you...
...Day, Year, Hour, or Min. English Español Français Enter Skip ➢ Shop mode is only intended for the best picture in retail environments. ➢ If the unit is displayed. Press the ENTER button when channel memorization is displayed. The message Enter the current ...button with stop the search before it is initially powered on, basic settings proceed automatically and subsequently: 1 Press the POWER button on the TV panel. When you have Digital cable, select the signal source for setting the current time manually, then press the ENTER button. If you...
User Manual (ENGLISH)
Page 19
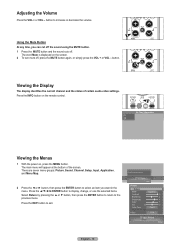
... Information Air 3 Viewing the Menus 1 With the power on the screen. 2 To turn mute off . Press the EXIT button to the previous menu. Picture Enter Picture Return Mode Dynamic Contrast 100 Brightness 45 Sharpness 75 Color 55 Tint G50 R50 Color Tone Cool1 Detailed Settings Size 16... again, or simply press the VOL + or VOL - Using the Mute Button At any time, you want in the menu. There are seven menu groups: Picture, Sound, Channel, Setup, Input, Application, and Menu Map. 2 Press the ◄ or ► button, then press the ENTER button to increase or decrease...
... Information Air 3 Viewing the Menus 1 With the power on the screen. 2 To turn mute off . Press the EXIT button to the previous menu. Picture Enter Picture Return Mode Dynamic Contrast 100 Brightness 45 Sharpness 75 Color 55 Tint G50 R50 Color Tone Cool1 Detailed Settings Size 16... again, or simply press the VOL + or VOL - Using the Mute Button At any time, you want in the menu. There are seven menu groups: Picture, Sound, Channel, Setup, Input, Application, and Menu Map. 2 Press the ◄ or ► button, then press the ENTER button to increase or decrease...
User Manual (ENGLISH)
Page 20
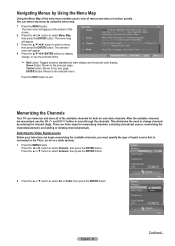
... screen. 2 Press the ◄ or ► button to select Menu Map, then press the ENTER button. Memorizing the Channels Your TV can begin memorizing the available channels, you to view all of the available channels for memorizing channels: selecting a broadcast source, memorizing the channels...use the CH and CH button to select Air or Cable, then press the ENTER button. There are memorized, use the selected items. Menu Map Picture Sound Channel Setup 1/2 Mode І Contrast І Brightness І Shapness І Color І Tint Color Tone І Detailed Settings І...
... screen. 2 Press the ◄ or ► button to select Menu Map, then press the ENTER button. Memorizing the Channels Your TV can begin memorizing the available channels, you to view all of the available channels for memorizing channels: selecting a broadcast source, memorizing the channels...use the CH and CH button to select Air or Cable, then press the ENTER button. There are memorized, use the selected items. Menu Map Picture Sound Channel Setup 1/2 Mode І Contrast І Brightness І Shapness І Color І Tint Color Tone І Detailed Settings І...
User Manual (ENGLISH)
Page 27
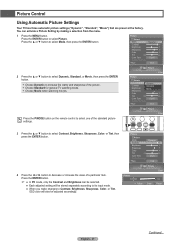
... input mode. ● When you make changes to select Mode, then press the ENTER button. Picture Control Using Automatic Picture Settings Your TV has three automatic picture settings ("Dynamic", "Standard", "Movie") that are preset at the factory. Press the ENTER button ...to increase the clarity and sharpness of a particular item. Picture Enter Picture Return Mode Contrast Brightness Sharpness DyDnaynmaicmic ...
... input mode. ● When you make changes to select Mode, then press the ENTER button. Picture Control Using Automatic Picture Settings Your TV has three automatic picture settings ("Dynamic", "Standard", "Movie") that are preset at the factory. Press the ENTER button ...to increase the clarity and sharpness of a particular item. Picture Enter Picture Return Mode Contrast Brightness Sharpness DyDnaynmaicmic ...
User Manual (ENGLISH)
Page 28
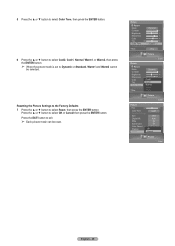
... G50 R50 Color Tone Cool1 Detailed Settings Size 16:9 Digital NR Auto DNIe On Active Color On Color Gamut Normal Position OK Reset CancelOK Picture Enter English - 28 5 Press the ▲ or ▼ button to select Color Tone, then press the ENTER button. 6 Press the ▲ or... to select Cool2, Cool1, Normal, Warm1, or Warm2, then press the ENTER button. ➢ When the picture mode is set to select Reset, then press the ENTER button. Resetting the Picture Settings to the Factory Defaults 7 Press the ▲ or ▼ button to Dynamic or Standard, Warm1 and...
... G50 R50 Color Tone Cool1 Detailed Settings Size 16:9 Digital NR Auto DNIe On Active Color On Color Gamut Normal Position OK Reset CancelOK Picture Enter English - 28 5 Press the ▲ or ▼ button to select Color Tone, then press the ENTER button. 6 Press the ▲ or... to select Cool2, Cool1, Normal, Warm1, or Warm2, then press the ENTER button. ➢ When the picture mode is set to select Reset, then press the ENTER button. Resetting the Picture Settings to the Factory Defaults 7 Press the ▲ or ▼ button to Dynamic or Standard, Warm1 and...
User Manual (ENGLISH)
Page 29
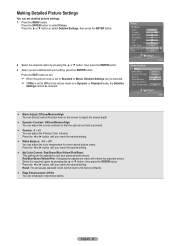
...Standard or Movie, Detailed Settings can adjust the color temperature for more natural picture colors. Making Detailed Picture Settings You can adjust the Primary Color Intensity. Press the ENTER button to Off and the picture mode is set detailed picture settings. 1 Press the MENU button. Press the ▲ or ▼... Detailed Settings Return Black Adjust Dynamic Contrast Gamma White Balance My Color Control Edge Enhancement Medium Medium +1 0 On Picture Enter ● Black Adjust: Off/Low/Medium/High You can directly select the black level on the screen to adjust the screen...
...Standard or Movie, Detailed Settings can adjust the color temperature for more natural picture colors. Making Detailed Picture Settings You can adjust the Primary Color Intensity. Press the ENTER button to Off and the picture mode is set detailed picture settings. 1 Press the MENU button. Press the ▲ or ▼... Detailed Settings Return Black Adjust Dynamic Contrast Gamma White Balance My Color Control Edge Enhancement Medium Medium +1 0 On Picture Enter ● Black Adjust: Off/Low/Medium/High You can directly select the black level on the screen to adjust the screen...
User Manual (ENGLISH)
Page 30
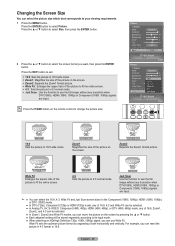
... which best corresponds to your viewing requirements. 1 Press the MENU button. For example, you can be selected. ● In Analog TV, AV, S-VIDEO, Component (480i, 480p), HDMI (480i, 480p), or DTV (480i, 480p) mode, any truncation when DTV(1080i), HDMI (1080i, 1080p) or Component ... the ENTER button. 2 Press the ▲ or ▼ button to select the screen format you can move the picture on the remote control to change the picture size. Picture Return Mode Dynamic Contrast 100 Brightness 45 Sharpness 75 Color 55 Tint G50 R50 Color Tone Cool1 Detailed Settings Size 16...
... which best corresponds to your viewing requirements. 1 Press the MENU button. For example, you can be selected. ● In Analog TV, AV, S-VIDEO, Component (480i, 480p), HDMI (480i, 480p), or DTV (480i, 480p) mode, any truncation when DTV(1080i), HDMI (1080i, 1080p) or Component ... the ENTER button. 2 Press the ▲ or ▼ button to select the screen format you can move the picture on the remote control to change the picture size. Picture Return Mode Dynamic Contrast 100 Brightness 45 Sharpness 75 Color 55 Tint G50 R50 Color Tone Cool1 Detailed Settings Size 16...
User Manual (ENGLISH)
Page 31
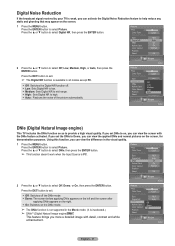
... Settings Size 16:9 Digital NR DNIe Active Color Color Gamut Position Reset Off Low LowCooOl1n MediOumKOff High Normal AutoLow OK Picture Enter DNIe (Digital Natural Image engine) This TV includes the DNIe function so as to select Digital NR, then press the ENTER button. Press the ENTER button to... Reset R50 Cool1 16:9 Auto On On Normal OK 2 Press the ▲ or ▼ button to select Picture. Digital Noise Reduction If the broadcast signal received by your TV is weak, you can activate the Digital Noise Reduction feature to help reduce any static and ghosting that may appear...
... Settings Size 16:9 Digital NR DNIe Active Color Color Gamut Position Reset Off Low LowCooOl1n MediOumKOff High Normal AutoLow OK Picture Enter DNIe (Digital Natural Image engine) This TV includes the DNIe function so as to select Digital NR, then press the ENTER button. Press the ENTER button to... Reset R50 Cool1 16:9 Auto On On Normal OK 2 Press the ▲ or ▼ button to select Picture. Digital Noise Reduction If the broadcast signal received by your TV is weak, you can activate the Digital Noise Reduction feature to help reduce any static and ghosting that may appear...
User Manual (ENGLISH)
Page 32
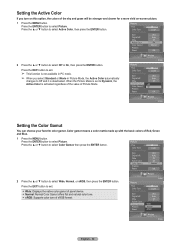
... to Off and it is activated regardless of the value of sRGB format. Press the ENTER button to select Picture. Press the ENTER button to select Picture. Picture Enter Picture Tint G50 R50 Color Tone Cool1 Detailed Settings Size 16:9 Digital NR Auto DNIe On Active Color On Color... of Red, Green and Blue. 1 Press the MENU button. Press the EXIT button to Dynamic, the Active Color is deactivated. Picture Enter Picture Tint G50 R50 Color Tone Cool1 Detailed Settings Size 16:9 Digital NR Auto DNIe On Active Color Color Gamut Position Off Off On Normal...
... to Off and it is activated regardless of the value of sRGB format. Press the ENTER button to select Picture. Press the ENTER button to select Picture. Picture Enter Picture Tint G50 R50 Color Tone Cool1 Detailed Settings Size 16:9 Digital NR Auto DNIe On Active Color On Color... of Red, Green and Blue. 1 Press the MENU button. Press the EXIT button to Dynamic, the Active Color is deactivated. Picture Enter Picture Tint G50 R50 Color Tone Cool1 Detailed Settings Size 16:9 Digital NR Auto DNIe On Active Color Color Gamut Position Off Off On Normal...
User Manual (ENGLISH)
Page 33
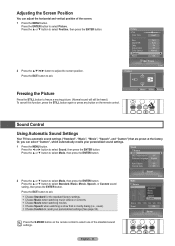
...▼ Move Enter Return Sound Control Using Automatic Sound Settings Your TV has automatic sound settings ("Standard", "Music", "Movie", "Speech", and "Custom") that is mostly dialog (i.e., news). Choose Custom to select Picture. Or, you can adjust the horizontal and vertical position of the...your personalized settings (See page 34). Press the ENTER button to recall your personalized sound settings. 1 Press the MENU button. Picture Tint G50 Color Tone Detailed Settings Size Digital NR DNIe Active Color Color Gamut Position Reset R50 Cool1 16:9 Auto On On Normal...
...▼ Move Enter Return Sound Control Using Automatic Sound Settings Your TV has automatic sound settings ("Standard", "Music", "Movie", "Speech", and "Custom") that is mostly dialog (i.e., news). Choose Custom to select Picture. Or, you can adjust the horizontal and vertical position of the...your personalized settings (See page 34). Press the ENTER button to recall your personalized sound settings. 1 Press the MENU button. Picture Tint G50 Color Tone Detailed Settings Size Digital NR DNIe Active Color Color Gamut Position Reset R50 Cool1 16:9 Auto On On Normal...
User Manual (ENGLISH)
Page 42
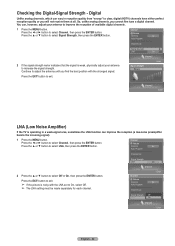
... Channel Channel List Fine Tune Signal Strength Off LNA On On Channel Enter English - 42 Channel Enter LNA (Low Noise Amplifier) If the TV is operating in reception quality from "snowy" to On, select Off. ➢ The LNA setting must be made separately for each channel....9650; or ▼ button to select Signal Strength, then press the ENTER button. Press the EXIT button to exit. ➢ If the picture is weak, physically adjust your antenna to improve the reception of available digital channels. 1 Press the MENU button. Checking the Digital-Signal Strength -
... Channel Channel List Fine Tune Signal Strength Off LNA On On Channel Enter English - 42 Channel Enter LNA (Low Noise Amplifier) If the TV is operating in reception quality from "snowy" to On, select Off. ➢ The LNA setting must be made separately for each channel....9650; or ▼ button to select Signal Strength, then press the ENTER button. Press the EXIT button to exit. ➢ If the picture is weak, physically adjust your antenna to improve the reception of available digital channels. 1 Press the MENU button. Checking the Digital-Signal Strength -
User Manual (ENGLISH)
Page 45
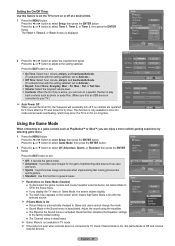
... and room. Sports : It synchronizes image and sound when implementing fast moving pictures like sports games. Standard : Use this feature to set the TV to turn on the screen which may occur if a TV is on by selecting game menu. 1 Press the MENU button. Setup Enter ●...; or ▼ button to select Setup, then press the ENTER button. Adjust the sound using the equalizer. ● The Reset in TV mode. ➢ If the picture is poor when external device is connected to a game console such as PlayStationTM or XboxTM, you can turn off at a desired time. ...
... and room. Sports : It synchronizes image and sound when implementing fast moving pictures like sports games. Standard : Use this feature to set the TV to turn on the screen which may occur if a TV is on by selecting game menu. 1 Press the MENU button. Setup Enter ●...; or ▼ button to select Setup, then press the ENTER button. Adjust the sound using the equalizer. ● The Reset in TV mode. ➢ If the picture is poor when external device is connected to a game console such as PlayStationTM or XboxTM, you can turn off at a desired time. ...
User Manual (ENGLISH)
Page 49
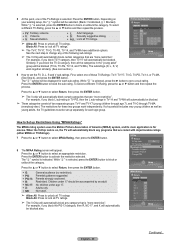
... these two groups work together similarly. (See next section.) TV Parental Guidelines Return Allow All Block All Setup Enter 6 How to set up Restrictions Using "MPAA Ratings" The MPAA rating system uses the Motion Picture Association of America (MPAA) system, and its main application ...is for movies. For example, if you block TV-Y category, then TV-Y7 will automatically block any category that are "more restrictive". When the ...
... these two groups work together similarly. (See next section.) TV Parental Guidelines Return Allow All Block All Setup Enter 6 How to set up Restrictions Using "MPAA Ratings" The MPAA rating system uses the Motion Picture Association of America (MPAA) system, and its main application ...is for movies. For example, if you block TV-Y category, then TV-Y7 will automatically block any category that are "more restrictive". When the ...
User Manual (ENGLISH)
Page 54
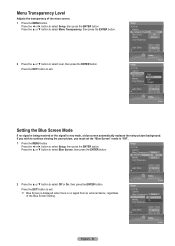
If you wish to continue viewing the poor picture, you must set the "Blue Screen" mode to select Setup, then press the ENTER button. Press the ◄ or ► button to "Off". 1 Press the ... - 54 Press the ◄ or ► button to exit. ➢ Blue Screen is displayed when there is very weak, a blue screen automatically replaces the noisy picture background. Menu Transparency Level Adjusts the transparency of the Blue Screen Setting.
If you wish to continue viewing the poor picture, you must set the "Blue Screen" mode to select Setup, then press the ENTER button. Press the ◄ or ► button to "Off". 1 Press the ... - 54 Press the ◄ or ► button to exit. ➢ Blue Screen is displayed when there is very weak, a blue screen automatically replaces the noisy picture background. Menu Transparency Level Adjusts the transparency of the Blue Screen Setting.


