
Open Source Guide (ENGLISH)
Page 1
... covered by running the Program is not restricted, and the output from the original licensor to copy, distribute or modify the Program subject to any patents or other free programs whose authors commit to using it. (Some other work based on it free software which is implemented by the Free Software Foundation. 10. It is not the purpose of executable or object code...
... covered by running the Program is not restricted, and the output from the original licensor to copy, distribute or modify the Program subject to any patents or other free programs whose authors commit to using it. (Some other work based on it free software which is implemented by the Free Software Foundation. 10. It is not the purpose of executable or object code...

Open Source Guide (ENGLISH)
Page 2
You can redistribute and change. and each source file to most effectively convey the ...OPERATE WITH ANY OTHER SOFTWARE), EVEN IF SUCH HOLDER OR OTHER PARTY HAS BEEN ADVISED OF THE POSSIBILITY OF SUCH DAMAGES. To apply these terms (or, alternatively, under the terms of each file should have at least the "copyright" line... and a pointer to where the full notice is safest to attach them to the library. 16. How to Apply These Terms to Your New Libraries If you develop a new library, and you want it to be of the greatest possible use to the public, we recommend making it free software...
You can redistribute and change. and each source file to most effectively convey the ...OPERATE WITH ANY OTHER SOFTWARE), EVEN IF SUCH HOLDER OR OTHER PARTY HAS BEEN ADVISED OF THE POSSIBILITY OF SUCH DAMAGES. To apply these terms (or, alternatively, under the terms of each file should have at least the "copyright" line... and a pointer to where the full notice is safest to attach them to the library. 16. How to Apply These Terms to Your New Libraries If you develop a new library, and you want it to be of the greatest possible use to the public, we recommend making it free software...
User Manual (ENGLISH)
Page 2
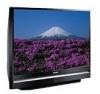
... than one program on the same TV channel) and datacasting. No rights are comparable to progressive-scan DVD movies in widescreen and are granted for product features or functions that do not conform to your home audio system. English - 2 Digital television (DTV) is High Definition Television (HDTV). • SDTV program formats include 480-line interlaced (480i) and 480-line progressive (480p) video. 480i programs are now...
... than one program on the same TV channel) and datacasting. No rights are comparable to progressive-scan DVD movies in widescreen and are granted for product features or functions that do not conform to your home audio system. English - 2 Digital television (DTV) is High Definition Television (HDTV). • SDTV program formats include 480-line interlaced (480i) and 480-line progressive (480p) video. 480i programs are now...
User Manual (ENGLISH)
Page 3
... enjoy clear, sharp widescreen images and high-quality audio. English - 3 Is the antenna I connect an antenna in height. However, DTV broadcast channel assignments are not covered by browsing selected Internet web sites such as analog TV receivers to watch OTA DTV and HDTV programs. They're free, unlike subscription satellite TV or premium cable TV. DTV receivers do not require as much signal as www.titantv.com, www...
... enjoy clear, sharp widescreen images and high-quality audio. English - 3 Is the antenna I connect an antenna in height. However, DTV broadcast channel assignments are not covered by browsing selected Internet web sites such as analog TV receivers to watch OTA DTV and HDTV programs. They're free, unlike subscription satellite TV or premium cable TV. DTV receivers do not require as much signal as www.titantv.com, www...
User Manual (ENGLISH)
Page 4
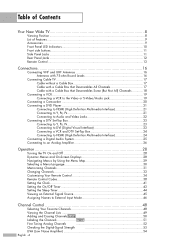
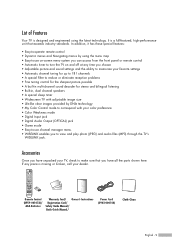
... Operation 28 Turning the TV On and Off 28 Dynamic Menus and On-Screen Displays 28 Navigating Menus by Using the Menu Map 29 Selecting a Menu Language 30 Memorizing Channels 31 Changing Channels 33 Customizing Your Remote Control 34 Remote Control Codes 38 Setting the Clock...41 Setting the On/Off Timer 43 Setting the Sleep Timer 44 Viewing an External Signal Source 45 Assigning Names to External Input Mode 46 Channel Control 48 Selecting Your Favorite Channels 48 Viewing the Channel Lists...
... Operation 28 Turning the TV On and Off 28 Dynamic Menus and On-Screen Displays 28 Navigating Menus by Using the Menu Map 29 Selecting a Menu Language 30 Memorizing Channels 31 Changing Channels 33 Customizing Your Remote Control 34 Remote Control Codes 38 Setting the Clock...41 Setting the On/Off Timer 43 Setting the Sleep Timer 44 Viewing an External Signal Source 45 Assigning Names to External Input Mode 46 Channel Control 48 Selecting Your Favorite Channels 48 Viewing the Channel Lists...
User Manual (ENGLISH)
Page 5
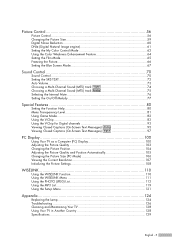
Picture Control 56 Picture Control...56 Changing the Picture Size 59 Digital Noise Reduction 60 DNIe (Digital Natural Image engine 61 Setting the My Color Control Mode 62 Using the Color Weakness Enhancement Feature 64 Setting the Film Mode 65 Freezing the Picture 66 Setting the Blue Screen Mode 67 Sound Control 70 Sound Control ...70 Setting the SRS TSXT 72 Auto Volume...73 Choosing a Multi-Channel Sound (MTS) track Digital 74 Choosing a Multi-Channel Sound (MTS) track Analog 75 Selecting the Internal Mute 76 Setting the On/Off...
Picture Control 56 Picture Control...56 Changing the Picture Size 59 Digital Noise Reduction 60 DNIe (Digital Natural Image engine 61 Setting the My Color Control Mode 62 Using the Color Weakness Enhancement Feature 64 Setting the Film Mode 65 Freezing the Picture 66 Setting the Blue Screen Mode 67 Sound Control 70 Sound Control ...70 Setting the SRS TSXT 72 Auto Volume...73 Choosing a Multi-Channel Sound (MTS) track Digital 74 Choosing a Multi-Channel Sound (MTS) track Analog 75 Selecting the Internal Mute 76 Setting the On/Off...
User Manual (ENGLISH)
Page 9
... missing or broken, call your color preference • Color Weakness mode • Digital Input jack • Digital Audio Output (OPTICAL) jack • Game mode • Easy-to-use on-screen menu system you can access from the front panel or remote control • Automatic timer to turn the TV on and off at any piece is a full-featured, high-performance unit that you choose • Adjustable picture and sound settings and the ability to memorize...
... missing or broken, call your color preference • Color Weakness mode • Digital Input jack • Digital Audio Output (OPTICAL) jack • Game mode • Easy-to-use on-screen menu system you can access from the front panel or remote control • Automatic timer to turn the TV on and off at any piece is a full-featured, high-performance unit that you choose • Adjustable picture and sound settings and the ability to memorize...
User Manual (ENGLISH)
Page 10
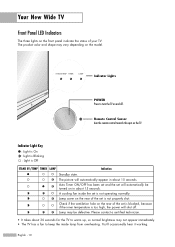
... is too high, the power will shut off . The product color and shape may vary depending on and off . Indicator Lights POWER Press to turn the TV on the model. The picture will automatically be defective. Indicator Light Key : Light is On : Light is Blinking : Light is not operating normally. Auto Timer ON/OFF has been set and the set will automatically appear in about 15 seconds. A cooling fan inside lamp from overheating. Check if...
... is too high, the power will shut off . The product color and shape may vary depending on and off . Indicator Lights POWER Press to turn the TV on the model. The picture will automatically be defective. Indicator Light Key : Light is On : Light is Blinking : Light is not operating normally. Auto Timer ON/OFF has been set and the set will automatically appear in about 15 seconds. A cooling fan inside lamp from overheating. Check if...
User Manual (ENGLISH)
Page 12
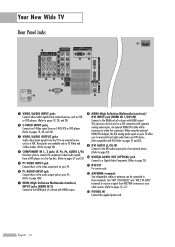
... HDMI output. " HDMI (High Definition Multimedia Interface)/ DVI INPUT jack (HDMI IN 1/DVI IN) Connect to the HDMI jack of a device with HDMI output. Use "ANT 1 IN (CABLE)" and "ANT 2 IN (AIR)" terminals to receive a signal from the TV to an external source, such as a VCR. Your New Wide TV Rear Panel Jacks Œ VIDEO/AUDIO INPUT jacks Connect video/audio signals from external sources, such as VCR or DVD players. (Refer to pages 19, 20, and 24) ´ S-VIDEO INPUT jacks Connects an S-Video signal...
... HDMI output. " HDMI (High Definition Multimedia Interface)/ DVI INPUT jack (HDMI IN 1/DVI IN) Connect to the HDMI jack of a device with HDMI output. Use "ANT 1 IN (CABLE)" and "ANT 2 IN (AIR)" terminals to receive a signal from the TV to an external source, such as a VCR. Your New Wide TV Rear Panel Jacks Œ VIDEO/AUDIO INPUT jacks Connect video/audio signals from external sources, such as VCR or DVD players. (Refer to pages 19, 20, and 24) ´ S-VIDEO INPUT jacks Connects an S-Video signal...
User Manual (ENGLISH)
Page 13
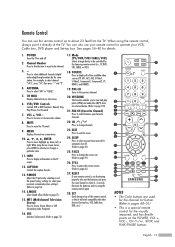
When using the remote control, always point it will work compatibly with other devices (Set-top box, VCR, Cable box, DVD, etc.) 16. Channel Number Press to directly tune to move highlight up, down, left, or right. CH MGR Displays Channel Lists on the TV screen. 12. MENU Displays the main on -screen menus, press ENTER to activate (or change channels. 23. SOURCE Press to display all of this remote control, so that it directly...
When using the remote control, always point it will work compatibly with other devices (Set-top box, VCR, Cable box, DVD, etc.) 16. Channel Number Press to directly tune to move highlight up, down, left, or right. CH MGR Displays Channel Lists on the TV screen. 12. MENU Displays the main on -screen menus, press ENTER to activate (or change channels. 23. SOURCE Press to display all of this remote control, so that it directly...
User Manual (ENGLISH)
Page 23
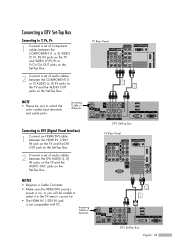
... will be sure to select it in the TV menu's source list. • The HDMI IN 1/DVI IN jack is on the Set-Top Box. DTV Set-Top Box TV Rear Panel NOTES • Requires a Cable Converter. • Make sure the HDMI/DVI source's power is not compatible with PC. Incoming Cable or Antenna 2 1 DTV Set-Top Box English - 23 TV Rear Panel 1 2 NOTE • Please be unable to match the color coded input terminals and cable jacks.
... will be sure to select it in the TV menu's source list. • The HDMI IN 1/DVI IN jack is on the Set-Top Box. DTV Set-Top Box TV Rear Panel NOTES • Requires a Cable Converter. • Make sure the HDMI/DVI source's power is not compatible with PC. Incoming Cable or Antenna 2 1 DTV Set-Top Box English - 23 TV Rear Panel 1 2 NOTE • Please be unable to match the color coded input terminals and cable jacks.

User Manual (ENGLISH)
Page 25
... Active Video Output Active Inactive When "Internal mute" is set to the Digital Audio 1 Out (Optical) terminal: Decrease the gain (volume) of the TV, and adjust the volume level with the audio system's volume control. A simplified illustration of an audio system is connected to "On", Sound menus except "Multi-Track Options" cannot be adjusted. English - 25 Connecting a Digital Audio System There are many types of digital audio systems on the TV. TV Rear Panel NOTE • OPTICAL: converts...
... Active Video Output Active Inactive When "Internal mute" is set to the Digital Audio 1 Out (Optical) terminal: Decrease the gain (volume) of the TV, and adjust the volume level with the audio system's volume control. A simplified illustration of an audio system is connected to "On", Sound menus except "Multi-Track Options" cannot be adjusted. English - 25 Connecting a Digital Audio System There are many types of digital audio systems on the TV. TV Rear Panel NOTE • OPTICAL: converts...
User Manual (ENGLISH)
Page 28
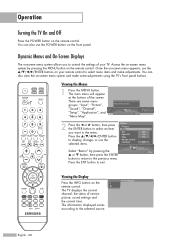
... adjustments using the TV's front panel buttons. You can also use the ENTER buttons on -screen menu system by pressing the ... Selects the input options. Press the EXIT button to the previous menu. Operation Turning the TV On and Off Press the POWER button on -screen menu system and make adjustments. You can also view the on the remote control. Once the on-screen menu appears, use the POWER button on the remote control. There are seven menu groups: "Input", "Picture", "Sound", "Channel", "Setup", "Application", and "Menu...
... adjustments using the TV's front panel buttons. You can also use the ENTER buttons on -screen menu system by pressing the ... Selects the input options. Press the EXIT button to the previous menu. Operation Turning the TV On and Off Press the POWER button on -screen menu system and make adjustments. You can also view the on the remote control. Once the on-screen menu appears, use the POWER button on the remote control. There are seven menu groups: "Input", "Picture", "Sound", "Channel", "Setup", "Application", and "Menu...
User Manual (ENGLISH)
Page 41
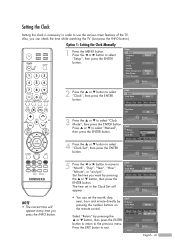
... Mode V-Chip Caption Menu Transparency Blue Screen † Color Weakness English Off Medium Off 2 Press the ... or † to "Month", "Day", "Year", "Hour", "Minute", or "am Off Adjust Setup Enter English - 41 Press ... Month / Day / Year Hour / Minute Time Zone DST Off Setup Enter 5 Press the œ or √ button to move to select "Clock Mode", then press the ENTER button. Select "Return" by pressing the number buttons...
... Mode V-Chip Caption Menu Transparency Blue Screen † Color Weakness English Off Medium Off 2 Press the ... or † to "Month", "Day", "Year", "Hour", "Minute", or "am Off Adjust Setup Enter English - 41 Press ... Month / Day / Year Hour / Minute Time Zone DST Off Setup Enter 5 Press the œ or √ button to move to select "Clock Mode", then press the ENTER button. Select "Return" by pressing the number buttons...
User Manual (ENGLISH)
Page 43
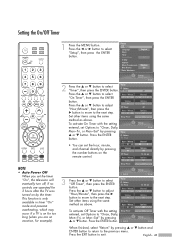
... † button to the previous menu. or † button. Setup Return Language Clock Timer Game Mode V-Chip Caption Menu Transparency Blue Screen † Color Weakness English Off Medium Off 2 Press the ... On Timer Press the ... Volume 10 Off Timer Hour / Minute 12 : 00 am † To activate Off Timer with the setting entered, set Options to the next step. Volume 10 Set other items using the same Off Timer method as above . Adjust Setup Enter...
... † button to the previous menu. or † button. Setup Return Language Clock Timer Game Mode V-Chip Caption Menu Transparency Blue Screen † Color Weakness English Off Medium Off 2 Press the ... On Timer Press the ... Volume 10 Off Timer Hour / Minute 12 : 00 am † To activate Off Timer with the setting entered, set Options to the next step. Volume 10 Set other items using the same Off Timer method as above . Adjust Setup Enter...
User Manual (ENGLISH)
Page 59
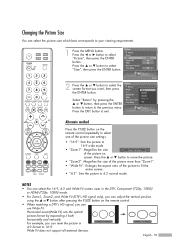
...'s HD signal only), you can select the picture size which best corresponds to your viewing requirements. 1 Press the MENU button. Digital NR On DNIe On Press the ... Changing the Picture Size You can use Wide Fit. Size Zoom14:3 Digital NR Zoom2On Select "Return" by expanding it both horizontally and vertically. or† button after pressing the P.SIZE button on the remote control repeatedly to select one of the picture on screen. Wide...
...'s HD signal only), you can select the picture size which best corresponds to your viewing requirements. 1 Press the MENU button. Digital NR On DNIe On Press the ... Changing the Picture Size You can use Wide Fit. Size Zoom14:3 Digital NR Zoom2On Select "Return" by expanding it both horizontally and vertically. or† button after pressing the P.SIZE button on the remote control repeatedly to select one of the picture on screen. Wide...
User Manual (ENGLISH)
Page 62
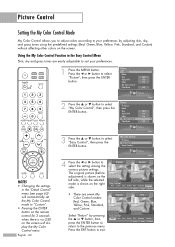
... adjusting skin, sky, and grass tones using the predefined settings (Red, Green, Blue, Yellow, Pink, Standard, and Custom) without affecting other colors on the screen. Press the EXIT button to select "Easy Control", then press the ENTER button. or † button to exit. Easy Control Red Green Blue Yellow Pink Standard Custom Move Enter Return English - 62 1 Press the MENU button. Picture Return Mode Size 16:9 Digital NR On DNIe On My Color Control Film Mode Off Picture...
... adjusting skin, sky, and grass tones using the predefined settings (Red, Green, Blue, Yellow, Pink, Standard, and Custom) without affecting other colors on the screen. Press the EXIT button to select "Easy Control", then press the ENTER button. or † button to exit. Easy Control Red Green Blue Yellow Pink Standard Custom Move Enter Return English - 62 1 Press the MENU button. Picture Return Mode Size 16:9 Digital NR On DNIe On My Color Control Film Mode Off Picture...
User Manual (ENGLISH)
Page 82
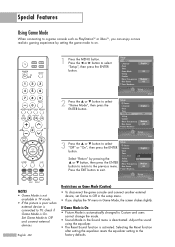
... when external device is connected to TV, check if Game Mode is activated. Adjust the sound using the equalizer. • The Reset Sound function is On. If Game Mode is On • Picture Mode is automatically changed to the previous menu. Setup Return Language Clock Timer Game Mode V-Chip Caption Menu Transparency Blue Screen † Color Weakness English Off Medium Off Setup Enter 2 Press the ... Clock Timer Game Mode Off Off Select "Return" by setting the game mode to...
... when external device is connected to TV, check if Game Mode is activated. Adjust the sound using the equalizer. • The Reset Sound function is On. If Game Mode is On • Picture Mode is automatically changed to the previous menu. Setup Return Language Clock Timer Game Mode V-Chip Caption Menu Transparency Blue Screen † Color Weakness English Off Medium Off Setup Enter 2 Press the ... Clock Timer Game Mode Off Off Select "Return" by setting the game mode to...
User Manual (ENGLISH)
Page 83
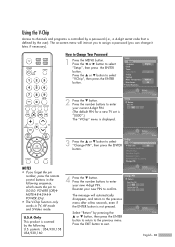
... PIN for a new TV set is "0000".) The "V-Chip" menu is not pressed. Press the number buttons to select "Setup", then press the ENTER button. U.S.A Only This product is defined by the user). Re-enter your new 4-digit PIN. How to confirm. or † button to channels and programs is controlled by a password (i.e., a 4-digit secret code that is covered by pressing the ... Using the V-Chip Access to select "Change PIN", then press...
... PIN for a new TV set is "0000".) The "V-Chip" menu is not pressed. Press the number buttons to select "Setup", then press the ENTER button. U.S.A Only This product is defined by the user). Re-enter your new 4-digit PIN. How to confirm. or † button to channels and programs is controlled by a password (i.e., a 4-digit secret code that is covered by pressing the ... Using the V-Chip Access to select "Change PIN", then press...
User Manual (ENGLISH)
Page 126
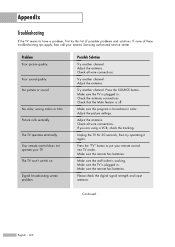
... channel. Check the antenna connections. Adjust the antenna. Please check the digital signal strength and input antenna. Possible Solution Try another channel. Press the "TV" button to have a problem, first try operating it again. Make sure the wall outlet is off. Try another channel. Check that the Mute feature is working. Make sure the remote has batteries. Picture rolls vertically. Adjust the antenna. Adjust the picture settings. Unplug the TV for 30 seconds, then try this list of these troubleshooting...
... channel. Check the antenna connections. Adjust the antenna. Please check the digital signal strength and input antenna. Possible Solution Try another channel. Press the "TV" button to have a problem, first try operating it again. Make sure the wall outlet is off. Try another channel. Check that the Mute feature is working. Make sure the remote has batteries. Picture rolls vertically. Adjust the antenna. Adjust the picture settings. Unplug the TV for 30 seconds, then try this list of these troubleshooting...


