
Open Source Guide (ENGLISH)
Page 1
The original manual has wrong versions of the following notices to carry prominent notices stating that you ; This product uses some software programs which are distributed under the OpenSSL Project. This product uses some software programs which are distributed under the MPL. This ...the software, or if you wish to it , thus forming a work under the Freetype Project. The precise terms and conditions for questions regarding open sources, contact Samsung via Email (vdswmanager@samsung. You may copy and distribute verbatim copies of the Program's source code as to this...
The original manual has wrong versions of the following notices to carry prominent notices stating that you ; This product uses some software programs which are distributed under the OpenSSL Project. This product uses some software programs which are distributed under the MPL. This ...the software, or if you wish to it , thus forming a work under the Freetype Project. The precise terms and conditions for questions regarding open sources, contact Samsung via Email (vdswmanager@samsung. You may copy and distribute verbatim copies of the Program's source code as to this...
User Manual (ENGLISH)
Page 2
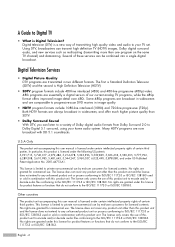
... and offer much higher picture quality than one program on the same TV channel) and datacasting. Other countries The product unit accompanying this product unit. Many HDTV programs are now broadcast with this user manual is High Definition Television (HDTV). • SDTV program formats include...IEC 13818-3. English - 2 U.S.A Only The product unit accompanying this license for licensed contents. No rights are granted under this user manual is limited to private non-commercial use of certain third parties. The license only covers the use . No rights are granted for ...
... and offer much higher picture quality than one program on the same TV channel) and datacasting. Other countries The product unit accompanying this product unit. Many HDTV programs are now broadcast with this user manual is High Definition Television (HDTV). • SDTV program formats include...IEC 13818-3. English - 2 U.S.A Only The product unit accompanying this license for licensed contents. No rights are granted under this user manual is limited to private non-commercial use of certain third parties. The license only covers the use . No rights are granted for ...
User Manual (ENGLISH)
Page 9
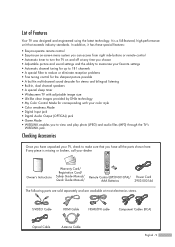
...Guide Manual/ Remote Control (BP59-00107A)/ Power Cord AAA Batteries 3903-000144 The following parts are sold separately and are available at any piece is a full-featured, high-performance unit that you to view and play photo (JPEG) and audio files (MP3) through the TV's WISELINK... multi-channel sound decoder for stereo and bilingual listening • Built-in, dual channel speakers • A special sleep timer • Widescreen TV with adjustable image size • Life-like clear images provided by DNle technology • My Color Control Mode for corresponding with your color style...
...Guide Manual/ Remote Control (BP59-00107A)/ Power Cord AAA Batteries 3903-000144 The following parts are sold separately and are available at any piece is a full-featured, high-performance unit that you to view and play photo (JPEG) and audio files (MP3) through the TV's WISELINK... multi-channel sound decoder for stereo and bilingual listening • Built-in, dual channel speakers • A special sleep timer • Widescreen TV with adjustable image size • Life-like clear images provided by DNle technology • My Color Control Mode for corresponding with your color style...
User Manual (ENGLISH)
Page 23
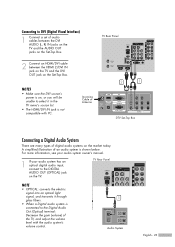
...level with PC. For more information, see your audio system owner's manual. 1 If your audio system has an optical digital audio input, connect to select it through glass fibers. • When a Digital audio system is shown below. TV Rear Panel 2 Connect an HDMI/DVI cable between the DVI AUDIO (L, ...R) IN jacks on the TV and the AUDIO OUT jacks on the Set-Top Box. Connecting to DVI (Digital Visual Interface) 1 ...
...level with PC. For more information, see your audio system owner's manual. 1 If your audio system has an optical digital audio input, connect to select it through glass fibers. • When a Digital audio system is shown below. TV Rear Panel 2 Connect an HDMI/DVI cable between the DVI AUDIO (L, ...R) IN jacks on the TV and the AUDIO OUT jacks on the Set-Top Box. Connecting to DVI (Digital Visual Interface) 1 ...
User Manual (ENGLISH)
Page 27
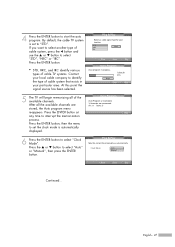
.... Press the ENTER button at Skip any time to "STD". Plug & Play Sets the current time manually or automatically. Stop Cable 26 37% Enter Skip 5 The TV will begin memorizing all the available channels are Auto Program Auto Program is automatically displayed. 6 Press the ...want to start the auto program. Press the ENTER button. • STD, HRC, and IRC identify various types of cable TV systems. Contact your location. Clock Mode Auto Manual Move Enter Skip Continued... or † button to select "STD", "HRC" or "IRC". or † button to ...
.... Press the ENTER button at Skip any time to "STD". Plug & Play Sets the current time manually or automatically. Stop Cable 26 37% Enter Skip 5 The TV will begin memorizing all the available channels are Auto Program Auto Program is automatically displayed. 6 Press the ...want to start the auto program. Press the ENTER button. • STD, HRC, and IRC identify various types of cable TV systems. Contact your location. Clock Mode Auto Manual Move Enter Skip Continued... or † button to select "STD", "HRC" or "IRC". or † button to ...
User Manual (ENGLISH)
Page 28
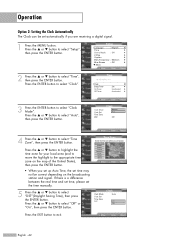
... ENTER button. Newfoundland Atlantic Eastern Central Mountain Pacific Alaska Hawaii Move Enter Skip • When you set up Auto Time, the set the time manually. 9 The message "Enjoy your watching." Year ---am /pm". i Enjoy your watching. Press the ... If there is a difference between the...the ... Plug & Play Enter the current date and time. or † button to daylight saving time. OK Option 2: Setting the Clock Manually If you have finished, press the ENTER button. is displayed. Plug & Play Select the time zone where you want by pressing the number...
... ENTER button. Newfoundland Atlantic Eastern Central Mountain Pacific Alaska Hawaii Move Enter Skip • When you set up Auto Time, the set the time manually. 9 The message "Enjoy your watching." Year ---am /pm". i Enjoy your watching. Press the ... If there is a difference between the...the ... Plug & Play Enter the current date and time. or † button to daylight saving time. OK Option 2: Setting the Clock Manually If you have finished, press the ENTER button. is displayed. Plug & Play Select the time zone where you want by pressing the number...
User Manual (ENGLISH)
Page 31
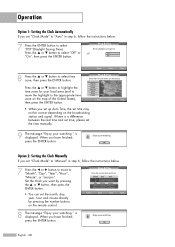
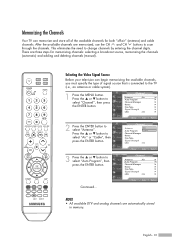
...On √ Move Enter Return Continued... English - 31 or † button to scan through the channels. Memorizing the Channels Your TV can begin memorizing the available channels, you must specify the type of the available channels for memorizing channels: selecting a broadcast source, ...memorizing the channels (automatic) and adding and deleting channels (manual). Press the ... NOTE • All available DTV and analog channels are three steps for both "off-air" (antenna) and...
...On √ Move Enter Return Continued... English - 31 or † button to scan through the channels. Memorizing the Channels Your TV can begin memorizing the available channels, you must specify the type of the available channels for memorizing channels: selecting a broadcast source, ...memorizing the channels (automatic) and adding and deleting channels (manual). Press the ... NOTE • All available DTV and analog channels are three steps for both "off-air" (antenna) and...
User Manual (ENGLISH)
Page 34
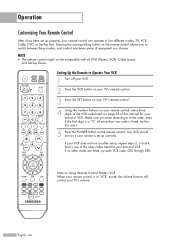
Note on page 38 of this manual for your brand of the other codes are listed, try one .) 5 Press the POWER button on...operate in "VCR" mode, the volume buttons still control your VCR does not turn on the remote control. If your TV's volume. Operation Customizing Your Remote Control After it has been set up correctly. Make sure you enter three digits of the... code, even if the first digit is a "0". (If more than one code is in five different modes: TV, VCR, Cable, DVD, or Set-Top Box. Your VCR should turn on after set-up, repeat steps 2, 3 and 4, but ...
Note on page 38 of this manual for your brand of the other codes are listed, try one .) 5 Press the POWER button on...operate in "VCR" mode, the volume buttons still control your VCR does not turn on the remote control. If your TV's volume. Operation Customizing Your Remote Control After it has been set up correctly. Make sure you enter three digits of the... code, even if the first digit is a "0". (If more than one code is in five different modes: TV, VCR, Cable, DVD, or Set-Top Box. Your VCR should turn on after set-up, repeat steps 2, 3 and 4, but ...
User Manual (ENGLISH)
Page 35
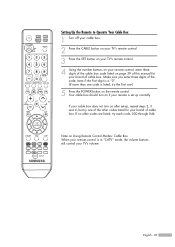
...Using Remote Control Modes: Cable Box When your remote control is in "CATV" mode, the volume buttons still control your TV's volume. English - 35 If no other codes listed for your brand of cable box. Make sure you enter three digits... Operate Your Cable Box 1 Turn off your cable box. 2 Press the CABLE button on your TV's remote control. 3 Press the SET button on your TV's remote control. 4 Using the number buttons on your remote control, enter three digits of the cable...other codes are listed, try one .) 5 Press the POWER button on page 39 of this manual for your brand of cable box.
...Using Remote Control Modes: Cable Box When your remote control is in "CATV" mode, the volume buttons still control your TV's volume. English - 35 If no other codes listed for your brand of cable box. Make sure you enter three digits... Operate Your Cable Box 1 Turn off your cable box. 2 Press the CABLE button on your TV's remote control. 3 Press the SET button on your TV's remote control. 4 Using the number buttons on your remote control, enter three digits of the cable...other codes are listed, try one .) 5 Press the POWER button on page 39 of this manual for your brand of cable box.
User Manual (ENGLISH)
Page 36
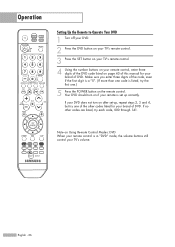
...: DVD When your remote control is set up correctly. Note on the remote control. If your DVD does not turn on page 40 of this manual for your brand of DVD. If no other codes listed for your brand of DVD. English - 36 Your DVD should turn on after set-up... through 141. Operation Setting Up the Remote to Operate Your DVD 1 Turn off your DVD. 2 Press the DVD button on your TV's remote control. 3 Press the SET button on your TV's remote control. 4 Using the number buttons on your remote control, enter three digits of the DVD code listed on if your...
...: DVD When your remote control is set up correctly. Note on the remote control. If your DVD does not turn on page 40 of this manual for your brand of DVD. If no other codes listed for your brand of DVD. English - 36 Your DVD should turn on after set-up... through 141. Operation Setting Up the Remote to Operate Your DVD 1 Turn off your DVD. 2 Press the DVD button on your TV's remote control. 3 Press the SET button on your TV's remote control. 4 Using the number buttons on your remote control, enter three digits of the DVD code listed on if your...
User Manual (ENGLISH)
Page 37
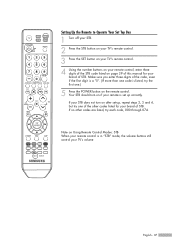
... control. 3 Press the SET button on your TV's remote control. 4 Using the number buttons on your remote control, enter three digits of the STB code listed on page 39 of this manual for your brand of STB. Make sure you enter three digits of the other codes are listed, try the first... one code is listed, try each code, 000 through 074. If your TV's volume English - 37 Your STB should turn on if...
... control. 3 Press the SET button on your TV's remote control. 4 Using the number buttons on your remote control, enter three digits of the STB code listed on page 39 of this manual for your brand of STB. Make sure you enter three digits of the other codes are listed, try the first... one code is listed, try each code, 000 through 074. If your TV's volume English - 37 Your STB should turn on if...
User Manual (ENGLISH)
Page 41
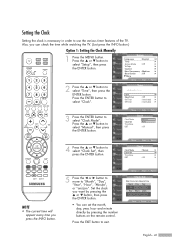
...; More Move Enter Return 2 Press the ... or † button to select "Setup", then press the ENTER button. or † button to select "Manual", then press the ENTER button. Set the clock you can set the month, day, year, hour and minute directly by pressing the ... Press the ... ... ENTER button. or † button, then press the ENTER button. • You can check the time while watching the TV. (Just press the INFO button.) Option 1: Setting the Clock Manually 1 Press the MENU button. Month ▲ -- ▼ Hour Day -Minute Year ---am /pm". Press the ENTER ...
...; More Move Enter Return 2 Press the ... or † button to select "Setup", then press the ENTER button. or † button to select "Manual", then press the ENTER button. Set the clock you can set the month, day, year, hour and minute directly by pressing the ... Press the ... ... ENTER button. or † button, then press the ENTER button. • You can check the time while watching the TV. (Just press the INFO button.) Option 1: Setting the Clock Manually 1 Press the MENU button. Month ▲ -- ▼ Hour Day -Minute Year ---am /pm". Press the ENTER ...
User Manual (ENGLISH)
Page 42
... if you are located. Time Zone Select the time zone where you set up Auto Time, the set time may not be set the time manually. 5 Press the ... or † button to select "Time Zone", then press the ENTER button. or † button to select "Time", then press the ENTER ...the ... Press the ... or † button to select "Clock Mode". or † button to select "Auto", then press the ENTER button. Move Enter Return English - 42 Press the ... or † button to select "Off" or "On", then press the ENTER button. or † button to the appropriate time zone on the...
... if you are located. Time Zone Select the time zone where you set up Auto Time, the set time may not be set the time manually. 5 Press the ... or † button to select "Time Zone", then press the ENTER button. or † button to select "Time", then press the ENTER ...the ... Press the ... or † button to select "Clock Mode". or † button to select "Auto", then press the ENTER button. Move Enter Return English - 42 Press the ... or † button to select "Off" or "On", then press the ENTER button. or † button to the appropriate time zone on the...
User Manual (ENGLISH)
Page 55
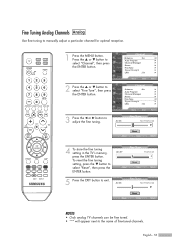
Fine Tuning Analog Channels Analog Use fine tuning to select "Fine Tune", then press the ENTER button. or † button to manually adjust a particular channel for optimal reception. 1 Press the MENU button. To reset the fine tuning setting, press the † button to select "...button to adjust the fine tuning. Air 26 Fine Tune Not Fine Tuned 0 Adjust Reset Save Return 4 To store the fine tuning setting in the TV's memory, press the ENTER button. Channel Antenna : Air Auto Program Channel Manager Name Fine Tune Signal Strength LNA : On Move Enter Return 3 Press...
Fine Tuning Analog Channels Analog Use fine tuning to select "Fine Tune", then press the ENTER button. or † button to manually adjust a particular channel for optimal reception. 1 Press the MENU button. To reset the fine tuning setting, press the † button to select "...button to adjust the fine tuning. Air 26 Fine Tune Not Fine Tuned 0 Adjust Reset Save Return 4 To store the fine tuning setting in the TV's memory, press the ENTER button. Channel Antenna : Air Auto Program Channel Manager Name Fine Tune Signal Strength LNA : On Move Enter Return 3 Press...


