

Open Source Guide (ENGLISH)
Page 1
...used to control compilation and installation of this License and any third party, for a charge no warranty (or else, saying that you changed the files and the date of any other Free Software Foundation software is covered by others will be guided by the Free Software Foundation. For an executable work...NOT LIMITED TO, THE IMPLIED WARRANTIES OF MERCHANTABILITY AND FITNESS FOR A PARTICULAR PURPOSE. SHOULD THE PROGRAM PROVE DEFECTIVE, YOU ASSUME THE COST OF ALL NECESSARY SERVICING, REPAIR OR CORRECTION. 12. By contrast, the GNU General Public License is intended to guarantee your ...
...used to control compilation and installation of this License and any third party, for a charge no warranty (or else, saying that you changed the files and the date of any other Free Software Foundation software is covered by others will be guided by the Free Software Foundation. For an executable work...NOT LIMITED TO, THE IMPLIED WARRANTIES OF MERCHANTABILITY AND FITNESS FOR A PARTICULAR PURPOSE. SHOULD THE PROGRAM PROVE DEFECTIVE, YOU ASSUME THE COST OF ALL NECESSARY SERVICING, REPAIR OR CORRECTION. 12. By contrast, the GNU General Public License is intended to guarantee your ...

Open Source Guide (ENGLISH)
Page 2
...LOSSES SUSTAINED BY YOU OR THIRD PARTIES OR A FAILURE OF THE LIBRARY TO OPERATE WITH ANY OTHER SOFTWARE), EVEN IF SUCH HOLDER OR OTHER PARTY HAS BEEN ADVISED OF THE POSSIBILITY OF SUCH DAMAGES. You can redistribute and change. How to Apply These Terms to Your New Libraries If you develop a ...new library, and you want it to be of the greatest possible use to the public, we recommend making it free software that everyone can do so by permitting redistribution under...
...LOSSES SUSTAINED BY YOU OR THIRD PARTIES OR A FAILURE OF THE LIBRARY TO OPERATE WITH ANY OTHER SOFTWARE), EVEN IF SUCH HOLDER OR OTHER PARTY HAS BEEN ADVISED OF THE POSSIBILITY OF SUCH DAMAGES. You can redistribute and change. How to Apply These Terms to Your New Libraries If you develop a ...new library, and you want it to be of the greatest possible use to the public, we recommend making it free software that everyone can do so by permitting redistribution under...
Quick Guide (ENGLISH)
Page 1
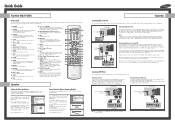
... Return Input Picture Sound Channel Setup Channel Antenna : Ainrt.1 Air/CATV : SATiDr Auto Program HRC Add/Delete IRC Favorite Channels Name Fine Tune M More Move Enter Return Storing Channels in the PIP window only.) 26. Press the MENU button. Press the ... One output of signal source that is currently displayed on the TV screen. 16. When you use the remote control up of this remote control, so that you want to record one of audio cables...
... Return Input Picture Sound Channel Setup Channel Antenna : Ainrt.1 Air/CATV : SATiDr Auto Program HRC Add/Delete IRC Favorite Channels Name Fine Tune M More Move Enter Return Storing Channels in the PIP window only.) 26. Press the MENU button. Press the ... One output of signal source that is currently displayed on the TV screen. 16. When you use the remote control up of this remote control, so that you want to record one of audio cables...
Quick Guide (ENGLISH)
Page 2
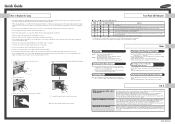
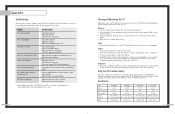
... specific chargeable channels. Front Panel LED Indicators : Light is On, : Light is Blinking, : Light is not properly shut. Lamp cover on rear of the screen. Use cable converter for 30 minutes after waiting 1 minute. • The cooling fan will not function if the lamp cover is not securely attached. Adjust the volume from reflection. Channels will not make a sound. Q & A White spot appears on the center of the screen. When power is turned off your monitor is shone on exterior screen...
... specific chargeable channels. Front Panel LED Indicators : Light is On, : Light is Blinking, : Light is not properly shut. Lamp cover on rear of the screen. Use cable converter for 30 minutes after waiting 1 minute. • The cooling fan will not function if the lamp cover is not securely attached. Adjust the volume from reflection. Channels will not make a sound. Q & A White spot appears on the center of the screen. When power is turned off your monitor is shone on exterior screen...
User Manual (ENGLISH)
Page 2
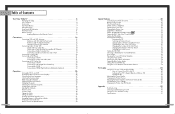
... 65 Auto Volume ...66 Enjoying the Sound of External Speakers 67 Using the V-Chip (USA 68 Viewing Closed Caption Information 74 Setting the Blue Screen Mode 76 Setting The On/Off Melody 77 Using the Color Weakness Enhancement Feature 78 PC Display...80 Using Your TV as a Computer (PC) Display 80 How to Connect Your PC to the TV 80 Setting up Your PC Software (Based on Widows 98 81 Display Modes 82 Adjusting the Picture Quality 83 Changing the Picture...
... 65 Auto Volume ...66 Enjoying the Sound of External Speakers 67 Using the V-Chip (USA 68 Viewing Closed Caption Information 74 Setting the Blue Screen Mode 76 Setting The On/Off Melody 77 Using the Color Weakness Enhancement Feature 78 PC Display...80 Using Your TV as a Computer (PC) Display 80 How to Connect Your PC to the TV 80 Setting up Your PC Software (Based on Widows 98 81 Display Modes 82 Adjusting the Picture Quality 83 Changing the Picture...
User Manual (ENGLISH)
Page 5
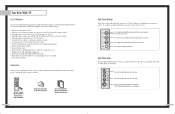
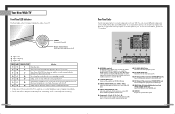
...(or change channels and move between viewing TV programs and signals from a camcorder or video game. Connect the video signal from a camcorder or video game. (S-Video 3 jack and Audio L/R input 3 are used only occasionally (a camcorder or video game, for corresponding with adjustable image size • Life-like clear images provided by DNle technology • MCC (My Color Control) Mode for example). Remote Control (BP59-00048B)/ AAA Batteries (4301-000103) 8 Warranty Cards (2)/ Registration Card (1) Instruction Manual/ Safety Guide Manual/ Quick Guide Manual Side Panel Buttons The...
...(or change channels and move between viewing TV programs and signals from a camcorder or video game. Connect the video signal from a camcorder or video game. (S-Video 3 jack and Audio L/R input 3 are used only occasionally (a camcorder or video game, for corresponding with adjustable image size • Life-like clear images provided by DNle technology • MCC (My Color Control) Mode for example). Remote Control (BP59-00048B)/ AAA Batteries (4301-000103) 8 Warranty Cards (2)/ Registration Card (1) Instruction Manual/ Safety Guide Manual/ Quick Guide Manual Side Panel Buttons The...
User Manual (ENGLISH)
Page 6
.... The PIP channel can be defective. Use the "ANT 1 OUT" terminal to send the signal being received by the "ANT 1 IN" terminal out to the video output jack on the rear of the set is Off TIMER LAMP STAND BY/TEMP Indication Standby state. POWER Press to an external source, such as a Cable Set-Top Box). A cooling fan inside lamp from the TV to turn the TV on the TV. : Light is On : Light is Blinking : Light is not operating normally. Please...
.... The PIP channel can be defective. Use the "ANT 1 OUT" terminal to send the signal being received by the "ANT 1 IN" terminal out to the video output jack on the rear of the set is Off TIMER LAMP STAND BY/TEMP Indication Standby state. POWER Press to an external source, such as a Cable Set-Top Box). A cooling fan inside lamp from the TV to turn the TV on the TV. : Light is On : Light is Blinking : Light is not operating normally. Please...
User Manual (ENGLISH)
Page 7
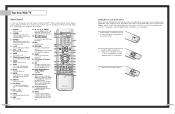
... (Secondary Audio Program). 19. TV/VIDEO Press to be replaced. ADD/DEL Press to display information on the main screen with the diagram inside the compartment. 3 Slide the cover back into place. 13 PIP (Picture In Picture) Activates PIP. 23. RESET If your personal, customized sound settings.) 3. Make sure to open the battery compartment of the preset factory settings (or select your remote control is currently displayed on the TV screen. 16. MENU Displays the main...
... (Secondary Audio Program). 19. TV/VIDEO Press to be replaced. ADD/DEL Press to display information on the main screen with the diagram inside the compartment. 3 Slide the cover back into place. 13 PIP (Picture In Picture) Activates PIP. 23. RESET If your personal, customized sound settings.) 3. Make sure to open the battery compartment of the preset factory settings (or select your remote control is currently displayed on the TV screen. 16. MENU Displays the main...

User Manual (ENGLISH)
Page 11
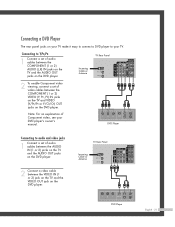
... DVD player. TV Rear Panel Incoming Cable or Antenna DVD Player 21 You can use your TV. TV Rear Panel Incoming Cable or Antenna 2 To enable Component video viewing, connect a set of video cables between the VIDEO IN (1 or 2) jack on the TV and the VIDEO OUT jack on the DVD player. Connections Connecting a Camcorder The side panel jacks on the camcorder. Camcorder Output Jacks TV Side Panel Camcorder 20 Connecting a DVD Player The rear panel jacks on the camcorder. DVD Player Connecting to Y,PB,PR 1 Connect a set of audio cables between the VIDEO IN (or S-VIDEO...
... DVD player. TV Rear Panel Incoming Cable or Antenna DVD Player 21 You can use your TV. TV Rear Panel Incoming Cable or Antenna 2 To enable Component video viewing, connect a set of video cables between the VIDEO IN (1 or 2) jack on the TV and the VIDEO OUT jack on the DVD player. Connections Connecting a Camcorder The side panel jacks on the camcorder. Camcorder Output Jacks TV Side Panel Camcorder 20 Connecting a DVD Player The rear panel jacks on the camcorder. DVD Player Connecting to Y,PB,PR 1 Connect a set of audio cables between the VIDEO IN (or S-VIDEO...

User Manual (ENGLISH)
Page 14
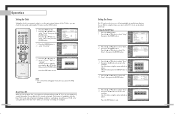
... adjustments using the TV's side panel buttons. Press the EXIT button to exit. You can also view the on the remote control. Viewing the Menus 1 Press the MENU button. Press the œ, √ or ENTER button to display, change, or use the POWER button on -screen menus: English, Spanish or French. 1 Press the MENU button. Air 12 Signal V-Chip Picture Sound SRS TSXT MTS - - : - - Input Picture Sound Channel Setup Setup Language : English √ Time √ V-Chip √ Caption √ Blue Screen : Off √ Melody : On √ Color...
... adjustments using the TV's side panel buttons. Press the EXIT button to exit. You can also view the on the remote control. Viewing the Menus 1 Press the MENU button. Press the œ, √ or ENTER button to display, change, or use the POWER button on -screen menus: English, Spanish or French. 1 Press the MENU button. Air 12 Signal V-Chip Picture Sound SRS TSXT MTS - - : - - Input Picture Sound Channel Setup Setup Language : English √ Time √ V-Chip √ Caption √ Blue Screen : Off √ Melody : On √ Color...

User Manual (ENGLISH)
Page 18
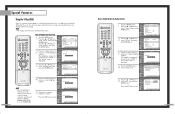
... previously adjusted picture settings will be reset to select "Reset", then press the ENTER button. Input Picture Sound Channel Setup Mode Mode : Standard √ Contrast 90 Brightness 50 Sharpness 50 Color 50 Tint 50 50 Reset Move Enter Return 34 Using Automatic Picture Settings Your TV has automatic picture settings ("Dynamic", "Standard" and "Cinema") that are preset at the factory. Standard • Choose "Dynamic" for the standard factory settings. • Choose "Cinema" when viewing a movie. 35 Operation Picture Control...
... previously adjusted picture settings will be reset to select "Reset", then press the ENTER button. Input Picture Sound Channel Setup Mode Mode : Standard √ Contrast 90 Brightness 50 Sharpness 50 Color 50 Tint 50 50 Reset Move Enter Return 34 Using Automatic Picture Settings Your TV has automatic picture settings ("Dynamic", "Standard" and "Cinema") that are preset at the factory. Standard • Choose "Dynamic" for the standard factory settings. • Choose "Cinema" when viewing a movie. 35 Operation Picture Control...
User Manual (ENGLISH)
Page 20
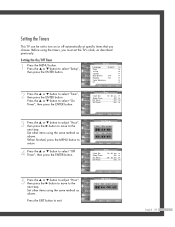
... not operate any controls during the 3 hours after the TV is turned on or off automatically at specific times that you choose. Setting the On/Off Timer 1 Press the MENU button. or † button to select "On Timer", then press the ENTER button. Set other items using the same method as described previously. or † button to adjust "Hour", then press the √ button to move to the next step. Input Picture Sound Channel Setup...
... not operate any controls during the 3 hours after the TV is turned on or off automatically at specific times that you choose. Setting the On/Off Timer 1 Press the MENU button. or † button to select "On Timer", then press the ENTER button. Set other items using the same method as described previously. or † button to adjust "Hour", then press the √ button to move to the next step. Input Picture Sound Channel Setup...

User Manual (ENGLISH)
Page 28
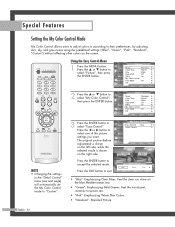
... ENTER button. Using the Easy Control Menu 1 Press the MENU button. There are three MCC colors: "Skin Tone", "Green Grass" and "Blue Sky". Original Adjusted ▲ Skin Tone ▼ Move Detail Control Adjust 50 Return Resetting the MCC Colors to the Factory Defaults You can return to the factory default settings for MCC colors. 4 Press the MENU button to select "Picture", then press the ENTER button. or † button to display the "Detail Control" menu. Input Picture Sound Channel Setup Picture Mode Color Tone Size Digital...
... ENTER button. Using the Easy Control Menu 1 Press the MENU button. There are three MCC colors: "Skin Tone", "Green Grass" and "Blue Sky". Original Adjusted ▲ Skin Tone ▼ Move Detail Control Adjust 50 Return Resetting the MCC Colors to the Factory Defaults You can return to the factory default settings for MCC colors. 4 Press the MENU button to select "Picture", then press the ENTER button. or † button to display the "Detail Control" menu. Input Picture Sound Channel Setup Picture Mode Color Tone Size Digital...
User Manual (ENGLISH)
Page 35
... 4-digit pin number. or † button to Change Your Password 1 Press the MENU button. Input Picture Sound Channel Setup Setup Language : English √ Time √ V-Chip √ Caption √ Blue Screen : Off √ Melody : On √ Color Weakness √ PC √ Move Enter Return 2 Press the ... The on-screen menu will instruct you to assign a password (and you forget the pin number, press the remote control buttons in the following sequence, which resets the pin to 0-0-0-0: POWER (Off), MUTE, 8, 2, 4, POWER...
... 4-digit pin number. or † button to Change Your Password 1 Press the MENU button. Input Picture Sound Channel Setup Setup Language : English √ Time √ V-Chip √ Caption √ Blue Screen : Off √ Melody : On √ Color Weakness √ PC √ Move Enter Return 2 Press the ... The on-screen menu will instruct you to assign a password (and you forget the pin number, press the remote control buttons in the following sequence, which resets the pin to 0-0-0-0: POWER (Off), MUTE, 8, 2, 4, POWER...

User Manual (ENGLISH)
Page 42
... remove or reduce picture noise. or † button to the DVI jack. Input Picture Sound Channel Setup Setup Language : English √ Time √ V-Chip √ Caption √ Blue Screen : Off √ Melody : On √ Color Weakness √ PC √ Move Enter Return 4 Press the ... or † button to exit. ▲ Fine 0 ▼ NOTE • This feature may change the width of screen. 1 Press the TV/VIDEO button to select "PC". 2 Press the MENU button. PC Display Display Modes Mode...
... remove or reduce picture noise. or † button to the DVI jack. Input Picture Sound Channel Setup Setup Language : English √ Time √ V-Chip √ Caption √ Blue Screen : Off √ Melody : On √ Color Weakness √ PC √ Move Enter Return 4 Press the ... or † button to exit. ▲ Fine 0 ▼ NOTE • This feature may change the width of screen. 1 Press the TV/VIDEO button to select "PC". 2 Press the MENU button. PC Display Display Modes Mode...
User Manual (ENGLISH)
Page 46
... an optical system. Adjust the picture settings. Unplug the TV for the DLP Projection TV is working. Make sure the remote has batteries. • The display panel used for 30 seconds, then try this list of service. Liquids that may occasionally appear on a soft surface, such as vacuum cleaners. • Keep the ventilation openings clear; The TV operates erratically. Press the TV/VIDEO button. Adjust the antenna. Using Your TV in color. No picture or sound. Try another channel...
... an optical system. Adjust the picture settings. Unplug the TV for the DLP Projection TV is working. Make sure the remote has batteries. • The display panel used for 30 seconds, then try this list of service. Liquids that may occasionally appear on a soft surface, such as vacuum cleaners. • Keep the ventilation openings clear; The TV operates erratically. Press the TV/VIDEO button. Adjust the antenna. Using Your TV in color. No picture or sound. Try another channel...
User Manual (ENGLISH)
Page 21
DVD Player Connecting to audio and video jacks 1 Connect a set of audio cables between the VIDEO IN (1 or 2) jack on the TV and the VIDEO OUT jack on the DVD player. TV Rear Panel Incoming Cable or Antenna DVD Player English - 21 Connecting to Y,PB,PR 1 Connect a set of Component video, see your TV. Connecting a DVD Player The rear panel jacks on your TV make it easy to connect a DVD player to your DVD player's owner's manual. Note: For an explanation of video cables between the COMPONENT (1 or 2) VIDEO (Y, PB, PR) IN jacks...
DVD Player Connecting to audio and video jacks 1 Connect a set of audio cables between the VIDEO IN (1 or 2) jack on the TV and the VIDEO OUT jack on the DVD player. TV Rear Panel Incoming Cable or Antenna DVD Player English - 21 Connecting to Y,PB,PR 1 Connect a set of Component video, see your TV. Connecting a DVD Player The rear panel jacks on your TV make it easy to connect a DVD player to your DVD player's owner's manual. Note: For an explanation of video cables between the COMPONENT (1 or 2) VIDEO (Y, PB, PR) IN jacks...
User Manual (ENGLISH)
Page 39
... √ Time √ V-Chip √ Caption √ Blue Screen : Off √ Melody : On √ Color Weakness √ PC √ Move Enter Return 2 Press the ... or † button to adjust "Hour", then press the √ button to move to the next step. or † button to return. Press the ... Input Picture Sound Channel Setup Off Timer Hour ▲ 12 ▼ Min am/pm Activation 00 am Vol. Before using the...
... √ Time √ V-Chip √ Caption √ Blue Screen : Off √ Melody : On √ Color Weakness √ PC √ Move Enter Return 2 Press the ... or † button to adjust "Hour", then press the √ button to move to the next step. or † button to return. Press the ... Input Picture Sound Channel Setup Off Timer Hour ▲ 12 ▼ Min am/pm Activation 00 am Vol. Before using the...
User Manual (ENGLISH)
Page 54
... Clear Blues. Input Picture Sound Channel Setup Picture Mode : Standard √ Color Tone : Warm1 √ Size : Wide √ Digital NR : Off √ DNIe : On √ My Color Control √ Film Mode : Off √ PIP √ Move Enter Return NOTE • Changing the settings in the "Detail Control" menu (see next page) will automatically set the My Color Control mode to "Custom". 3 Press the ENTER button to accept the selected mode. My Color Control Input Easy Control : Blue √ Detail Control √ Picture Sound Channel Setup...
... Clear Blues. Input Picture Sound Channel Setup Picture Mode : Standard √ Color Tone : Warm1 √ Size : Wide √ Digital NR : Off √ DNIe : On √ My Color Control √ Film Mode : Off √ PIP √ Move Enter Return NOTE • Changing the settings in the "Detail Control" menu (see next page) will automatically set the My Color Control mode to "Custom". 3 Press the ENTER button to accept the selected mode. My Color Control Input Easy Control : Blue √ Detail Control √ Picture Sound Channel Setup...
User Manual (ENGLISH)
Page 94
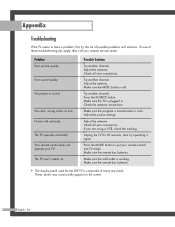
...; The display panel used for 30 seconds, then try this list of these troubleshooting tips apply, then call your nearest service center. Poor sound quality. No color, wrong colors or tints. Your remote control does not operate your TV. Possible Solution Try another channel. If none of possible problems and solutions. The TV won't switch on the screen. Try another channel. Adjust the picture settings. Press the MODE button to have a problem, first try operating it...
...; The display panel used for 30 seconds, then try this list of these troubleshooting tips apply, then call your nearest service center. Poor sound quality. No color, wrong colors or tints. Your remote control does not operate your TV. Possible Solution Try another channel. If none of possible problems and solutions. The TV won't switch on the screen. Try another channel. Adjust the picture settings. Press the MODE button to have a problem, first try operating it...


