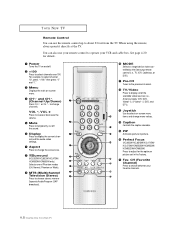
User Manual (user Manual) (ver.1.0) (English)
Page 6
... with Your New TV 1.2 Front Panel Buttons 1.2 Front/Side Panel Jacks 1.3 Using a display deck 1.3 Rear Panel Jacks 1.4 Remote Control 1.5 Chapter 2: Installation 2.1 Connecting VHF and UHF Antennas 2.1 Antennas with 300-ohm Flat Twin Leads 2.1 Antennas with 75-ohm ... (480i, 480p) Player 2.7 Connecting a DTV Set-Top Box (480p, 1080i 2.8 Connecting Surround Speakers (HCL552W/HCL652W/HCL473W/HCM553W/HCM653W only 2.8 Installing Batteries in the Remote Control 2.9 Chapter 3: Operation 3.1 Turning the TV On and Off 3.1 Plug & Play Feature 3.1 Using the Perfect Focus Feature 3.3...
User Manual (user Manual) (ver.1.0) (English)
Page 7
...4.3 Using the R.surf Feature 4.4 Setting the On/Off Timer 4.5 Setting the Sleep Timer 4.6 Dolby Surround (HCL552W/HCL652W/HCL473W/HCM553W/HCM653W only 4.7 Choosing a Multi-Channel Sound (MTS) track 4.8 Auto Volume 4.9 Viewing Closed Captions 4.10 Viewing Picture-in-Picture 4.11... Reset the TV after the V-Chip Blocks a Channel ("Emergency Escape 4.19 Customizing Your Remote Control 4.20 Setting Up Your Remote Control to Operate Your VCR or DVD 4.20 Setting Up Your Remote Control to Operate Your Cable Box 4.21 Chapter 5: Troubleshooting 5.1 Identifying Problems 5.1 Appendix A.1 ...
User Manual (user Manual) (ver.1.0) (English)
Page 8
...HCM653W) Precautions When Moving and Installing the Unit • This Projection Television is a high-performance unit that includes the following special features: • Easy-to-use remote control • Easy-to-use on-screen menu system • Automatic timer to turn the TV on the material of Features Your Samsung... TV was designed with casters at its bottom, so it can be stored in the TV's memory • Automatic channel tuning for up to 181 channels • A special filter to reduce or eliminate reception problems • Fine tuning control for the sharpest...
User Manual (user Manual) (ver.1.0) (English)
Page 9
... the TV is turned on, the Timer indicator blinks about ten times. YOUR NEW TV Familiarizing Yourself with the remote control. w HCL552W HCL652W HCL5515W HCL6515W w HCL4715W w HCL473W HCM5525W HCM553W HCM6525W HCM653W Œ TV/VIDEO Press this button to display a menu of your TV's basic features, including the on-screen menu. To use the...
User Manual (user Manual) (ver.1.0) (English)
Page 12
... the screen size. " Surround (HCL552W/HCL652W/HCL473W/ HCM553W/HCM653W only) Selects one of Phantom modes (Off, Normal, Phantom or Wide). ' MTS (Multichannel Television Stereo) Press to choose stereo, mono or Separate Audio Program (SAP broadcast). ˝ MODE Selects a target device to be controlled by the Samsung remote control (i.e., TV, VCR, Cable box, or DVD). Ô...
User Manual (user Manual) (ver.1.0) (English)
Page 13
...TV Add/Erase Press to memorize (scan) the available channels. Scan Press to add or erase channels in the PIP window. YOUR NEW TV Remote Control (continued) ¯ ANT A/B Press to select the ANT A or ANT B. ˘ R.surf Press to automatically return to a preferred ...factory settings (or select your personal, customized picture settings). ˛ VCR controls Controls VCR tape functions: Rewind, Play, Fast Forward, Stop, Pause. ◊ PIP Controls Source Press to select one of this Samsung remote control, so that is currently displayed on the models HCL5515W/ HCL6515W/HCL4715W/HCM552...
User Manual (user Manual) (ver.1.0) (English)
Page 22
... cover all the way out to open the battery compartment of the batteries with the diagram inside the compartment. 3 Replace the cover. The remote control can be using the remote control for about 23 feet from the TV. (Assuming typical TV usage, the Batteries last for a long time. w 2 Install two AAA ...size batteries. Make sure to match the "+" and "-" ends of the remote control. INSTALLATION Installing Batteries in a cool, dry place if you won't be used up to about one year.) 2.9 CHAPTER TWO: INSTALLATION
User Manual (user Manual) (ver.1.0) (English)
Page 23
... the clock" on page 3.19.) Press Menu to select "Clock". The message "Plug & Play" is displayed. You can also use the POWER button on the remote control. Chapter Three O P E R AT I O N Turning the TV On and Off Press the Power button.
User Manual (user Manual) (ver.1.0) (English)
Page 26
First steps: 1 Press the Menu button. Be sure to enter. 3 The "Manual Convergence" screen will appear, and the word "Red" will be highlighted. continued... 3.4 CHAPTER THREE: TV OPERATION OPERATION Adjusting Manual Convergence If the color appears spread out or "smeared" on the screen, the convergence probably needs alignment. Move the joystick down to select "FUNCTION", then press the joystick to enter. 2 Move the joystick down to select "Convergence", then press the joystick to use the remote control for the convergence adjustments.
User Manual (user Manual) (ver.1.0) (English)
Page 28
... tuned.) 3.6 CHAPTER THREE: TV OPERATION w w The on the screen. OPERATION Viewing the Menus and On-Screen Displays Viewing the Menus 1 With the power on the remote control. You can also use the selected items. Use the joystick ( ) to enter items in the menu (the icons blink when highlighted). The PICTURE menu appears...
User Manual (user Manual) (ver.1.0) (English)
Page 31
... minutes. This takes about one to enter. You can view any time to interrupt the memorization process and return to exit. See steps 1~2 on the remote control. 3.9 CHAPTER THREE: TV OPERATION
User Manual (user Manual) (ver.1.0) (English)
Page 33
... find frequently watched channels. w Note: Only memorized channels can store up /down to select "Fav. Then, when you press the Fav.CH button on the remote control, the TV displays only the favorite channels you previously stored, allowing you erase by moving the joystick up to ten of your favorite channels for...
User Manual (user Manual) (ver.1.0) (English)
Page 37
... settings according to personal preference (see "Customizing the Picture, page 3.14). 3.15 CHAPTER THREE: TV OPERATION Alternate method: Simply press the P.Mode button on the remote control to select the "Standard," "Dynamic," "Mild," or "Custom" picture setting. OPERATION Using Automatic Picture Settings Your TV has two automatic picture settings ("Standard", "Dynamic" and...
User Manual (user Manual) (ver.1.0) (English)
Page 40
Alternate method: Simply press the S.MODE button on the remote control to select one of them by pressing the S.Mode button (or by making a selection from the on-screen menu). Or, you can activate any of ...
User Manual (user Manual) (ver.1.0) (English)
Page 43
... (and their corresponding input jacks): 3.21 CHAPTER THREE: TV OPERATION When you press the TV/Video button, the on the TV. 1 Make sure that the remote control is controlling the TV set. (Press the MODE button and make sure that the "TV" LED is illuminated.) 2 Press the TV/Video button. 3 Move the joystick...
User Manual (user Manual) (ver.1.0) (English)
Page 49
... the Sleep Timer The sleep timer automatically shuts off the TV after a preset time (from 10 to 360 minutes). 1 Press the Sleep button on the remote control. 2 Press Sleep repeatedly until the appropriate time interval appears (any of the preset values from the screen, and the time interval will disappear from "Off...
User Manual (user Manual) (ver.1.0) (English)
Page 50
... are marked with full surround sound from Dolby Laboratories. During "Test Tone," a tone will cycle through both left or right and, depending on the remote control. 2 Move the joystick down , and highlight "Center." Dolby Pro Logic Dolby Pro Logic will vary according to enter. Follow a similar procedure for ...", "Phantom", or "Normal"). After selecting the mode, move the joystick to exit. SPECIAL FEATURES Dolby Surround (HCL552W/HCL652W/HCL473W/HCM553W/HCM653W only) The Dolby Surround Pro Logic option allows you with the following logo: 1 Press the Menu button.
User Manual (user Manual) (ver.1.0) (English)
Page 51
... table applies to only softwares, equipments (DVD, VCR, etc.) or broadcasting signals covering Dolby Surround Output. Choosing a Multi-Channel Sound (MTS) Soundtrack Depending on the remote control. 2 Move the joystick down to select "SOUND", then press the joystick to the Separate Audio Program, which is usually a foreign-language translation. Sometimes SAP has...
User Manual (user Manual) (ver.1.0) (English)
Page 53
... the Menu button to turn closed captioning "on the tape's packaging: . 1 Press the Menu button. These are not malfunctions of the screen. 5 Depending on the remote control: 2 Move the joystick down to select "Mode", then move the joystick to the left or right to exit. w Different channels and fields display different information...
User Manual (user Manual) (ver.1.0) (English)
Page 54
... "On". SPECIAL FEATURES Viewing Picture-in-Picture You can use the PIP feature to access the PIP menu: Simply press the "PIP" button on the remote control. w Quick way to simultaneously watch two video sources. w If you turn TV off while watching and turn it cannot be changed in the PIP mode...