User Manual (ENGLISH)
Page 16
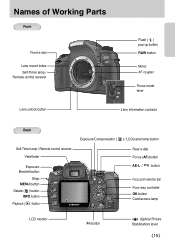
...Parts Front Front e-dial Lens mount index Self-Timer lamp / Remote control receiver Flash ( ) pop-up button RAW button Mirror AF coupler Focus mode lever Lens unlock button Lens information contacts Back Self-Timer lamp / Remote control receiver Viewfinder Exposure Bracket button Strap MENU... button Delete ( ) button INFO button Playback ( ) button Exposure Compensation ( ) / LCD panel lamp button Rear e-dial Focus (AF) button AE-L / button ...
...Parts Front Front e-dial Lens mount index Self-Timer lamp / Remote control receiver Flash ( ) pop-up button RAW button Mirror AF coupler Focus mode lever Lens unlock button Lens information contacts Back Self-Timer lamp / Remote control receiver Viewfinder Exposure Bracket button Strap MENU... button Delete ( ) button INFO button Playback ( ) button Exposure Compensation ( ) / LCD panel lamp button Rear e-dial Focus (AF) button AE-L / button ...
User Manual (ENGLISH)
Page 20
... the subject and get the proper metering. (p.132) ۃAE-L button Locks the exposure before shooting. (p.205) ۄEV ( ) / LCD panel lamp button Holding this button, rotate the front e-dial to compensate the exposure. (p.204) Press this button to turn on the LCD monitor. (p.24) ڼ...
... the subject and get the proper metering. (p.132) ۃAE-L button Locks the exposure before shooting. (p.205) ۄEV ( ) / LCD panel lamp button Holding this button, rotate the front e-dial to compensate the exposure. (p.204) Press this button to turn on the LCD monitor. (p.24) ڼ...
User Manual (ENGLISH)
Page 39
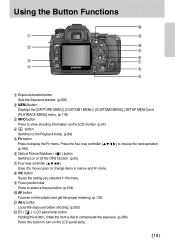
... not turn on formatting. 1. INFORMATION ƃ Do not remove the Memory Card while card access lamp is turned off before use. Also format Memory Cards used with other cameras. Refer to the OPEN direction Card cover opens )ڻ. 2. Using the memory card Inserting / Removing the Memory Card ƈ...; SD / SDHC memory card and Multi Media Card can be used with this camera. ƈ Captured images are recorded on the Memory Card. Have the front of the memory card facing toward the LCD monitor and insert the ...
... not turn on formatting. 1. INFORMATION ƃ Do not remove the Memory Card while card access lamp is turned off before use. Also format Memory Cards used with other cameras. Refer to the OPEN direction Card cover opens )ڻ. 2. Using the memory card Inserting / Removing the Memory Card ƈ...; SD / SDHC memory card and Multi Media Card can be used with this camera. ƈ Captured images are recorded on the Memory Card. Have the front of the memory card facing toward the LCD monitor and insert the ...
User Manual (ENGLISH)
Page 65
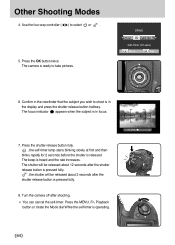
...MENU, Fn, Playback button or rotate the Mode dial Whlie the self-timer is released. Press the shutter release button fully. , the self-timer lamp starts blinking slowly at first and then blinks rapidly for 2 seconds before the shutter is operating. ŝ64Ş Confirm in the viewfinder that...the subject is pressed fully. , the shutter will be released about 2 seconds after shooting. ſ You can cancel the self-timer. Turn the camera off after the shutter release button is in focus. 7. The beep is ready to take pictures. Use the four-way controller (ȜȞ) to shoot...
...MENU, Fn, Playback button or rotate the Mode dial Whlie the self-timer is released. Press the shutter release button fully. , the self-timer lamp starts blinking slowly at first and then blinks rapidly for 2 seconds before the shutter is operating. ŝ64Ş Confirm in the viewfinder that...the subject is pressed fully. , the shutter will be released about 2 seconds after shooting. ſ You can cancel the self-timer. Turn the camera off after the shutter release button is in focus. 7. The beep is ready to take pictures. Use the four-way controller (ȜȞ) to shoot...
User Manual (ENGLISH)
Page 67
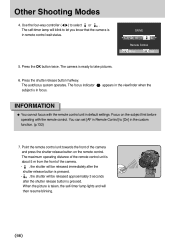
... OK button twice. Press the shutter release button halfway. The maximum operating distance of the remote control unit is about 5 m from the front of the camera and press the shutter release button on the subject first before operating with the remote control unit in focus. The self-timer... blink to select or . appears in Remote Control] to take pictures. 6. When the picture is taken, the self-timer lamp lights and will be released approximately 3 seconds after the shutter release button is pressed. - , the shutter will then resume blinking. ŝ66Ş Focus on ...
... OK button twice. Press the shutter release button halfway. The maximum operating distance of the remote control unit is about 5 m from the front of the camera and press the shutter release button on the subject first before operating with the remote control unit in focus. The self-timer... blink to select or . appears in Remote Control] to take pictures. 6. When the picture is taken, the self-timer lamp lights and will be released approximately 3 seconds after the shutter release button is pressed. - , the shutter will then resume blinking. ŝ66Ş Focus on ...
User Manual (ENGLISH)
Page 78
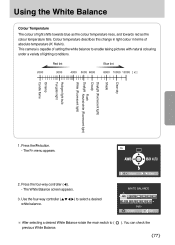
... sky Shade Daylight (Fluorescent light) Cloudy Flash Daylight Neutral white (Fluorescent light) White (Fluorescent light) Halogen light bulb Tungsten light Oil lamp Candle flame 1. The White Balance screen appears. 3. This camera is capable of setting the white balance to ( previous White Balance. ). Colour temperature describes this change in light colour in terms...
... sky Shade Daylight (Fluorescent light) Cloudy Flash Daylight Neutral white (Fluorescent light) White (Fluorescent light) Halogen light bulb Tungsten light Oil lamp Candle flame 1. The White Balance screen appears. 3. This camera is capable of setting the white balance to ( previous White Balance. ). Colour temperature describes this change in light colour in terms...
User Manual (ENGLISH)
Page 148
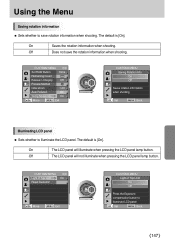
Off Does not save rotation information when shooting. The default is [On]. Off The LCD panel will illuminate when pressing the LCD panel lamp button. CUSTOM2 MENU Light of Top LCD On Reset Custom2 : Move : Exit CUSTOM2 MENU Light of Top LCD On Off Press the Exposure compensation button ... the rotation information when shooting. On : Move : Exit CUSTOM2 MENU Saving Rotation Info. On The LCD panel will not illuminate when pressing the LCD panel lamp button. On Saves the rotation information when shooting. The default is [On].
Off Does not save rotation information when shooting. The default is [On]. Off The LCD panel will illuminate when pressing the LCD panel lamp button. CUSTOM2 MENU Light of Top LCD On Reset Custom2 : Move : Exit CUSTOM2 MENU Light of Top LCD On Off Press the Exposure compensation button ... the rotation information when shooting. On : Move : Exit CUSTOM2 MENU Saving Rotation Info. On The LCD panel will not illuminate when pressing the LCD panel lamp button. On Saves the rotation information when shooting. The default is [On].

User Manual (ENGLISH)
Page 162
Please contact Samsung Camera service center for white backgrounds and other shooting conditions if the CCD becomes dirty or dusty. ... not put the tip of the blower inside the lens mount area. This indicates that the CCD must be cleaned. Turn the camera on the LCD monitor. ƃ If you are not using the AC adapter, please use the AC adapter (SAC-82,...prevent dirt and dust from accumulating on the CCD when no lens is on the camera. ƃ It is recommended to the shutter or the CCD sensor. ƃ The self-timer lamp blinks and [Cln] appears on the [SETUP MENU] menu. 4. The Sensor ...
Please contact Samsung Camera service center for white backgrounds and other shooting conditions if the CCD becomes dirty or dusty. ... not put the tip of the blower inside the lens mount area. This indicates that the CCD must be cleaned. Turn the camera on the LCD monitor. ƃ If you are not using the AC adapter, please use the AC adapter (SAC-82,...prevent dirt and dust from accumulating on the CCD when no lens is on the camera. ƃ It is recommended to the shutter or the CCD sensor. ƃ The self-timer lamp blinks and [Cln] appears on the [SETUP MENU] menu. 4. The Sensor ...
User Manual (ENGLISH)
Page 226
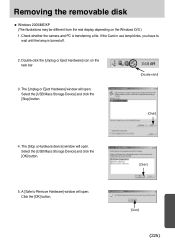
...-click!] [Click!] 4. The [Unplug or Eject Hardware] window will open. Click the [OK] button. [Click!] [Click!] ŝ225Ş A [Safe to wait until the lamp is transferring a file. Double-click the [Unplug or Eject Hardware] icon on the Windows O/S.) 1. Select the [USB Mass Storage Device] and click the [OK] button... disk ƈ Windows 2000/ME/XP (The illustrations may be different from the real display depending on the task bar. 3. Check whether the camera and PC is turned off. 2. If the Card in use lamp blinks, you have to Remove Hardware] window will open .
...-click!] [Click!] 4. The [Unplug or Eject Hardware] window will open. Click the [OK] button. [Click!] [Click!] ŝ225Ş A [Safe to wait until the lamp is transferring a file. Double-click the [Unplug or Eject Hardware] icon on the Windows O/S.) 1. Select the [USB Mass Storage Device] and click the [OK] button... disk ƈ Windows 2000/ME/XP (The illustrations may be different from the real display depending on the task bar. 3. Check whether the camera and PC is turned off. 2. If the Card in use lamp blinks, you have to Remove Hardware] window will open .