User Manual (user Manual) (ver.1.0) (English)
Page 16
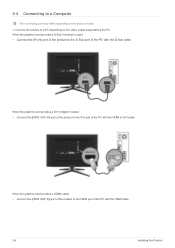
... the video output supported by the PC. When the graphics card provides a D-Sub () output • Connect the [PC IN] port of the product to DVI cable. When the graphics card provides a HDMI output • Connect the [HDMI (DVI) IN] port of the product to the HDMI port of the PC with the HDMI to the D-Sub port of the...
... the video output supported by the PC. When the graphics card provides a D-Sub () output • Connect the [PC IN] port of the product to DVI cable. When the graphics card provides a HDMI output • Connect the [HDMI (DVI) IN] port of the product to the HDMI port of the PC with the HDMI to the D-Sub port of the...
User Manual (user Manual) (ver.1.0) (English)
Page 17
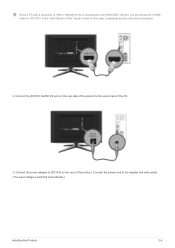
Connect the power cord to [DC14V] on the rear side of the product to the sound card of the mode. Connect the [PC/DVI AUDIO IN] port on the rear of the product. When a PC with a resolution of 1920 x 1080 @ 60 Hz is connected to the [HDMI (DVI) IN] port, you should set the mode to in the of the PC. 3. Connect the power adapter to the adapter and wall socket. (The input voltage is required. 2. In this case, a separate sound connection is switched automatically.) Installing the Product 2-4
Connect the power cord to [DC14V] on the rear side of the product to the sound card of the mode. Connect the [PC/DVI AUDIO IN] port on the rear of the product. When a PC with a resolution of 1920 x 1080 @ 60 Hz is connected to the [HDMI (DVI) IN] port, you should set the mode to in the of the PC. 3. Connect the power adapter to the adapter and wall socket. (The input voltage is required. 2. In this case, a separate sound connection is switched automatically.) Installing the Product 2-4

User Manual (user Manual) (ver.1.0) (English)
Page 21
Connect the red and white plugs of an RCA to stereo (for PC) cable to the same colored audio output terminals of the digital output device, and connect the opposite plug to HDMI cable. 2. Installing the Product 2-7 Connect the DVI output terminal of an external device to the [HDMI (DVI) IN] terminal of the product using a DVI to the [PC/DVI AUDIO IN] terminal of the product or on the remote control to HDMI Cable 1. Press the [SOURCE] button at the front of the product. 2-7 Connecting Using a DVI to select mode.
Connect the red and white plugs of an RCA to stereo (for PC) cable to the same colored audio output terminals of the digital output device, and connect the opposite plug to HDMI cable. 2. Installing the Product 2-7 Connect the DVI output terminal of an external device to the [HDMI (DVI) IN] terminal of the product using a DVI to the [PC/DVI AUDIO IN] terminal of the product or on the remote control to HDMI Cable 1. Press the [SOURCE] button at the front of the product. 2-7 Connecting Using a DVI to select mode.

User Manual (user Manual) (ver.1.0) (English)
Page 32
... the Screen Adjustment Menu (OSD: On Screen Display) The Screen Adjustment Menu (OSD: On Screen Display) Structure TOP MENUS Picture [PC / HDMI PC Timing] Picture [TV / AV / Component / HDMI1 / HDMI2] Sound Channel Setup Input Application Support MagicBright Eco Solution Mode Sharpness...Auto Program Time PIP Edit Name Anynet+ (HDMICEC) Software Upgrade Clear Scrambled Channel Menu Language HD Connection Guide Channel List Caption Contact Samsung Fine Tune Security Picture [PC / HDMI PC Timing] The default setting may be different depending on the selected Input Mode (input signal source ...
... the Screen Adjustment Menu (OSD: On Screen Display) The Screen Adjustment Menu (OSD: On Screen Display) Structure TOP MENUS Picture [PC / HDMI PC Timing] Picture [TV / AV / Component / HDMI1 / HDMI2] Sound Channel Setup Input Application Support MagicBright Eco Solution Mode Sharpness...Auto Program Time PIP Edit Name Anynet+ (HDMICEC) Software Upgrade Clear Scrambled Channel Menu Language HD Connection Guide Channel List Caption Contact Samsung Fine Tune Security Picture [PC / HDMI PC Timing] The default setting may be different depending on the selected Input Mode (input signal source ...
User Manual (user Manual) (ver.1.0) (English)
Page 50
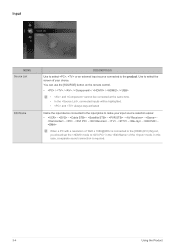
...this case, a separate sound connection is connected to the [HDMI (DVI) IN] port, you should set the mode to make your choice. You can use the [SOURCE] button on the remote control. • / / / / / / • and cannot be connected at the same time. • In the , connected inputs will be highlighted. ...• and always stay activated Name the input device connected to the input jacks to in the of the mode. Use to the product. When a PC with a resolution of 1920 x 1080@60Hz is required. 3-4 Using the Product Input MENU Source List Edit ...
...this case, a separate sound connection is connected to the [HDMI (DVI) IN] port, you should set the mode to make your choice. You can use the [SOURCE] button on the remote control. • / / / / / / • and cannot be connected at the same time. • In the , connected inputs will be highlighted. ...• and always stay activated Name the input device connected to the input jacks to in the of the mode. Use to the product. When a PC with a resolution of 1920 x 1080@60Hz is required. 3-4 Using the Product Input MENU Source List Edit ...

User Manual (user Manual) (ver.1.0) (English)
Page 70
...-Sales service. If the problem continues, please contact your nearest Samsung Electronics Service Center. Blank spaces on . (Refer to Connecting to a Computer) Run Frequency and tuning. message Ensure that the power cord is firmly connected and the product is on the screen are not caused by ... connected and tightened. (Refer to Connecting to the , ) The display brightness can be fixed by the monitor. Adjust the and . (Refer to a Computer) Blank spaces are shown in the HDMI or DVI option of the video adapter. The monitor is not clear. PROBLEMS RELATED TO INSTALLATION (PC MODE...
...-Sales service. If the problem continues, please contact your nearest Samsung Electronics Service Center. Blank spaces on . (Refer to Connecting to a Computer) Run Frequency and tuning. message Ensure that the power cord is firmly connected and the product is on the screen are not caused by ... connected and tightened. (Refer to Connecting to the , ) The display brightness can be fixed by the monitor. Adjust the and . (Refer to a Computer) Blank spaces are shown in the HDMI or DVI option of the video adapter. The monitor is not clear. PROBLEMS RELATED TO INSTALLATION (PC MODE...

User Manual (user Manual) (ver.1.0) (Korean)
Page 32
3-4 OSD:On Screen Display OSD:On Screen Display) 구조 Picture [PC / HDMI PC Timing] Picture [TV / AV / Component / HDMI1 / HDMI2] Sound Channel Setup Input Application Support MagicBright Eco Solution Mode ... Menu Language General PIP Source List Edit Name Media Play Anynet+ (HDMICEC) Self Diagnosis Software Upgrade HD Connection Guide SPDIF Output Channel List Caption Contact Samsung Sharpness Picture Reset Brightness Advanced Settings Preferred Language Sound Reset Fine Tune Security Picture : [ PC / HDMI PC Timing] 3-4 사용하기
3-4 OSD:On Screen Display OSD:On Screen Display) 구조 Picture [PC / HDMI PC Timing] Picture [TV / AV / Component / HDMI1 / HDMI2] Sound Channel Setup Input Application Support MagicBright Eco Solution Mode ... Menu Language General PIP Source List Edit Name Media Play Anynet+ (HDMICEC) Self Diagnosis Software Upgrade HD Connection Guide SPDIF Output Channel List Caption Contact Samsung Sharpness Picture Reset Brightness Advanced Settings Preferred Language Sound Reset Fine Tune Security Picture : [ PC / HDMI PC Timing] 3-4 사용하기


