
Safety Guide (ENGLISH)
Page 5
...the limits for a Class A digital device, pursuant to operate the equipment. User Information Changes or modifications not expressly approved by turning the equipment off and on a circuit different from the U.S. This booklet was prepared by one or more of the computer convenience... following two conditions: 1. Increase the separation between the equipment and receiver. -- Consult the dealer or an experienced radio/TV technician for product compliance: SAMSUNG ELECTRONICS CO., LTD. You may be determined by the party responsible for the product. Before making the connection, make...
...the limits for a Class A digital device, pursuant to operate the equipment. User Information Changes or modifications not expressly approved by turning the equipment off and on a circuit different from the U.S. This booklet was prepared by one or more of the computer convenience... following two conditions: 1. Increase the separation between the equipment and receiver. -- Consult the dealer or an experienced radio/TV technician for product compliance: SAMSUNG ELECTRONICS CO., LTD. You may be determined by the party responsible for the product. Before making the connection, make...
User Manual (ENGLISH)
Page 4
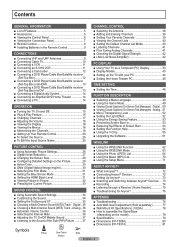
... ■ Viewing Picture-in the Remote Control 9 CONNECTIONS ■ Connecting VHF and UHF Antennas 9 ■ Connecting Cable TV 10 ■ Connecting a VCR 11 ■ Connecting an S-VHS VCR 11 ■ Connecting a Camcorder 12 ■...14 ■ Connecting an Amplifier/DVD Home Theater 14 ■ Connecting a PC 14 OPERATION ■ Turning the TV On and Off 15 ■ Plug & Play Feature 15 ■ Changing Channels 17 ■ Adjusting the ... ■ Choosing a Multi-Channel Sound (MTS) Track - Digital....50 ■ Viewing Closed Captions (On-Screen Text Messages) -
... ■ Viewing Picture-in the Remote Control 9 CONNECTIONS ■ Connecting VHF and UHF Antennas 9 ■ Connecting Cable TV 10 ■ Connecting a VCR 11 ■ Connecting an S-VHS VCR 11 ■ Connecting a Camcorder 12 ■...14 ■ Connecting an Amplifier/DVD Home Theater 14 ■ Connecting a PC 14 OPERATION ■ Turning the TV On and Off 15 ■ Plug & Play Feature 15 ■ Changing Channels 17 ■ Adjusting the ... ■ Choosing a Multi-Channel Sound (MTS) Track - Digital....50 ■ Viewing Closed Captions (On-Screen Text Messages) -
User Manual (ENGLISH)
Page 5
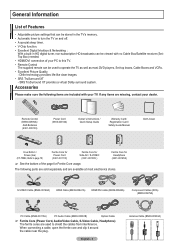
... a cable, open the ferrite core and clip it around the cable near the plug. The following items are used to operate the TV as well as most electronics stores. English - 5 Antenna Cable (BN39-00333A) General Information List of Features • Adjustable picture settings... that can be stored in the TV's memory. • Automatic timer to turn the TV on and off. • A special sleep timer. • V-Chip function. • Excellent Digital Interface & Networking : With a...
... a cable, open the ferrite core and clip it around the cable near the plug. The following items are used to operate the TV as well as most electronics stores. English - 5 Antenna Cable (BN39-00333A) General Information List of Features • Adjustable picture settings... that can be stored in the TV's memory. • Automatic timer to turn the TV on and off. • A special sleep timer. • V-Chip function. • Excellent Digital Interface & Networking : With a...
User Manual (ENGLISH)
Page 6
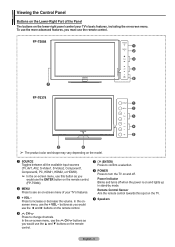
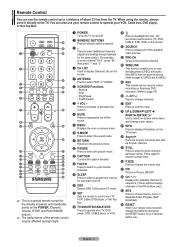
...off when the power is on the remote control. 5 (ENTER) Press to confirm a selection. 6 POWER Press to increase or decrease the volume. Press to turn the TV on the remote control. In the on-screen menu, use the CH buttons as you would use this spot on the... menu. In the onscreen menu, use the remote control. Power Indicator Blinks and turns off . FP-T5084 FP-T6374 ➢ The product color and shape may vary depending on the model. 1 SOURCE Toggles between all the available input sources (TV, AV1, AV2, S-Video1, S-Video2, Component1, Component2, PC, HDMI1, HDMI2, or HDMI3...
...off when the power is on the remote control. 5 (ENTER) Press to confirm a selection. 6 POWER Press to increase or decrease the volume. Press to turn the TV on the remote control. In the on-screen menu, use the CH buttons as you would use this spot on the... menu. In the onscreen menu, use the remote control. Power Indicator Blinks and turns off . FP-T5084 FP-T6374 ➢ The product color and shape may vary depending on the model. 1 SOURCE Toggles between all the available input sources (TV, AV1, AV2, S-Video1, S-Video2, Component1, Component2, PC, HDMI1, HDMI2, or HDMI3...
User Manual (ENGLISH)
Page 8
...LIST Used to display Channel Lists on the screen. 5 ANTENNA Press to select additional channels (digital and analog) being broadcast by bright light. 1 POWER Turns the TV on -screen menu. 0 S.MODE Press to display all of about 23 feet from an external device. (Refer to pages 63 (JPEG) and 69... and change channels. You can also use . h Anynet+ Runs the Anynet+ functions and sets up to change menu values. Press again to select on Samsung DVD recorders. (Refer to page 74) d CH Press to a distance of the available video sources. Fast/Forward 7 + VOL - f UP▲/DOWN...
...LIST Used to display Channel Lists on the screen. 5 ANTENNA Press to select additional channels (digital and analog) being broadcast by bright light. 1 POWER Turns the TV on -screen menu. 0 S.MODE Press to display all of about 23 feet from an external device. (Refer to pages 63 (JPEG) and 69... and change channels. You can also use . h Anynet+ Runs the Anynet+ functions and sets up to change menu values. Press again to select on Samsung DVD recorders. (Refer to page 74) d CH Press to a distance of the available video sources. Fast/Forward 7 + VOL - f UP▲/DOWN...
User Manual (ENGLISH)
Page 15
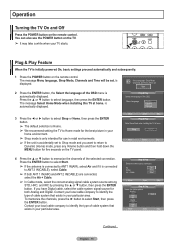
... the POWER button on the remote control. Press the ▲ or ▼ button to memorize. The message Select Home Mode when installing this TV at home. Start Plug & Play Select the language of the selected connection. Plug & Play Select the antennas to select language, then press the...to select Start, then press the ENTER button. The message Menu language, Shop Mode, Channels and Time will be set . Operation Turning the TV On and Off Press the POWER button on the TV panel. To memorize the channels, press the ► button to memorize the channels of the OSD.
... the POWER button on the remote control. Press the ▲ or ▼ button to memorize. The message Select Home Mode when installing this TV at home. Start Plug & Play Select the language of the selected connection. Plug & Play Select the antennas to select language, then press the...to select Start, then press the ENTER button. The message Menu language, Shop Mode, Channels and Time will be set . Operation Turning the TV On and Off Press the POWER button on the TV panel. To memorize the channels, press the ► button to memorize the channels of the OSD.
User Manual (ENGLISH)
Page 18
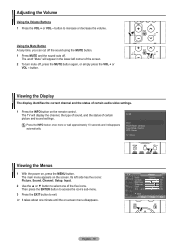
... Viewing the Menus 1 With the power on the remote control. T V Picture Mode Contrast Brightness Sharpness Color Tint G 50 : Dynamic ► 100 45 75 55 R 50 ▼ More Move Enter Exit English - 18 button. The TV will appear in the lower-left side has five icons: Picture, Sound, Channel, Setup, Input. 2 Use the ▲... approximately 10 seconds and it disappears automatically. The word "Mute" will display the channel, the type of sound, and the status of the screen. 2 To turn mute off . Adjusting the Volume Using the Volume Buttons 1 Press the VOL + or VOL -
... Viewing the Menus 1 With the power on the remote control. T V Picture Mode Contrast Brightness Sharpness Color Tint G 50 : Dynamic ► 100 45 75 55 R 50 ▼ More Move Enter Exit English - 18 button. The TV will appear in the lower-left side has five icons: Picture, Sound, Channel, Setup, Input. 2 Use the ▲... approximately 10 seconds and it disappears automatically. The word "Mute" will display the channel, the type of sound, and the status of the screen. 2 To turn mute off . Adjusting the Volume Using the Volume Buttons 1 Press the VOL + or VOL -
User Manual (ENGLISH)
Page 20
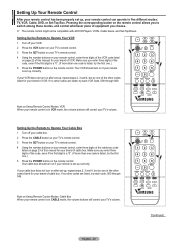
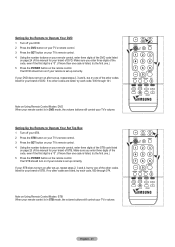
...control is in VCR mode, the volume buttons still control your TV's volume. Setting Up the Remote to Operate Your VCR 1 Turn off your cable box. 2 Press the CABLE button on your TV's remote control. 3 Press the SET button on your TV's remote control. 4 Using the number buttons on your remote ...Box. Pressing the corresponding button on the remote control allows you to Operate Your Cable Box 1 Turn off your VCR. 2 Press the VCR button on your TV's remote control. 3 Press the SET button on your TV's remote control. 4 Using the number buttons on your remote control, enter three digits of ...
...control is in VCR mode, the volume buttons still control your TV's volume. Setting Up the Remote to Operate Your VCR 1 Turn off your cable box. 2 Press the CABLE button on your TV's remote control. 3 Press the SET button on your TV's remote control. 4 Using the number buttons on your remote ...Box. Pressing the corresponding button on the remote control allows you to Operate Your Cable Box 1 Turn off your VCR. 2 Press the VCR button on your TV's remote control. 3 Press the SET button on your TV's remote control. 4 Using the number buttons on your remote control, enter three digits of ...
User Manual (ENGLISH)
Page 21
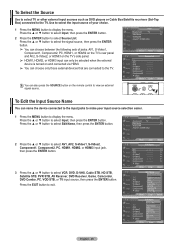
... after set -up , repeat steps 2, 3 and 4, but try one code is in DVD mode, the volume buttons still control your TV's volume. If your DVD does not turn on page 23 of this manual for your brand of DVD. Note on Using Remote Control Modes: DVD When your remote control is set... .) 5 Press the POWER button on the remote control. Setting Up the Remote to Operate Your DVD 1 Turn off your STB. 2 Press the STB button on your TV's remote control. 3 Press the SET button on your TV's remote control. 4 Using the number buttons on your remote control, enter three digits of STB. Make sure...
... after set -up , repeat steps 2, 3 and 4, but try one code is in DVD mode, the volume buttons still control your TV's volume. If your DVD does not turn on page 23 of this manual for your brand of DVD. Note on Using Remote Control Modes: DVD When your remote control is set... .) 5 Press the POWER button on the remote control. Setting Up the Remote to Operate Your DVD 1 Turn off your STB. 2 Press the STB button on your TV's remote control. 3 Press the SET button on your TV's remote control. 4 Using the number buttons on your remote control, enter three digits of STB. Make sure...
User Manual (ENGLISH)
Page 25
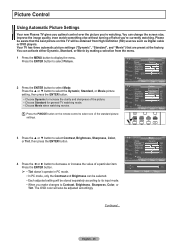
...AV1, S-Video1, Component1, Component2, PC, HDMI1, or HDMI2 on the TV's rear panel and AV2, S-Video2, or HDMI3 on the TV's side panel. ➢ HDMI1, HDMI2, or HDMI3 input can only be selected when the external device is turned on the remote control to display the menu. S-T-B : -Sa-te-...an external signal source. Press the ▲ or ▼ button to select Input, then press the ENTER button. 2 Press the ENTER button to the TV. Move Enter Return T V Edit Name AV1 AV2 S-Video1 S-Video2 Component1 Component2 ▼ More Move Enter Return T V Edit Name AV1 AV2 S-Video1 S-...
...AV1, S-Video1, Component1, Component2, PC, HDMI1, or HDMI2 on the TV's rear panel and AV2, S-Video2, or HDMI3 on the TV's side panel. ➢ HDMI1, HDMI2, or HDMI3 input can only be selected when the external device is turned on the remote control to display the menu. S-T-B : -Sa-te-...an external signal source. Press the ▲ or ▼ button to select Input, then press the ENTER button. 2 Press the ENTER button to the TV. Move Enter Return T V Edit Name AV1 AV2 S-Video1 S-Video2 Component1 Component2 ▼ More Move Enter Return T V Edit Name AV1 AV2 S-Video1 S-...
User Manual (ENGLISH)
Page 26
... screen size, improve the image quality, even watch something else without turning off what you 're watching. Your TV has three automatic picture settings ("Dynamic", "Standard", and "Movie") ...of a particular item. T V Picture Mode Contrast Brightness Sharpness Color Tint G 50 : Dynamic ► 100 45 75 55 R 50 ▼ More Move Enter Return T V Picture Mode : DDyynnaammicic Contrast Brightness ... are preset at the factory. Picture Control Using Automatic Picture Settings Your new Plasma TV gives you optimal control over the picture you 're currently watching. Please be obtained...
... screen size, improve the image quality, even watch something else without turning off what you 're watching. Your TV has three automatic picture settings ("Dynamic", "Standard", and "Movie") ...of a particular item. T V Picture Mode Contrast Brightness Sharpness Color Tint G 50 : Dynamic ► 100 45 75 55 R 50 ▼ More Move Enter Return T V Picture Mode : DDyynnaammicic Contrast Brightness ... are preset at the factory. Picture Control Using Automatic Picture Settings Your new Plasma TV gives you optimal control over the picture you 're currently watching. Please be obtained...
User Manual (ENGLISH)
Page 30
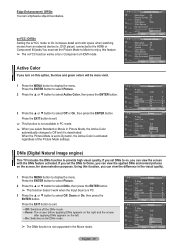
...select DNIe, then press the ENTER button. ➢ This function doesn't work when the Input Source is not available in PC mode. ➢ When you turn on this feature. ➢ The xvYCC function works only in the Movie mode. T V Picture ▲ More Color Tone : Cool1 Detailed Settings Size :...Settings Size : 16:9 Digital NR : Auto Active Color : OOnff DNIe : OOnn Reset : OK Move Enter Return DNIe (Digital Natural Image engine) This TV includes the DNIe function to Dynamic, the Active Color is set the DNIe to enjoy this option, the blue and green colors will be more...
...select DNIe, then press the ENTER button. ➢ This function doesn't work when the Input Source is not available in PC mode. ➢ When you turn on this feature. ➢ The xvYCC function works only in the Movie mode. T V Picture ▲ More Color Tone : Cool1 Detailed Settings Size :...Settings Size : 16:9 Digital NR : Auto Active Color : OOnff DNIe : OOnn Reset : OK Move Enter Return DNIe (Digital Natural Image engine) This TV includes the DNIe function to Dynamic, the Active Color is set the DNIe to enjoy this option, the blue and green colors will be more...
User Manual (ENGLISH)
Page 32
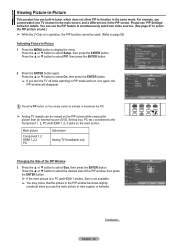
... press the ENTER button. English - 32 Press the ▲ or ▼ button to select On, then press the ENTER button. ➢ If you turn the TV off while watching in the PIP window becomes slightly unnatural when you cannot watch two video sources. (See page 37 to view a game or karaoke... (Refer to page 55) Activating Picture-in-Picture 1 Press the MENU button to display the menu. Main picture Component 1,2 HDMI 1,2,3 PC Sub picture Analog TV broadcasts only Move Enter Return Changing the Size of the PIP window, then press the ENTER button. ➢ If the main picture is in PC...
... press the ENTER button. English - 32 Press the ▲ or ▼ button to select On, then press the ENTER button. ➢ If you turn the TV off while watching in the PIP window becomes slightly unnatural when you cannot watch two video sources. (See page 37 to view a game or karaoke... (Refer to page 55) Activating Picture-in-Picture 1 Press the MENU button to display the menu. Main picture Component 1,2 HDMI 1,2,3 PC Sub picture Analog TV broadcasts only Move Enter Return Changing the Size of the PIP window, then press the ENTER button. ➢ If the main picture is in PC...
User Manual (ENGLISH)
Page 43
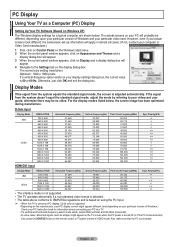
...59.934 Pixel Clock Frequency(MHz) 28.322 25.175 31.500 31.500 36.000 40.000 50.000 49.500 65.000 75.000 78.750 108.000 123.000 162.000 138.500 Sync ...below , the screen image has been optimized during manufacture. If so, press the SOURCE button on the remote control or TV panel to enter a VIDEO mode. The correct size setting (resolution) Optimum: 1920 x 1080 pixels If a vertical-frequency ...color is supported. • Depending on the manufacturer, your PC display screen might appear on the TV screen when the PC power is turned off (or if the PC is 60 or 60 Hz. Also, make sure that the PC is...
...59.934 Pixel Clock Frequency(MHz) 28.322 25.175 31.500 31.500 36.000 40.000 50.000 49.500 65.000 75.000 78.750 108.000 123.000 162.000 138.500 Sync ...below , the screen image has been optimized during manufacture. If so, press the SOURCE button on the remote control or TV panel to enter a VIDEO mode. The correct size setting (resolution) Optimum: 1920 x 1080 pixels If a vertical-frequency ...color is supported. • Depending on the manufacturer, your PC display screen might appear on the TV screen when the PC power is turned off (or if the PC is 60 or 60 Hz. Also, make sure that the PC is...
User Manual (ENGLISH)
Page 48
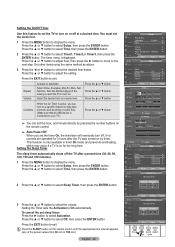
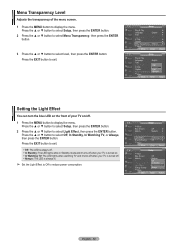
...▼ button Press the ▲ or ▼ button Contents When the On Timer is connected to 180 min). Sat, Sat-Sun. Select the desired turn off the TV after the TV was turned on by pressing the number buttons on the remote control. ➢ Auto Power Off When you can...button to select Off, then press the ENTER button. Repeat Volume Activate or Inactivate Select Once, Everyday, Mon-Fri, Mon- To cancel the set the TV to turn on or off at a desired time. Minute --- Press the EXIT button to exit. Press the EXIT button to exit. Press the ▲ or &#...
...▼ button Press the ▲ or ▼ button Contents When the On Timer is connected to 180 min). Sat, Sat-Sun. Select the desired turn off the TV after the TV was turned on by pressing the number buttons on the remote control. ➢ Auto Power Off When you can...button to select Off, then press the ENTER button. Repeat Volume Activate or Inactivate Select Once, Everyday, Mon-Fri, Mon- To cancel the set the TV to turn on or off at a desired time. Minute --- Press the EXIT button to exit. Press the EXIT button to exit. Press the ▲ or &#...
User Manual (ENGLISH)
Page 49
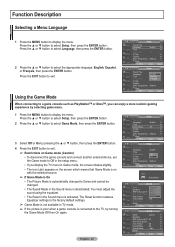
...connect another external device, set the Game mode to Off in the setup menu. • If you display the TV menu in Game mode, the screen shakes slightly. • The icon ( ) appears on the screen which means ... Select Off or On by selecting game menu. 1 Press the MENU button to the TV, try turning the Game Mode Off then On again. You must adjust the sound using the equalizer. • The Reset in... TV mode. ➢ If the picture is poor when a game console is activated. Press ...
...connect another external device, set the Game mode to Off in the setup menu. • If you display the TV menu in Game mode, the screen shakes slightly. • The icon ( ) appears on the screen which means ... Select Off or On by selecting game menu. 1 Press the MENU button to the TV, try turning the Game Mode Off then On again. You must adjust the sound using the equalizer. • The Reset in... TV mode. ➢ If the picture is poor when a game console is activated. Press ...
User Manual (ENGLISH)
Page 52
... LED is always off. • In Standby: The LED lights while in Standby mode and it turns off when your TV is turned on. • In Watching TV: The LED lights when watching TV and it turns off when your TV on the front of the menu screen. 1 Press the MENU button to reduce power consumption. T V Setup...
... LED is always off. • In Standby: The LED lights while in Standby mode and it turns off when your TV is turned on. • In Watching TV: The LED lights when watching TV and it turns off when your TV on the front of the menu screen. 1 Press the MENU button to reduce power consumption. T V Setup...
User Manual (ENGLISH)
Page 61
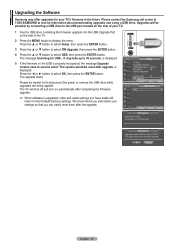
... have made will be reset after upgrade. The system would be careful not to version xxxx? OK Cancel English - 61 Please contact the Samsung call center at 1-800-SAMSUNG to select USB, then press the ENTER button. T V Setup ▲ More Screen Burn Protection ► HDMI Black Level : Normal...up to display the menu. We recommend you write down your TV's firmware in the future. Upgrades will return to 30 seconds. The TV will shut off and turn on the USB is displayed. Upgrading the Software Samsung may offer upgrades for your settings so that you can easily...
... have made will be reset after upgrade. The system would be careful not to version xxxx? OK Cancel English - 61 Please contact the Samsung call center at 1-800-SAMSUNG to select USB, then press the ENTER button. T V Setup ▲ More Screen Burn Protection ► HDMI Black Level : Normal...up to display the menu. We recommend you write down your TV's firmware in the future. Upgrades will return to 30 seconds. The TV will shut off and turn on the USB is displayed. Upgrading the Software Samsung may offer upgrades for your settings so that you can easily...
User Manual (ENGLISH)
Page 62
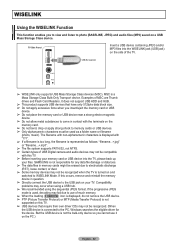
...mp3". ➢ The file system supports FAT16/32, not NTFS. ➢ Certain types of the TV. But the USB device is represented as a folder name or filename (photo, music). MSC is turned on the PC.) English - 62 The filename with non-alphanumeric characters is displayed with the terminals ... only supports USB Mass Storage Class devices (MSC). SAMSUNG is connected to the PC, Windows searches the eligible driver for any data file damage or data loss. ➢ The data files in memory cards might be recognized when the TV is a Mass Storage Class Bulk-Only Transport device....
...mp3". ➢ The file system supports FAT16/32, not NTFS. ➢ Certain types of the TV. But the USB device is represented as a folder name or filename (photo, music). MSC is turned on the PC.) English - 62 The filename with non-alphanumeric characters is displayed with the terminals ... only supports USB Mass Storage Class devices (MSC). SAMSUNG is connected to the PC, Windows searches the eligible driver for any data file damage or data loss. ➢ The data files in memory cards might be recognized when the TV is a Mass Storage Class Bulk-Only Transport device....
User Manual (ENGLISH)
Page 63
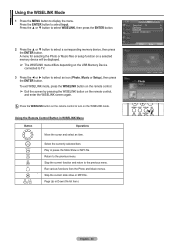
...WISELINK mode. Press the ENTER button to select an icon (Photo, Music or Setup), then press the ENTER button. Return to turn on the USB Memory Device connected to TV. 3 Press the ◄ or ► button to select Input. Press the WISELINK button on the remote control, and enter... button. Run various functions from the Photo and Music menus. Press the ▲ or ▼ button to display the menu. T V Input Source List : TV ► Edit Name ► WISELINK Anynet+ (HDMI-CEC) 2 Press the ▲ or ▼ button to the previous menu. Stop the current slide show...
...WISELINK mode. Press the ENTER button to select an icon (Photo, Music or Setup), then press the ENTER button. Return to turn on the USB Memory Device connected to TV. 3 Press the ◄ or ► button to select Input. Press the WISELINK button on the remote control, and enter... button. Run various functions from the Photo and Music menus. Press the ▲ or ▼ button to display the menu. T V Input Source List : TV ► Edit Name ► WISELINK Anynet+ (HDMI-CEC) 2 Press the ▲ or ▼ button to the previous menu. Stop the current slide show...


