
Safety Guide (ENGLISH)
Page 5
...product. Operation is no guarantee that may not cause harmful interference, and 2. Consult the dealer or an experienced radio/TV technician for product compliance: SAMSUNG ELECTRONICS CO., LTD. The party responsible for help. Provided with this equipment does cause harmful interference to the following...environment. If this monitor is a detachable power supply cord with the instructions, may cause harmful interference to correct the interference by turning the equipment off and on a circuit different from the U.S. You may be determined by one or more of the FCC ...
...product. Operation is no guarantee that may not cause harmful interference, and 2. Consult the dealer or an experienced radio/TV technician for product compliance: SAMSUNG ELECTRONICS CO., LTD. The party responsible for help. Provided with this equipment does cause harmful interference to the following...environment. If this monitor is a detachable power supply cord with the instructions, may cause harmful interference to correct the interference by turning the equipment off and on a circuit different from the U.S. You may be determined by one or more of the FCC ...
User Manual (ENGLISH)
Page 4
...9632; Connecting a Digital Audio System 14 ■ Connecting an Amplifier/DVD Home Theater 14 ■ Connecting a PC 14 OPERATION ■ Turning the TV On and Off 15 ■ Plug & Play Feature 15 ■ Changing Channels 17 ■ Adjusting the Volume 18 ■ Viewing the Display...Setting up the TV with your PC 44 ■ Setting the Home Theater PC 45 TIME SETTING ■ Setting the Time 46 FUNCTION DESCRIPTION ■ Selecting a Menu Language 49 ■ Using the Game Mode 49 ■ Viewing Closed Captions (On-Screen Text Messages) - Digital....50 ■ Viewing...
...9632; Connecting a Digital Audio System 14 ■ Connecting an Amplifier/DVD Home Theater 14 ■ Connecting a PC 14 OPERATION ■ Turning the TV On and Off 15 ■ Plug & Play Feature 15 ■ Changing Channels 17 ■ Adjusting the Volume 18 ■ Viewing the Display...Setting up the TV with your PC 44 ■ Setting the Home Theater PC 45 TIME SETTING ■ Setting the Time 46 FUNCTION DESCRIPTION ■ Selecting a Menu Language 49 ■ Using the Game Mode 49 ■ Viewing Closed Captions (On-Screen Text Messages) - Digital....50 ■ Viewing...
User Manual (ENGLISH)
Page 5
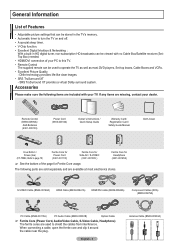
... provides a virtual Dolby surround system. General Information List of Features • Adjustable picture settings that can be stored in the TV's memory. • Automatic timer to turn the TV on and off. • A special sleep timer. • V-Chip function. • Excellent Digital Interface & Networking :...cables from interference. DNIe technology provides life-like clear images. • SRS TruSurround XT - If any items are used to this TV. • Remote Control The supplied remote can be viewed with your dealer. English - 5 Antenna Cable (BN39-00333A) Accessories ...
... provides a virtual Dolby surround system. General Information List of Features • Adjustable picture settings that can be stored in the TV's memory. • Automatic timer to turn the TV on and off. • A special sleep timer. • V-Chip function. • Excellent Digital Interface & Networking :...cables from interference. DNIe technology provides life-like clear images. • SRS TruSurround XT - If any items are used to this TV. • Remote Control The supplied remote can be viewed with your dealer. English - 5 Antenna Cable (BN39-00333A) Accessories ...
User Manual (ENGLISH)
Page 6
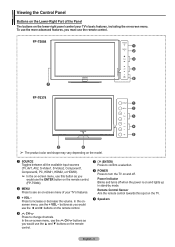
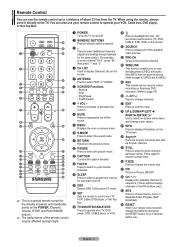
... would use the ◄ and ► buttons on the remote control. 5 (ENTER) Press to confirm a selection. 6 POWER Press to turn the TV on and off when the power is on the remote control. Power Indicator Blinks and turns off . Viewing the Control Panel Buttons on the Lower-Right Part of your... TV's basic features, including the on the TV. 7 Speakers 4 CH Press to change channels. Remote Control Sensor Aim the remote control towards ...
... would use the ◄ and ► buttons on the remote control. 5 (ENTER) Press to confirm a selection. 6 POWER Press to turn the TV on and off when the power is on the remote control. Power Indicator Blinks and turns off . Viewing the Control Panel Buttons on the Lower-Right Part of your... TV's basic features, including the on the TV. 7 Speakers 4 CH Press to change channels. Remote Control Sensor Aim the remote control towards ...
User Manual (ENGLISH)
Page 8
... backlight the VOL, CH, and active source button (TV, DVD, CABLE, STB, VCR) on the remote. ) SOURCE Press to the previous channel. Fast/Forward 7 + VOL - g INFO Press to change the screen size. j P.SIZE Press to display information on Samsung DVD recorders. (Refer to page 74) d CH ... UP▲/DOWN▼/LEFT◄/ RIGHT►/ENTER Use to select additional channels (digital and analog) being broadcast by bright light. 1 POWER Turns the TV on and off the sound. 9 MENU Displays the main on the POWER, Channel, Volume, STOP, and PLAY/PAUSE buttons. ➢ The ...
... backlight the VOL, CH, and active source button (TV, DVD, CABLE, STB, VCR) on the remote. ) SOURCE Press to the previous channel. Fast/Forward 7 + VOL - g INFO Press to change the screen size. j P.SIZE Press to display information on Samsung DVD recorders. (Refer to page 74) d CH ... UP▲/DOWN▼/LEFT◄/ RIGHT►/ENTER Use to select additional channels (digital and analog) being broadcast by bright light. 1 POWER Turns the TV on and off the sound. 9 MENU Displays the main on the POWER, Channel, Volume, STOP, and PLAY/PAUSE buttons. ➢ The ...
User Manual (ENGLISH)
Page 15
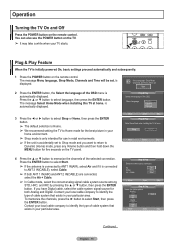
... Home Move Enter Skip 4 Press the ▲ or ▼ button to identify the type of the OSD menu is automatically displayed. Operation Turning the TV On and Off Press the POWER button on the remote control. is displayed. 2 Press the ENTER button, the Select the language of cable system...Press the POWER button on the remote control. Contact your local cable company to memorize the channels of the OSD. Plug & Play Feature When the TV is accidentally set . Press the ▲ or ▼ button to Shop mode and you have Digital cable, select the cable system signal source ...
... Home Move Enter Skip 4 Press the ▲ or ▼ button to identify the type of the OSD menu is automatically displayed. Operation Turning the TV On and Off Press the POWER button on the remote control. is displayed. 2 Press the ENTER button, the Select the language of cable system...Press the POWER button on the remote control. Contact your local cable company to memorize the channels of the OSD. Plug & Play Feature When the TV is accidentally set . Press the ▲ or ▼ button to Shop mode and you have Digital cable, select the cable system signal source ...
User Manual (ENGLISH)
Page 18
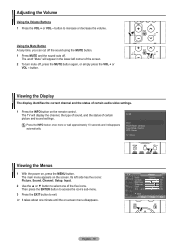
The TV will appear in the lower-left side has five icons: Picture, Sound, Channel, Setup, Input. 2 Use the ▲ or ... the current channel and the status of certain picture and sound settings. T V Picture Mode Contrast Brightness Sharpness Color Tint G 50 : Dynamic ► 100 45 75 55 R 50 ▼ More Move Enter Exit English - 18 Adjusting the Volume Using the Volume Buttons 1 Press the VOL + or VOL..., or simply press the VOL + or VOL - button to exit. ➢ It takes about one of the screen. 2 To turn mute off . The main menu appears on the remote control.
The TV will appear in the lower-left side has five icons: Picture, Sound, Channel, Setup, Input. 2 Use the ▲ or ... the current channel and the status of certain picture and sound settings. T V Picture Mode Contrast Brightness Sharpness Color Tint G 50 : Dynamic ► 100 45 75 55 R 50 ▼ More Move Enter Exit English - 18 Adjusting the Volume Using the Volume Buttons 1 Press the VOL + or VOL..., or simply press the VOL + or VOL - button to exit. ➢ It takes about one of the screen. 2 To turn mute off . The main menu appears on the remote control.
User Manual (ENGLISH)
Page 20
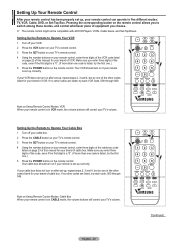
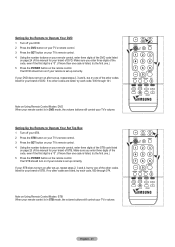
... control has been properly set up correctly. Setting Up the Remote to Operate Your Cable Box 1 Turn off your VCR. 2 Press the VCR button on your TV's remote control. 3 Press the SET button on your TV's remote control. 4 Using the number buttons on your remote control, enter three digits of cable...but try each VCR code, 000 through 046. Setting Up the Remote to Operate Your VCR 1 Turn off your cable box. 2 Press the CABLE button on your TV's remote control. 3 Press the SET button on your TV's remote control. 4 Using the number buttons on your remote control, enter three digits of the ...
... control has been properly set up correctly. Setting Up the Remote to Operate Your Cable Box 1 Turn off your VCR. 2 Press the VCR button on your TV's remote control. 3 Press the SET button on your TV's remote control. 4 Using the number buttons on your remote control, enter three digits of cable...but try each VCR code, 000 through 046. Setting Up the Remote to Operate Your VCR 1 Turn off your cable box. 2 Press the CABLE button on your TV's remote control. 3 Press the SET button on your TV's remote control. 4 Using the number buttons on your remote control, enter three digits of the ...
User Manual (ENGLISH)
Page 21
... of DVD. Note on Using Remote Control Modes: STB When your remote control is in STB mode, the volume buttons still control your TV's volume. Your DVD should turn on after set up correctly. Make sure you enter three digits of the code, even if the first digit is a "0". (If more than... the POWER button on the remote control. Setting Up the Remote to Operate Your Set Top Box 1 Turn off your DVD. 2 Press the DVD button on your TV's remote control. 3 Press the SET button on your TV's remote control. 4 Using the number buttons on your remote control, enter three digits of the DVD...
... of DVD. Note on Using Remote Control Modes: STB When your remote control is in STB mode, the volume buttons still control your TV's volume. Your DVD should turn on after set up correctly. Make sure you enter three digits of the code, even if the first digit is a "0". (If more than... the POWER button on the remote control. Setting Up the Remote to Operate Your Set Top Box 1 Turn off your DVD. 2 Press the DVD button on your TV's remote control. 3 Press the SET button on your TV's remote control. 4 Using the number buttons on your remote control, enter three digits of the DVD...
User Manual (ENGLISH)
Page 25
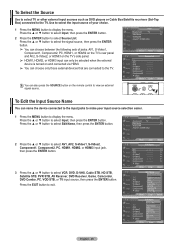
... S-Video1, Component1, Component2, PC, HDMI1, or HDMI2 on the TV's rear panel and AV2, S-Video2, or HDMI3 on the TV's side panel. ➢ HDMI1, HDMI2, or HDMI3 input can only be selected when the external device is turned on the remote control to display the menu. Press the ▲... or ▼ button to the TV. Move Enter Return T V Edit Name AV1 AV2 S-Video1 S-Video2 Component1 Component2 ▼ More Move Enter ...
... S-Video1, Component1, Component2, PC, HDMI1, or HDMI2 on the TV's rear panel and AV2, S-Video2, or HDMI3 on the TV's side panel. ➢ HDMI1, HDMI2, or HDMI3 input can only be selected when the external device is turned on the remote control to display the menu. Press the ▲... or ▼ button to the TV. Move Enter Return T V Edit Name AV1 AV2 S-Video1 S-Video2 Component1 Component2 ▼ More Move Enter ...
User Manual (ENGLISH)
Page 26
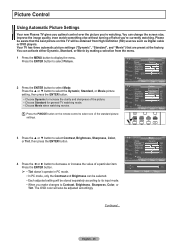
.... T V Mode Mode : Dynamic Contrast 100 Brightness 45 Sharpness 75 Color 55 Tint G 50 R 50 ▼ More Move Enter Return Contrast Move Adjust 100 Return Continued... Please be stored separately...Picture Control Using Automatic Picture Settings Your new Plasma TV gives you optimal control over the picture you 're currently watching. Your TV has three automatic picture settings ("Dynamic", "...You can change the screen size, improve the image quality, even watch something else without turning off what you 're watching. You can activate either Dynamic, Standard, or Movie ...
.... T V Mode Mode : Dynamic Contrast 100 Brightness 45 Sharpness 75 Color 55 Tint G 50 R 50 ▼ More Move Enter Return Contrast Move Adjust 100 Return Continued... Please be stored separately...Picture Control Using Automatic Picture Settings Your new Plasma TV gives you optimal control over the picture you 're currently watching. Your TV has three automatic picture settings ("Dynamic", "...You can change the screen size, improve the image quality, even watch something else without turning off what you 're watching. You can activate either Dynamic, Standard, or Movie ...
User Manual (ENGLISH)
Page 30
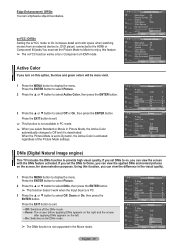
... Detailed Settings Size : 16:9 Digital NR : Auto Active Color : OOnff DNIe : OOnn Reset : OK Move Enter Return DNIe (Digital Natural Image engine) This TV includes the DNIe function to On increases detail and color space when watching movies from an external device (ie. Using this function, you can view... on the left. • On: Switches on the DNIe mode. ➢ The DNle function is not available in PC mode. ➢ When you turn on this feature. ➢ The xvYCC function works only in the Movie mode. If you set to Dynamic, the Active Color is PC. 3 Press ...
... Detailed Settings Size : 16:9 Digital NR : Auto Active Color : OOnff DNIe : OOnn Reset : OK Move Enter Return DNIe (Digital Natural Image engine) This TV includes the DNIe function to On increases detail and color space when watching movies from an external device (ie. Using this function, you can view... on the left. • On: Switches on the DNIe mode. ➢ The DNle function is not available in PC mode. ➢ When you turn on this feature. ➢ The xvYCC function works only in the Movie mode. If you set to Dynamic, the Active Color is PC. 3 Press ...
User Manual (ENGLISH)
Page 32
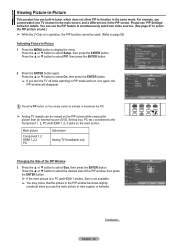
...ENTER button again. Press the ▲ or ▼ button to function in PIP mode and turn the TV off while watching in the same mode. English - 32 Viewing Picture-in-Picture This product has...: : DTV Air 3 - 0 Move Enter Return Continued... Main picture Component 1,2 HDMI 1,2,3 PC Sub picture Analog TV broadcasts only Move Enter Return Changing the Size of the PIP window, then press the ENTER button. ➢ If ... one TV channel in the main screen, and a different one built-in tuner, which does not allow PIP to select On, then press the ENTER button. ➢ If you turn it...
...ENTER button again. Press the ▲ or ▼ button to function in PIP mode and turn the TV off while watching in the same mode. English - 32 Viewing Picture-in-Picture This product has...: : DTV Air 3 - 0 Move Enter Return Continued... Main picture Component 1,2 HDMI 1,2,3 PC Sub picture Analog TV broadcasts only Move Enter Return Changing the Size of the PIP window, then press the ENTER button. ➢ If ... one TV channel in the main screen, and a different one built-in tuner, which does not allow PIP to select On, then press the ENTER button. ➢ If you turn it...
User Manual (ENGLISH)
Page 43
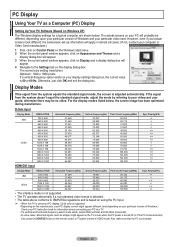
...different, depending upon your particular version of Windows.) Check your PC instruction book for information about connecting your PC to a TV. • If a vertical and horizontal frequency-select mode exists, select 60Hz (vertical) and 48.4KHz (horizontal). ...setting (resolution) Optimum: 1920 x 1080 pixels If a vertical-frequency option exists on the TV screen when the PC power is turned off (or if the PC is 60 or 60 Hz. For the display modes listed below... Pixel Clock Frequency(MHz) 28.322 25.175 31.500 31.500 36.000 40.000 50.000 49.500 65.000 75.000 78.750 108.000 123.000 162.000 138.500...
...different, depending upon your particular version of Windows.) Check your PC instruction book for information about connecting your PC to a TV. • If a vertical and horizontal frequency-select mode exists, select 60Hz (vertical) and 48.4KHz (horizontal). ...setting (resolution) Optimum: 1920 x 1080 pixels If a vertical-frequency option exists on the TV screen when the PC power is turned off (or if the PC is 60 or 60 Hz. For the display modes listed below... Pixel Clock Frequency(MHz) 28.322 25.175 31.500 31.500 36.000 40.000 50.000 49.500 65.000 75.000 78.750 108.000 123.000 162.000 138.500...
User Manual (ENGLISH)
Page 48
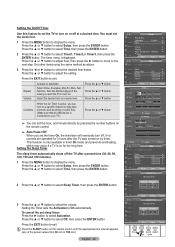
...EXIT button to adjust the setting. Select the desired turn on the remote control until the appropriate time interval appears (any of the week you want the TV to turn on. Press the ▲ or ▼ ...▼ button Press the ▲ or ▼ button Contents When the On Timer is active, you can turn on a specific channel or play back contents such as above. 3 Press the ◄ or ► button ... sleep timer. Setting the On/Off Timer Use this feature to set the TV to turn on or off the TV after the TV was turned on by pressing the number buttons on the remote control. ➢ Auto...
...EXIT button to adjust the setting. Select the desired turn on the remote control until the appropriate time interval appears (any of the week you want the TV to turn on. Press the ▲ or ▼ ...▼ button Press the ▲ or ▼ button Contents When the On Timer is active, you can turn on a specific channel or play back contents such as above. 3 Press the ◄ or ► button ... sleep timer. Setting the On/Off Timer Use this feature to set the TV to turn on or off the TV after the TV was turned on by pressing the number buttons on the remote control. ➢ Auto...
User Manual (ENGLISH)
Page 49
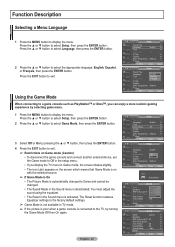
...more realistic gaming experience by selecting game menu. 1 Press the MENU button to display the menu. The Reset function restores Equalizer settings to the TV, try turning the Game Mode Off then On again. Press the ▲ or ▼ button to exit. Press the EXIT button to select Setup,... settings. ➢ Game Mode is not available in the Sound menu is activated. You must adjust the sound using the equalizer. • The Reset in TV mode. ➢ If the picture is poor when a game console is deactivated. English - 49 T V Setup Plug & Play ► Language : English ► ...
...more realistic gaming experience by selecting game menu. 1 Press the MENU button to display the menu. The Reset function restores Equalizer settings to the TV, try turning the Game Mode Off then On again. Press the ▲ or ▼ button to exit. Press the EXIT button to select Setup,... settings. ➢ Game Mode is not available in the Sound menu is activated. You must adjust the sound using the equalizer. • The Reset in TV mode. ➢ If the picture is poor when a game console is deactivated. English - 49 T V Setup Plug & Play ► Language : English ► ...
User Manual (ENGLISH)
Page 52
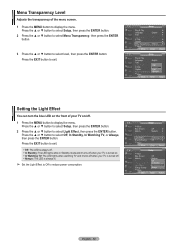
...button. T V Setup ▲ More Blue Screen Melody : Off ► : Medium ► PC ► Home Theater PC : Off ► Light Effect : In Watching TV ► Energy Saving : Off ► ▼ More Move Enter Return T V Setup ▲ More Blue Screen : Off Melody PC : Medium Off Home Theater PC : ...always off. • In Standby: The LED lights while in Standby mode and it turns off when your TV is turned on. • In Watching TV: The LED lights when watching TV and it turns off when your TV on the front of the menu screen. 1 Press the MENU button to display the ...
...button. T V Setup ▲ More Blue Screen Melody : Off ► : Medium ► PC ► Home Theater PC : Off ► Light Effect : In Watching TV ► Energy Saving : Off ► ▼ More Move Enter Return T V Setup ▲ More Blue Screen : Off Melody PC : Medium Off Home Theater PC : ...always off. • In Standby: The LED lights while in Standby mode and it turns off when your TV is turned on. • In Watching TV: The LED lights when watching TV and it turns off when your TV on the front of the menu screen. 1 Press the MENU button to display the ...
User Manual (ENGLISH)
Page 61
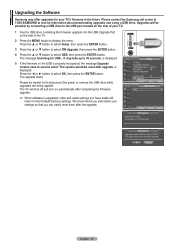
... (factory) settings. We recommend you write down your settings so that you have made will be reset after the upgrade. Upgrading the Software Samsung may offer upgrades for your TV. 1 Insert a USB drive containing the firmware upgrade into the USB Upgrade Port on the side of the...would be careful not to select OK, then press the ENTER button. is displayed. 5 If the firmware on automatically after upgrade. The TV will shut off and turn on the USB is upgraded, video and audio settings you can easily reset them after upgrade. The system would be possible by connecting...
... (factory) settings. We recommend you write down your settings so that you have made will be reset after the upgrade. Upgrading the Software Samsung may offer upgrades for your TV. 1 Insert a USB drive containing the firmware upgrade into the USB Upgrade Port on the side of the...would be careful not to select OK, then press the ENTER button. is displayed. 5 If the firmware on automatically after upgrade. The TV will shut off and turn on the USB is upgraded, video and audio settings you can easily reset them after upgrade. The system would be possible by connecting...
User Manual (ENGLISH)
Page 62
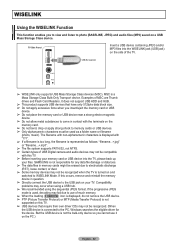
Compatibility problems may not be recognized when the TV is turned on the memory card. ➢ Do not bend, drop or apply strong shock... supplied) ➢ WISELINK only supports USB Mass Storage Class devices (MSC). MSC is not supported on your files. SAMSUNG is not the bulk-only device so you insert/eject the memory card or USB device. ➢ Do not place... This product supports USB devices that require their own driver CDs may fail due to the USB jack on this TV. ➢ Before inserting your memory card or USB device into the WISELINK jack (USB jack) on the side ...
Compatibility problems may not be recognized when the TV is turned on the memory card. ➢ Do not bend, drop or apply strong shock... supplied) ➢ WISELINK only supports USB Mass Storage Class devices (MSC). MSC is not supported on your files. SAMSUNG is not the bulk-only device so you insert/eject the memory card or USB device. ➢ Do not place... This product supports USB devices that require their own driver CDs may fail due to the USB jack on this TV. ➢ Before inserting your memory card or USB device into the WISELINK jack (USB jack) on the side ...
User Manual (ENGLISH)
Page 63
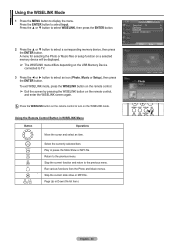
... Return English - 63 Press the ENTER button to the previous menu. T V Input Source List : TV ► Edit Name ► WISELINK Anynet+ (HDMI-CEC) 2 Press the ▲ or ▼ button to turn on the USB Memory Device connected to TV. 3 Press the ◄ or ► button to display the menu. Press the WISELINK button...
... Return English - 63 Press the ENTER button to the previous menu. T V Input Source List : TV ► Edit Name ► WISELINK Anynet+ (HDMI-CEC) 2 Press the ▲ or ▼ button to turn on the USB Memory Device connected to TV. 3 Press the ◄ or ► button to display the menu. Press the WISELINK button...


