User Manual
Page 2
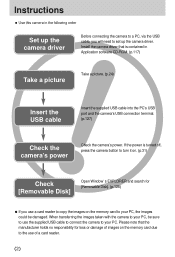
...(p.117) Take a picture Take a picture. (p.24) Insert the USB cable Insert the supplied USB cable into the PC's USB port and the camera's USB connection terminal. (p.127) Check the camera's power Check the camera's power. When transferring the images taken with the camera to your PC, be sure to use of images on the memory ...card to the use the supplied USB cable to connect the camera to set up the camera driver Before connecting the camera to a PC, via the USB cable, you use a card reader to copy the images on the memory card due to ...
...(p.117) Take a picture Take a picture. (p.24) Insert the USB cable Insert the supplied USB cable into the PC's USB port and the camera's USB connection terminal. (p.127) Check the camera's power Check the camera's power. When transferring the images taken with the camera to your PC, be sure to use of images on the memory ...card to the use the supplied USB cable to connect the camera to set up the camera driver Before connecting the camera to a PC, via the USB cable, you use a card reader to copy the images on the memory card due to ...

User Manual
Page 9
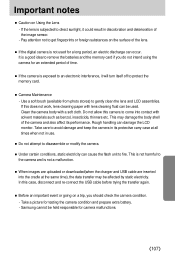
...12299; System chart Computer System Requirements PictBridge compatible printer(see p.101) CAUTION When you connect the camera to a computer, printer or external monitor, you have to use the USB/ AV cable supplied with processor better than MMX Pentium 233MHz (XP : Pentium II 300MHz) •Windows 98/...Minimum 32MB RAM (XP : 128MB) •140MB of available hard-disk space •USB port •CD-ROM drive •800x600 pixels, 16-bit colour display compatible monitor (24-bit colour display recommended) USB cable For Macintosh •Power Mac G3 or later •Mac OS 9.2 ~ 10.3...
...12299; System chart Computer System Requirements PictBridge compatible printer(see p.101) CAUTION When you connect the camera to a computer, printer or external monitor, you have to use the USB/ AV cable supplied with processor better than MMX Pentium 233MHz (XP : Pentium II 300MHz) •Windows 98/...Minimum 32MB RAM (XP : 128MB) •140MB of available hard-disk space •USB port •CD-ROM drive •800x600 pixels, 16-bit colour display compatible monitor (24-bit colour display recommended) USB cable For Macintosh •Power Mac G3 or later •Mac OS 9.2 ~ 10.3...

User Manual
Page 12
... at 1 second intervals. A picture will be taken after about 10 seconds and 2 seconds later a Blinking second picture will be taken. ■ Camera Status Lamp Status Power on After taking a picture When the USB cable is inserted to a PC Transmitting Data with a PC Description The lamp turns on and off when the... blinks while saving the image data and turns off when the camera is ready to take a picture The lamp lights up (LCD monitor turns off after initializing the device) The lamp blinks (LCD monitor turns off) When the USB cable is inserted to a printer The lamp lights up When the ...
... at 1 second intervals. A picture will be taken after about 10 seconds and 2 seconds later a Blinking second picture will be taken. ■ Camera Status Lamp Status Power on After taking a picture When the USB cable is inserted to a PC Transmitting Data with a PC Description The lamp turns on and off when the... blinks while saving the image data and turns off when the camera is ready to take a picture The lamp lights up (LCD monitor turns off after initializing the device) The lamp blinks (LCD monitor turns off) When the USB cable is inserted to a printer The lamp lights up When the ...

User Manual
Page 16
...error Red LED is off or blinking Direct to charge it, do not turn the camera off because the rechargeable battery is a charging error, please check all the power connections are in place. ● A USB cable for transmitting data can 't charge fully. Using the SAC-41 : About 150MIN ...INFORMATION Important information about the rechargeable battery. ● If you insert the fully discharged battery to the camera Red LED is on Green LED is on the...
...error Red LED is off or blinking Direct to charge it, do not turn the camera off because the rechargeable battery is a charging error, please check all the power connections are in place. ● A USB cable for transmitting data can 't charge fully. Using the SAC-41 : About 150MIN ...INFORMATION Important information about the rechargeable battery. ● If you insert the fully discharged battery to the camera Red LED is on Green LED is on the...

User Manual
Page 77
.../ Cancel No/ Yes Select/ All Pics/ Cancel - Setting up the play back function using the LCD monitor Menu tab Main menu DPOF Copy to the camera, sold separately) with a USB cable. Menu tab Main menu Sub menu Secondary menu Page Images One Pic All Pics p.90 -
.../ Cancel No/ Yes Select/ All Pics/ Cancel - Setting up the play back function using the LCD monitor Menu tab Main menu DPOF Copy to the camera, sold separately) with a USB cable. Menu tab Main menu Sub menu Secondary menu Page Images One Pic All Pics p.90 -

User Manual
Page 89
.... 《89》 In any mode with Cradle : Connect the camera and the cradle. Connect the cradle to a printer's USB port with the supplied USB cable. ● Using the USB cable with Camera : Connect the camera to a printer's USB port with the supplied USB cable. [Using the USB cable with Cradle] [Using the USB cable with Camera] ※ If you selected [Computer] in Step 4, when you...
.... 《89》 In any mode with Cradle : Connect the camera and the cradle. Connect the cradle to a printer's USB port with the supplied USB cable. ● Using the USB cable with Camera : Connect the camera to a printer's USB port with the supplied USB cable. [Using the USB cable with Cradle] [Using the USB cable with Camera] ※ If you selected [Computer] in Step 4, when you...

User Manual
Page 99
.../ Medium/ High 5. Refer to page 127 for instructions on how to connect the camera to connect the camera using the USB cable. ● Selecting an External Device 1. Select the [USB] menu by pressing the UP/ DOWN Setup Format Date&Time Imprint Sound USB Computer Printer Back:◀ Set:OK button and press the OK button. [Computer...
.../ Medium/ High 5. Refer to page 127 for instructions on how to connect the camera to connect the camera using the USB cable. ● Selecting an External Device 1. Select the [USB] menu by pressing the UP/ DOWN Setup Format Date&Time Imprint Sound USB Computer Printer Back:◀ Set:OK button and press the OK button. [Computer...

User Manual
Page 101
...Setup Sound USB AF Lamp NTSC PAL LCD Video Out Back:◀ Set:OK ■ Connecting to an external monitor ● Using the AV cable with Camera] Yellow - Connect the cradle to an external monitor with the supplied AV cable. ● Using the AV cable with Camera : Connect the camera to which the camera is ... the type of device (monitor or TV, etc.) to an external monitor with the supplied AV cable. [Using the AV cable with Cradle] [Using the AV cable with Cradle : Connect the camera and the cradle. Press the menu button twice and the menu will be NTSC or PAL. Selecting...
...Setup Sound USB AF Lamp NTSC PAL LCD Video Out Back:◀ Set:OK ■ Connecting to an external monitor ● Using the AV cable with Camera] Yellow - Connect the cradle to an external monitor with the supplied AV cable. ● Using the AV cable with Camera : Connect the camera to which the camera is ... the type of device (monitor or TV, etc.) to an external monitor with the supplied AV cable. [Using the AV cable with Cradle] [Using the AV cable with Cradle : Connect the camera and the cradle. Press the menu button twice and the menu will be NTSC or PAL. Selecting...
User Manual
Page 107
... foreign substances on the surface of the lens. ■ If the digital camera is not used . Do not allow this camera to come into the cradle at the same time), the data transfer ... assemblies. This may be affected by static electricity. Samsung cannot be used for a long period, an electric discharge can be held responsible for camera malfunctions. 《107》 It is a good...if you should check the camera condition. - This is not harmful to the camera and is not a malfunction. ■ When images are uploaded or downloaded(when the charger and USB cable are inserted into contact ...
... foreign substances on the surface of the lens. ■ If the digital camera is not used . Do not allow this camera to come into the cradle at the same time), the data transfer ... assemblies. This may be affected by static electricity. Samsung cannot be used for a long period, an electric discharge can be held responsible for camera malfunctions. 《107》 It is a good...if you should check the camera condition. - This is not harmful to the camera and is not a malfunction. ■ When images are uploaded or downloaded(when the charger and USB cable are inserted into contact ...
User Manual
Page 111
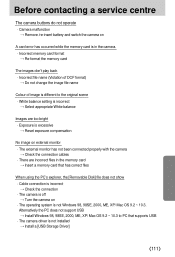
... the memory card is in the memory card → Insert a memory card that supports USB ㆍThe camera driver is not Windows 98, 98SE, 2000, ME, XP/ Mac OS 9.2 ~ 10.3. Alternatively the PC does not support USB → Install Windows 98, 98SE, 2000, ME, XP/ Mac OS 9.2 ~ 10...Reset exposure compensation No image on external monitor ㆍThe external monitor has not been connected properly with the camera → Check the connection cables ㆍThere are incorrect files in the camera. ㆍIncorrect memory card format → Re-format the memory card The images don't play back &#...
... the memory card is in the memory card → Insert a memory card that supports USB ㆍThe camera driver is not Windows 98, 98SE, 2000, ME, XP/ Mac OS 9.2 ~ 10.3. Alternatively the PC does not support USB → Install Windows 98, 98SE, 2000, ME, XP/ Mac OS 9.2 ~ 10...Reset exposure compensation No image on external monitor ㆍThe external monitor has not been connected properly with the camera → Check the connection cables ㆍThere are incorrect files in the camera. ㆍIncorrect memory card format → Re-format the memory card The images don't play back &#...

User Manual
Page 125
... OS is Windows XP, an image viewer program will recognise the camera. * If you can see [Removable Disk] under [My computer], the camera driver installation was setup successfully. 34. Select [Yes, I want to the camera with the USB cable. 33. After restarting the computer, connect the PC to restart... my computer now], and then click [Finish]. [Click !] 32. To apply changes, you can transfer image files from the camera to PC via the USB cable. 《125》 If you ...
... OS is Windows XP, an image viewer program will recognise the camera. * If you can see [Removable Disk] under [My computer], the camera driver installation was setup successfully. 34. Select [Yes, I want to the camera with the USB cable. 33. After restarting the computer, connect the PC to restart... my computer now], and then click [Finish]. [Click !] 32. To apply changes, you can transfer image files from the camera to PC via the USB cable. 《125》 If you ...
User Manual
Page 127
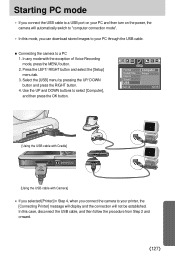
...this mode, you can download stored images to your PC through the USB cable. ■ Connecting the camera to a PC 1. Setup Format Date&Time Imprint Sound USB Computer Printer Back:◀ Set:OK [Using the USB cable with Cradle] [Using the USB cable with the exception of Voice Recording mode, press the MENU button. ...2. Starting PC mode • If you connect the USB cable to a USB port on your PC and then turn on the power, the camera will not be established. Use the UP and DOWN buttons to your printer, the [Connecting Printer] message...
...this mode, you can download stored images to your PC through the USB cable. ■ Connecting the camera to a PC 1. Setup Format Date&Time Imprint Sound USB Computer Printer Back:◀ Set:OK [Using the USB cable with Cradle] [Using the USB cable with the exception of Voice Recording mode, press the MENU button. ...2. Starting PC mode • If you connect the USB cable to a USB port on your PC and then turn on the power, the camera will not be established. Use the UP and DOWN buttons to your printer, the [Connecting Printer] message...
User Manual
Page 128
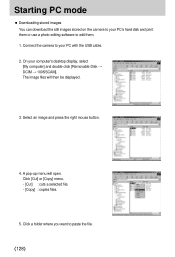
...[Copy] menu. - [Cut] : cuts a selected file. - [Copy] : copies files. 5. Connect the camera to paste the file. 《128》 Click a folder where you want to your PC with the USB cable. 2. Select an image and press the right mouse button. 4. Starting PC mode ■ Downloading stored images You... can download the still images stored on the camera to your computer's desktop display, select [My computer] and ...
...[Copy] menu. - [Cut] : cuts a selected file. - [Copy] : copies files. 5. Connect the camera to paste the file. 《128》 Click a folder where you want to your PC with the USB cable. 2. Select an image and press the right mouse button. 4. Starting PC mode ■ Downloading stored images You... can download the still images stored on the camera to your computer's desktop display, select [My computer] and ...
User Manual
Page 131
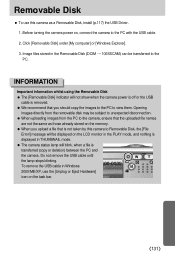
... the lamp stops blinking. Removable Disk ■ To use the [Unplug or Eject Hardware] icon on , connect the camera to the PC with the USB cable. 2. Before turning the camera power on the task bar. 《131》 INFORMATION Important information whilst using the Removable Disk ● The [Removable ...Disk] indicator will not show when the camera power is off or the USB cable is transferred (copy or deletion) between the PC and the camera. Image files stored in the Removable Disk (DCIM → 100SSCAM) can be displayed on the...
... the lamp stops blinking. Removable Disk ■ To use the [Unplug or Eject Hardware] icon on , connect the camera to the PC with the USB cable. 2. Before turning the camera power on the task bar. 《131》 INFORMATION Important information whilst using the Removable Disk ● The [Removable ...Disk] indicator will not show when the camera power is off or the USB cable is transferred (copy or deletion) between the PC and the camera. Image files stored in the Removable Disk (DCIM → 100SSCAM) can be displayed on the...

User Manual
Page 132
... USB cable. ■ Windows 2000/ME/XP (The illustrations may be different from the real display in accordance with the Windows O/S.) 1. The [Unplug or Eject Hardware] window will open . Double-click the [Unplug or Eject Hardware] icon on the task bar. [Double-click!] 3. If the camera status... lamp blinks, you have to Remove Hardware] window will open . Select the [USB Mass Storage Device] and click the [Stop] button. [Click !] 4. The [Stop a Hardware device] window ...
... USB cable. ■ Windows 2000/ME/XP (The illustrations may be different from the real display in accordance with the Windows O/S.) 1. The [Unplug or Eject Hardware] window will open . Double-click the [Unplug or Eject Hardware] icon on the task bar. [Double-click!] 3. If the camera status... lamp blinks, you have to Remove Hardware] window will open . Select the [USB Mass Storage Device] and click the [Stop] button. [Click !] 4. The [Stop a Hardware device] window ...
User Manual
Page 133
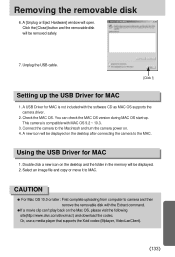
... the software CD as MAC OS supports the camera driver. 2. Connect the camera to camera and then remove the removable disk with the Extract command. ●If a movie clip can check the MAC OS version during MAC OS start-up the USB Driver for MAC 1. CAUTION ● For ...the removable disk will be removed safely. 7. You can 't play back on . 4. Double click a new icon on the desktop after connecting the camera to MAC. Unplug the USB cable. [Click !] Setting up . A new icon will open. Or, use a media player that supports the Xvid codec (Mplayer, VideoLanClient). 《...
... the software CD as MAC OS supports the camera driver. 2. Connect the camera to camera and then remove the removable disk with the Extract command. ●If a movie clip can check the MAC OS version during MAC OS start-up the USB Driver for MAC 1. CAUTION ● For ...the removable disk will be removed safely. 7. You can 't play back on . 4. Double click a new icon on the desktop after connecting the camera to MAC. Unplug the USB cable. [Click !] Setting up . A new icon will open. Or, use a media player that supports the Xvid codec (Mplayer, VideoLanClient). 《...
User Manual
Page 135
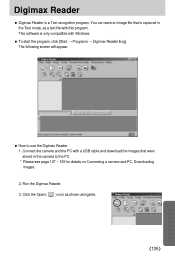
... mode, as shown alongside. 《135》 Run the Digimax Reader. 3. Connect the camera and the PC with a USB cable and download the images that is captured in the camera to use the Digimax Reader 1. Click the Open( ) icon as a text file with this program. Digimax Reader ■ Digimax Reader is only compatible with Windows. ■ To start...
... mode, as shown alongside. 《135》 Run the Digimax Reader. 3. Connect the camera and the PC with a USB cable and download the images that is captured in the camera to use the Digimax Reader 1. Click the Open( ) icon as a text file with this program. Digimax Reader ■ Digimax Reader is only compatible with Windows. ■ To start...
User Manual
Page 139
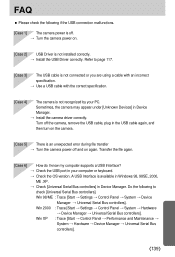
FAQ ■ Please check the following to page 117. [Case 3] The USB cable is not connected or you are using a cable with an incorrect specification. → Use a USB cable with the correct specification. [Case 4] The camera is available in Windows 98, 98SE, 2000, ME .XP. → ... Sometimes, the camera may appear under [Unknown Devices] in the USB cable again, and then turn on the camera. [Case 5] There is an unexpected error during file transfer → Turn the camera power off the camera, remove the USB cable, plug in Device Manager. → Install the camera driver correctly. ...
FAQ ■ Please check the following to page 117. [Case 3] The USB cable is not connected or you are using a cable with an incorrect specification. → Use a USB cable with the correct specification. [Case 4] The camera is available in Windows 98, 98SE, 2000, ME .XP. → ... Sometimes, the camera may appear under [Unknown Devices] in the USB cable again, and then turn on the camera. [Case 5] There is an unexpected error during file transfer → Turn the camera power off the camera, remove the USB cable, plug in Device Manager. → Install the camera driver correctly. ...
User Manual
Page 140
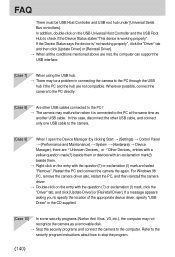
... In some security programs (Norton Anti Virus, V3, etc.), the computer may not recognize the camera as another USB cable. In this case, disconnect the other USB cables connected to the PC? → The camera may malfunction when it is "not working properly". Restart the PC and connect the...click the "Driver" tab, and click [Update Driver] or [Reinstall Driver]. Wherever possible, connect the camera to the PC directly. [Case 8] Are other USB cable, and connect only one USB cable to the computer. Refer to the security program instructions about how to the PC at the same time ...
... In some security programs (Norton Anti Virus, V3, etc.), the computer may not recognize the camera as another USB cable. In this case, disconnect the other USB cables connected to the PC? → The camera may malfunction when it is "not working properly". Restart the PC and connect the...click the "Driver" tab, and click [Update Driver] or [Reinstall Driver]. Wherever possible, connect the camera to the PC directly. [Case 8] Are other USB cable, and connect only one USB cable to the computer. Refer to the security program instructions about how to the PC at the same time ...


