
User Manual
Page 1
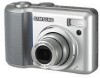
Please read this manual carefully before using the application software. User's Manual Thank you through using the camera, including capturing images, downloading images and using your new camera. ENGLISH This manual will guide you for buying a Samsung Camera.
Please read this manual carefully before using the application software. User's Manual Thank you through using the camera, including capturing images, downloading images and using your new camera. ENGLISH This manual will guide you for buying a Samsung Camera.

User Manual
Page 2
... Take a picture. (p.14) Insert the USB cable Insert the supplied USB cable into the PC's USB port and the camera's USB connection terminal. (p.69) Getting to know your camera Thank you for buying a Samsung Digital Camera. ƃ Prior to using this manual are registered trademarks of Microsoft Corporation incorporated in the United States and/or...
... Take a picture. (p.14) Insert the USB cable Insert the supplied USB cable into the PC's USB port and the camera's USB connection terminal. (p.69) Getting to know your camera Thank you for buying a Samsung Digital Camera. ƃ Prior to using this manual are registered trademarks of Microsoft Corporation incorporated in the United States and/or...

User Manual
Page 3
...are using it . Should this be carried out by your dealer or Samsung Camera Service centre. Then make sure that any way. Switch off the camera before moving parts. ƈ Battery and camera may adversely affect the camera's internal components and could increase the risk of explosion. ƈ ..., could result in contact with wet hands. You must contact your dealer or Samsung Camera Service centre. ƈ Please do so may cause heat to avoid taking an unclear image and possibly causing camera malfunction. ƈ Avoid obstructing the lens or the flash when you or your...
...are using it . Should this be carried out by your dealer or Samsung Camera Service centre. Then make sure that any way. Switch off the camera before moving parts. ƈ Battery and camera may adversely affect the camera's internal components and could increase the risk of explosion. ƈ ..., could result in contact with wet hands. You must contact your dealer or Samsung Camera Service centre. ƈ Please do so may cause heat to avoid taking an unclear image and possibly causing camera malfunction. ƈ Avoid obstructing the lens or the flash when you or your...

User Manual
Page 4
...333;ōō7 ƈCradle(Optional 7 ƈSelf-timer lamp 8 ƈCamera Status Lamp ōōōōō8 ƈMode icon 8 ƃConnecting ...memory cardō10 ƃWhen Using the Camera for the First Timeō12 RECORDING ƃ...333;ōōōō38 ƃUsing the camera buttons to set the camera 39 ƈThumbnail / Enlargement button ō39 ...When Taking Pictures 17 ƃUsing the camera buttons to set the camera 18 ƈPOWER button 18 ƈShutter...29 ƃUsing the LCD monitor to set the camera settings 32 ƈHow to use the VOICE RECORDING...
...333;ōō7 ƈCradle(Optional 7 ƈSelf-timer lamp 8 ƈCamera Status Lamp ōōōōō8 ƈMode icon 8 ƃConnecting ...memory cardō10 ƃWhen Using the Camera for the First Timeō12 RECORDING ƃ...333;ōōōō38 ƃUsing the camera buttons to set the camera 39 ƈThumbnail / Enlargement button ō39 ...When Taking Pictures 17 ƃUsing the camera buttons to set the camera 18 ƈPOWER button 18 ƈShutter...29 ƃUsing the LCD monitor to set the camera settings 32 ƈHow to use the VOICE RECORDING...

User Manual
Page 5
..., you have the correct contents before using this product. The contents can 't recognise the camera. To buy the optional equipment, contact your nearest Samsung dealer or Samsung service centre. < Included items > Camera case User manual, Product warranty Camera strap Software CD (see p.67) DPOF compatible printer (see p.48) SD memory card... available hard-disk space ҮUSB port ҮCD-ROM drive External monitor (see p.59) CAUTION When you connect the camera to use the USB / AV cable supplied with the camera, or the external devices can vary depending on the sales region.
..., you have the correct contents before using this product. The contents can 't recognise the camera. To buy the optional equipment, contact your nearest Samsung dealer or Samsung service centre. < Included items > Camera case User manual, Product warranty Camera strap Software CD (see p.67) DPOF compatible printer (see p.48) SD memory card... available hard-disk space ҮUSB port ҮCD-ROM drive External monitor (see p.59) CAUTION When you connect the camera to use the USB / AV cable supplied with the camera, or the external devices can vary depending on the sales region.

User Manual
Page 7
button, Delete button Play mode / Printer button 5 function button USB / AV connection terminal Cradle connector Identification of features Back & Bottom LCD monitor Tripod socket ŝ6Ş Camera status lamp Zoom W button (Thumbnail) Zoom T button (Digital zoom) E (Effects) button +/-
button, Delete button Play mode / Printer button 5 function button USB / AV connection terminal Cradle connector Identification of features Back & Bottom LCD monitor Tripod socket ŝ6Ş Camera status lamp Zoom W button (Thumbnail) Zoom T button (Digital zoom) E (Effects) button +/-

User Manual
Page 8
Identification of features Bottom / 5-function button Battery chamber cover Memory card slot Battery chamber Cradle (Optional) ƈ You can recharge your rechargeable battery (SBP-2524), transfer a captured image to print, and download images with the cradle. (Refer to page 51, 69~71) ƃ Top Camera connection terminal Voice memo / Voice Recording / Up button Menu / OK button Flash / Left button Self-timer / Right button Macro / Down button Play & Pause button ƃ Back USB port / AV connection terminal AC connection terminal ŝ7Ş
Identification of features Bottom / 5-function button Battery chamber cover Memory card slot Battery chamber Cradle (Optional) ƈ You can recharge your rechargeable battery (SBP-2524), transfer a captured image to print, and download images with the cradle. (Refer to page 51, 69~71) ƃ Top Camera connection terminal Voice memo / Voice Recording / Up button Menu / OK button Flash / Left button Self-timer / Right button Macro / Down button Play & Pause button ƃ Back USB port / AV connection terminal AC connection terminal ŝ7Ş

User Manual
Page 9
...PLAY Icon SCENE MODE LANDSCAPE CLOSE UP SUNSET DAWN BACKLIGHT FIREWORKS BEACH & SNOW Icon Connecting to page 14~17 for more information about the camera mode setting. Non rechargeable batteries : 2 X AA Alkaline (High Capacity) - A picture will be taken after about 10 seconds and... 2,500mAh Voltage 1.2V X 2 1.2V X 2 Charging time Approximately 210 ~ 240Minutes Approximately 240 Minutes (Use for cradle) (Use for a digital camera (Within a year from the date of features ƈ Self-timer lamp Icon Status Blinking Blinking Blinking Description For the 2 seconds, the lamp blinks...
...PLAY Icon SCENE MODE LANDSCAPE CLOSE UP SUNSET DAWN BACKLIGHT FIREWORKS BEACH & SNOW Icon Connecting to page 14~17 for more information about the camera mode setting. Non rechargeable batteries : 2 X AA Alkaline (High Capacity) - A picture will be taken after about 10 seconds and... 2,500mAh Voltage 1.2V X 2 1.2V X 2 Charging time Approximately 210 ~ 240Minutes Approximately 240 Minutes (Use for cradle) (Use for a digital camera (Within a year from the date of features ƈ Self-timer lamp Icon Status Blinking Blinking Blinking Description For the 2 seconds, the lamp blinks...
User Manual
Page 10
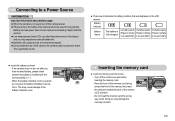
... ƃ During extended use spare battery) ƈ Insert the battery as shown. - This may cause damage to leaking if kept inside the camera. ƃ Low temperatures (below 0˚C) can lose power over time and are prone to the battery chamber cover. Have the front of the...capacity Low battery capacity (Prepare to recharge (Prepare to recharge (Prepare to a Power Source INFORMATION Important information about battery usage ƃ When the camera is inserted with the correct polarity (+ / -). - This is opened, do not press the battery chamber cover by force. Connecting to recharge or...
... ƃ During extended use spare battery) ƈ Insert the battery as shown. - This may cause damage to leaking if kept inside the camera. ƃ Low temperatures (below 0˚C) can lose power over time and are prone to the battery chamber cover. Have the front of the...capacity Low battery capacity (Prepare to recharge (Prepare to recharge (Prepare to a Power Source INFORMATION Important information about battery usage ƃ When the camera is inserted with the correct polarity (+ / -). - This is opened, do not press the battery chamber cover by force. Connecting to recharge or...

User Manual
Page 11
...card formatted by the Samsung warranty. ƃ The memory card is subjected to come into contact with strong electronic or magnetic fields, e.g. Should this happen, clean the memory card with a soft cloth. ƃ Please keep the memory card in its case when not in another digital camera or memory card reader.... ƃ If the memory card is an electronic precision device. To use the memory card in the camera, replace the memory card or delete unnecessary images stored on the memory ...
...card formatted by the Samsung warranty. ƃ The memory card is subjected to come into contact with strong electronic or magnetic fields, e.g. Should this happen, clean the memory card with a soft cloth. ƃ Please keep the memory card in its case when not in another digital camera or memory card reader.... ƃ If the memory card is an electronic precision device. To use the memory card in the camera, replace the memory card or delete unnecessary images stored on the memory ...

User Manual
Page 12
...the enclosed manual for using a 20MB internal memory, the specified shooting capacity will be cancelled. Card pins Write protect switch Label [ SD (Secure Digital) memory card ] The SD memory card has a write protect switch that prevents image files from being deleted or formatted. By sliding the switch ...Instructions on how to use the memory card INFORMATION ƃ Don't remove the memory card when the camera status lamp is blinking as this may cause damage to data in the memory card. ƈ The camera can use during the movie recording. ŝ11Ş Movie 320 - - Slide the switch ...
...the enclosed manual for using a 20MB internal memory, the specified shooting capacity will be cancelled. Card pins Write protect switch Label [ SD (Secure Digital) memory card ] The SD memory card has a write protect switch that prevents image files from being deleted or formatted. By sliding the switch ...Instructions on how to use the memory card INFORMATION ƃ Don't remove the memory card when the camera status lamp is blinking as this may cause damage to data in the memory card. ƈ The camera can use during the movie recording. ŝ11Ş Movie 320 - - Slide the switch ...

User Manual
Page 13
This menu will not be maintained. ƃ Setting up . Set up the date / time, language and battery type before using this camera. ƃ Setting up the language 1. SETUP Date&Time Language 06/01/01 Battery Type 13:00 yy/mm/dd Back: Set:OK ... S.Chinese, T.Chinese, Japanese, Russian, Portuguese, Dutch, Danish, Swedish, Finnish, Thai, BAHASA(MALAY/ INDONESIAN), Arabic, Czech, Polish, Hungarian and Turkish. ƃ Even if the camera is restarted, the language setting will be displayed after setting up the battery type 1. Select the desired sub menu by pressing the UP / DOWN button...
This menu will not be maintained. ƃ Setting up . Set up the date / time, language and battery type before using this camera. ƃ Setting up the language 1. SETUP Date&Time Language 06/01/01 Battery Type 13:00 yy/mm/dd Back: Set:OK ... S.Chinese, T.Chinese, Japanese, Russian, Portuguese, Dutch, Danish, Swedish, Finnish, Thai, BAHASA(MALAY/ INDONESIAN), Arabic, Czech, Polish, Hungarian and Turkish. ƃ Even if the camera is restarted, the language setting will be displayed after setting up the battery type 1. Select the desired sub menu by pressing the UP / DOWN button...

User Manual
Page 14
Description 4 Continuous shot 5 Flash 6 Self-timer 7 Macro 8 Metering 9 Card inserted indicator 10 Auto focus frame 11 Camera shake warning 12 Date / Time 13 Exposure compensation 14 White Balance 15 ISO 16 RGB 17 Sharpness 18 Image quality / Frame rate 19 Image size ...Number of available shots remaining 20 Remaining time (Movie clip/ Voice recording) 21 Voice memo 22 Optical/ Digital Zoom bar/ Digital Zoom rate Icons 2006/01/01 01:00 PM RGB 12 00:01:30/ 01:00:00 Page p.34 p.22~23 p.23~24 p.20...
Description 4 Continuous shot 5 Flash 6 Self-timer 7 Macro 8 Metering 9 Card inserted indicator 10 Auto focus frame 11 Camera shake warning 12 Date / Time 13 Exposure compensation 14 White Balance 15 ISO 16 RGB 17 Sharpness 18 Image quality / Frame rate 19 Image size ...Number of available shots remaining 20 Remaining time (Movie clip/ Voice recording) 21 Voice memo 22 Optical/ Digital Zoom bar/ Digital Zoom rate Icons 2006/01/01 01:00 PM RGB 12 00:01:30/ 01:00:00 Page p.34 p.22~23 p.23~24 p.20...

User Manual
Page 15
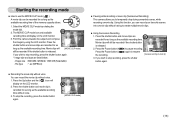
...metering (p.34), continuous shooting (p.34) and special effects (p.25). [ PROGRAM mode ] ƈ How to insert the memory card. Point the camera towards the subject and compose the image by rotating the mode dial. 2. You can manually configure all functions except the aperture value and shutter ... monitor. 7. Starting the recording mode ƈ How to use the PROGRAM mode ( ) Selecting the automatic mode will configure the camera with optimal settings. As this mode for the shutter speed and aperture value will be stored on the subject. If the memory card...
...metering (p.34), continuous shooting (p.34) and special effects (p.25). [ PROGRAM mode ] ƈ How to insert the memory card. Point the camera towards the subject and compose the image by rotating the mode dial. 2. You can manually configure all functions except the aperture value and shutter ... monitor. 7. Starting the recording mode ƈ How to use the PROGRAM mode ( ) Selecting the automatic mode will configure the camera with optimal settings. As this mode for the shutter speed and aperture value will be stored on the subject. If the memory card...
User Manual
Page 16
... Using Successive Recording 1. Stop:Shutter REC: / Press the Pause button ( the recording. ) again to stop during unwanted scenes, while recording a movie clip. Point the camera towards the subject and compose the image by rotating the mode dial. 2. If you to temporarily stop recording, press the shutter button again. ŝ15... voice. 3. To stop the recording, press the shutter button again. [ MOVIE CLIP mode ] ƈ Pausing while recording a movie clip (Successive Recording) This camera allows you wish to resume [Successive recording of the memory capacity allows. 1.
... Using Successive Recording 1. Stop:Shutter REC: / Press the Pause button ( the recording. ) again to stop during unwanted scenes, while recording a movie clip. Point the camera towards the subject and compose the image by rotating the mode dial. 2. If you to temporarily stop recording, press the shutter button again. ŝ15... voice. 3. To stop the recording, press the shutter button again. [ MOVIE CLIP mode ] ƈ Pausing while recording a movie clip (Successive Recording) This camera allows you wish to resume [Successive recording of the memory capacity allows. 1.

User Manual
Page 18
... light, or when the background is very bright. - When photographing a subject that has little contrast. - In this case, use a tripod, support the camera on a solid surface or change to flash shot mode. ƈ Shooting against the sun, please use the VOICE RECORDING mode ( ) 1. Press the shutter...picture. [ Lightly press the shutter button ] [ Press the shutter button ] ƈ The available recording time may vary depending on shooting conditions and camera settings. ƈ When the Flash Off or Slow synchro mode is selected in flash (see page 22), spot metering (see page 34), or ...
... light, or when the background is very bright. - When photographing a subject that has little contrast. - In this case, use a tripod, support the camera on a solid surface or change to flash shot mode. ƈ Shooting against the sun, please use the VOICE RECORDING mode ( ) 1. Press the shutter...picture. [ Lightly press the shutter button ] [ Press the shutter button ] ƈ The available recording time may vary depending on shooting conditions and camera settings. ƈ When the Flash Off or Slow synchro mode is selected in flash (see page 22), spot metering (see page 34), or ...

User Manual
Page 19
... process for taking an image or recording voice in the memory allows. Releasing ZOOM T button stops the digital zooming at the required setting. Using the camera buttons to set up by using the camera buttons. Press the shutter button once and the movie clip is recorded for turning the... the condition of 30X. ƃ TELE Zoom Optical zoom TELE Digital zoom TELE : Pressing the ZOOM T button. POWER button ƃ Used for as long as the OPTICAL ZOOM or DIGITAL ZOOM button. ƃ This camera has a 3X optical zoom and a 10X digital zoom function. ZOOM W / T button ƃ If the menu...
... process for taking an image or recording voice in the memory allows. Releasing ZOOM T button stops the digital zooming at the required setting. Using the camera buttons to set up by using the camera buttons. Press the shutter button once and the movie clip is recorded for turning the... the condition of 30X. ƃ TELE Zoom Optical zoom TELE Digital zoom TELE : Pressing the ZOOM T button. POWER button ƃ Used for as long as the OPTICAL ZOOM or DIGITAL ZOOM button. ƃ This camera has a 3X optical zoom and a 10X digital zoom function. ZOOM W / T button ƃ If the menu...

User Manual
Page 20
... button [ TELE zoom ] [ Optical zoom 2X ] [ WIDE zoom ] Digital zoom WIDE Optical zoom Digital zoom : When the digital zoom is in operation, pressing the ZOOM W button will zoom out from the camera. This will reduce the digital zooming in the Nightscene mode, Children mode and two scene modes (Close up...as this to take a little longer for this may cause a camera malfunction. ƃ When the camera is reached. the subject appears at the maximum (5X) optical zoom position and press the zoom T button again. ƃ The digital zoom can't be used in movie clip shots. ƃ ...
... button [ TELE zoom ] [ Optical zoom 2X ] [ WIDE zoom ] Digital zoom WIDE Optical zoom Digital zoom : When the digital zoom is in operation, pressing the ZOOM W button will zoom out from the camera. This will reduce the digital zooming in the Nightscene mode, Children mode and two scene modes (Close up...as this to take a little longer for this may cause a camera malfunction. ƃ When the camera is reached. the subject appears at the maximum (5X) optical zoom position and press the zoom T button again. ƃ The digital zoom can't be used in movie clip shots. ƃ ...

User Manual
Page 21
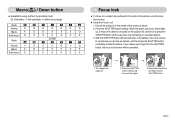
...80~Infinity T : 80~Infinity W : 4~80 T : 50~80 W : 80~Infinity T : 80~Infinity INFORMATION ƃ When the macro mode is selected, it is possible that camera shake will occur. The distance ranges are shown below. Stop:Shutter [Preparing for more information about the voice recording. ƃ Recording a voice memo 1. The picture...is not displayed on the LCD monitor, the setting is not showing, you can add your voice-over to shake the camera. ƃ When you and the camera (microphone) is stored. When the menu is completed. You can use the MACRO / DOWN button to page 17 ...
...80~Infinity T : 80~Infinity W : 4~80 T : 50~80 W : 80~Infinity T : 80~Infinity INFORMATION ƃ When the macro mode is selected, it is possible that camera shake will occur. The distance ranges are shown below. Stop:Shutter [Preparing for more information about the voice recording. ƃ Recording a voice memo 1. The picture...is not displayed on the LCD monitor, the setting is not showing, you can add your voice-over to shake the camera. ƃ When you and the camera (microphone) is stored. When the menu is completed. You can use the MACRO / DOWN button to page 17 ...
User Manual
Page 22
The image to avoid taking an unwanted picture. 3. Be careful not to press the SHUTTER button all the way down only halfway, move the camera to recompose your finger from the SHUTTER button, the focus lock function will be captured. 2. Recompose the picture and fully press the SHUTTER button....picture as desired, and then press the SHUTTER button completely to take the picture. When the green auto focus frame lights up, it means the camera is in the centre of the autofocus frame. 2. Press the SHUTTER button halfway and focus on a subject not positioned in the centre of the...
The image to avoid taking an unwanted picture. 3. Be careful not to press the SHUTTER button all the way down only halfway, move the camera to recompose your finger from the SHUTTER button, the focus lock function will be captured. 2. Recompose the picture and fully press the SHUTTER button....picture as desired, and then press the SHUTTER button completely to take the picture. When the green auto focus frame lights up, it means the camera is in the centre of the autofocus frame. 2. Press the SHUTTER button halfway and focus on a subject not positioned in the centre of the...


