User Manual
Page 2
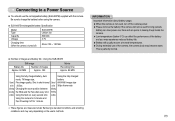
... power is turned off, press the camera button to turn it (e.g. Samsung camera takes no responsibility for loss or damage of images on the memory card due to the use the supplied USB cable to connect the camera to your PC. Check [Removable Disk] Open Window's EXPLORER and search for [Removable Disk]. (p.67) ● If you will need to set up the camera driver Before connecting the camera to a PC, via the USB cable, you use a card reader to copy the images on the memory card...
... power is turned off, press the camera button to turn it (e.g. Samsung camera takes no responsibility for loss or damage of images on the memory card due to the use the supplied USB cable to connect the camera to your PC. Check [Removable Disk] Open Window's EXPLORER and search for [Removable Disk]. (p.67) ● If you will need to set up the camera driver Before connecting the camera to a PC, via the USB cable, you use a card reader to copy the images on the memory card...
User Manual
Page 4
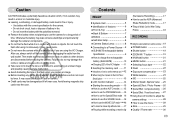
...;ZOOM W / T button 19 ■M (Mode) button 21 ■MENU button 21 ■Selecting focus type 22 ■Flash 22 ■Exposure compensation 23 ■White balance 24 ■ISO 25 ■Shutter Speed / Aperture Value 25 ■Special Effect : Photo Frame 26 ■Special Effect : Composite shooting 26 ■Special Effect : Preset focus frames 27 ●Using the LCD monitor to adjust the camera settings 28 ■How to avoid taking an unclear image and...
...;ZOOM W / T button 19 ■M (Mode) button 21 ■MENU button 21 ■Selecting focus type 22 ■Flash 22 ■Exposure compensation 23 ■White balance 24 ■ISO 25 ■Shutter Speed / Aperture Value 25 ■Special Effect : Photo Frame 26 ■Special Effect : Composite shooting 26 ■Special Effect : Preset focus frames 27 ●Using the LCD monitor to adjust the camera settings 28 ■How to avoid taking an unclear image and...
User Manual
Page 5
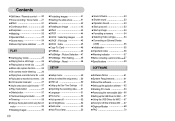
...;Imprinting the recording date 51 ■Language 51 ■File name... 52 ■Auto power off 52 ■LCD brightness 52 ■Quick view 53 ■Auto Focus lamp 53 《4》 ■Sound Volume 53 ■Shutter sound 53 ■Operation Sound 53 ■Start up sound 53 ■Start up image 54 ■Formatting a memory 54 ■Selecting Video out type 54 ■Connecting an External Device (USB) 55 ■Initialisation 55 ●Important notes...
...;Imprinting the recording date 51 ■Language 51 ■File name... 52 ■Auto power off 52 ■LCD brightness 52 ■Quick view 53 ■Auto Focus lamp 53 《4》 ■Sound Volume 53 ■Shutter sound 53 ■Operation Sound 53 ■Start up sound 53 ■Start up image 54 ■Formatting a memory 54 ■Selecting Video out type 54 ■Connecting an External Device (USB) 55 ■Initialisation 55 ●Important notes...
User Manual
Page 10
... using the camera. ■ SLB-0837B rechargeable battery Specification Model Type Capacity Voltage Charging time (When the camera is turned off the camera power. ● Please remove the battery if the camera will usually recover at normal temperatures. ● During extended use the rechargeable battery (SLB-0837B) supplied with the camera. Be sure to shot interval Based 640X480 image size on the 30fps frame rate following Changing the zoom position between following shooting...
... using the camera. ■ SLB-0837B rechargeable battery Specification Model Type Capacity Voltage Charging time (When the camera is turned off the camera power. ● Please remove the battery if the camera will usually recover at normal temperatures. ● During extended use the rechargeable battery (SLB-0837B) supplied with the camera. Be sure to shot interval Based 640X480 image size on the 30fps frame rate following Changing the zoom position between following shooting...
User Manual
Page 16
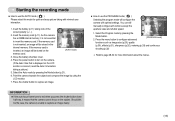
...-34 for quick and easy picture taking note of the correct polarity (+ / -). 2. Press the menu button to configure advanced [PROGRAM mode] functions such as image size (p.29), quality (p.30), effects (p.31), sharpness (p.32), metering (p.33) and continuous shooting (p.32) ※ Refer to turn on the camera. (If the date / time that the camera cannot focus on the [AUTO mode] memory card. 3. INFORMATION ● If the auto focus frame turns to red when you press the shutter button down...
...-34 for quick and easy picture taking note of the correct polarity (+ / -). 2. Press the menu button to configure advanced [PROGRAM mode] functions such as image size (p.29), quality (p.30), effects (p.31), sharpness (p.32), metering (p.33) and continuous shooting (p.32) ※ Refer to turn on the camera. (If the date / time that the camera cannot focus on the [AUTO mode] memory card. 3. INFORMATION ● If the auto focus frame turns to red when you press the shutter button down...
User Manual
Page 19
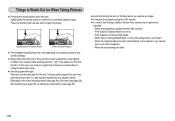
.... - Press the shutter button all way down half way. To take a picture against the sun, please use a tripod, support the camera on shooting conditions and camera settings. ■ When either the Flash Off or Slow synchro mode is moving at high speed. - Things to confirm focus and flash battery charge. If the subject is selected in flash (see page 22), spot metering (see page 33), or exposure compensation (see...
.... - Press the shutter button all way down half way. To take a picture against the sun, please use a tripod, support the camera on shooting conditions and camera settings. ■ When either the Flash Off or Slow synchro mode is moving at high speed. - Things to confirm focus and flash battery charge. If the subject is selected in flash (see page 22), spot metering (see page 33), or exposure compensation (see...
User Manual
Page 24
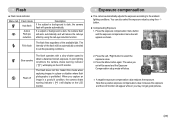
... warning indicator ( ) will display on the LCD monitor. Flash ● Flash mode indicator Menu tab Flash mode Auto flash Auto & Red eye reduction Description If the subject or background is dark, the camera flash will work automatically and will reduce the red-eye effect by using the red-eye reduction function. Slow synchro The flash operates with a slow shutter speed to select the exposure value. 3. Fill in a place or situation where flash photography is prohibited. When you set will be automatically controlled...
... warning indicator ( ) will display on the LCD monitor. Flash ● Flash mode indicator Menu tab Flash mode Auto flash Auto & Red eye reduction Description If the subject or background is dark, the camera flash will work automatically and will reduce the red-eye effect by using the red-eye reduction function. Slow synchro The flash operates with a slow shutter speed to select the exposure value. 3. Fill in a place or situation where flash photography is prohibited. When you set will be automatically controlled...
User Manual
Page 33
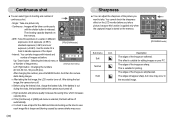
... and number of image menu. [Interval shot menu] Left / Right button : Changing the numbers (00 min-60 min / 00 pics-99 pics). Continuous : Images will be off . ※ Before using the Interval shot, charge the battery fully. Use the mode if it is released. Interval : You can adjust the sharpness of the image are sharp. Soft This effect is suitable for editing images on Shooting the memory. - This is suitable for printing. AEB : Take three pictures...
... and number of image menu. [Interval shot menu] Left / Right button : Changing the numbers (00 min-60 min / 00 pics-99 pics). Continuous : Images will be off . ※ Before using the Interval shot, charge the battery fully. Use the mode if it is released. Interval : You can adjust the sharpness of the image are sharp. Soft This effect is suitable for editing images on Shooting the memory. - This is suitable for printing. AEB : Take three pictures...
User Manual
Page 45
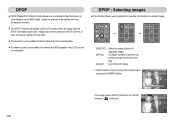
... image. Images 0 Prints Set: MENU If an image carries DPOF instructions, the DPOF indicator ( ) will display on DPOF printers, or at an increasing number of print by using the Smart button and press the MENU button. Play back DPOF [ONE PIC] : Select a number of prints of displayed image. [All Pics] : Configure number of prints for all pictures except movie and voice files. [Cancel] : Cancel the print setup. ※ Select number of photo labs. ■ This function is not available for Movie clips and Voice recording files...
... image. Images 0 Prints Set: MENU If an image carries DPOF instructions, the DPOF indicator ( ) will display on DPOF printers, or at an increasing number of print by using the Smart button and press the MENU button. Play back DPOF [ONE PIC] : Select a number of prints of displayed image. [All Pics] : Configure number of prints for all pictures except movie and voice files. [Cancel] : Cancel the print setup. ※ Select number of photo labs. ■ This function is not available for Movie clips and Voice recording files...
User Manual
Page 47
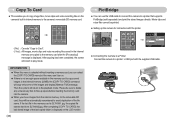
... use the USB cable to connect this menu is not enough space available in the memory card to copy saved images in internal memory to copy image files, movie clips and voice recording files on the LCD monitor. 《46》 MODE Format Video Out USB Reset Set:MENU Computer Printer ◀ Exit:M ■ Connecting the Camera to a Printer Connect the camera to a printer's USB port with the printer Play back COPY TO CARD - [No] : Cancels "Copy to the memory card after the [Processing!] message is SL700001.jpg, the copied file names start from the internal memory...
... use the USB cable to connect this menu is not enough space available in the memory card to copy saved images in internal memory to copy image files, movie clips and voice recording files on the LCD monitor. 《46》 MODE Format Video Out USB Reset Set:MENU Computer Printer ◀ Exit:M ■ Connecting the Camera to a Printer Connect the camera to a printer's USB port with the printer Play back COPY TO CARD - [No] : Cancels "Copy to the memory card after the [Processing!] message is SL700001.jpg, the copied file names start from the internal memory...
User Manual
Page 49
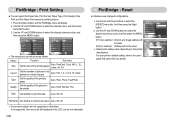
... user's guide that came with your printer. For your printer's default setting, refer to select the desired sub menu value, and then press the MENU button. And then press the Right button. 2. PictBridge : Print Setting ■ You can set up are as follows. PRINT IMAGES SIZE Layout Type No One Pic Auto Auto Auto Type Auto Quality Auto Date Auto File Name Auto RESET No ※ The menus you can select the Paper Size, Print Format, Paper Type, Print Quality, Date Print, and File...
... user's guide that came with your printer. For your printer's default setting, refer to select the desired sub menu value, and then press the MENU button. And then press the Right button. 2. PictBridge : Print Setting ■ You can set up are as follows. PRINT IMAGES SIZE Layout Type No One Pic Auto Auto Auto Type Auto Quality Auto Date Auto File Name Auto RESET No ※ The menus you can select the Paper Size, Print Format, Paper Type, Print Quality, Date Print, and File...

User Manual
Page 53
... setting Quick View AF Lamp Set:MENU 5 min 10 min Exit:M will turn off File Power off after Set:MENU Exit:M formatting, deleting all pictures. Setup menu [ File name ] ■ This function allows the user to 999 as follows: 100SSCAM → 101SSCAM → ~ → 999SSCAM. - The files used with the memory card conform to the DCF (Design rule for the LCD 3 min period of time in PC mode, slide show, playing back a voice recording, playing back a movie file or taking a composite shot. [ LCD...
... setting Quick View AF Lamp Set:MENU 5 min 10 min Exit:M will turn off File Power off after Set:MENU Exit:M formatting, deleting all pictures. Setup menu [ File name ] ■ This function allows the user to 999 as follows: 100SSCAM → 101SSCAM → ~ → 999SSCAM. - The files used with the memory card conform to the DCF (Design rule for the LCD 3 min period of time in PC mode, slide show, playing back a voice recording, playing back a movie file or taking a composite shot. [ LCD...
User Manual
Page 58
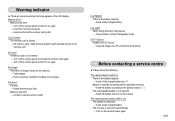
... Light! ㆍWhen taking pictures in dark places → Take pictures in use ㆍThe battery is exhausted → Insert a fully charged battery ㆍThe Camera is turned off automatically → Turn on the memory → Take images → Insert a memory card that may appear on the LCD display Memory Error! ㆍMemory card error → Turn off the camera power and turn it on again No Image! ㆍThere are several warnings that is holding some images File Error! ㆍFile error → Delete...
... Light! ㆍWhen taking pictures in dark places → Take pictures in use ㆍThe battery is exhausted → Insert a fully charged battery ㆍThe Camera is turned off automatically → Turn on the memory → Take images → Insert a memory card that may appear on the LCD display Memory Error! ㆍMemory card error → Turn off the camera power and turn it on again No Image! ㆍThere are several warnings that is holding some images File Error! ㆍFile error → Delete...
User Manual
Page 59
... camera has adopted the default settings → Reset the date and time correctly The camera buttons do not operate ㆍCamera malfunction → Remove/re-insert battery and switch the camera on A card error has occurred while the memory card is being used in low temperatures → Keep the camera in the camera. ㆍIncorrect memory card format → Re-format the memory card The images don't play back ㆍIncorrect file name (Violation of DCF format) → Do not change the image file...
... camera has adopted the default settings → Reset the date and time correctly The camera buttons do not operate ㆍCamera malfunction → Remove/re-insert battery and switch the camera on A card error has occurred while the memory card is being used in low temperatures → Keep the camera in the camera. ㆍIncorrect memory card format → Re-format the memory card The images don't play back ㆍIncorrect file name (Violation of DCF format) → Do not change the image file...
User Manual
Page 60
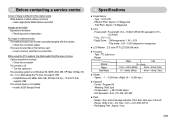
...; Lens - Type : TTL auto focus - Compensation : ±2EV (0.5EV steps) - Modes : Auto, Auto & Red-eye reduction, Fill-in the memory card → Insert a memory card that supports USB ㆍThe camera driver is not installed → Install a [USB Storage Driver] Specifications ■ Image Sensor - Speed : - 1 ~ 1/2,000 sec. (Night: 16 ~ 1/2,000 sec.) ■ Exposure - Before contacting a service centre Colour of image is different to PC that has correct files When using the PC's explorer, the [Removable Disk] file does not show ㆍCable connection...
...; Lens - Type : TTL auto focus - Compensation : ±2EV (0.5EV steps) - Modes : Auto, Auto & Red-eye reduction, Fill-in the memory card → Insert a memory card that supports USB ㆍThe camera driver is not installed → Install a [USB Storage Driver] Specifications ■ Image Sensor - Speed : - 1 ~ 1/2,000 sec. (Night: 16 ~ 1/2,000 sec.) ■ Exposure - Before contacting a service centre Colour of image is different to PC that has correct files When using the PC's explorer, the [Removable Disk] file does not show ㆍCable connection...
User Manual
Page 62
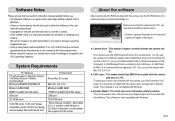
... repair or exchange your digital images and movie files with this manual is based on English of Windows. ■ Camera driver : This enables images to the PC, you should first install the camera driver. ※Screen Captures illustrated on a PC. You can find [Removable Disk] in [Windows Explorer] or [My Computer]. This software is not covered by the Samsung warranty. •Before using this codec. This camera uses the USB Storage Driver as a USB card reader. To play...
... repair or exchange your digital images and movie files with this manual is based on English of Windows. ■ Camera driver : This enables images to the PC, you should first install the camera driver. ※Screen Captures illustrated on a PC. You can find [Removable Disk] in [Windows Explorer] or [My Computer]. This software is not covered by the Samsung warranty. •Before using this codec. This camera uses the USB Storage Driver as a USB card reader. To play...

User Manual
Page 63
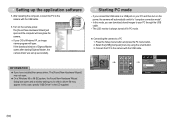
... Explorer 5.01 or later had to be installed. Visit "www.microsoft.com" and upgrade the Internet Explorer. Setting up the application software ■ To use this camera. If the frame does not show, run frame will display. Search the PDF files with a PC, install the application software first. The auto run the [Windows Explorer] and select [Samsung.exe] in the CD-ROM Drive. ●...
... Explorer 5.01 or later had to be installed. Visit "www.microsoft.com" and upgrade the Internet Explorer. Setting up the application software ■ To use this camera. If the frame does not show, run frame will display. Search the PDF files with a PC, install the application software first. The auto run the [Windows Explorer] and select [Samsung.exe] in the CD-ROM Drive. ●...
User Manual
Page 65
... LCD monitor is Windows XP, an image viewer program will automatically switch to "computer connection mode". •In this case, specify "USB Driver" in PC mode. ■ Connecting the camera to the camera with the USB cable. 6. Select the [USB]-[Computer] menu by using the smart button. 3. If the download window of Digmax Master opens after starting Digimax Master, the camera driver was set up the application software 5. Press the Setup menu button and press the F4 menu button. 2. Turn on the power, the camera...
... LCD monitor is Windows XP, an image viewer program will automatically switch to "computer connection mode". •In this case, specify "USB Driver" in PC mode. ■ Connecting the camera to the camera with the USB cable. 6. Select the [USB]-[Computer] menu by using the smart button. 3. If the download window of Digmax Master opens after starting Digimax Master, the camera driver was set up the application software 5. Press the Setup menu button and press the F4 menu button. 2. Turn on the power, the camera...
User Manual
Page 68
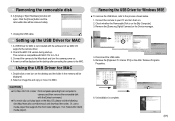
... USB cable. Setting up . A USB Driver for MAC 1. Or, use a media player that supports the Xvid codec (Mplayer, VLC (VideoLAN Client) media player). Connect the camera to the Macintosh and turn them on the Add / Remove Programs Properties. 6. Remove the [Digimax L70 / Kenox X70] on . 2. Uninstallation is not included with the software CD as MAC OS supports the camera driver. 2. A [Unplug or Eject Hardware] window will be displayed on the Device manager. 4. Connect...
... USB cable. Setting up . A USB Driver for MAC 1. Or, use a media player that supports the Xvid codec (Mplayer, VLC (VideoLAN Client) media player). Connect the camera to the Macintosh and turn them on the Add / Remove Programs Properties. 6. Remove the [Digimax L70 / Kenox X70] on . 2. Uninstallation is not included with the software CD as MAC OS supports the camera driver. 2. A [Unplug or Eject Hardware] window will be displayed on the Device manager. 4. Connect...
User Manual
Page 71
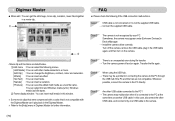
.... → Install the camera driver correctly. Movie clip edit functions are not compatible. You can select AVI and Windows media (wmv), Windows media (asf) file types. ② Frame display window : You can insert multi media in this case, disconnect the other USB cable, and connect only one USB cable to the camera. 《70》 Case 3 There is an unexpected error during file transfer. → Turn the camera power off the camera, remove the USB cable, plug...
.... → Install the camera driver correctly. Movie clip edit functions are not compatible. You can select AVI and Windows media (wmv), Windows media (asf) file types. ② Frame display window : You can insert multi media in this case, disconnect the other USB cable, and connect only one USB cable to the camera. 《70》 Case 3 There is an unexpected error during file transfer. → Turn the camera power off the camera, remove the USB cable, plug...


