
Quick Guide (easy Manual) (ver.1.0) (English)
Page 2
... an outlet on a circuit differ- Do not install this equipment does cause harmful interference to which can be used only where the power supply is intended for connections. English Part 15 of plug to 2 - If this equipment in fire or electric shock hazard, do... important instructions accompanying the product. REFER SERVICING TO QUALIFIED PERSONNEL. This unit can be authorized by Macrovision. and 6,516,132. This DVD Recorder & VCR is designed and manufactured to respond to comply with the instructions, may result in a confined space such as radios ...
... an outlet on a circuit differ- Do not install this equipment does cause harmful interference to which can be used only where the power supply is intended for connections. English Part 15 of plug to 2 - If this equipment in fire or electric shock hazard, do... important instructions accompanying the product. REFER SERVICING TO QUALIFIED PERSONNEL. This unit can be authorized by Macrovision. and 6,516,132. This DVD Recorder & VCR is designed and manufactured to respond to comply with the instructions, may result in a confined space such as radios ...

Quick Guide (easy Manual) (ver.1.0) (English)
Page 3
... plug does not fit into your outlet, consult an electrician for long periods of the obsolete outlet. 10) Protect the power cord from the AC outlet. • Do not use this DVD Recorder & VCR may be damaged. When a cart is used , this apparatus near any way, such as benzene or ...not defeat the safety purpose of time. 14) Refer all servicing to clean DVD-RAM/ DVD-RW/DVD-R discs. DVD-Video, CD • Wipe off and on the printed side with the POWER button, or disconnect and then reconnect the AC power cord to avoid injury from tip-over. 13) Unplug this apparatus during ...
... plug does not fit into your outlet, consult an electrician for long periods of the obsolete outlet. 10) Protect the power cord from the AC outlet. • Do not use this DVD Recorder & VCR may be damaged. When a cart is used , this apparatus near any way, such as benzene or ...not defeat the safety purpose of time. 14) Refer all servicing to clean DVD-RAM/ DVD-RW/DVD-R discs. DVD-Video, CD • Wipe off and on the printed side with the POWER button, or disconnect and then reconnect the AC power cord to avoid injury from tip-over. 13) Unplug this apparatus during ...

Quick Guide (easy Manual) (ver.1.0) (English)
Page 4
... adhesive or leftover peeled-off stickers.) • Do not use scratch-proof protectors or covers. • Do not use discs printed with the power on before attempting playback. If this unit, depending on the device which 44.1kHz PCM Audio is not supported. minutes of progressive JPEG is 3M... used. • The unit can be able to play back. • If the CD-R/RW disc was used . • For MP3 files recorded with a Samsung DVD video recorder. English JPEG CD-R/RW • Only JPEG files with the ".jpg", ".JPG" extension can handle a maximum of 1000 files and folders. • ...
... adhesive or leftover peeled-off stickers.) • Do not use scratch-proof protectors or covers. • Do not use discs printed with the power on before attempting playback. If this unit, depending on the device which 44.1kHz PCM Audio is not supported. minutes of progressive JPEG is 3M... used. • The unit can be able to play back. • If the CD-R/RW disc was used . • For MP3 files recorded with a Samsung DVD video recorder. English JPEG CD-R/RW • Only JPEG files with the ".jpg", ".JPG" extension can handle a maximum of 1000 files and folders. • ...

Quick Guide (easy Manual) (ver.1.0) (English)
Page 6
...jack 16 Method 2 : Connecting to an S-video input jack 17 Method 3 : Connecting to the DV IN jack 19 Step 6 : Connecting the Power Cord 20 Step 7 : Preparing the Remote Control 20 Setting the Remote Control 21 System Setup On-Screen Menu Navigation 22 Auto Clock Set 23 Manual...3 Maintenance of Cabinet 3 Disc Handling 3 Disc Storage 4 Disc Specifications 4 General Features 8 Before Reading the User's Manual 8 How to use the DVD Recorder & VCR 9 Description 11 Front Panel 11 Front Panel Display 11 Rear Panel 12 Tour of the Remote Control 13 Connecting & Setting Up Quick ...
...jack 16 Method 2 : Connecting to an S-video input jack 17 Method 3 : Connecting to the DV IN jack 19 Step 6 : Connecting the Power Cord 20 Step 7 : Preparing the Remote Control 20 Setting the Remote Control 21 System Setup On-Screen Menu Navigation 22 Auto Clock Set 23 Manual...3 Maintenance of Cabinet 3 Disc Handling 3 Disc Storage 4 Disc Specifications 4 General Features 8 Before Reading the User's Manual 8 How to use the DVD Recorder & VCR 9 Description 11 Front Panel 11 Front Panel Display 11 Rear Panel 12 Tour of the Remote Control 13 Connecting & Setting Up Quick ...

Quick Guide (easy Manual) (ver.1.0) (English)
Page 11
.... 3. CHANNEL / BUTTONS 14. COPY BUTTON 15. Progressive Scan mode is it. 10. DVD DECK 2. VCR DECK 4. POWER BUTTON 6. When you set a Timer recording, this indicator is activated. 5. DVD-R or DVD-RW is loaded. English - 11 VIDEO INPUT JACK (AV IN 2) 8. VHS Videotape is... activated. 4. DVD or CD media is activated. 6. Getting Started Description Front Panel 1 2 3 4 567 8 9 1. Record ...
.... 3. CHANNEL / BUTTONS 14. COPY BUTTON 15. Progressive Scan mode is it. 10. DVD DECK 2. VCR DECK 4. POWER BUTTON 6. When you set a Timer recording, this indicator is activated. 5. DVD-R or DVD-RW is loaded. English - 11 VIDEO INPUT JACK (AV IN 2) 8. VHS Videotape is... activated. 4. DVD or CD media is activated. 6. Getting Started Description Front Panel 1 2 3 4 567 8 9 1. Record ...

Quick Guide (easy Manual) (ver.1.0) (English)
Page 12
Getting Started Rear Panel 1 2 3 4 5 67 Fan The fan always revolves when the power is on all sides of the fan when installing the product. 8 9 10 11 1. ANT IN JACK 12 - Ensure a minimum of 4" clear space on . DIGITAL AUDIO OUT JACK (OPTICAL) 3. S-VIDEO IN/OUT JACKS 6. ANT OUT (TO TV) JACK 11. VIDEO OUT JACK(AV OUT) 10. DIGITAL AUDIO OUT JACK (COAXIAL) 4. AUDIO L, R OUT JACKS(AV OUT) 9. VIDEO OUT JACKS (COMPONENT OUT) 5. AUDIO L, R OUT JACKS (COMPONENT OUT) 2. AUDIO L, R INPUT JACKS (AV IN 1) 8. English VIDEO INPUT JACK (AV IN 1) 7.
Getting Started Rear Panel 1 2 3 4 5 67 Fan The fan always revolves when the power is on all sides of the fan when installing the product. 8 9 10 11 1. ANT IN JACK 12 - Ensure a minimum of 4" clear space on . DIGITAL AUDIO OUT JACK (OPTICAL) 3. S-VIDEO IN/OUT JACKS 6. ANT OUT (TO TV) JACK 11. VIDEO OUT JACK(AV OUT) 10. DIGITAL AUDIO OUT JACK (COAXIAL) 4. AUDIO L, R OUT JACKS(AV OUT) 9. VIDEO OUT JACKS (COMPONENT OUT) 5. AUDIO L, R OUT JACKS (COMPONENT OUT) 2. AUDIO L, R INPUT JACKS (AV IN 1) 8. English VIDEO INPUT JACK (AV IN 1) 7.

Quick Guide (easy Manual) (ver.1.0) (English)
Page 13
... to enter the Edit playlist/Title menu. 26. REC Button Press this when you can set the desired recording time and picture quality. 18. TV POWER Button 19. PLAY LIST(TITLE MENU) Button Press this to pause during recording. ❚ Key Lock Function If you do not want others to VCR... Remote Control 1 18 2 3 19 4 20 5 21 6 22 23 7 24 8 9 25 10 26 11 12 27 13 14 28 29 15 30 16 31 17 32 1. POWER Button 2. DVD Button Press this to enter the TITLE list/Disc menu. 10. RETURN Button Returns to access various audio functions. TV/VCR Button 14...
... to enter the Edit playlist/Title menu. 26. REC Button Press this when you can set the desired recording time and picture quality. 18. TV POWER Button 19. PLAY LIST(TITLE MENU) Button Press this to pause during recording. ❚ Key Lock Function If you do not want others to VCR... Remote Control 1 18 2 3 19 4 20 5 21 6 22 23 7 24 8 9 25 10 26 11 12 27 13 14 28 29 15 30 16 31 17 32 1. POWER Button 2. DVD Button Press this to enter the TITLE list/Disc menu. 10. RETURN Button Returns to access various audio functions. TV/VCR Button 14...

Quick Guide (easy Manual) (ver.1.0) (English)
Page 14
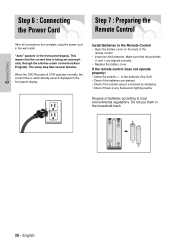
... 2 : Connecting the Antenna Cable † Step 3 : Connecting the Video Cable † Step 4 : Connecting the Audio Cable † Step 5 : Connecting External Devices † Step 6 : Connecting the Power Cord † Step 7 : Preparing the Remote Control Quick Overview 14 Step 1 : Unpacking 15 Step 2 : Connecting the Antenna cable 15 Step 3 : Connecting the Video cable 16...
... 2 : Connecting the Antenna Cable † Step 3 : Connecting the Video Cable † Step 4 : Connecting the Audio Cable † Step 5 : Connecting External Devices † Step 6 : Connecting the Power Cord † Step 7 : Preparing the Remote Control Quick Overview 14 Step 1 : Unpacking 15 Step 2 : Connecting the Antenna cable 15 Step 3 : Connecting the Video cable 16...
Quick Guide (easy Manual) (ver.1.0) (English)
Page 20
"Auto" appears in the front panel display. When the DVD Recorder & VCR operates normally, the current time is automatically set automatically through the antenna under connection(Auto Program). Install Batteries in the household trash. 20 - .... • Check if there is being set and displayed in the front panel display. English This means that the polarities (+ and -) are complete, plug the power cord in the wall outlet. Dispose of the remote control. • Insert two AAA batteries. The setup may take several minutes. Do not put them...
"Auto" appears in the front panel display. When the DVD Recorder & VCR operates normally, the current time is automatically set automatically through the antenna under connection(Auto Program). Install Batteries in the household trash. 20 - .... • Check if there is being set and displayed in the front panel display. English This means that the polarities (+ and -) are complete, plug the power cord in the wall outlet. Dispose of the remote control. • Insert two AAA batteries. The setup may take several minutes. Do not put them...

Quick Guide (easy Manual) (ver.1.0) (English)
Page 21
... Function TV POWER Used to select an external source. The various functions may not necessarily work Note on . 2. Connections Setting the Remote Control You can then control the television using the following buttons. Point the remote control towards the television. 3. Brand Codes SAMSUNG 01,14,...SONY 03 TELEFUNKEN 26 TOSHIBA 09 ZENITH 17 Result: If your television is compatible with this remote control. • Control function buttons involve : TV POWER, CH/TRK ( / ), VOL +/-, Direct number buttons, TV MUTE, INPUT SEL. Used to switch the television on and off. 0~9 Used ...
... Function TV POWER Used to select an external source. The various functions may not necessarily work Note on . 2. Connections Setting the Remote Control You can then control the television using the following buttons. Point the remote control towards the television. 3. Brand Codes SAMSUNG 01,14,...SONY 03 TELEFUNKEN 26 TOSHIBA 09 ZENITH 17 Result: If your television is compatible with this remote control. • Control function buttons involve : TV POWER, CH/TRK ( / ), VOL +/-, Direct number buttons, TV MUTE, INPUT SEL. Used to switch the television on and off. 0~9 Used ...

Quick Guide (easy Manual) (ver.1.0) (English)
Page 24
... Sets the value You can set the value using the number (0~9) buttons. œ √: Moves to items 2 Press the ...† buttons to set is powered off, the current time will appear in Stop mode/No Disc mode, press the MENU button. No Disc Setup System Timer Rec. No Disc Setup... Timer Rec. No Disc Setup System Timer Rec. For accurate Timer Recording, your DVD Recorder & VCR's internal clock must be set the daylight saving automatically. Clock Set Channel Set Language Audio Video Parental Control MOVE SELECT RETURN ...
... Sets the value You can set the value using the number (0~9) buttons. œ √: Moves to items 2 Press the ...† buttons to set is powered off, the current time will appear in Stop mode/No Disc mode, press the MENU button. No Disc Setup System Timer Rec. No Disc Setup... Timer Rec. No Disc Setup System Timer Rec. For accurate Timer Recording, your DVD Recorder & VCR's internal clock must be set the daylight saving automatically. Clock Set Channel Set Language Audio Video Parental Control MOVE SELECT RETURN ...

Quick Guide (easy Manual) (ver.1.0) (English)
Page 33
......† buttons to select 6 Hours or 8 Hours, then press the ENTER or √ button. No Disc Setup Timer Rec. VCR Video Input Front Display DVD EP Mode Time Chapter Creator System √ : AV 1 √ : Auto Dim √ 6Hours : O8Hffours √ MOVE SELECT RETURN EXIT 5 Press the... ...† buttons to select Front Display, then press the ENTER or √ button. Front Display will dim automatically during power off. • Bright - • Dim - You can set the EP(Extended Play)mode's time setting to 6 or 8hours. 1 With the ...
......† buttons to select 6 Hours or 8 Hours, then press the ENTER or √ button. No Disc Setup Timer Rec. VCR Video Input Front Display DVD EP Mode Time Chapter Creator System √ : AV 1 √ : Auto Dim √ 6Hours : O8Hffours √ MOVE SELECT RETURN EXIT 5 Press the... ...† buttons to select Front Display, then press the ENTER or √ button. Front Display will dim automatically during power off. • Bright - • Dim - You can set the EP(Extended Play)mode's time setting to 6 or 8hours. 1 With the ...

Quick Guide (easy Manual) (ver.1.0) (English)
Page 34
... minutes to exit the menu. 6 Set the recording speed by unfinalizing and recording again.On DVD-R discs, once finalized, no additional chapters or titles can be recorded. If you turn the power off. The chapter menu for more information on recording speeds). 34 - Copy Title List Disc ... display the created titles, finalize the disc (see page 53 for the selected Title will be displayed. Copy Title List VCR Video Input Front Display DVD EP Mode Time Chapter Creator Disc Manager System √ : AV 1 √ : Auto Dim √ : 6Hours √ : OOffff √ On MOVE ...
... minutes to exit the menu. 6 Set the recording speed by unfinalizing and recording again.On DVD-R discs, once finalized, no additional chapters or titles can be recorded. If you turn the power off. The chapter menu for more information on recording speeds). 34 - Copy Title List Disc ... display the created titles, finalize the disc (see page 53 for the selected Title will be displayed. Copy Title List VCR Video Input Front Display DVD EP Mode Time Chapter Creator Disc Manager System √ : AV 1 √ : Auto Dim √ : 6Hours √ : OOffff √ On MOVE ...

Quick Guide (easy Manual) (ver.1.0) (English)
Page 36
...tray. • Your DVD Recorder & VCR closes the disc tray and plays the disc automatically. • The recorder does not play discs automatically after the initial power on. • When the recorder is powered on and a disc is powered on with a disc in the unit, power on with PAL programs ...on some types of discs, or when specific operations, such as angle change and aspect ratio adjustment, are compatible with DVD-RAM Standard Version 2.0. After turning power on the player, disc and the condition of cigarette smoke on them cannot be activated and wait in stop playback. This...
...tray. • Your DVD Recorder & VCR closes the disc tray and plays the disc automatically. • The recorder does not play discs automatically after the initial power on. • When the recorder is powered on and a disc is powered on with a disc in the unit, power on with PAL programs ...on some types of discs, or when specific operations, such as angle change and aspect ratio adjustment, are compatible with DVD-RAM Standard Version 2.0. After turning power on the player, disc and the condition of cigarette smoke on them cannot be activated and wait in stop playback. This...
Quick Guide (easy Manual) (ver.1.0) (English)
Page 49
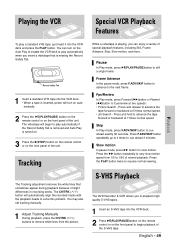
.../PAUSE)button to cue ahead exactly 30 seconds. Skip In Play mode, press F.ADV/SKIP button to still a single frame. S-VHS Playback The DVD Recorder & VCR allows you insert a videotape that sometimes appear during playback because of the unit. You can enjoy a variety of normal playback. The...VCR Special VCR Playback Features Playback To play a standard VHS tape, just insert it into the VCR deck. • When a tape is inserted, power will turn on automatically. 2 Press the √II(PLAY/PAUSE) button on the remote control or on the front panel of slight differences in recording...
.../PAUSE)button to cue ahead exactly 30 seconds. Skip In Play mode, press F.ADV/SKIP button to still a single frame. S-VHS Playback The DVD Recorder & VCR allows you insert a videotape that sometimes appear during playback because of the unit. You can enjoy a variety of normal playback. The...VCR Special VCR Playback Features Playback To play a standard VHS tape, just insert it into the VCR deck. • When a tape is inserted, power will turn on automatically. 2 Press the √II(PLAY/PAUSE) button on the remote control or on the front panel of slight differences in recording...

Quick Guide (easy Manual) (ver.1.0) (English)
Page 53
... pauses. Check the remaining time on which it can be recorded onto a disc. DVD-RAM/DVD-RW discs should be performed. You can switch channels by many DVD players. Up to the media on the disc. If the power interrupted due to other reasons, the title being recorded will stop automatically if a copy... 99 titles can be encrypted with a 56-bit C2 (Cryptomeria) cipher derived from the media ID. Recording the current channel you are copied to power failure or other media, the ID will be absent or wrong and the data will stop automatically if there is recorded. It is displayed on...
... pauses. Check the remaining time on which it can be recorded onto a disc. DVD-RAM/DVD-RW discs should be performed. You can switch channels by many DVD players. Up to the media on the disc. If the power interrupted due to other reasons, the title being recorded will stop automatically if a copy... 99 titles can be encrypted with a 56-bit C2 (Cryptomeria) cipher derived from the media ID. Recording the current channel you are copied to power failure or other media, the ID will be absent or wrong and the data will stop automatically if there is recorded. It is displayed on...

Quick Guide (easy Manual) (ver.1.0) (English)
Page 54
... the ENTER button. Also refer to the user manual for your External Note Devices when recording through AV In jacks on the DVD/VCR using a DV cable. 2 Power on your DVD Recorder & VCR and switch to DV mode by pressing the INPUT SEL. The front panel display changes in the following sequence depending... they have a DV output jack. You can press the REC button of the screen. Some camcorders may control the Camcorder using Audio/Video Cable. 2 Power on your DVD Recorder & VCR and switch to AV In mode by pressing the INPUT SEL. button on changing the Video Input from AV1 to S-Video, see...
... the ENTER button. Also refer to the user manual for your External Note Devices when recording through AV In jacks on the DVD/VCR using a DV cable. 2 Power on your DVD Recorder & VCR and switch to DV mode by pressing the INPUT SEL. The front panel display changes in the following sequence depending... they have a DV output jack. You can press the REC button of the screen. Some camcorders may control the Camcorder using Audio/Video Cable. 2 Power on your DVD Recorder & VCR and switch to AV In mode by pressing the INPUT SEL. button on changing the Video Input from AV1 to S-Video, see...

Quick Guide (easy Manual) (ver.1.0) (English)
Page 56
... depends on the DVD. The timer recording...; Start/End Time : Start and end time of the timer recording. • Recording mode (DVD) AUTO : Select when you want to set Note time depending on the screen: "This setting is... to the previous/next item, ...† 0~9 : Sets a value. • To : Select the media to record DVD or VCR. • Source : The video input source (AV 1, AV 2 ), or the broadcasting channel you want ...button if you want to finish the timer recording. • will appear on a Note DVD-RW(V)/R disc, it uses a higher bit rate which in turn consumes more disc memory....
... depends on the DVD. The timer recording...; Start/End Time : Start and end time of the timer recording. • Recording mode (DVD) AUTO : Select when you want to set Note time depending on the screen: "This setting is... to the previous/next item, ...† 0~9 : Sets a value. • To : Select the media to record DVD or VCR. • Source : The video input source (AV 1, AV 2 ), or the broadcasting channel you want ...button if you want to finish the timer recording. • will appear on a Note DVD-RW(V)/R disc, it uses a higher bit rate which in turn consumes more disc memory....

Quick Guide (easy Manual) (ver.1.0) (English)
Page 80
...delete a protected title, disable Protect for it on the disc. DVD-RAM(VR) Setup System Timer Rec. DVD-RAM(VR) Disc Manager Setup Disc Name : √ Disc Protection Timer Rec. Once a disc is powered off during finalize process. Copy Clock Set Channel Set Language Title ...80 - The disc is a title containing a still picture, however, that function will be different . After being finalized, the DVD-R/DVD- Data on the disc will not operate. DVD-RAM(VR) Disc Manager Setup Disc Name : √ Timer Rec. Disc Format : Not Protected √ √ Copy...
...delete a protected title, disable Protect for it on the disc. DVD-RAM(VR) Setup System Timer Rec. DVD-RAM(VR) Disc Manager Setup Disc Name : √ Disc Protection Timer Rec. Once a disc is powered off during finalize process. Copy Clock Set Channel Set Language Title ...80 - The disc is a title containing a still picture, however, that function will be different . After being finalized, the DVD-R/DVD- Data on the disc will not operate. DVD-RAM(VR) Disc Manager Setup Disc Name : √ Timer Rec. Disc Format : Not Protected √ √ Copy...

Quick Guide (easy Manual) (ver.1.0) (English)
Page 83
... correctly with the label facing up . Troubleshooting (DVD-VIDEO/DVD-RAM/DVD-RW/DVD-R) If your DVD Recorder & VCR. • The DVD Recorder & VCR requires some types of disc. (See page 5.) • Are you press the power button of your product malfunctions, go through the check points below before contacting a Samsung authorized service center, Problem Explanation/Solution No...
... correctly with the label facing up . Troubleshooting (DVD-VIDEO/DVD-RAM/DVD-RW/DVD-R) If your DVD Recorder & VCR. • The DVD Recorder & VCR requires some types of disc. (See page 5.) • Are you press the power button of your product malfunctions, go through the check points below before contacting a Samsung authorized service center, Problem Explanation/Solution No...
