
Quick Guide (easy Manual) (ver.1.0) (English)
Page 2
... this equipment in fire or electric shock hazard, do not expose this appliance to the Region number of this , the DVD Recorder & VCR cannot play the disc. This product incorporates copyright protection technology that to correct the interference by one or more...IN HAZARDOUS RADIATION EXPOSURE. CAUTIONS Caution: To prevent electric shock, match wide blade of the following U.S. This DVD Recorder & VCR is covered by U.S. CAUTION : This DVD Recorder & VCR USES AN INVISIBLE LASER BEAM WHICH CAN CAUSE HAZARDOUS RADIATION EXPOSURE IF DIRECTED. CAUTION THIS PRODUCT UTILIZES ...
... this equipment in fire or electric shock hazard, do not expose this appliance to the Region number of this , the DVD Recorder & VCR cannot play the disc. This product incorporates copyright protection technology that to correct the interference by one or more...IN HAZARDOUS RADIATION EXPOSURE. CAUTIONS Caution: To prevent electric shock, match wide blade of the following U.S. This DVD Recorder & VCR is covered by U.S. CAUTION : This DVD Recorder & VCR USES AN INVISIBLE LASER BEAM WHICH CAN CAUSE HAZARDOUS RADIATION EXPOSURE IF DIRECTED. CAUTION THIS PRODUCT UTILIZES ...

Quick Guide (easy Manual) (ver.1.0) (English)
Page 3
...to disconnect the AC power cord from the AC outlet. • Do not use benzene, thinner, or other components to this recorder, be sure to clean DVD-RAM/ DVD-RW/DVD-R discs. Precaution Important Safety Instructions Read these instructions. 3) Heed all warnings. 4) Follow all servicing to avoid injury from tip-over... with a ball-point pen or pencil. • Do not use volatile chemicals, such as power-supply cord or plug is used , this DVD Recorder & VCR may be damaged. Cautions on handling discs • Do not write on the disc with one wider than the disc in any ventilation...
...to disconnect the AC power cord from the AC outlet. • Do not use benzene, thinner, or other components to this recorder, be sure to clean DVD-RAM/ DVD-RW/DVD-R discs. Precaution Important Safety Instructions Read these instructions. 3) Heed all warnings. 4) Follow all servicing to avoid injury from tip-over... with a ball-point pen or pencil. • Do not use volatile chemicals, such as power-supply cord or plug is used , this DVD Recorder & VCR may be damaged. Cautions on handling discs • Do not write on the disc with one wider than the disc in any ventilation...

Quick Guide (easy Manual) (ver.1.0) (English)
Page 4
... on contents and discs. This unit may vary depending on which was not recorded as giving titles to the con- ers. 4 - English JPEG CD-R/RW • Only JPEG files with a Samsung DVD video recorder. If possible, do not use , playability may not be used to the... condition of recording. • This unit can play back DVD-R discs recorded and finalized with the ".jpg", ".JPG" extension can - Optimizing is record- dition of the...
... on contents and discs. This unit may vary depending on which was not recorded as giving titles to the con- ers. 4 - English JPEG CD-R/RW • Only JPEG files with a Samsung DVD video recorder. If possible, do not use , playability may not be used to the... condition of recording. • This unit can play back DVD-R discs recorded and finalized with the ".jpg", ".JPG" extension can - Optimizing is record- dition of the...

Quick Guide (easy Manual) (ver.1.0) (English)
Page 5
.... • If your DVD-RW disc was recorded and finalized in this unit. • DVD-RAM recorded on DVD recording compatibility, consult your DVD-RAM/DVD-RW/DVD-R manufacturer. ❋ Use of poor quality DVD-RAM/DVD-RW/DVD-R discs may cause following discs! • LD, CD-G, CD-I, CD-ROM, DVD-ROM, VCD, DVD+R and DVD+RW discs should only connect your DVD Recorder & VCR directly to...
.... • If your DVD-RW disc was recorded and finalized in this unit. • DVD-RAM recorded on DVD recording compatibility, consult your DVD-RAM/DVD-RW/DVD-R manufacturer. ❋ Use of poor quality DVD-RAM/DVD-RW/DVD-R discs may cause following discs! • LD, CD-G, CD-I, CD-ROM, DVD-ROM, VCD, DVD+R and DVD+RW discs should only connect your DVD Recorder & VCR directly to...

Quick Guide (easy Manual) (ver.1.0) (English)
Page 6
...Cabinet 3 Disc Handling 3 Disc Storage 4 Disc Specifications 4 General Features 8 Before Reading the User's Manual 8 How to use the DVD Recorder & VCR 9 Description 11 Front Panel 11 Front Panel Display 11 Rear Panel 12 Tour of the Remote Control 13 Connecting & Setting Up... 15 Step 2 : Connecting the Antenna cable 15 Method 1 : Antenna + DVD Recorder & VCR + TV : No Cable box 15 Method 2 : Antenna +Cable box + DVD Recorder & VCR + TV : Cable box with many scrambled channels 15 Method 3 : Antenna + DVD Recorder & VCR + Cable box +TV : Cable box with a digital input jack...
...Cabinet 3 Disc Handling 3 Disc Storage 4 Disc Specifications 4 General Features 8 Before Reading the User's Manual 8 How to use the DVD Recorder & VCR 9 Description 11 Front Panel 11 Front Panel Display 11 Rear Panel 12 Tour of the Remote Control 13 Connecting & Setting Up... 15 Step 2 : Connecting the Antenna cable 15 Method 1 : Antenna + DVD Recorder & VCR + TV : No Cable box 15 Method 2 : Antenna +Cable box + DVD Recorder & VCR + TV : Cable box with many scrambled channels 15 Method 3 : Antenna + DVD Recorder & VCR + Cable box +TV : Cable box with a digital input jack...

Quick Guide (easy Manual) (ver.1.0) (English)
Page 7
... 50 Recording DVD Recording Before Recording 51 Recordable discs 51 Recording Formats 52 Recording Mode 52 Unrecordable video 52 Recording the current channel you are watching .53 Recording From External Devices 54 Recording through a DV Input jack 54 Making a One Touch Recording(OTR 55 Making a Timer Recording 55 Editing the Scheduled Record List 57 Deleting the Scheduled Record List 58 VCR Recording Basic VCR Recording 59...
... 50 Recording DVD Recording Before Recording 51 Recordable discs 51 Recording Formats 52 Recording Mode 52 Unrecordable video 52 Recording the current channel you are watching .53 Recording From External Devices 54 Recording through a DV Input jack 54 Making a One Touch Recording(OTR 55 Making a Timer Recording 55 Editing the Scheduled Record List 57 Deleting the Scheduled Record List 58 VCR Recording Basic VCR Recording 59...

Quick Guide (easy Manual) (ver.1.0) (English)
Page 8
...to-use of this user's manual may be operated button by using DVD-RW/DVD-R discs With the DVD-VR320, VR320, you can edit recorded images, create playlist, and edit video in a data CD (CD-R or CD-RW on 4.7 GB DVD-RW/DVD-R discs. High quality, about 2 hours • LP mode ... 2) If a problem occurs, check the Troubleshooting. (See pages 83~85) Copyright ©2005 Samsung Electronics Co. Creating DVD video titles using only one button. With a DVD-RAM/DVD-RW(VR mode) disc, you can create your recording needs. (See page 52.) • XP mode - All rights reserved; Low quality, about...
...to-use of this user's manual may be operated button by using DVD-RW/DVD-R discs With the DVD-VR320, VR320, you can edit recorded images, create playlist, and edit video in a data CD (CD-R or CD-RW on 4.7 GB DVD-RW/DVD-R discs. High quality, about 2 hours • LP mode ... 2) If a problem occurs, check the Troubleshooting. (See pages 83~85) Copyright ©2005 Samsung Electronics Co. Creating DVD video titles using only one button. With a DVD-RAM/DVD-RW(VR mode) disc, you can create your recording needs. (See page 52.) • XP mode - All rights reserved; Low quality, about...

Quick Guide (easy Manual) (ver.1.0) (English)
Page 9
...record on a disc. Step 3 Recording There are two different recording methods: Direct Recording and Timer Recording. A DVD consists of the original recording. During recording, a title is required for the preparation of recording on the following types of discs. The recorder supports many different edit functions, possible only with the Chapter Creator set to On. Creating a playlist (DVD... when changing formats. Using a DVD-RW This type of disc can create a new playlist on various DVD components. Timer recording is displayed. Step 5 Editing a recorded disc Editing on the disc. ...
...record on a disc. Step 3 Recording There are two different recording methods: Direct Recording and Timer Recording. A DVD consists of the original recording. During recording, a title is required for the preparation of recording on the following types of discs. The recorder supports many different edit functions, possible only with the Chapter Creator set to On. Creating a playlist (DVD... when changing formats. Using a DVD-RW This type of disc can create a new playlist on various DVD components. Timer recording is displayed. Step 5 Editing a recorded disc Editing on the disc. ...

Quick Guide (easy Manual) (ver.1.0) (English)
Page 10
...unnecessary when playing the disc on a VR Mode compatible component, a finalized disc should be used for playback. No more editing or recording can be necessary. When using a DVD-RW disc in Video Mode The disc should finalize the disc to enable playback on anything other than this... recorder. First, finish all editing and recording operations, then finalize the disc. You cannot edit or record on the disc once it has been finalized. When using a DVD-R disc You should be finalized first to play your DVD on other DVD components, finalizing may be made...
...unnecessary when playing the disc on a VR Mode compatible component, a finalized disc should be used for playback. No more editing or recording can be necessary. When using a DVD-RW disc in Video Mode The disc should finalize the disc to enable playback on anything other than this... recorder. First, finish all editing and recording operations, then finalize the disc. You cannot edit or record on the disc once it has been finalized. When using a DVD-R disc You should be finalized first to play your DVD on other DVD components, finalizing may be made...

Quick Guide (easy Manual) (ver.1.0) (English)
Page 11
VCR EJECT BUTTON 5. DV INPUT JACK 10. FRONT PANEL DISPLAY 11. RECORD BUTTON 13. COPY BUTTON 15. DVD-RAM is activated. 8 9 10 7. VCR is activated. 3. DVD DECK 2. DVD or CD media is it. 10. When you set a Timer recording, this indicator is loaded. 8. DVD OPEN/CLOSE BUTTON 3. VCR DECK 4. POWER BUTTON 6. P.SCAN BUTTON 7. The time, counter position...
VCR EJECT BUTTON 5. DV INPUT JACK 10. FRONT PANEL DISPLAY 11. RECORD BUTTON 13. COPY BUTTON 15. DVD-RAM is activated. 8 9 10 7. VCR is activated. 3. DVD DECK 2. DVD or CD media is it. 10. When you set a Timer recording, this indicator is loaded. 8. DVD OPEN/CLOSE BUTTON 3. VCR DECK 4. POWER BUTTON 6. P.SCAN BUTTON 7. The time, counter position...

Quick Guide (easy Manual) (ver.1.0) (English)
Page 13
...Returns to operate TV. 21. REC Button Press this to pause during recording. ❚ Key Lock Function If you do not want others to operate the DVD Recorder & VCR (for example if you have programmed a timer recording) you copy DVD to make a recording on a disc (if the disc contains multiple camera angles). 30..../SKIP Button 8. TITLE LIST(DISC MENU) Button Press this to enter the TITLE list/Disc menu. 10. MENU Button Press this to bring up the DVD Recorder & VCR's setup menu. 11. ENTER/DIRECTION Buttons (UP/DOWN or LEFT/RIGHT Buttons) This button functions as sound mute. (TV mode) 20....
...Returns to operate TV. 21. REC Button Press this to pause during recording. ❚ Key Lock Function If you do not want others to operate the DVD Recorder & VCR (for example if you have programmed a timer recording) you copy DVD to make a recording on a disc (if the disc contains multiple camera angles). 30..../SKIP Button 8. TITLE LIST(DISC MENU) Button Press this to enter the TITLE list/Disc menu. 10. MENU Button Press this to bring up the DVD Recorder & VCR's setup menu. 11. ENTER/DIRECTION Buttons (UP/DOWN or LEFT/RIGHT Buttons) This button functions as sound mute. (TV mode) 20....

Quick Guide (easy Manual) (ver.1.0) (English)
Page 14
... of Canadian Electrical Code, Part I), that the cable ground shall be connected to the grounding system of the building as close to start using the recorder. Connections Connecting & Setting Up Quick Overview A Quick overview presented in particular, specifies that provides guidelines for proper grounding and, in this guide will give you...
... of Canadian Electrical Code, Part I), that the cable ground shall be connected to the grounding system of the building as close to start using the recorder. Connections Connecting & Setting Up Quick Overview A Quick overview presented in particular, specifies that provides guidelines for proper grounding and, in this guide will give you...

Quick Guide (easy Manual) (ver.1.0) (English)
Page 15
... and the other UHF), use an external antenna Note connector (300-75 ohm adaptor : not supplied) to connect the antenna to connect your DVD Recorder & VCR. Wall Cable box To RF IN ■ If you below . • Video/Audio Cable (AC39-00073A) • RF ...watching another channel. Connections Step 1: Unpacking Accessories Check for the supplied accessories below . • Method 1 : Antenna + DVD Recorder & VCR + TV : No Cable box • Method 2 : Antenna +Cable box + DVD Recorder & VCR + TV : Cable box with a few scrambled channels ■ If you watch channels without a cable box....
... and the other UHF), use an external antenna Note connector (300-75 ohm adaptor : not supplied) to connect the antenna to connect your DVD Recorder & VCR. Wall Cable box To RF IN ■ If you below . • Video/Audio Cable (AC39-00073A) • RF ...watching another channel. Connections Step 1: Unpacking Accessories Check for the supplied accessories below . • Method 1 : Antenna + DVD Recorder & VCR + TV : No Cable box • Method 2 : Antenna +Cable box + DVD Recorder & VCR + TV : Cable box with a few scrambled channels ■ If you watch channels without a cable box....

Quick Guide (easy Manual) (ver.1.0) (English)
Page 16
...in the picture. If there are fully compatible with this model, please contact our customer service center at 1-800-SAMSUNG. English You cannot record scrambled channels that not all high definition television sets are questions regarding TV set compatibility with this product and may ...(Y, PB, PR ) S-Video, Component video and Progressive Output Modes • S-Video and Component video output are several ways to your DVD Recorder & VCR. If you experience 480 progressive scan picture problems, it is only available with TVs that support progressive scan. • Consumers should...
...in the picture. If there are fully compatible with this model, please contact our customer service center at 1-800-SAMSUNG. English You cannot record scrambled channels that not all high definition television sets are questions regarding TV set compatibility with this product and may ...(Y, PB, PR ) S-Video, Component video and Progressive Output Modes • S-Video and Component video output are several ways to your DVD Recorder & VCR. If you experience 480 progressive scan picture problems, it is only available with TVs that support progressive scan. • Consumers should...

Quick Guide (easy Manual) (ver.1.0) (English)
Page 17
...Yes" to select Yes, and then press the ENTER button. Connect Component video cables(not included) between the VIDEO OUT jacks (COMPONENT OUT) on DVD Recorder & VCR and COMPONENT VIDEO IN jacks on your TV. Press the œ √ buttons to confirm Progressive scan mode. Otherwise, red or... connections Note match. Method 2 : Connecting to an S-video input jack Connect an S-video cable(not included) between the S-VIDEO OUT jack on DVD Recorder & VCR and S-VIDEO IN jack on your TV, respectively.(page 18) English - 17 S-Video separates the picture element into black and White(Y), blue...
...Yes" to select Yes, and then press the ENTER button. Connect Component video cables(not included) between the VIDEO OUT jacks (COMPONENT OUT) on DVD Recorder & VCR and COMPONENT VIDEO IN jacks on your TV. Press the œ √ buttons to confirm Progressive scan mode. Otherwise, red or... connections Note match. Method 2 : Connecting to an S-video input jack Connect an S-video cable(not included) between the S-VIDEO OUT jack on DVD Recorder & VCR and S-VIDEO IN jack on your TV, respectively.(page 18) English - 17 S-Video separates the picture element into black and White(Y), blue...
Quick Guide (easy Manual) (ver.1.0) (English)
Page 18
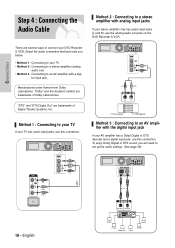
... amplifier (analog audio out) • Method 3 : Connecting to your TV If your TV has audio input jacks, use this connection. Method 2 : Connecting to connect your DVD Recorder & VCR. "DTS" and "DTS Digital Out" are trademarks of Digital Theater Systems, Inc. Connections Step 4 : Connecting the Audio Cable There are several ways to a stereo...
... amplifier (analog audio out) • Method 3 : Connecting to your TV If your TV has audio input jacks, use this connection. Method 2 : Connecting to connect your DVD Recorder & VCR. "DTS" and "DTS Digital Out" are trademarks of Digital Theater Systems, Inc. Connections Step 4 : Connecting the Audio Cable There are several ways to a stereo...

Quick Guide (easy Manual) (ver.1.0) (English)
Page 19
...input source is inserted into AV IN 2 while viewing TV, the input will have priority. You can record from connected equipment (VCR, STB or DVD). Method 1 : Connecting a VCR, Settop Box(STB) or DVD player to the AUDIO/VIDEO AV IN 1 jacks Connecting a VCR or external device to AV IN 1...will be automatically done. ■ Copy protected content cannot be switched to the DV input jack of your DVD Recorder & VCR. ■ You can use the AV IN 2 jacks on the front panel of the DVD Recorder & VCR. Method 2 : Connecting a Camcorder to the DV IN jack. Connections Step 5 : Connecting ...
...input source is inserted into AV IN 2 while viewing TV, the input will have priority. You can record from connected equipment (VCR, STB or DVD). Method 1 : Connecting a VCR, Settop Box(STB) or DVD player to the AUDIO/VIDEO AV IN 1 jacks Connecting a VCR or external device to AV IN 1...will be automatically done. ■ Copy protected content cannot be switched to the DV input jack of your DVD Recorder & VCR. ■ You can use the AV IN 2 jacks on the front panel of the DVD Recorder & VCR. Method 2 : Connecting a Camcorder to the DV IN jack. Connections Step 5 : Connecting ...
Quick Guide (easy Manual) (ver.1.0) (English)
Page 20
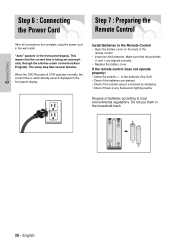
Connections Step 6 : Connecting the Power Cord Step 7 : Preparing the Remote Control After all connections are aligned correctly. • Replace the battery cover. When the DVD Recorder & VCR operates normally, the current time is automatically set automatically through the antenna under connection(Auto Program). Install Batteries in the Remote Control • Open ...
Connections Step 6 : Connecting the Power Cord Step 7 : Preparing the Remote Control After all connections are aligned correctly. • Replace the battery cover. When the DVD Recorder & VCR operates normally, the current time is automatically set automatically through the antenna under connection(Auto Program). Install Batteries in the Remote Control • Open ...

Quick Guide (easy Manual) (ver.1.0) (English)
Page 22
... Audio Options 28 Setting Up the Display (Video) Options 29 Setting Up the Parental Control 30 VCR Setting 31 Video Input 32 Front Display 33 DVD EP Mode Time 33 Automatic Chapter Creator 34 22 - English 1 MENU Button Press this button on the remote control to return to the previous MENU... Setup The on-screen menus allow you to open the on-screen MENU. Use the following buttons to enable or disable various functions on your DVD Recorder & VCR.
... Audio Options 28 Setting Up the Display (Video) Options 29 Setting Up the Parental Control 30 VCR Setting 31 Video Input 32 Front Display 33 DVD EP Mode Time 33 Automatic Chapter Creator 34 22 - English 1 MENU Button Press this button on the remote control to return to the previous MENU... Setup The on-screen menus allow you to open the on-screen MENU. Use the following buttons to enable or disable various functions on your DVD Recorder & VCR.

Quick Guide (easy Manual) (ver.1.0) (English)
Page 23
... to select Clock Set, then press the ENTER or √ button. Select Auto to set when you can adjust these settings without turning off the recorder. 1 With the unit in Stop mode/No Disc mode, press the MENU button. No Disc Setup Timer Rec. Clock Data CH Time Zone Daylight Saving... Auto Clock Set, then press the ENTER or √ button. No Disc Setup Timer Rec. Clock Data CH Press the ...† buttons to use timer recording. No Disc Setup Timer Rec.
... to select Clock Set, then press the ENTER or √ button. Select Auto to set when you can adjust these settings without turning off the recorder. 1 With the unit in Stop mode/No Disc mode, press the MENU button. No Disc Setup Timer Rec. Clock Data CH Time Zone Daylight Saving... Auto Clock Set, then press the ENTER or √ button. No Disc Setup Timer Rec. Clock Data CH Press the ...† buttons to use timer recording. No Disc Setup Timer Rec.


