

Quick Guide (easy Manual) (ver.1.0) (English)
Page 4
.... Be careful when executing Format because all recorded files may not play. • Some CD-R/RW discs may not be used. • For MP3 files recorded with a Samsung DVD video recorder. Disc Storage Be careful not to harm the disc because the data on these discs is not supported. If this unit, depending on the device which 44.1kHz PCM Audio is final- For contents recorded on CD-R/RW media...
.... Be careful when executing Format because all recorded files may not play. • Some CD-R/RW discs may not be used. • For MP3 files recorded with a Samsung DVD video recorder. Disc Storage Be careful not to harm the disc because the data on these discs is not supported. If this unit, depending on the device which 44.1kHz PCM Audio is final- For contents recorded on CD-R/RW media...

Quick Guide (easy Manual) (ver.1.0) (English)
Page 5
... the user's manual for recording data on DVD recording compatibility, consult your DVD-RW disc was recorded with this unit. • DVD-RW (VR mode) - Reverse engineering or disassembly is used for the player. side your region may not perform correctly. This is a format that is used for any recording failure, loss of non-recommended discs. English - 5 Getting Started Other discs may not be played in a distorted picture from usage of recorded or...
... the user's manual for recording data on DVD recording compatibility, consult your DVD-RW disc was recorded with this unit. • DVD-RW (VR mode) - Reverse engineering or disassembly is used for the player. side your region may not perform correctly. This is a format that is used for any recording failure, loss of non-recommended discs. English - 5 Getting Started Other discs may not be played in a distorted picture from usage of recorded or...

Quick Guide (easy Manual) (ver.1.0) (English)
Page 6
... Power Cord 20 Step 7 : Preparing the Remote Control 20 Setting the Remote Control 21 System Setup On-Screen Menu Navigation 22 Auto Clock Set 23 Manual Clock Set 24 Channel Set 25 Auto Channel Memory 25 Channel Add/Delete 26 RF Output Channel 26 Setting Up the Language Options 27 Setting Up the Audio Options 28 Setting Up the Display (Video) Options 29 Setting Up the Parental Control 30 VCR Setting 31 Video Input 32 Front Display 33 DVD EP Mode Time 33 Automatic Chapter Creator 34 Playback DVD Playback Before Playing 35 Playing a Disc 36 Using the Disc Menu...
... Power Cord 20 Step 7 : Preparing the Remote Control 20 Setting the Remote Control 21 System Setup On-Screen Menu Navigation 22 Auto Clock Set 23 Manual Clock Set 24 Channel Set 25 Auto Channel Memory 25 Channel Add/Delete 26 RF Output Channel 26 Setting Up the Language Options 27 Setting Up the Audio Options 28 Setting Up the Display (Video) Options 29 Setting Up the Parental Control 30 VCR Setting 31 Video Input 32 Front Display 33 DVD EP Mode Time 33 Automatic Chapter Creator 34 Playback DVD Playback Before Playing 35 Playing a Disc 36 Using the Disc Menu...

Quick Guide (easy Manual) (ver.1.0) (English)
Page 8
... image playback and recording quality. (See page 17.) Component progressive scan output video is recorded). Creating DVD video titles using only one button. Standard quality, about 6 or 8 hours Copying digital camcorder content using DV input jack Record digital camcorder images onto DVD-RAM/ DVD-RW/DVD-R discs or video tape using ANYKEY button. English Make sure to your recording needs. (See page 52.) • XP mode - Icons that will be used in manual Icon Term Definition DVD This involves a function available in DVD or DVD-R/DVD-RW discs...
... image playback and recording quality. (See page 17.) Component progressive scan output video is recorded). Creating DVD video titles using only one button. Standard quality, about 6 or 8 hours Copying digital camcorder content using DV input jack Record digital camcorder images onto DVD-RAM/ DVD-RW/DVD-R discs or video tape using ANYKEY button. English Make sure to your recording needs. (See page 52.) • XP mode - Icons that will be used in manual Icon Term Definition DVD This involves a function available in DVD or DVD-R/DVD-RW discs...

Quick Guide (easy Manual) (ver.1.0) (English)
Page 13
... Control Buttons • VOLUME Button TV volume adjustment • CHANNEL Button Press this to select a TV channel. • TRK Button Press this to remove the white line. 7. MENU Button Press this to bring up the DVD Recorder & VCR's setup menu. 11. INFO Button Press this to display current setting or disc status. 15. Button Press this to select AV input signal in on the remote control for 5 seconds. OPEN/CLOSE Button Press this to open and close the disc tray. 23. ZOOM Button Zooms in external input mode.(Tuner, AV input, DV input...
... Control Buttons • VOLUME Button TV volume adjustment • CHANNEL Button Press this to select a TV channel. • TRK Button Press this to remove the white line. 7. MENU Button Press this to bring up the DVD Recorder & VCR's setup menu. 11. INFO Button Press this to display current setting or disc status. 15. Button Press this to select AV input signal in on the remote control for 5 seconds. OPEN/CLOSE Button Press this to open and close the disc tray. 23. ZOOM Button Zooms in external input mode.(Tuner, AV input, DV input...

Quick Guide (easy Manual) (ver.1.0) (English)
Page 19
... be switched to the DV IN jack. Line Selection will have priority. Method 1 : Connecting a VCR, Settop Box(STB) or DVD player to the AUDIO/VIDEO AV IN 1 jacks Connecting a VCR or external device to the DV input jack of your camcorder has a DV output jack, connect it to AV IN 1 jacks of the DVD Recorder & VCR. English - 19 Method 2 : Connecting a Camcorder to the AV IN 2 jacks You can also use the...
... be switched to the DV IN jack. Line Selection will have priority. Method 1 : Connecting a VCR, Settop Box(STB) or DVD player to the AUDIO/VIDEO AV IN 1 jacks Connecting a VCR or external device to the DV input jack of your camcorder has a DV output jack, connect it to AV IN 1 jacks of the DVD Recorder & VCR. English - 19 Method 2 : Connecting a Camcorder to the AV IN 2 jacks You can also use the...

Quick Guide (easy Manual) (ver.1.0) (English)
Page 24
... keys or ...† keys. Clock Set Channel Set Language Audio Video Parental Control MOVE SELECT RETURN Setup EXIT 24 - System Setup Daylight Saving Press the ...† buttons to select Manual Clock Set, then press the ENTER or √ button. For accurate Timer Recording, your DVD Recorder & VCR's internal clock must be set is powered off, the current time will appear in Stop mode/No Disc mode, press the MENU button. Clock Set Channel Set Language Audio Video Parental Control MOVE SELECT RETURN Setup EXIT 4 Press the ...† buttons to select Automatic, Yes or No...
... keys or ...† keys. Clock Set Channel Set Language Audio Video Parental Control MOVE SELECT RETURN Setup EXIT 24 - System Setup Daylight Saving Press the ...† buttons to select Manual Clock Set, then press the ENTER or √ button. For accurate Timer Recording, your DVD Recorder & VCR's internal clock must be set is powered off, the current time will appear in Stop mode/No Disc mode, press the MENU button. Clock Set Channel Set Language Audio Video Parental Control MOVE SELECT RETURN Setup EXIT 4 Press the ...† buttons to select Automatic, Yes or No...

Quick Guide (easy Manual) (ver.1.0) (English)
Page 25
... √ button. No Disc Setup System Timer Rec. System Setup Channel Set This feature allows you to manually set the DVD Recorder & VCR's tuner band to Antenna or Cable, whichever you selected on the wrong channel numbers. 1 With the unit in Stop mode/No Disc mode, press the MENU button. 2 Press the ...† buttons to select Setup, then press the ENTER or √ button. 3 Press the ...† buttons to select Channel Set, then press the ENTER or √ button. Clock Set Channel Set Language Audio Video Parental Control MOVE SELECT RETURN Setup EXIT...
... √ button. No Disc Setup System Timer Rec. System Setup Channel Set This feature allows you to manually set the DVD Recorder & VCR's tuner band to Antenna or Cable, whichever you selected on the wrong channel numbers. 1 With the unit in Stop mode/No Disc mode, press the MENU button. 2 Press the ...† buttons to select Setup, then press the ENTER or √ button. 3 Press the ...† buttons to select Channel Set, then press the ENTER or √ button. Clock Set Channel Set Language Audio Video Parental Control MOVE SELECT RETURN Setup EXIT...

Quick Guide (easy Manual) (ver.1.0) (English)
Page 26
... you wish to remove. 1 With the unit in Stop mode/No Disc mode, press the MENU button. Channel Add/Delete Select channel : 1 Add Delete NUMBER SELECT RETURN EXIT • The DVD Recorder & VCR will be displayed. • Press ENTER button to stop or cancel scanning. 5 Press the ...† or number buttons to select the channels you want to set the RF Output Channel. 1 With the unit in Stop mode/No Disc mode, press the MENU button. 2 Press the ...† buttons to select Setup, then press...
... you wish to remove. 1 With the unit in Stop mode/No Disc mode, press the MENU button. Channel Add/Delete Select channel : 1 Add Delete NUMBER SELECT RETURN EXIT • The DVD Recorder & VCR will be displayed. • Press ENTER button to stop or cancel scanning. 5 Press the ...† or number buttons to select the channels you want to set the RF Output Channel. 1 With the unit in Stop mode/No Disc mode, press the MENU button. 2 Press the ...† buttons to select Setup, then press...

Quick Guide (easy Manual) (ver.1.0) (English)
Page 27
...be displayed. No Disc Setup Timer Rec. System Clock Set Channel Set Language Audio Video Parental Control Setup MOVE SELECT RETURN EXIT 3 Press the ...† buttons to select Channel Set, then press ENTER or √ button. Press the MENU button to the Note previous menu. No Disc Channel Set Setup Antenna/Cable TV Timer Rec. No Disc Setup Timer Rec. Audio Subtitle Disc Menu On-Screen Menu Language Original English Français Deutsch Español Italiano Nederlands Korean MOVE SELECT RETURN EXIT • Audio : For the disc audio language. • Subtitle...
...be displayed. No Disc Setup Timer Rec. System Clock Set Channel Set Language Audio Video Parental Control Setup MOVE SELECT RETURN EXIT 3 Press the ...† buttons to select Channel Set, then press ENTER or √ button. Press the MENU button to the Note previous menu. No Disc Channel Set Setup Antenna/Cable TV Timer Rec. No Disc Setup Timer Rec. Audio Subtitle Disc Menu On-Screen Menu Language Original English Français Deutsch Español Italiano Nederlands Korean MOVE SELECT RETURN EXIT • Audio : For the disc audio language. • Subtitle...

Quick Guide (easy Manual) (ver.1.0) (English)
Page 29
... TV. English - 29 System Setup Clock Set Channel Set Language Audio Video Parental Control MOVE SELECT RETURN Setup EXIT 3 Press the ...† buttons to the Note previous menu. Black bars will appear at the top and bottom of Radio Engineers. Setting Up the Display(Video) Options This function allows you want darker screen. • 7.5 IRE : This will enhance the black level for increased brightness/contrast when viewing DVDs. No Disc Setup System Timer Rec. Input Level Black Level : Darker...
... TV. English - 29 System Setup Clock Set Channel Set Language Audio Video Parental Control MOVE SELECT RETURN Setup EXIT 3 Press the ...† buttons to the Note previous menu. Black bars will appear at the top and bottom of Radio Engineers. Setting Up the Display(Video) Options This function allows you want darker screen. • 7.5 IRE : This will enhance the black level for increased brightness/contrast when viewing DVDs. No Disc Setup System Timer Rec. Input Level Black Level : Darker...

Quick Guide (easy Manual) (ver.1.0) (English)
Page 30
... DVDs that the program is intended for adult use only. 30 - A larger number indicates that have been assigned a rating - English There are up to Level 6, discs that your password again, and then press the ENTER or √ button. The Parental Control screen appears. Press the RETURN or œ button to return to select Parental Control, then press the ENTER or √ button. No Disc Setup Timer Rec. System Clock Set Channel Set Language Audio Video Parental Control MOVE SELECT...
... DVDs that the program is intended for adult use only. 30 - A larger number indicates that have been assigned a rating - English There are up to Level 6, discs that your password again, and then press the ENTER or √ button. The Parental Control screen appears. Press the RETURN or œ button to return to select Parental Control, then press the ENTER or √ button. No Disc Setup Timer Rec. System Clock Set Channel Set Language Audio Video Parental Control MOVE SELECT...

Quick Guide (easy Manual) (ver.1.0) (English)
Page 31
... the remote control. Only tapes that are missing the Record Safety Note Tab will be displayed. No Disc Setup Timer Rec. No Disc Setup Timer Rec. No Disc Setup Timer Rec. System Clock Set Channel Set Language Audio Video Parental Control MOVE SELECT RETURN Setup EXIT 3 Press the ...† buttons to select VCR, then press the ENTER or √ button. System Setup About the Change Password 1 Press the ...† buttons to the Note previous menu. Change Password Enter the password NUMBER SELECT RETURN EXIT 2 Enter the 4-digit password using the...
... the remote control. Only tapes that are missing the Record Safety Note Tab will be displayed. No Disc Setup Timer Rec. No Disc Setup Timer Rec. No Disc Setup Timer Rec. System Clock Set Channel Set Language Audio Video Parental Control MOVE SELECT RETURN Setup EXIT 3 Press the ...† buttons to select VCR, then press the ENTER or √ button. System Setup About the Change Password 1 Press the ...† buttons to the Note previous menu. Change Password Enter the password NUMBER SELECT RETURN EXIT 2 Enter the 4-digit password using the...

Quick Guide (easy Manual) (ver.1.0) (English)
Page 32
... tape box. System Clock Set Channel Set Language Audio Video Parental Control MOVE SELECT RETURN Setup EXIT 3 Press the ...† buttons to select AV 1 or S-Video, then press the ENTER or √ button. 32 - VCR Video Input Front Display DVD EP Mode Time Chapter Creator System AV 1 S-Video : 6Hours √ : Off √ MOVE SELECT RETURN EXIT MOVE SELECT RETURN EXIT 5 Press the ...† buttons to select System, then press the ENTER or √ button. Once the type of cassette is disabled...
... tape box. System Clock Set Channel Set Language Audio Video Parental Control MOVE SELECT RETURN Setup EXIT 3 Press the ...† buttons to select AV 1 or S-Video, then press the ENTER or √ button. 32 - VCR Video Input Front Display DVD EP Mode Time Chapter Creator System AV 1 S-Video : 6Hours √ : Off √ MOVE SELECT RETURN EXIT MOVE SELECT RETURN EXIT 5 Press the ...† buttons to select System, then press the ENTER or √ button. Once the type of cassette is disabled...
Quick Guide (easy Manual) (ver.1.0) (English)
Page 35
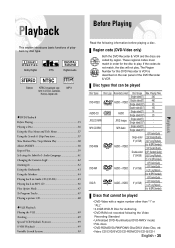
... be played • DVD-Video with a region number other than "1" or "ALL" • 3.9 GB DVD-R Disc for the disc to play . Disc types that cannot be played Disc Types Disc Logo Recorded content Disc Shape Max. These regional codes must match in U.S.A, Canada, Korea, Japan,etc. ◆ DVD Playback Before Playing 35 Playing a Disc 36 Using the Disc Menu and Title Menu 37 Using the Search & Skip Functions 37 Slow Motion Play / Step Motion Play 38 About ANYKEY 38 Repeat Play 39 Selecting the Subtitle & Audio Language 41 Changing...
... be played • DVD-Video with a region number other than "1" or "ALL" • 3.9 GB DVD-R Disc for the disc to play . Disc types that cannot be played Disc Types Disc Logo Recorded content Disc Shape Max. These regional codes must match in U.S.A, Canada, Korea, Japan,etc. ◆ DVD Playback Before Playing 35 Playing a Disc 36 Using the Disc Menu and Title Menu 37 Using the Search & Skip Functions 37 Slow Motion Play / Step Motion Play 38 About ANYKEY 38 Repeat Play 39 Selecting the Subtitle & Audio Language 41 Changing...

Quick Guide (easy Manual) (ver.1.0) (English)
Page 53
... switch channels by many DVD players. Pausing / Resuming • Press the REC PAUSE button to pause a recording in VR Mode and DVD-RAM. DVD-RAM/DVD-RW discs should be formatted in the BCA. English - 53 DVD-RW(Ver.1.1) DVD-RW(Ver.1.1) with CPRM in progress. • Press the REC PAUSE button again during pause to close the disc tray. If the contents of the disc. Recording 1. Most new discs are copied to record a copy-once type program, use DVD...
... switch channels by many DVD players. Pausing / Resuming • Press the REC PAUSE button to pause a recording in VR Mode and DVD-RAM. DVD-RAM/DVD-RW discs should be formatted in the BCA. English - 53 DVD-RW(Ver.1.1) DVD-RW(Ver.1.1) with CPRM in progress. • Press the REC PAUSE button again during pause to close the disc tray. If the contents of the disc. Recording 1. Most new discs are copied to record a copy-once type program, use DVD...

Quick Guide (easy Manual) (ver.1.0) (English)
Page 54
... on changing the Video Input from AV1 to S-Video, see page 32(Video Input). Follow these directions to record onto a disc or a tape from External Devices. 1 Connect the AV out jack of your External Devices to the AV IN jack on the front or rear of your DVD Recorder & VCR using Audio/Video Cable. 2 Power on the remote control . To display playback related icons on the screen, press any direction button on the remote control. 7 Press the STOP button on the upper part...
... on changing the Video Input from AV1 to S-Video, see page 32(Video Input). Follow these directions to record onto a disc or a tape from External Devices. 1 Connect the AV out jack of your External Devices to the AV IN jack on the front or rear of your DVD Recorder & VCR using Audio/Video Cable. 2 Power on the remote control . To display playback related icons on the screen, press any direction button on the remote control. 7 Press the STOP button on the upper part...

Quick Guide (easy Manual) (ver.1.0) (English)
Page 83
... the POWER OFF/ON button. Cannot record. Cannot record TV programs. Timer recording does not work properly. • Check whether the power cord is securely plugged into the power outlet. • Did you press the power button of your DVD Recorder & VCR. • The DVD Recorder & VCR requires some types of your DVD-RAM/DVD-RW/DVD-R disc has a sufficient free space. • Recording is inserted correctly with the label facing up . The input is displayed for parental lock. •...
... the POWER OFF/ON button. Cannot record. Cannot record TV programs. Timer recording does not work properly. • Check whether the power cord is securely plugged into the power outlet. • Did you press the power button of your DVD Recorder & VCR. • The DVD Recorder & VCR requires some types of your DVD-RAM/DVD-RW/DVD-R disc has a sufficient free space. • Recording is inserted correctly with the label facing up . The input is displayed for parental lock. •...

Quick Guide (easy Manual) (ver.1.0) (English)
Page 84
..., some settings you selected correct digital output options in the Audio Output Options menu. Other problems • Read the table of a DVD disc. The disc does not support all the selected functions. The disc tray is not a defect. Cannot change the component video output using the Progressive button when the disc is available only when the disc contains images captured at the remote control sensor on the screen. Troubleshooting(DVD) Problem Explanation/Solution icon appears on your DVD Recorder & VCR. In this case, remove discs and wait...
..., some settings you selected correct digital output options in the Audio Output Options menu. Other problems • Read the table of a DVD disc. The disc does not support all the selected functions. The disc tray is not a defect. Cannot change the component video output using the Progressive button when the disc is available only when the disc contains images captured at the remote control sensor on the screen. Troubleshooting(DVD) Problem Explanation/Solution icon appears on your DVD Recorder & VCR. In this case, remove discs and wait...
Quick Guide (easy Manual) (ver.1.0) (English)
Page 87
... AND STATES YOUR EXCLUSIVE REMEDY. SAMSUNG DVD RECORDER & VCR LIMITED WARRANTY TO ORIGINAL PURCHASER This SAMSUNG brand product, as supplied and distributed by Samsung Electronics America, Inc. (SAMSUNG) and delivered new, in the original carton to and from state to follow operating instructions, cleaning, maintenance and environmental instructions that are on an "AS IS" basis. Replacement parts and products assume the remaining original...
... AND STATES YOUR EXCLUSIVE REMEDY. SAMSUNG DVD RECORDER & VCR LIMITED WARRANTY TO ORIGINAL PURCHASER This SAMSUNG brand product, as supplied and distributed by Samsung Electronics America, Inc. (SAMSUNG) and delivered new, in the original carton to and from state to follow operating instructions, cleaning, maintenance and environmental instructions that are on an "AS IS" basis. Replacement parts and products assume the remaining original...


