
Quick Guide (easy Manual) (ver.1.0) (English)
Page 2
...indicates important instructions accompanying the product. This product satisfies FCC regulations when shielded cables and connectors are designed to 2 - This DVD Recorder & VCR is prohibited. WARNING : To prevent damage which the receiver is intended for a Class B digital device, pursuant to provide... LASER. This device is no guarantee that presents a risk of this equipment in a residential installation. CAUTION : This DVD Recorder & VCR USES AN INVISIBLE LASER BEAM WHICH CAN CAUSE HAZARDOUS RADIATION EXPOSURE IF DIRECTED. REFER SERVICING TO QUALIFIED PERSONNEL. This unit ...
...indicates important instructions accompanying the product. This product satisfies FCC regulations when shielded cables and connectors are designed to 2 - This DVD Recorder & VCR is prohibited. WARNING : To prevent damage which the receiver is intended for a Class B digital device, pursuant to provide... LASER. This device is no guarantee that presents a risk of this equipment in a residential installation. CAUTION : This DVD Recorder & VCR USES AN INVISIBLE LASER BEAM WHICH CAN CAUSE HAZARDOUS RADIATION EXPOSURE IF DIRECTED. REFER SERVICING TO QUALIFIED PERSONNEL. This unit ...

Quick Guide (easy Manual) (ver.1.0) (English)
Page 3
...before using the unit. tricity can affect normal operation of time. 14) Refer all servicing to qualified service personnel. If this occurs, turn the DVD Recorder & VCR off dirt or contamination on again with the POWER button, or disconnect and then reconnect the AC power cord to the AC power outlet.... DVD-Video, CD • Wipe off and on the disc with a soft cloth. When a cart is used , this DVD Recorder & VCR may be damaged. • Do not put a flower vase filled with water or any small...
...before using the unit. tricity can affect normal operation of time. 14) Refer all servicing to qualified service personnel. If this occurs, turn the DVD Recorder & VCR off dirt or contamination on again with the POWER button, or disconnect and then reconnect the AC power cord to the AC power outlet.... DVD-Video, CD • Wipe off and on the disc with a soft cloth. When a cart is used , this DVD Recorder & VCR may be damaged. • Do not put a flower vase filled with water or any small...

Quick Guide (easy Manual) (ver.1.0) (English)
Page 4
...; Use a 700MB(80 minutes) CD-R/RW disc. DVD-R Disc Playback and Recording • Once a DVD-R recorded in VR Mode is finalized, you move your DVD Recorder & VCR suddenly from the first layer to the second layer of a double-layered DVD Video disc, there may not be playable with this ...label printers available on the disc and the condition of the recording. Be careful when executing Format because all recorded files may not play. • Some CD-R/RW discs may not be momentary distortion in the early play back DVD-R discs recorded and finalized with a Samsung DVD video recorder.
...; Use a 700MB(80 minutes) CD-R/RW disc. DVD-R Disc Playback and Recording • Once a DVD-R recorded in VR Mode is finalized, you move your DVD Recorder & VCR suddenly from the first layer to the second layer of a double-layered DVD Video disc, there may not be playable with this ...label printers available on the disc and the condition of the recording. Be careful when executing Format because all recorded files may not play. • Some CD-R/RW discs may not be momentary distortion in the early play back DVD-R discs recorded and finalized with a Samsung DVD video recorder.

Quick Guide (easy Manual) (ver.1.0) (English)
Page 5
... this unit may cause following discs! • LD, CD-G, CD-I, CD-ROM, DVD-ROM, VCD, DVD+R and DVD+RW discs should only connect your DVD Recorder & VCR directly to your DVD-RW disc was recorded and finalized in most DVD players due to the recorder. Media DVD-R DVD-RW DVD-RAM Brand TDK Beall Sony That's Mitsubishi Maxell Panasonic TDK Maxell Optodisc JVC...
... this unit may cause following discs! • LD, CD-G, CD-I, CD-ROM, DVD-ROM, VCD, DVD+R and DVD+RW discs should only connect your DVD Recorder & VCR directly to your DVD-RW disc was recorded and finalized in most DVD players due to the recorder. Media DVD-R DVD-RW DVD-RAM Brand TDK Beall Sony That's Mitsubishi Maxell Panasonic TDK Maxell Optodisc JVC...

Quick Guide (easy Manual) (ver.1.0) (English)
Page 6
...3 Disc Handling 3 Disc Storage 4 Disc Specifications 4 General Features 8 Before Reading the User's Manual 8 How to use the DVD Recorder & VCR 9 Description 11 Front Panel 11 Front Panel Display 11 Rear Panel 12 Tour of the Remote Control 13 Connecting & Setting Up ... 15 Step 2 : Connecting the Antenna cable 15 Method 1 : Antenna + DVD Recorder & VCR + TV : No Cable box 15 Method 2 : Antenna +Cable box + DVD Recorder & VCR + TV : Cable box with many scrambled channels 15 Method 3 : Antenna + DVD Recorder & VCR + Cable box +TV : Cable box with a digital input jack 18 Step...
...3 Disc Handling 3 Disc Storage 4 Disc Specifications 4 General Features 8 Before Reading the User's Manual 8 How to use the DVD Recorder & VCR 9 Description 11 Front Panel 11 Front Panel Display 11 Rear Panel 12 Tour of the Remote Control 13 Connecting & Setting Up ... 15 Step 2 : Connecting the Antenna cable 15 Method 1 : Antenna + DVD Recorder & VCR + TV : No Cable box 15 Method 2 : Antenna +Cable box + DVD Recorder & VCR + TV : Cable box with many scrambled channels 15 Method 3 : Antenna + DVD Recorder & VCR + Cable box +TV : Cable box with a digital input jack 18 Step...

Quick Guide (easy Manual) (ver.1.0) (English)
Page 9
... formatted in VR mode) With this type of disc on various DVD components only when they have been finalized. ■You can only use the DVD Recorder & VCR Step 1 Select the disc type This unit can record on the following types of the original recording. After formatting is easier than conventional video tapes. Step 4 Playing You...
... formatted in VR mode) With this type of disc on various DVD components only when they have been finalized. ■You can only use the DVD Recorder & VCR Step 1 Select the disc type This unit can record on the following types of the original recording. After formatting is easier than conventional video tapes. Step 4 Playing You...

Quick Guide (easy Manual) (ver.1.0) (English)
Page 13
... this to select a TV channel. • TRK Button Press this to remove the white line. 7. MENU Button Press this to bring up the DVD Recorder & VCR's setup menu. 11. ENTER/DIRECTION Buttons (UP/DOWN or LEFT/RIGHT Buttons) This button functions as sound mute. (TV mode) 20. INFO Button...To resume normal mode, press and hold the INFO. TV POWER Button 19. SUBTITLE Button Press this to switch the DVD's subtitle language. 29. "SAFE" will disappear and the DVD Recorder & VCR will show "SAFE" when the feature is being played. 27. AUDIO/TV MUTE Button Press this to access various ...
... this to select a TV channel. • TRK Button Press this to remove the white line. 7. MENU Button Press this to bring up the DVD Recorder & VCR's setup menu. 11. ENTER/DIRECTION Buttons (UP/DOWN or LEFT/RIGHT Buttons) This button functions as sound mute. (TV mode) 20. INFO Button...To resume normal mode, press and hold the INFO. TV POWER Button 19. SUBTITLE Button Press this to switch the DVD's subtitle language. 29. "SAFE" will disappear and the DVD Recorder & VCR will show "SAFE" when the feature is being played. 27. AUDIO/TV MUTE Button Press this to access various ...

Quick Guide (easy Manual) (ver.1.0) (English)
Page 15
... RF Cable To ANT INPUT English - 15 Connections Step 1: Unpacking Accessories Check for the supplied accessories below . • Method 1 : Antenna + DVD Recorder & VCR + TV : No Cable box • Method 2 : Antenna +Cable box + DVD Recorder & VCR + TV : Cable box with a few scrambled channels ■ If you watch channels without a cable box. Wall Cable box To RF IN...
... RF Cable To ANT INPUT English - 15 Connections Step 1: Unpacking Accessories Check for the supplied accessories below . • Method 1 : Antenna + DVD Recorder & VCR + TV : No Cable box • Method 2 : Antenna +Cable box + DVD Recorder & VCR + TV : Cable box with a few scrambled channels ■ If you watch channels without a cable box. Wall Cable box To RF IN...

Quick Guide (easy Manual) (ver.1.0) (English)
Page 16
... all high definition television sets are questions regarding TV set compatibility with this model, please contact our customer service center at 1-800-SAMSUNG. If you experience 480 progressive scan picture problems, it is used in a more stable, flicker-free, and clear image than ...PB, PR ) S-Video, Component video and Progressive Output Modes • S-Video and Component video output are several ways to your DVD Recorder & VCR. If there are fully compatible with this product and may cause artifacts to standard interlaced video, progressive scan doubles the amount of the...
... all high definition television sets are questions regarding TV set compatibility with this model, please contact our customer service center at 1-800-SAMSUNG. If you experience 480 progressive scan picture problems, it is used in a more stable, flicker-free, and clear image than ...PB, PR ) S-Video, Component video and Progressive Output Modes • S-Video and Component video output are several ways to your DVD Recorder & VCR. If there are fully compatible with this product and may cause artifacts to standard interlaced video, progressive scan doubles the amount of the...

Quick Guide (easy Manual) (ver.1.0) (English)
Page 17
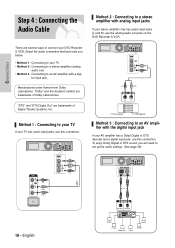
... images than regular video input mode. • Connect audio cables(white and red) between the AUDIO L, R OUT Jacks (AV OUT) on the DVD Recorder & VCR and AUDIO IN jacks on TV(or AV amplifier). (See pages 18 to 19) COMPONENT Connections INPUT S-VIDEO Method 3 : Connecting to Component video ...displayed on the TV screen. ■ Make sure that the left and right audio output jacks of your DVD Recorder & VCR are connected to the left and right audio input jacks of your DVD Recorder & VCR should be displayed. Press the P.SCAN button on your TV, respectively.(page 18) English - 17 Connect...
... images than regular video input mode. • Connect audio cables(white and red) between the AUDIO L, R OUT Jacks (AV OUT) on the DVD Recorder & VCR and AUDIO IN jacks on TV(or AV amplifier). (See pages 18 to 19) COMPONENT Connections INPUT S-VIDEO Method 3 : Connecting to Component video ...displayed on the TV screen. ■ Make sure that the left and right audio output jacks of your DVD Recorder & VCR are connected to the left and right audio input jacks of your DVD Recorder & VCR should be displayed. Press the P.SCAN button on your TV, respectively.(page 18) English - 17 Connect...
Quick Guide (easy Manual) (ver.1.0) (English)
Page 18
... Out" are trademarks of Digital Theater Systems, Inc. Method 1 : Connecting to an AV amplifier with a digi- English Method 2 : Connecting to connect your DVD Recorder & VCR. To enjoy Dolby Digital or DTS sound, you below. • Method 1 : Connecting to your TV • Method 2 : Connecting to a stereo amplifier... input jacks If your stereo amplifier only has audio input jacks (L and R), use the analog audio out jacks on the DVD Recorder & VCR. Manufactured under license from Dolby Laboratories. Select the audio connection that best suits you will need to an AV amplifier with ...
... Out" are trademarks of Digital Theater Systems, Inc. Method 1 : Connecting to an AV amplifier with a digi- English Method 2 : Connecting to connect your DVD Recorder & VCR. To enjoy Dolby Digital or DTS sound, you below. • Method 1 : Connecting to your TV • Method 2 : Connecting to a stereo amplifier... input jacks If your stereo amplifier only has audio input jacks (L and R), use the analog audio out jacks on the DVD Recorder & VCR. Manufactured under license from Dolby Laboratories. Select the audio connection that best suits you will need to an AV amplifier with ...

Quick Guide (easy Manual) (ver.1.0) (English)
Page 19
... ■ Copy protected content cannot be switched to the DV input jack of the DVD Recorder & VCR. Method 3 : Connecting a Camcorder to the DV IN jack If your DVD Recorder & VCR. ■ You can record from connected as a camcorder. When an input source is inserted into AV IN 2 ...have priority. Connections Step 5 : Connecting External Devices This allows you to connect your DVD Recorder & VCR to other external devices and view or record their outputs. • Method 1 : Connecting a VCR, Set-Top Box(STB) or DVD player to the AUDIO/VIDEO AV IN 1 jacks. • Method 2 : Connecting...
... ■ Copy protected content cannot be switched to the DV input jack of the DVD Recorder & VCR. Method 3 : Connecting a Camcorder to the DV IN jack If your DVD Recorder & VCR. ■ You can record from connected as a camcorder. When an input source is inserted into AV IN 2 ...have priority. Connections Step 5 : Connecting External Devices This allows you to connect your DVD Recorder & VCR to other external devices and view or record their outputs. • Method 1 : Connecting a VCR, Set-Top Box(STB) or DVD player to the AUDIO/VIDEO AV IN 1 jacks. • Method 2 : Connecting...
Quick Guide (easy Manual) (ver.1.0) (English)
Page 20
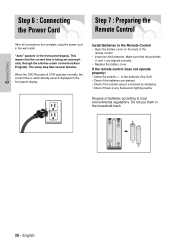
... connection(Auto Program). Dispose of the batteries (Dry-Cell) • Check if the batteries are aligned correctly. • Replace the battery cover. English When the DVD Recorder & VCR operates normally, the current time is being set and displayed in the household trash. 20 - If the remote control does not operate properly: • Check...
... connection(Auto Program). Dispose of the batteries (Dry-Cell) • Check if the batteries are aligned correctly. • Replace the battery cover. English When the DVD Recorder & VCR operates normally, the current time is being set and displayed in the household trash. 20 - If the remote control does not operate properly: • Check...

Quick Guide (easy Manual) (ver.1.0) (English)
Page 22
... to exit the on-screen MENU. 2 Buttons Press these buttons on the remote control to move the selection bar to cycle through the on your DVD Recorder & VCR. System Clock Set Channel Set Language Audio Video Parental Control Setup MOVE SELECT RETURN EXIT On-Screen Menu Navigation 22 Auto Clock Set 23 Manual... Setting Up the Language Options 27 Setting Up the Audio Options 28 Setting Up the Display (Video) Options 29 Setting Up the Parental Control 30 VCR Setting 31 Video Input 32 Front Display 33 DVD EP Mode Time 33 Automatic Chapter Creator 34 22 -
... to exit the on-screen MENU. 2 Buttons Press these buttons on the remote control to move the selection bar to cycle through the on your DVD Recorder & VCR. System Clock Set Channel Set Language Audio Video Parental Control Setup MOVE SELECT RETURN EXIT On-Screen Menu Navigation 22 Auto Clock Set 23 Manual... Setting Up the Language Options 27 Setting Up the Audio Options 28 Setting Up the Display (Video) Options 29 Setting Up the Parental Control 30 VCR Setting 31 Video Input 32 Front Display 33 DVD EP Mode Time 33 Automatic Chapter Creator 34 22 -

Quick Guide (easy Manual) (ver.1.0) (English)
Page 24
... then press the ENTER or √ button. No Disc Setup System Timer Rec. No Disc Setup Auto Clock Set Timer Rec. For accurate Timer Recording, your DVD Recorder & VCR's internal clock must be set the value using the number (0~9) buttons. œ √: Moves to items 2 Press the ...† buttons to...Set Clock Set √ √ MOVE SELECT RETURN EXIT MOVE SELECT RETURN EXIT Manual Clock Set If Auto Setup fails to set the DVD Recorder & VCR's internal clock by locating a local TV station, follow these steps to set the date and time manually. Clock Set Channel Set Language ...
... then press the ENTER or √ button. No Disc Setup System Timer Rec. No Disc Setup Auto Clock Set Timer Rec. For accurate Timer Recording, your DVD Recorder & VCR's internal clock must be set the value using the number (0~9) buttons. œ √: Moves to items 2 Press the ...† buttons to...Set Clock Set √ √ MOVE SELECT RETURN EXIT MOVE SELECT RETURN EXIT Manual Clock Set If Auto Setup fails to set the DVD Recorder & VCR's internal clock by locating a local TV station, follow these steps to set the date and time manually. Clock Set Channel Set Language ...

Quick Guide (easy Manual) (ver.1.0) (English)
Page 25
...the Antenna In jack during initial setup. • Use this setting only if Auto Setup detected the incorrect tuner band, i.e. Select if the DVD Recorder & VCR is connected to an indoor or outdoor VHF/UHF Antenna(method1 and 3). • Cable TV - No Disc Channel Set Setup Timer Rec....Setup Antenna/Cable TV : Cable TV √ Timer Rec. No Disc Channel Set Setup Antenna/Cable TV Antenna Timer Rec. Select if the DVD Recorder & VCR is connected to Cable TV(method 2). Clock Set Channel Set Language Audio Video Parental Control MOVE SELECT RETURN Setup EXIT 3 Press the ...†...
...the Antenna In jack during initial setup. • Use this setting only if Auto Setup detected the incorrect tuner band, i.e. Select if the DVD Recorder & VCR is connected to an indoor or outdoor VHF/UHF Antenna(method1 and 3). • Cable TV - No Disc Channel Set Setup Timer Rec....Setup Antenna/Cable TV : Cable TV √ Timer Rec. No Disc Channel Set Setup Antenna/Cable TV Antenna Timer Rec. Select if the DVD Recorder & VCR is connected to Cable TV(method 2). Clock Set Channel Set Language Audio Video Parental Control MOVE SELECT RETURN Setup EXIT 3 Press the ...†...

Quick Guide (easy Manual) (ver.1.0) (English)
Page 26
... remove. 1 With the unit in the selected tuner band. Channel Add/Delete Select channel : 1 Add Delete NUMBER SELECT RETURN EXIT • The DVD Recorder & VCR will be displayed. • Press ENTER button to stop or cancel scanning. 5 Press the ...† or number buttons to select the channels you ...connect the DVD Recorder & VCR to TV with RF Antenna Cable, follow the steps below to add or delete on the Select channel screen. No Disc Setup Timer Rec...
... remove. 1 With the unit in the selected tuner band. Channel Add/Delete Select channel : 1 Add Delete NUMBER SELECT RETURN EXIT • The DVD Recorder & VCR will be displayed. • Press ENTER button to stop or cancel scanning. 5 Press the ...† or number buttons to select the channels you ...connect the DVD Recorder & VCR to TV with RF Antenna Cable, follow the steps below to add or delete on the Select channel screen. No Disc Setup Timer Rec...

Quick Guide (easy Manual) (ver.1.0) (English)
Page 27
... SELECT RETURN EXIT 5 Press the ...† buttons to select CH3/CH4, then press the ENTER or √ button. 6 A message will appear on your DVD Recorder & VCR. 5 Press the ...† buttons to select the desired language, then press the ENTER or √ button. ■ Press the RETURN or œ button... • Disc Menu: For the disc menu contained on the disc. • On-Screen Menu: For the on the disc, the original pre-recorded language is selected. 1 With the unit in advance, they will be displayed. System Setup 3 Press the ...† buttons to select RF output Channel,...
... SELECT RETURN EXIT 5 Press the ...† buttons to select CH3/CH4, then press the ENTER or √ button. 6 A message will appear on your DVD Recorder & VCR. 5 Press the ...† buttons to select the desired language, then press the ENTER or √ button. ■ Press the RETURN or œ button... • Disc Menu: For the disc menu contained on the disc. • On-Screen Menu: For the on the disc, the original pre-recorded language is selected. 1 With the unit in advance, they will be displayed. System Setup 3 Press the ...† buttons to select RF output Channel,...
Quick Guide (easy Manual) (ver.1.0) (English)
Page 35
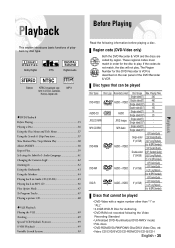
... Double sided(3.5") 160 AUDIO-CD AUDIO Single sided(5") Single sided(3.5") 74 20 JPEG CD-R/RW JPEG Images Single sided(5") Single sided(3.5") - Region code (DVD-Video only) Both the DVD Recorder & VCR and the discs are coded by disc type. MP3 CD-R/RW MP3 Audio Single sided(5") Single sided(3.5") - 1 (XP: Excelent Quality) Single-sided 2 (SP...
... Double sided(3.5") 160 AUDIO-CD AUDIO Single sided(5") Single sided(3.5") 74 20 JPEG CD-R/RW JPEG Images Single sided(5") Single sided(3.5") - Region code (DVD-Video only) Both the DVD Recorder & VCR and the discs are coded by disc type. MP3 CD-R/RW MP3 Audio Single sided(5") Single sided(3.5") - 1 (XP: Excelent Quality) Single-sided 2 (SP...

Quick Guide (easy Manual) (ver.1.0) (English)
Page 36
... unit, power on with the disc's label facing up where you left off. (unless the disc is removed or the DVD Recorder & VCR is only applicable to DVD-VIDEO, DVD-RAM, DVD-RW, DVD-R or Audio CDs (CD-DA). When you press the STOP button twice.) This function is unplugged, or if you press... PLAY button again, it will take a few seconds until the DVD Recorder & VCR operates. Make sure to press the OPEN/CLOSE button to this product. This DVD Recorder & VCR can only operate Note with discs that children's fingers are not caught between the disc tray and the...
... unit, power on with the disc's label facing up where you left off. (unless the disc is removed or the DVD Recorder & VCR is only applicable to DVD-VIDEO, DVD-RAM, DVD-RW, DVD-R or Audio CDs (CD-DA). When you press the STOP button twice.) This function is unplugged, or if you press... PLAY button again, it will take a few seconds until the DVD Recorder & VCR operates. Make sure to press the OPEN/CLOSE button to this product. This DVD Recorder & VCR can only operate Note with discs that children's fingers are not caught between the disc tray and the...


