

Quick Guide (easy Manual) (ver.1.0) (English)
Page 6
... Handling 3 Disc Storage 4 Disc Specifications 4 General Features 8 Before Reading the User's Manual 8 How to use the DVD Recorder & VCR 9 Description 11 Front Panel 11 Front Panel Display 11 Rear Panel 12 Tour of the Remote Control 13 Connecting & Setting Up Quick Overview 14 Step 1 : Unpacking 15 Accessories 15 Step 2 : Connecting the Antenna cable...
... Handling 3 Disc Storage 4 Disc Specifications 4 General Features 8 Before Reading the User's Manual 8 How to use the DVD Recorder & VCR 9 Description 11 Front Panel 11 Front Panel Display 11 Rear Panel 12 Tour of the Remote Control 13 Connecting & Setting Up Quick Overview 14 Step 1 : Unpacking 15 Accessories 15 Step 2 : Connecting the Antenna cable...

Quick Guide (easy Manual) (ver.1.0) (English)
Page 13
... the disc tray. 23. RETURN Button Returns to access various camera angles on the remote control for 5 seconds. TV/VCR Button 14. The display will operate normally. POWER Button 2. DVD COPY Button Press this to view the status of the Remote Control 1 18 2 3 19 4 20 5 21 6 22 23 7 24 8 9 25 10 26 11 12 27...
... the disc tray. 23. RETURN Button Returns to access various camera angles on the remote control for 5 seconds. TV/VCR Button 14. The display will operate normally. POWER Button 2. DVD COPY Button Press this to view the status of the Remote Control 1 18 2 3 19 4 20 5 21 6 22 23 7 24 8 9 25 10 26 11 12 27...

Quick Guide (easy Manual) (ver.1.0) (English)
Page 14
... : Connecting the Audio Cable † Step 5 : Connecting External Devices † Step 6 : Connecting the Power Cord † Step 7 : Preparing the Remote Control Quick Overview 14 Step 1 : Unpacking 15 Step 2 : Connecting the Antenna cable 15 Step 3 : Connecting the Video cable 16 Step 4 : Connecting the ...Audio cable 18 Step 5 : Connecting External Devices 19 Step 6 : Connecting the Power Cord 20 Step 7 : Preparing the Remote Control 20 14 - English • Note to CATV system installer : This reminder is to call CATV system installer's attention to Article 820-40...
... : Connecting the Audio Cable † Step 5 : Connecting External Devices † Step 6 : Connecting the Power Cord † Step 7 : Preparing the Remote Control Quick Overview 14 Step 1 : Unpacking 15 Step 2 : Connecting the Antenna cable 15 Step 3 : Connecting the Video cable 16 Step 4 : Connecting the ...Audio cable 18 Step 5 : Connecting External Devices 19 Step 6 : Connecting the Power Cord 20 Step 7 : Preparing the Remote Control 20 14 - English • Note to CATV system installer : This reminder is to call CATV system installer's attention to Article 820-40...

Quick Guide (easy Manual) (ver.1.0) (English)
Page 15
...00073A) • RF Cable for TV (AC39-42001J) • Remote Control (AK59-00034H) • Batteries for the supplied accessories below . • Method 1 : Antenna + DVD Recorder & VCR + TV : No Cable box • Method 2 : Antenna +Cable box + DVD Recorder & VCR + TV : Cable box with many scrambled channels... leads, use a UHF/VHF combineradaptor (available at most electronics shops) to connect the antenna to the DVD Recorder & VCR. Connections Step 1: Unpacking Accessories Check for Remote Control (AAA Size) (AC43-12002H) • User's Manual • Quick Guide Step 2: Connecting the ...
...00073A) • RF Cable for TV (AC39-42001J) • Remote Control (AK59-00034H) • Batteries for the supplied accessories below . • Method 1 : Antenna + DVD Recorder & VCR + TV : No Cable box • Method 2 : Antenna +Cable box + DVD Recorder & VCR + TV : Cable box with many scrambled channels... leads, use a UHF/VHF combineradaptor (available at most electronics shops) to connect the antenna to the DVD Recorder & VCR. Connections Step 1: Unpacking Accessories Check for Remote Control (AAA Size) (AC43-12002H) • User's Manual • Quick Guide Step 2: Connecting the ...
Quick Guide (easy Manual) (ver.1.0) (English)
Page 20
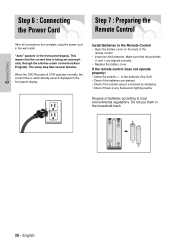
.... Connections Step 6 : Connecting the Power Cord Step 7 : Preparing the Remote Control After all connections are drained. • Check if the remote sensor is blocked by obstacles. • Check if there is any fluorescent lighting nearby. The setup may take several minutes. When the DVD Recorder & VCR operates normally, the current time is being set...
.... Connections Step 6 : Connecting the Power Cord Step 7 : Preparing the Remote Control After all connections are drained. • Check if the remote sensor is blocked by obstacles. • Check if there is any fluorescent lighting nearby. The setup may take several minutes. When the DVD Recorder & VCR operates normally, the current time is being set...

Quick Guide (easy Manual) (ver.1.0) (English)
Page 21
If you replace the remote control's batteries, you encounter problems, operate the television directly. CH/TRK ( / ) Used to select an external source. Press the TV button and enter the two-figure code corresponding to select channels over 100. Brand Codes SAMSUNG 01,14,15,23,31 DAEWOO .... If you must set the brand code again. Button Function TV POWER Used to toggle the sound on . 2. Used to operate with this remote control. • Control function buttons involve : TV POWER, CH/TRK ( / ), VOL +/-, Direct number buttons, TV MUTE, INPUT SEL. Used to select the ...
If you replace the remote control's batteries, you encounter problems, operate the television directly. CH/TRK ( / ) Used to select an external source. Press the TV button and enter the two-figure code corresponding to select channels over 100. Brand Codes SAMSUNG 01,14,15,23,31 DAEWOO .... If you must set the brand code again. Button Function TV POWER Used to toggle the sound on . 2. Used to operate with this remote control. • Control function buttons involve : TV POWER, CH/TRK ( / ), VOL +/-, Direct number buttons, TV MUTE, INPUT SEL. Used to select the ...

Quick Guide (easy Manual) (ver.1.0) (English)
Page 22
... VCR Setting 31 Video Input 32 Front Display 33 DVD EP Mode Time 33 Automatic Chapter Creator 34 22 - No Disc Setup Timer Rec. Press again to exit the on-screen MENU. 2 Buttons Press these buttons on the remote control to move the selection bar to cycle through the on -screen MENU.... Use the following buttons to open the on your DVD Recorder & VCR. On-Screen Menu System Setup Navigation System Setup The on-screen menus ...
... VCR Setting 31 Video Input 32 Front Display 33 DVD EP Mode Time 33 Automatic Chapter Creator 34 22 - No Disc Setup Timer Rec. Press again to exit the on-screen MENU. 2 Buttons Press these buttons on the remote control to move the selection bar to cycle through the on -screen MENU.... Use the following buttons to open the on your DVD Recorder & VCR. On-Screen Menu System Setup Navigation System Setup The on-screen menus ...

Quick Guide (easy Manual) (ver.1.0) (English)
Page 30
...RETURN EXIT 6 Press the ...† buttons to confirm the password. For example, if you control the types of DVDs that the program is intended for adult use only. 30 - English Parental Control Create the password NUMBER SELECT RETURN EXIT 4 Create a 4-digit password using the 0 to... if you want, then press the ENTER or √ button. The Parental Control screen appears. Refer to 8 rating levels on the remote control. System Clock Set Channel Set Language Audio Video Parental Control MOVE SELECT RETURN Setup EXIT 3 Press the ...† buttons to the Note ...
...RETURN EXIT 6 Press the ...† buttons to confirm the password. For example, if you control the types of DVDs that the program is intended for adult use only. 30 - English Parental Control Create the password NUMBER SELECT RETURN EXIT 4 Create a 4-digit password using the 0 to... if you want, then press the ENTER or √ button. The Parental Control screen appears. Refer to 8 rating levels on the remote control. System Clock Set Channel Set Language Audio Video Parental Control MOVE SELECT RETURN Setup EXIT 3 Press the ...† buttons to the Note ...

Quick Guide (easy Manual) (ver.1.0) (English)
Page 31
... are missing the Record Safety Note Tab will be displayed. No Disc Setup Timer Rec. No Disc Setup Timer Rec. VCR Video Input Front Display DVD EP Mode Time Chapter Creator System √ : AV 1 √ : Auto Dim √ : 6Hours √ : Off √ MOVE ...; √ MOVE SELECT RETURN EXIT English - 31 System Setup About the Change Password 1 Press the ...† buttons to 9 buttons on the remote control. Parental Control Password : On √ Rating Level : Level 1 kids √ Change password √ MOVE SELECT RETURN EXIT No Disc Setup Timer Rec. ...
... are missing the Record Safety Note Tab will be displayed. No Disc Setup Timer Rec. No Disc Setup Timer Rec. VCR Video Input Front Display DVD EP Mode Time Chapter Creator System √ : AV 1 √ : Auto Dim √ : 6Hours √ : Off √ MOVE ...; √ MOVE SELECT RETURN EXIT English - 31 System Setup About the Change Password 1 Press the ...† buttons to 9 buttons on the remote control. Parental Control Password : On √ Rating Level : Level 1 kids √ Change password √ MOVE SELECT RETURN EXIT No Disc Setup Timer Rec. ...

Quick Guide (easy Manual) (ver.1.0) (English)
Page 37
...allows you to select special functions for playing a desired scene is heard during Scan(Search) mode, Note except CDs (CD-DA). For DVD-RAM/DVD-RW/DVD-R disc Searching through a Chapter or Track During the playback, press the SEARCH œœ or √√ button on characters, etc...selecting a desired scene in reverse order. Since only the information necessary for title, chapters, audio track, subtitles, film previews, information on the remote control. Since the title list con- Each time you select a title. To return to display title list. provided by the user will not be...
...allows you to select special functions for playing a desired scene is heard during Scan(Search) mode, Note except CDs (CD-DA). For DVD-RAM/DVD-RW/DVD-R disc Searching through a Chapter or Track During the playback, press the SEARCH œœ or √√ button on characters, etc...selecting a desired scene in reverse order. Since only the information necessary for title, chapters, audio track, subtitles, film previews, information on the remote control. Since the title list con- Each time you select a title. To return to display title list. provided by the user will not be...
Quick Guide (easy Manual) (ver.1.0) (English)
Page 38
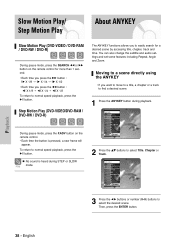
... the desired scene. Slow Motion Play/ Step Motion Play About ANYKEY Slow Motion Play (DVD-VIDEO / DVD-RAM / DVD-RW / DVD-R) During pause mode, press the SEARCH œœ or √√ button on the remote control. • Each time the button is heard during playback. You can also change the... subtitle and audio settings and set some features including Repeat, Angle and Zoom. DVD-VIDEO 1/10 1/40 00:01:45 ENG ENG D 5.1CH ...
... the desired scene. Slow Motion Play/ Step Motion Play About ANYKEY Slow Motion Play (DVD-VIDEO / DVD-RAM / DVD-RW / DVD-R) During pause mode, press the SEARCH œœ or √√ button on the remote control. • Each time the button is heard during playback. You can also change the... subtitle and audio settings and set some features including Repeat, Angle and Zoom. DVD-VIDEO 1/10 1/40 00:01:45 ENG ENG D 5.1CH ...
Quick Guide (easy Manual) (ver.1.0) (English)
Page 45
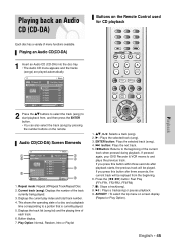
...TRACK 2 4:31 03. TRACK 1 Play Option : Normal & 00 : 52 $ 01. Playing back an Audio CD (CD-DA) Buttons on the Remote Control used for CD playback Playback Each disc has a variety of the track currently being played. 3. Playing an Audio CD(CD-DA) 1 Insert an Audio ... (song). 2. √ : Plays the selected track (song). 3. lœœbutton: Returns to and plays the previous track. If pressed again, your DVD Recorder & VCR moves to the beginning of the current track when pressed during playback. If you press this button within three seconds after three seconds...
...TRACK 2 4:31 03. TRACK 1 Play Option : Normal & 00 : 52 $ 01. Playing back an Audio CD (CD-DA) Buttons on the Remote Control used for CD playback Playback Each disc has a variety of the track currently being played. 3. Playing an Audio CD(CD-DA) 1 Insert an Audio ... (song). 2. √ : Plays the selected track (song). 3. lœœbutton: Returns to and plays the previous track. If pressed again, your DVD Recorder & VCR moves to the beginning of the current track when pressed during playback. If you press this button within three seconds after three seconds...
Quick Guide (easy Manual) (ver.1.0) (English)
Page 49
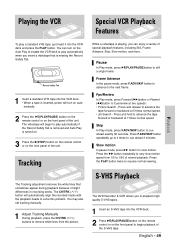
...of normal playback. While a videotape is playing, you can turn on automatically. 2 Press the √II(PLAY/PAUSE) button on the remote control or on the front panel of the unit. Pause In Play mode, press √II(PLAY/PAUSE)button to resume normal viewing. Tracking The...339;)button to 1/30 of the S-VHS tape. Slow motion In pause mode, press √√ button for slow motion. S-VHS Playback The DVD Recorder & VCR allows you insert a videotape that sometimes appear during playback because of special playback features, including Still, Frame Advance, Skip, Slow ...
...of normal playback. While a videotape is playing, you can turn on automatically. 2 Press the √II(PLAY/PAUSE) button on the remote control or on the front panel of the unit. Pause In Play mode, press √II(PLAY/PAUSE)button to resume normal viewing. Tracking The...339;)button to 1/30 of the S-VHS tape. Slow motion In pause mode, press √√ button for slow motion. S-VHS Playback The DVD Recorder & VCR allows you insert a videotape that sometimes appear during playback because of special playback features, including Still, Frame Advance, Skip, Slow ...

Quick Guide (easy Manual) (ver.1.0) (English)
Page 54
... button on your External Note Devices when recording through AV In jacks on the DVD/VCR using Audio/Video cables. button on the upper part of the remote control to start recording. Recording through a DV jack. Some camcorders may control the Camcorder using the IEEE1394 (DV) interface. AV1: ➝ Channel Number ...screen, then press the ENTER button. To display playback related icons on the screen, press any direction button on the remote control. 7 Press the STOP button on your DVD Recorder & VCR and switch to AV In mode by pressing the INPUT SEL. Also refer to the user manual ...
... button on your External Note Devices when recording through AV In jacks on the DVD/VCR using Audio/Video cables. button on the upper part of the remote control to start recording. Recording through a DV jack. Some camcorders may control the Camcorder using the IEEE1394 (DV) interface. AV1: ➝ Channel Number ...screen, then press the ENTER button. To display playback related icons on the screen, press any direction button on the remote control. 7 Press the STOP button on your DVD Recorder & VCR and switch to AV In mode by pressing the INPUT SEL. Also refer to the user manual ...
Quick Guide (easy Manual) (ver.1.0) (English)
Page 59
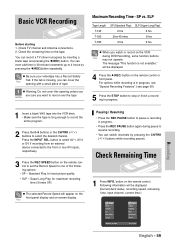
...in 30-minute increments up to resume recording. • You can even add time in progress. • Press the REC PAUSE button again during DVD Recording, some function buttons Note may not operate. Check TV channel and Antenna connections. 2. Be sure your videotape has a Record Safety Note Tab...( / ) buttons while recording pauses. SP vs. Press the INPUT SEL. Following information will appear on the front panel display and on the remote control to set the Record Speed to record over the tape. For options while recording is missing, you can record a TV show in progress. SLP...
...in 30-minute increments up to resume recording. • You can even add time in progress. • Press the REC PAUSE button again during DVD Recording, some function buttons Note may not operate. Check TV channel and Antenna connections. 2. Be sure your videotape has a Record Safety Note Tab...( / ) buttons while recording pauses. SP vs. Press the INPUT SEL. Following information will appear on the front panel display and on the remote control to set the Record Speed to record over the tape. For options while recording is missing, you can record a TV show in progress. SLP...

Quick Guide (easy Manual) (ver.1.0) (English)
Page 60
...automatically change to the DVD and start recording, then the other. 1 Watch a Different Channel When you watching through AV input during recording, change the input of your TV using S-Video or component video cable, the playback screen on the remote control. English for DVD or VCR. •...; Choose REC mode for DVD or VCR. • Press REC button for DVD or VCR. Change the channel you watching through the Antenna input during recording, ...
...automatically change to the DVD and start recording, then the other. 1 Watch a Different Channel When you watching through AV input during recording, change the input of your TV using S-Video or component video cable, the playback screen on the remote control. English for DVD or VCR. •...; Choose REC mode for DVD or VCR. • Press REC button for DVD or VCR. Change the channel you watching through the Antenna input during recording, ...

Quick Guide (easy Manual) (ver.1.0) (English)
Page 61
... √ button. Copy to DVD or VCR You can copy from DVD to VCR (VR mode) 1 With the unit in Stop mode, press the MENU button. 2 Press the ...† buttons to select Copy, then press the ENTER or √ button. Check the remaining time on front panel or remote control(TO VCR). • To... stop recording, press the STOP button. DVD-RAM(VR) JAN/19/2005 12:00 AM 7 Scenes JAN/19/2005 12:00 AM Edit Copylist No. To copy...
... √ button. Copy to DVD or VCR You can copy from DVD to VCR (VR mode) 1 With the unit in Stop mode, press the MENU button. 2 Press the ...† buttons to select Copy, then press the ENTER or √ button. Check the remaining time on front panel or remote control(TO VCR). • To... stop recording, press the STOP button. DVD-RAM(VR) JAN/19/2005 12:00 AM 7 Scenes JAN/19/2005 12:00 AM Edit Copylist No. To copy...

Quick Guide (easy Manual) (ver.1.0) (English)
Page 62
... select desired copylist, then press the ENTER or √ button. DVD-RAM(VR) VCR - -> DVD No. Direct copy VCR to DVD • Insert the VHS tape you want to copy. • Insert Recordable DVD disc. • Press DVD copy button on front panel or remote control(TO DVD). • To stop mode. 2 Press the ...† buttons to select...
... select desired copylist, then press the ENTER or √ button. DVD-RAM(VR) VCR - -> DVD No. Direct copy VCR to DVD • Insert the VHS tape you want to copy. • Insert Recordable DVD disc. • Press DVD copy button on front panel or remote control(TO DVD). • To stop mode. 2 Press the ...† buttons to select...

Quick Guide (easy Manual) (ver.1.0) (English)
Page 84
...chapter, or scan time that is out of a DVD disc. In this case, some settings you configure on your DVD Recorder & VCR and remote control. • Check whether the batteries are disc-specific. It will work . • Point the remote control at different angles. No progressive output. Operate within ...In this case, remove discs and wait for one of the following reasons: (1) Your DVD disc does not support the feature (for DVD disc. Check whether you move your nearest Samsung service center. 84 - Angle operation does not work properly. Desired sound language and subtitle...
...chapter, or scan time that is out of a DVD disc. In this case, some settings you configure on your DVD Recorder & VCR and remote control. • Check whether the batteries are disc-specific. It will work . • Point the remote control at different angles. No progressive output. Operate within ...In this case, remove discs and wait for one of the following reasons: (1) Your DVD disc does not support the feature (for DVD disc. Check whether you move your nearest Samsung service center. 84 - Angle operation does not work properly. Desired sound language and subtitle...

All Windows ( 0.16 )
Page 2
...It takes about 1~2 minutes before the mesage below will be displayed on the remote control. 8) After removing the update disc, turn off the unit with power button. Version: XX.X.XXXXX -> XX.X.XXXXX Yes NNoo 【 Remote Control 】 After checking old and new version, select "Yes" or "No"... with "◀" or "▶" on the remote control. ※ The Version is indicated by "XX.X.ModelName" ※ If you want...
...It takes about 1~2 minutes before the mesage below will be displayed on the remote control. 8) After removing the update disc, turn off the unit with power button. Version: XX.X.XXXXX -> XX.X.XXXXX Yes NNoo 【 Remote Control 】 After checking old and new version, select "Yes" or "No"... with "◀" or "▶" on the remote control. ※ The Version is indicated by "XX.X.ModelName" ※ If you want...


