
Quick Guide (easy Manual) (ver.1.0) (English)
Page 2
... radios and televisions, use shielded cables and connectors for a Class B digital device, pursuant to other equipment. CAUTION : This DVD Recorder & VCR USES AN INVISIBLE LASER BEAM WHICH CAN CAUSE HAZARDOUS RADIATION EXPOSURE IF DIRECTED. This equipment generates, uses and can radiate radio frequency... energy and, if not installed and used elseNote where. This DVD Recorder & VCR is designed and manufactured to respond to radio communications. Use of this equipment does cause harmful interference to radio or...
... radios and televisions, use shielded cables and connectors for a Class B digital device, pursuant to other equipment. CAUTION : This DVD Recorder & VCR USES AN INVISIBLE LASER BEAM WHICH CAN CAUSE HAZARDOUS RADIATION EXPOSURE IF DIRECTED. This equipment generates, uses and can radiate radio frequency... energy and, if not installed and used elseNote where. This DVD Recorder & VCR is designed and manufactured to respond to radio communications. Use of this equipment does cause harmful interference to radio or...

Quick Guide (easy Manual) (ver.1.0) (English)
Page 3
...1) Read these instructions. 2) Keep these operating instructions carefully before using the unit. The recorder will operate normally. • Be sure to remove the disc and turn the DVD Recorder & VCR off . • Do not move the recorder while a disc is used , use . • Disconnect the AC power cord from...being walked on again with the POWER button, or disconnect and then reconnect the AC power cord to use the recorder for long periods of this DVD Recorder & VCR may be damaged. The wide blade or the third prong are provided for your outlet, consult an electrician for...
...1) Read these instructions. 2) Keep these operating instructions carefully before using the unit. The recorder will operate normally. • Be sure to remove the disc and turn the DVD Recorder & VCR off . • Do not move the recorder while a disc is used , use . • Disconnect the AC power cord from...being walked on again with the POWER button, or disconnect and then reconnect the AC power cord to use the recorder for long periods of this DVD Recorder & VCR may be damaged. The wide blade or the third prong are provided for your outlet, consult an electrician for...

Quick Guide (easy Manual) (ver.1.0) (English)
Page 4
...generate on which was used . • For MP3 files recorded with MPEG-2 picture compression and Dolby 3D surround, allowing you move your DVD Recorder & VCR suddenly from 56Kbps to 320Kbps. • The unit can - Recording onto the disc may be lost. • A DVD-RW blank disc is initialized to VR Mode when first ini...adhesive or leftover peeled-off stickers.) • Do not use scratch-proof protectors or covers. • Do not use discs printed with a Samsung DVD video recorder. Using CD-R/RW • Use a 700MB(80 minutes) CD-R/RW disc. Be careful when executing Format because all...
...generate on which was used . • For MP3 files recorded with MPEG-2 picture compression and Dolby 3D surround, allowing you move your DVD Recorder & VCR suddenly from 56Kbps to 320Kbps. • The unit can - Recording onto the disc may be lost. • A DVD-RW blank disc is initialized to VR Mode when first ini...adhesive or leftover peeled-off stickers.) • Do not use scratch-proof protectors or covers. • Do not use discs printed with a Samsung DVD video recorder. Using CD-R/RW • Use a 700MB(80 minutes) CD-R/RW disc. Be careful when executing Format because all...

Quick Guide (easy Manual) (ver.1.0) (English)
Page 5
...-I, CD-ROM, DVD-ROM, VCD, DVD+R and DVD+RW discs should only connect your DVD Recorder & VCR directly to your region may not perform correctly. COPY PROTECTION • Many DVD discs are played, either "No disc." Use of recorded or edited materials or damage to a VCR results in most DVD players due to the recorder arising from copy-protected DVD discs. •...
...-I, CD-ROM, DVD-ROM, VCD, DVD+R and DVD+RW discs should only connect your DVD Recorder & VCR directly to your region may not perform correctly. COPY PROTECTION • Many DVD discs are played, either "No disc." Use of recorded or edited materials or damage to a VCR results in most DVD players due to the recorder arising from copy-protected DVD discs. •...

Quick Guide (easy Manual) (ver.1.0) (English)
Page 6
...3 Disc Handling 3 Disc Storage 4 Disc Specifications 4 General Features 8 Before Reading the User's Manual 8 How to use the DVD Recorder & VCR 9 Description 11 Front Panel 11 Front Panel Display 11 Rear Panel 12 Tour of the Remote Control 13 Connecting & Setting Up ... 15 Step 2 : Connecting the Antenna cable 15 Method 1 : Antenna + DVD Recorder & VCR + TV : No Cable box 15 Method 2 : Antenna +Cable box + DVD Recorder & VCR + TV : Cable box with many scrambled channels 15 Method 3 : Antenna + DVD Recorder & VCR + Cable box +TV : Cable box with a digital input jack 18 Step...
...3 Disc Handling 3 Disc Storage 4 Disc Specifications 4 General Features 8 Before Reading the User's Manual 8 How to use the DVD Recorder & VCR 9 Description 11 Front Panel 11 Front Panel Display 11 Rear Panel 12 Tour of the Remote Control 13 Connecting & Setting Up ... 15 Step 2 : Connecting the Antenna cable 15 Method 1 : Antenna + DVD Recorder & VCR + TV : No Cable box 15 Method 2 : Antenna +Cable box + DVD Recorder & VCR + TV : Cable box with many scrambled channels 15 Method 3 : Antenna + DVD Recorder & VCR + Cable box +TV : Cable box with a digital input jack 18 Step...

Quick Guide (easy Manual) (ver.1.0) (English)
Page 9
... rename, lock, etc., on various DVD components. How to use either DVDVideo format (Video mode) or DVD-Video Recording format (VR mode). If you can only use the DVD Recorder & VCR Step 1 Select the disc type This unit can be formatted in DVD-Video Recording format (VR mode). You can play... a video mode disc on a recorded title. A DVD consists of disc on various DVD components only...
... rename, lock, etc., on various DVD components. How to use either DVDVideo format (Video mode) or DVD-Video Recording format (VR mode). If you can only use the DVD Recorder & VCR Step 1 Select the disc type This unit can be formatted in DVD-Video Recording format (VR mode). You can play... a video mode disc on a recorded title. A DVD consists of disc on various DVD components only...

Quick Guide (easy Manual) (ver.1.0) (English)
Page 13
... close the disc tray. 23. OPEN/CLOSE Button Press this to operate the DVD Recorder & VCR (for example if you have programmed a timer recording) you use Timer Recording. 24. ANYKEY Button Press this to pause during recording. ❚ Key Lock Function If you do not want others to access various... to select a TV channel. • TRK Button Press this to remove the white line. 7. MENU Button Press this to bring up the DVD Recorder & VCR's setup menu. 11. ANGLE Button Press this to access various camera angles on screen. 31. button again for 5 seconds. ENTER/DIRECTION Buttons ...
... close the disc tray. 23. OPEN/CLOSE Button Press this to operate the DVD Recorder & VCR (for example if you have programmed a timer recording) you use Timer Recording. 24. ANYKEY Button Press this to pause during recording. ❚ Key Lock Function If you do not want others to access various... to select a TV channel. • TRK Button Press this to remove the white line. 7. MENU Button Press this to bring up the DVD Recorder & VCR's setup menu. 11. ANGLE Button Press this to access various camera angles on screen. 31. button again for 5 seconds. ENTER/DIRECTION Buttons ...

Quick Guide (easy Manual) (ver.1.0) (English)
Page 15
...AK59-00034H) • Batteries for the supplied accessories below . • Method 1 : Antenna + DVD Recorder & VCR + TV : No Cable box • Method 2 : Antenna +Cable box + DVD Recorder & VCR + TV : Cable box with a few scrambled channels ■ If you watch channels without a cable... Method1 : Antenna + DVD Recorder & VCR + TV : No Cable box You can record channels by selecting the channel on the DVD Recorder & VCR. RF Cable Method 2 : Antenna +Cable box + DVD Recorder & VCR + TV : Cable box with many scrambled channels • Method 3 : Antenna + DVD Recorder & VCR + Cable box + ...
...AK59-00034H) • Batteries for the supplied accessories below . • Method 1 : Antenna + DVD Recorder & VCR + TV : No Cable box • Method 2 : Antenna +Cable box + DVD Recorder & VCR + TV : Cable box with a few scrambled channels ■ If you watch channels without a cable... Method1 : Antenna + DVD Recorder & VCR + TV : No Cable box You can record channels by selecting the channel on the DVD Recorder & VCR. RF Cable Method 2 : Antenna +Cable box + DVD Recorder & VCR + TV : Cable box with many scrambled channels • Method 3 : Antenna + DVD Recorder & VCR + Cable box + ...

Quick Guide (easy Manual) (ver.1.0) (English)
Page 16
...'standard definition' output. Step 3: Connecting the Video Cable There are available only if your DVD Recorder & VCR. If there are fully compatible with this model, please contact our customer service center at 1-800-SAMSUNG. To RF OUT To RF IN Cable box To ANT INPUT RF Cable Method 1 :...and Component video output are several ways to a video input jack Connect a video(yellow) cable between the VIDEO OUT jack (AV OUT) on DVD Recorder & VCR and VIDEO (yellow) IN jack on the TV(or AV amplifier). • You will enjoy regular quality images. • Connect audio cables ...
...'standard definition' output. Step 3: Connecting the Video Cable There are available only if your DVD Recorder & VCR. If there are fully compatible with this model, please contact our customer service center at 1-800-SAMSUNG. To RF OUT To RF IN Cable box To ANT INPUT RF Cable Method 1 :...and Component video output are several ways to a video input jack Connect a video(yellow) cable between the VIDEO OUT jack (AV OUT) on DVD Recorder & VCR and VIDEO (yellow) IN jack on the TV(or AV amplifier). • You will enjoy regular quality images. • Connect audio cables ...

Quick Guide (easy Manual) (ver.1.0) (English)
Page 17
... clearer images than regular video input mode. • Connect audio cables(white and red) between the VIDEO OUT jacks (COMPONENT OUT) on DVD Recorder & VCR and COMPONENT VIDEO IN jacks on your TV, respectively.(page 18) English - 17 S-Video separates the picture element into black and White(Y), blue.... ■ Make sure that the left and right audio input jacks of your DVD Recorder & VCR should be displayed. Connect Component video cables(not included) between the AUDIO L, R OUT Jacks (AV OUT) on the DVD Recorder & VCR and AUDIO IN jacks on the front panel while the unit is , the Y,...
... clearer images than regular video input mode. • Connect audio cables(white and red) between the VIDEO OUT jacks (COMPONENT OUT) on DVD Recorder & VCR and COMPONENT VIDEO IN jacks on your TV, respectively.(page 18) English - 17 S-Video separates the picture element into black and White(Y), blue.... ■ Make sure that the left and right audio input jacks of your DVD Recorder & VCR should be displayed. Connect Component video cables(not included) between the AUDIO L, R OUT Jacks (AV OUT) on the DVD Recorder & VCR and AUDIO IN jacks on the front panel while the unit is , the Y,...
Quick Guide (easy Manual) (ver.1.0) (English)
Page 18
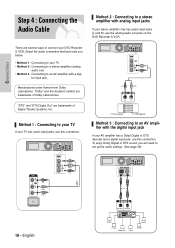
... Digital or DTS decoder and a digital input jack, use the analog audio out jacks on the DVD Recorder & VCR. Manufactured under license from Dolby Laboratories. Method 2 : Connecting to an AV amplifier with the digital input jack If your DVD Recorder & VCR. Method 3 : Connecting to a stereo amplifier with a digi- To enjoy Dolby Digital or DTS sound, you...
... Digital or DTS decoder and a digital input jack, use the analog audio out jacks on the DVD Recorder & VCR. Manufactured under license from Dolby Laboratories. Method 2 : Connecting to an AV amplifier with the digital input jack If your DVD Recorder & VCR. Method 3 : Connecting to a stereo amplifier with a digi- To enjoy Dolby Digital or DTS sound, you...

Quick Guide (easy Manual) (ver.1.0) (English)
Page 19
...3 : Connecting a Camcorder to the DV IN jack If your camcorder has a DV output jack, connect it to the DV input jack of the DVD Recorder & VCR. ■ When the S-Video jack and Video jack are both connected, the S-Video jack will have priority. When an input source is inserted into... cannot be switched to AV IN 2 automatically. Line Selection will be recorded. Method 1 : Connecting a VCR, Settop Box(STB) or DVD player to the AUDIO/VIDEO AV IN 1 jacks Connecting a VCR or external device to AV IN 1 jacks of the DVD Recorder & VCR. You can also use the AV IN 2 jacks on the front ...
...3 : Connecting a Camcorder to the DV IN jack If your camcorder has a DV output jack, connect it to the DV input jack of the DVD Recorder & VCR. ■ When the S-Video jack and Video jack are both connected, the S-Video jack will have priority. When an input source is inserted into... cannot be switched to AV IN 2 automatically. Line Selection will be recorded. Method 1 : Connecting a VCR, Settop Box(STB) or DVD player to the AUDIO/VIDEO AV IN 1 jacks Connecting a VCR or external device to AV IN 1 jacks of the DVD Recorder & VCR. You can also use the AV IN 2 jacks on the front ...
Quick Guide (easy Manual) (ver.1.0) (English)
Page 20
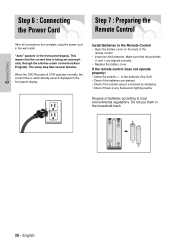
The setup may take several minutes. Dispose of the remote control. • Insert two AAA batteries. When the DVD Recorder & VCR operates normally, the current time is automatically set automatically through the antenna under connection(Auto Program). Make sure that the current time is being set ...
The setup may take several minutes. Dispose of the remote control. • Insert two AAA batteries. When the DVD Recorder & VCR operates normally, the current time is automatically set automatically through the antenna under connection(Auto Program). Make sure that the current time is being set ...

Quick Guide (easy Manual) (ver.1.0) (English)
Page 22
... Press this button on the remote control to open and navigate through the on -screen MENU. Use the following buttons to exit the on your DVD Recorder & VCR. No Disc Setup Timer Rec. English 1 MENU Button Press this button on the remote control to return to the previous MENU screen displayed or to... Setting Up the Language Options 27 Setting Up the Audio Options 28 Setting Up the Display (Video) Options 29 Setting Up the Parental Control 30 VCR Setting 31 Video Input 32 Front Display 33 DVD EP Mode Time 33 Automatic Chapter Creator 34 22 -
... Press this button on the remote control to open and navigate through the on -screen MENU. Use the following buttons to exit the on your DVD Recorder & VCR. No Disc Setup Timer Rec. English 1 MENU Button Press this button on the remote control to return to the previous MENU screen displayed or to... Setting Up the Language Options 27 Setting Up the Audio Options 28 Setting Up the Display (Video) Options 29 Setting Up the Parental Control 30 VCR Setting 31 Video Input 32 Front Display 33 DVD EP Mode Time 33 Automatic Chapter Creator 34 22 -

Quick Guide (easy Manual) (ver.1.0) (English)
Page 24
...using the number (0~9) buttons. œ √: Moves to items 2 Press the ...† buttons to set correctly. For accurate Timer Recording, your DVD Recorder & VCR's internal clock must be set the date and time manually. No Disc Setup System Timer Rec. Clock Set Channel Set Language Audio Video ... Set Clock Set √ √ MOVE SELECT RETURN EXIT MOVE SELECT RETURN EXIT Manual Clock Set If Auto Setup fails to set the DVD Recorder & VCR's internal clock by locating a local TV station, follow these steps to select Setup, then press the ENTER or √ button. No...
...using the number (0~9) buttons. œ √: Moves to items 2 Press the ...† buttons to set correctly. For accurate Timer Recording, your DVD Recorder & VCR's internal clock must be set the date and time manually. No Disc Setup System Timer Rec. Clock Set Channel Set Language Audio Video ... Set Clock Set √ √ MOVE SELECT RETURN EXIT MOVE SELECT RETURN EXIT Manual Clock Set If Auto Setup fails to set the DVD Recorder & VCR's internal clock by locating a local TV station, follow these steps to select Setup, then press the ENTER or √ button. No...

Quick Guide (easy Manual) (ver.1.0) (English)
Page 25
...Antenna In jack during initial setup. • Use this setting only if Auto Setup detected the incorrect tuner band, i.e. Select if the DVD Recorder & VCR is connected to Cable TV(method 2). No Disc Setup System Timer Rec. No Disc Channel Set Setup Timer Rec. System Setup Channel ...button. Auto Channel Memory 2 Press the ...† buttons to select Channel Set, then press the ENTER or √ button. Select if the DVD Recorder & VCR is connected to an indoor or outdoor VHF/UHF Antenna(method1 and 3). • Cable TV - Antenna/Cable TV Auto Channel Memory Channel Add...
...Antenna In jack during initial setup. • Use this setting only if Auto Setup detected the incorrect tuner band, i.e. Select if the DVD Recorder & VCR is connected to Cable TV(method 2). No Disc Setup System Timer Rec. No Disc Channel Set Setup Timer Rec. System Setup Channel ...button. Auto Channel Memory 2 Press the ...† buttons to select Channel Set, then press the ENTER or √ button. Select if the DVD Recorder & VCR is connected to an indoor or outdoor VHF/UHF Antenna(method1 and 3). • Cable TV - Antenna/Cable TV Auto Channel Memory Channel Add...

Quick Guide (easy Manual) (ver.1.0) (English)
Page 26
... ENTER or √ button. No Disc Setup Timer Rec. Channel Add/Delete Select channel : 1 Add Delete NUMBER SELECT RETURN EXIT • The DVD Recorder & VCR will be displayed. • Press ENTER button to stop or cancel scanning. 5 Press the ...† or number buttons to select the channels you ...connect the DVD Recorder & VCR to TV with RF Antenna Cable, follow the steps below to remove. 1 With the unit in the selected tuner band. Channel Add/Delete...
... ENTER or √ button. No Disc Setup Timer Rec. Channel Add/Delete Select channel : 1 Add Delete NUMBER SELECT RETURN EXIT • The DVD Recorder & VCR will be displayed. • Press ENTER button to stop or cancel scanning. 5 Press the ...† or number buttons to select the channels you ...connect the DVD Recorder & VCR to TV with RF Antenna Cable, follow the steps below to remove. 1 With the unit in the selected tuner band. Channel Add/Delete...

Quick Guide (easy Manual) (ver.1.0) (English)
Page 27
...the ...† buttons to select the desired language option, press the ENTER or √ button. If the selected language is not recorded on the disc, the original pre-recorded language is supported on your TV to channel 3 or 4 to select Channel Set, then press ENTER or √ button. ... -screen menu of the player. No Disc Setup Timer Rec. System Setup 3 Press the ...† buttons to match the RF Output Channel of your DVD Recorder & VCR. 5 Press the ...† buttons to select the desired language, then press the ENTER or √ button. ■ Press the RETURN or œ...
...the ...† buttons to select the desired language option, press the ENTER or √ button. If the selected language is not recorded on the disc, the original pre-recorded language is supported on your TV to channel 3 or 4 to select Channel Set, then press ENTER or √ button. ... -screen menu of the player. No Disc Setup Timer Rec. System Setup 3 Press the ...† buttons to match the RF Output Channel of your DVD Recorder & VCR. 5 Press the ...† buttons to select the desired language, then press the ENTER or √ button. ■ Press the RETURN or œ...
Quick Guide (easy Manual) (ver.1.0) (English)
Page 35
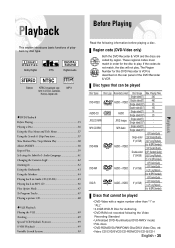
...7GB) 2 (SP: Standard Quality) 4 (LP: Long Playback) 6 or 8 (EP:Extended) Discs that can be played • DVD-Video with a region number other than "1" or "ALL" • 3.9 GB DVD-R Disc for this DVD Recorder & VCR is described on the rear panel of playback by region. MP3 tem in order for the disc to play . Region... code (DVD-Video only) Both the DVD Recorder & VCR and the discs are coded by disc type. If the codes do not match, the disc will not play . Playback This ...
...7GB) 2 (SP: Standard Quality) 4 (LP: Long Playback) 6 or 8 (EP:Extended) Discs that can be played • DVD-Video with a region number other than "1" or "ALL" • 3.9 GB DVD-R Disc for this DVD Recorder & VCR is described on the rear panel of playback by region. MP3 tem in order for the disc to play . Region... code (DVD-Video only) Both the DVD Recorder & VCR and the discs are coded by disc type. If the codes do not match, the disc will not play . Playback This ...

Quick Guide (easy Manual) (ver.1.0) (English)
Page 36
...CLOSE button. 2 Place a disc gently into the tray with the PLAY button. 4 Press the STOP button to stop playback. English Do not move your DVD Recorder & VCR will display the file list on the screen and start playing. • If you insert a JPEG Disc, folders and a file list are displayed. ... discs is powered on , it will pick up . 3 Press OPEN/CLOSE button to start playback. • If you insert a MP3 Disc, your DVD Recorder & VCR while CAUTION playing, as angle change and aspect ratio adjustment, are being opened or closed, as this may perform differently or be activated and wait...
...CLOSE button. 2 Place a disc gently into the tray with the PLAY button. 4 Press the STOP button to stop playback. English Do not move your DVD Recorder & VCR will display the file list on the screen and start playing. • If you insert a JPEG Disc, folders and a file list are displayed. ... discs is powered on , it will pick up . 3 Press OPEN/CLOSE button to start playback. • If you insert a MP3 Disc, your DVD Recorder & VCR while CAUTION playing, as angle change and aspect ratio adjustment, are being opened or closed, as this may perform differently or be activated and wait...


