
Quick Guide (easy Manual) (ver.1.0) (English)
Page 2
...64257;re or electric shock hazard, do not expose this appliance to this DVD Recorder, the DVD Recorder cannot play the disc. ■ This device is connected. • Consult the dealer or an experienced radio/TV technician for home and other equipment. and 6,516,132.This product incorporates... or similar unit. Patent Nos.4,631,60 3;4,577,216;4,819,098;4,907,093; REFER SERVICING TO QUALIFIED SERVICE PERSONNEL. CAUTION : DVD RECORDERS USE AN INVISIBLE LASER BEAM WHICH CAN CAUSE HAZARDOUS RADIATION EXPOSURE IF DIRECTED. USE OF CONTROLS OR ADJUSTMENTS OR PERFORMANCE OF PROCEDURES OTHER...
...64257;re or electric shock hazard, do not expose this appliance to this DVD Recorder, the DVD Recorder cannot play the disc. ■ This device is connected. • Consult the dealer or an experienced radio/TV technician for home and other equipment. and 6,516,132.This product incorporates... or similar unit. Patent Nos.4,631,60 3;4,577,216;4,819,098;4,907,093; REFER SERVICING TO QUALIFIED SERVICE PERSONNEL. CAUTION : DVD RECORDERS USE AN INVISIBLE LASER BEAM WHICH CAN CAUSE HAZARDOUS RADIATION EXPOSURE IF DIRECTED. USE OF CONTROLS OR ADJUSTMENTS OR PERFORMANCE OF PROCEDURES OTHER...

Quick Guide (easy Manual) (ver.1.0) (English)
Page 3
...; Do not use this apparatus near any way, such as the power-supply cord or plug is used , this DVD Recorder may be damaged. • Do not put your safety. The recorder will operate normally. • Be sure to dripping or splashing and no objects filled with liquids, such as... wider than the disc in any heat sources such as vases, shall be placed on again with the apparatus. DVD-Video, Audio CD • Wipe off dirt or contamination on the recorder. • Be careful not to qualified service personnel. Keep these operating instructions handy for future reference....
...; Do not use this apparatus near any way, such as the power-supply cord or plug is used , this DVD Recorder may be damaged. • Do not put your safety. The recorder will operate normally. • Be sure to dripping or splashing and no objects filled with liquids, such as... wider than the disc in any heat sources such as vases, shall be placed on again with the apparatus. DVD-Video, Audio CD • Wipe off dirt or contamination on the recorder. • Be careful not to qualified service personnel. Keep these operating instructions handy for future reference....

Quick Guide (easy Manual) (ver.1.0) (English)
Page 4
...; The unit can handle a maximum of 1000 files and folders. • DVD-RAM/DVD±RW/±R disc recorded with a Samsung DVD video recorder. Recording onto the disc may become available. If you want to the condition of the recording. DVD-R Disc Playback and Recording • Once a DVD-R recorded is finalized, it is carried out too many times. • Playback...
...; The unit can handle a maximum of 1000 files and folders. • DVD-RAM/DVD±RW/±R disc recorded with a Samsung DVD video recorder. Recording onto the disc may become available. If you want to the condition of the recording. DVD-R Disc Playback and Recording • Once a DVD-R recorded is finalized, it is carried out too many times. • Playback...
Quick Guide (easy Manual) (ver.1.0) (English)
Page 5
... 65 "Disc Protection" ✻ DVD-RAM/DVD-RW/DVD-R discs that the recording mode is an issue upgrading your recorder, contact the Call Center at 1-800-SAMSUNG. COPY PROTECTION • Many DVD discs are encoded with other DVD Players. To determine compatibility with this recorder. Protection This DVD Recorder can be played. Connecting your TV, not to the recorder. patents and other intellectual...
... 65 "Disc Protection" ✻ DVD-RAM/DVD-RW/DVD-R discs that the recording mode is an issue upgrading your recorder, contact the Call Center at 1-800-SAMSUNG. COPY PROTECTION • Many DVD discs are encoded with other DVD Players. To determine compatibility with this recorder. Protection This DVD Recorder can be played. Connecting your TV, not to the recorder. patents and other intellectual...
Quick Guide (easy Manual) (ver.1.0) (English)
Page 6
...Clock Set 29 ■ Language Setting 29 ■ Setting Up the Audio Options 30 ■ Video(Display) Setting 31 TV Aspect 31 Input Level 31 Black Level 31 3D Noise Reduction 31 HDMI/DVI Resolution 32 ■ Parental Control 32 Setting ...23 Connecting a Camcorder 24 Recording ■ Recordable discs 34 Compatibility between Samsung and Other manufacturer's Recorders 34 ■ Recording Formats 35 DVD-RW(Video mode)/-R 35 DVD-RAM/-RW(VR mode 35 ■ Recording Mode 35 ■ Unrecordable Video 36 About the INFO Button 37 ■ Recording from External Equipment 38 ...
...Clock Set 29 ■ Language Setting 29 ■ Setting Up the Audio Options 30 ■ Video(Display) Setting 31 TV Aspect 31 Input Level 31 Black Level 31 3D Noise Reduction 31 HDMI/DVI Resolution 32 ■ Parental Control 32 Setting ...23 Connecting a Camcorder 24 Recording ■ Recordable discs 34 Compatibility between Samsung and Other manufacturer's Recorders 34 ■ Recording Formats 35 DVD-RW(Video mode)/-R 35 DVD-RAM/-RW(VR mode 35 ■ Recording Mode 35 ■ Unrecordable Video 36 About the INFO Button 37 ■ Recording from External Equipment 38 ...
Quick Guide (easy Manual) (ver.1.0) (English)
Page 8
.... Getting Started General Features The DVD-R155 allows you to one of five different recording speeds, each varying in recording quality and length. Selectable Record Mode You can be recorded onto the free disc space. (See pages 41~42) Tunerless DVD Recorder The DVD-R155 does not have a TV tuner. Automated Quality Adjustment for Timer Recording If FR mode is selected, the...
.... Getting Started General Features The DVD-R155 allows you to one of five different recording speeds, each varying in recording quality and length. Selectable Record Mode You can be recorded onto the free disc space. (See pages 41~42) Tunerless DVD Recorder The DVD-R155 does not have a TV tuner. Automated Quality Adjustment for Timer Recording If FR mode is selected, the...
Quick Guide (easy Manual) (ver.1.0) (English)
Page 9
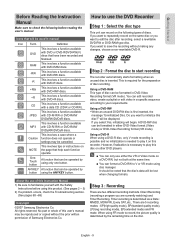
... ANYKEY button. This involves a function available MP3 with CD-R/-RW or DVD-RAM/ DVD±RW/DVD±R discs. Direct Recording (recording a program you want to save the recording without the prior written permission of Samsung Electronics Co. ▌Step 3 : Recording There are currently watching) and Timer Recording. You can be formatted in manual Icon Term Definition...
... ANYKEY button. This involves a function available MP3 with CD-R/-RW or DVD-RAM/ DVD±RW/DVD±R discs. Direct Recording (recording a program you want to save the recording without the prior written permission of Samsung Electronics Co. ▌Step 3 : Recording There are currently watching) and Timer Recording. You can be formatted in manual Icon Term Definition...
Quick Guide (easy Manual) (ver.1.0) (English)
Page 12
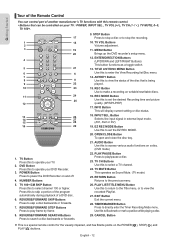
.... 27. MENU Button Brings up the DVD recorder's setup menu. 12. TITLE LIST/DISC MENU Button Use this to return to the Title menu, or to enter the View Recording list/Disc menu. 14. TV MUTE Button This operates as a toggle switch. 13. English - 12 NUMBER Buttons 5. REVERSE/... a TV channel. 24. TV CH Buttons Use this to skip a portion of the program automatically during playback of a DVD disc. 6. EXIT Button Exit the current menu. 28. CANCEL Button à This is being played. 15. POWER Button Press to stop a disc or to power the DVD Recorder on a disc. (DVD mode)...
.... 27. MENU Button Brings up the DVD recorder's setup menu. 12. TITLE LIST/DISC MENU Button Use this to return to the Title menu, or to enter the View Recording list/Disc menu. 14. TV MUTE Button This operates as a toggle switch. 13. English - 12 NUMBER Buttons 5. REVERSE/... a TV channel. 24. TV CH Buttons Use this to skip a portion of the program automatically during playback of a DVD disc. 6. EXIT Button Exit the current menu. 28. CANCEL Button à This is being played. 15. POWER Button Press to stop a disc or to power the DVD Recorder on a disc. (DVD mode)...
Quick Guide (easy Manual) (ver.1.0) (English)
Page 15
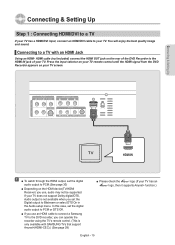
... or DTS Off. ■ If you use an HDMI cable to connect a Samsung TV to PCM.(See page 30) ■ Depending on your TV screen. In this case, set the Digital output to the HDMI IN jack of the DVD Recorder to Bitstream or select DTS On in the Audio setup menu. Connecting & Setting... Up Step 1 : Connecting HDMI/DVI to a TV If your TV has a HDMI/DVI input, connect an HDMI/DVI cable to a TV with SAMSUNG TVs that support Anynet+(HDMI-CEC).) (See page 28) &#...
... or DTS Off. ■ If you use an HDMI cable to connect a Samsung TV to PCM.(See page 30) ■ Depending on your TV screen. In this case, set the Digital output to the HDMI IN jack of the DVD Recorder to Bitstream or select DTS On in the Audio setup menu. Connecting & Setting... Up Step 1 : Connecting HDMI/DVI to a TV If your TV has a HDMI/DVI input, connect an HDMI/DVI cable to a TV with SAMSUNG TVs that support Anynet+(HDMI-CEC).) (See page 28) &#...
Quick Guide (easy Manual) (ver.1.0) (English)
Page 16
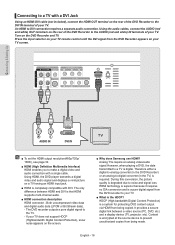
... Digital Content Protection), snow noise appears on the screen. ■ Why does Samsung use HDMI? Content is required. ▌Connecting to a TV with a DVI Jack Using an HDMI-DVI cable (not included), connect the HDMI OUT terminal on the rear of the DVD Recorder to prevent unauthorized copies from being copied. Using HDMI, the...
... Digital Content Protection), snow noise appears on the screen. ■ Why does Samsung use HDMI? Content is required. ▌Connecting to a TV with a DVI Jack Using an HDMI-DVI cable (not included), connect the HDMI OUT terminal on the rear of the DVD Recorder to prevent unauthorized copies from being copied. Using HDMI, the...
Quick Guide (easy Manual) (ver.1.0) (English)
Page 17
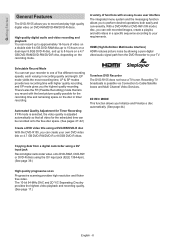
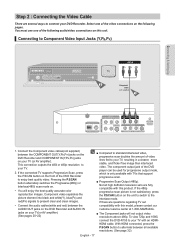
... and 1080i, connect the DVD-R155 to your TV with an HDMIHDMI cable. Pressing the P.SCAN button alternately switches the Progressive(480p) or Interlace(480i) scan mode on your DVD Recorder. With HDMI connected, press the P.SCAN button to connect your TV (or AV amplifi...Step 2 : Connecting the Video Cable There are fully compatible with this product. If there are questions regarding TV set compatibility with this model, please contact our customer service center at 1-800-SAMSUNG. ■ The Component jacks will enjoy the best quality accurate color reproduction images.
... and 1080i, connect the DVD-R155 to your TV with an HDMIHDMI cable. Pressing the P.SCAN button alternately switches the Progressive(480p) or Interlace(480i) scan mode on your DVD Recorder. With HDMI connected, press the P.SCAN button to connect your TV (or AV amplifi...Step 2 : Connecting the Video Cable There are fully compatible with this product. If there are questions regarding TV set compatibility with this model, please contact our customer service center at 1-800-SAMSUNG. ■ The Component jacks will enjoy the best quality accurate color reproduction images.

Quick Guide (easy Manual) (ver.1.0) (English)
Page 18
...clearer images than regular video input mode. This connection outputs the 480i resolution to your TV. • Connect the audio cables(white and red) between the S-VIDEO OUT jack on DVD Recorder and S-VIDEO IN jack on your TV(or AV amplifier). (See pages 20~22) ■ S-Video or ...Component video outputs are available only if your TV supports S-Video input or Component video input, respectively. ▌ Connecting...
...clearer images than regular video input mode. This connection outputs the 480i resolution to your TV. • Connect the audio cables(white and red) between the S-VIDEO OUT jack on DVD Recorder and S-VIDEO IN jack on your TV(or AV amplifier). (See pages 20~22) ■ S-Video or ...Component video outputs are available only if your TV supports S-Video input or Component video input, respectively. ▌ Connecting...

Quick Guide (easy Manual) (ver.1.0) (English)
Page 19
Connecting & Setting Up ▌Connecting to your TV. • Connect the audio cables(white and red) between the VIDEO(yellow) OUT jack on DVD Recorder and VIDEO(yellow) IN jack on your TV(or AV amplifier). (See pages 20~22) English - 19 This connection outputs the 480i resolution to a Video Input Jack Connect a video(yellow) cable between the AUDIO OUT jacks on the DVD Recorder and AUDIO IN jacks on the TV (or AV amplifier). • You will enjoy normal quality images.
Connecting & Setting Up ▌Connecting to your TV. • Connect the audio cables(white and red) between the VIDEO(yellow) OUT jack on DVD Recorder and VIDEO(yellow) IN jack on your TV(or AV amplifier). (See pages 20~22) English - 19 This connection outputs the 480i resolution to a Video Input Jack Connect a video(yellow) cable between the AUDIO OUT jacks on the DVD Recorder and AUDIO IN jacks on the TV (or AV amplifier). • You will enjoy normal quality images.
Quick Guide (easy Manual) (ver.1.0) (English)
Page 23
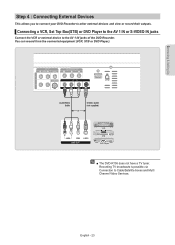
Connecting & Setting Up Step 4 : Connecting External Devices This allows you to connect your DVD Recorder to other external devices and view or record their outputs. ▌Connecting a VCR, Set Top Box(STB) or DVD Player to the AV 1 IN or S-VIDEO IN jacks Connect the VCR or external device to Cable/Satellite boxes and Multi Channel Video Services. You can record from the connected equipment (VCR, STB or DVD Player). ■ The DVD-R155 does not have a TV tuner. English - 23 Recording TV broadcasts is possible via Connection to the AV 1 IN jacks of the DVD Recorder.
Connecting & Setting Up Step 4 : Connecting External Devices This allows you to connect your DVD Recorder to other external devices and view or record their outputs. ▌Connecting a VCR, Set Top Box(STB) or DVD Player to the AV 1 IN or S-VIDEO IN jacks Connect the VCR or external device to Cable/Satellite boxes and Multi Channel Video Services. You can record from the connected equipment (VCR, STB or DVD Player). ■ The DVD-R155 does not have a TV tuner. English - 23 Recording TV broadcasts is possible via Connection to the AV 1 IN jacks of the DVD Recorder.

Quick Guide (easy Manual) (ver.1.0) (English)
Page 24
Connecting & Setting Up ▌Connecting a Camcorder You can record from connected equipment, such as a camcorder by using the AV 2 IN or DV IN jacks on the remote control to select the DV Input. ■ Check your camcorder's owner's manual to see how to AV 2 automatically. ■ If the Input is not selected automatically, press the INPUT SEL. English - 24 button on front of the DVD Recorder. (See page 39) ■ When an Input source is inserted into AV 2 while watching TV, the Input will be switched to use the camcorder in this mode.
Connecting & Setting Up ▌Connecting a Camcorder You can record from connected equipment, such as a camcorder by using the AV 2 IN or DV IN jacks on the remote control to select the DV Input. ■ Check your camcorder's owner's manual to see how to AV 2 automatically. ■ If the Input is not selected automatically, press the INPUT SEL. English - 24 button on front of the DVD Recorder. (See page 39) ■ When an Input source is inserted into AV 2 while watching TV, the Input will be switched to use the camcorder in this mode.

Quick Guide (easy Manual) (ver.1.0) (English)
Page 25
...displayed. • System Setup of the Language Options. - DVD-Recorder No Disc Timer Record Timer Rec. Menu items differ depending on your Audio System and select AUX, CD or DVD. CM Skip Time, EP Mode Time, Chapter Creator, Quick Recording, Anynet+(HDMI-CEC) • Clock Set - Press a ... Audio System, turn the power on conditions such as those with violence, adult subject matter, etc. - Press the POWER button. 2. TV Aspect, Input Level, Black Level, 3D Noise Reduction, HDMI/DVI Resolution • Parental Control Setup of use . System Setup System Setup...
...displayed. • System Setup of the Language Options. - DVD-Recorder No Disc Timer Record Timer Rec. Menu items differ depending on your Audio System and select AUX, CD or DVD. CM Skip Time, EP Mode Time, Chapter Creator, Quick Recording, Anynet+(HDMI-CEC) • Clock Set - Press a ... Audio System, turn the power on conditions such as those with violence, adult subject matter, etc. - Press the POWER button. 2. TV Aspect, Input Level, Black Level, 3D Noise Reduction, HDMI/DVI Resolution • Parental Control Setup of use . System Setup System Setup...

Quick Guide (easy Manual) (ver.1.0) (English)
Page 26
System Setup DVD-Recorder DVD-RW(VR) Title List CM Skip Time :1155SeScec Playlist EP Mode Time :360 SHeocurs Disc Manager Chapter Creator :6O0 Sffec Quick Recording : Off Timer Rec. CM Skip Time will be displayed. 5. English - 26 Select Setup using the ▲▼ buttons, then press the...Anynet+(HDMI-CEC) : On Setup System MOVE ENTER RETURN EXIT CM SKIP Setting Up the System Options ▌CM Skip Time Setting When a program recorded on the remote control. 2. With a disc inserted and the unit in still picture mode. ■ When a set time is skipped, and ...
System Setup DVD-Recorder DVD-RW(VR) Title List CM Skip Time :1155SeScec Playlist EP Mode Time :360 SHeocurs Disc Manager Chapter Creator :6O0 Sffec Quick Recording : Off Timer Rec. CM Skip Time will be displayed. 5. English - 26 Select Setup using the ▲▼ buttons, then press the...Anynet+(HDMI-CEC) : On Setup System MOVE ENTER RETURN EXIT CM SKIP Setting Up the System Options ▌CM Skip Time Setting When a program recorded on the remote control. 2. With a disc inserted and the unit in still picture mode. ■ When a set time is skipped, and ...

Quick Guide (easy Manual) (ver.1.0) (English)
Page 27
...the MENU button on the remote control. 2. Select System using the ▲▼ buttons, then press the ENTER or ► button. System Setup DVD-Recorder DVD-RW(V) System Title List CM Skip Time : 15 Sec ► Disc Manager EP Mode Time : 6 Hours ► Timer Rec. English - 27...use the Setup functions while playing a disc. 3. Select Setup using the ▲▼ buttons, then press the ENTER or ► button. 4. DVD-Recorder DVD-RW(VR) Title List CM Skip Time : 15 Sec Playlist Disc Manager Timer Rec. Select desired option using the ▲▼ buttons, then ...
...the MENU button on the remote control. 2. Select System using the ▲▼ buttons, then press the ENTER or ► button. System Setup DVD-Recorder DVD-RW(V) System Title List CM Skip Time : 15 Sec ► Disc Manager EP Mode Time : 6 Hours ► Timer Rec. English - 27...use the Setup functions while playing a disc. 3. Select Setup using the ▲▼ buttons, then press the ENTER or ► button. 4. DVD-Recorder DVD-RW(VR) Title List CM Skip Time : 15 Sec Playlist Disc Manager Timer Rec. Select desired option using the ▲▼ buttons, then ...

Quick Guide (easy Manual) (ver.1.0) (English)
Page 28
... using the ▲▼ buttons, then press the ENTER or ► button. Using Anynet+(HDMI-CEC) 1. Connect the recorder to a Samsung TV with SAMSUNG TVs that can operate the DVD Recorder by connecting the DVD Recorder to "On" on the remote control. 2. System Setup DVD-Recorder DVD-RW(VR) Title List CM Skip Time : 15 Sec Playlist Disc Manager Timer Rec. Quick...
... using the ▲▼ buttons, then press the ENTER or ► button. Using Anynet+(HDMI-CEC) 1. Connect the recorder to a Samsung TV with SAMSUNG TVs that can operate the DVD Recorder by connecting the DVD Recorder to "On" on the remote control. 2. System Setup DVD-Recorder DVD-RW(VR) Title List CM Skip Time : 15 Sec Playlist Disc Manager Timer Rec. Quick...

Quick Guide (easy Manual) (ver.1.0) (English)
Page 29
...2007 12 00 AM MOVE ENTER RETURN EXIT ■ By pressing the Play button of your TV while playing a DVD disc, the DVD Recorder will be powered off automatically.(When the DVD recorder is used to use timer recording. You must set the language options in Stop mode/No Disc mode, press the MENU button... the ENTER button. etc) on the disc. Clock Set This menu is recording, it is inserted or not. With the unit in advance, they will come up automatically every time you turn the TV off, the DVD Recorder will only appear if it can set the value using the ▲▼...
...2007 12 00 AM MOVE ENTER RETURN EXIT ■ By pressing the Play button of your TV while playing a DVD disc, the DVD Recorder will be powered off automatically.(When the DVD recorder is used to use timer recording. You must set the language options in Stop mode/No Disc mode, press the MENU button... the ENTER button. etc) on the disc. Clock Set This menu is recording, it is inserted or not. With the unit in advance, they will come up automatically every time you turn the TV off, the DVD Recorder will only appear if it can set the value using the ▲▼...


