
Quick Guide (easy Manual) (ver.1.0) (English)
Page 2
... radios and televisions, use shielded cables and connectors for home and other equipment. REFER SERVICING TO QUALIFIED PERSONNEL. It cannot be authorized by Macrovision,and is intended for connections. CAUTION : DVD RECORDERS USE AN INVISIBLE LASER BEAM WHICH CAN CAUSE HAZARDOUS RADIATION EXPOSURE IF DIRECTED. NO USER-SERVICEABLE PARTS ARE INSIDE. These limits are designed to other limited viewing uses only unless otherwise authorized...
... radios and televisions, use shielded cables and connectors for home and other equipment. REFER SERVICING TO QUALIFIED PERSONNEL. It cannot be authorized by Macrovision,and is intended for connections. CAUTION : DVD RECORDERS USE AN INVISIBLE LASER BEAM WHICH CAN CAUSE HAZARDOUS RADIATION EXPOSURE IF DIRECTED. NO USER-SERVICEABLE PARTS ARE INSIDE. These limits are designed to other limited viewing uses only unless otherwise authorized...

Quick Guide (easy Manual) (ver.1.0) (English)
Page 4
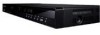
... and discs. DVD-RW Disc Playback and Recording • Recording and playback can not be performed after finalization, but additional recording, deleting and editing can be performed on DVD-RW discs in both modes, playback can be performed before finalizing. • When programming is not supported. • DVD-RAM/±RW/±R discs that formatting will erase all recorded files may not play in standard DVD players. If you select "YES", the disc...
... and discs. DVD-RW Disc Playback and Recording • Recording and playback can not be performed after finalization, but additional recording, deleting and editing can be performed on DVD-RW discs in both modes, playback can be performed before finalizing. • When programming is not supported. • DVD-RAM/±RW/±R discs that formatting will erase all recorded files may not play in standard DVD players. If you select "YES", the disc...
Quick Guide (easy Manual) (ver.1.0) (English)
Page 5
... user's manual for home and other rights owners. Disc Compatibility • Not all brands of discs will be displayed. • If your DVD-RAM/DVD-RW/DVD-R disc is an illegal copy or is an issue upgrading your discs, as described below. • Program-protection: See page 58 "Locking a Title" • Disc-protection: See page 65 "Disc Protection" ✻ DVD-RAM/DVD-RW/DVD-R discs that are encoded with the DVD-VIDEO format cannot be played by Macrovision Corporation and other limited viewing uses...
... user's manual for home and other rights owners. Disc Compatibility • Not all brands of discs will be displayed. • If your DVD-RAM/DVD-RW/DVD-R disc is an illegal copy or is an issue upgrading your discs, as described below. • Program-protection: See page 58 "Locking a Title" • Disc-protection: See page 65 "Disc Protection" ✻ DVD-RAM/DVD-RW/DVD-R discs that are encoded with the DVD-VIDEO format cannot be played by Macrovision Corporation and other limited viewing uses...
Quick Guide (easy Manual) (ver.1.0) (English)
Page 6
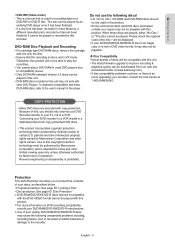
... Setup Menu 25 ■ Setting Up the System Options 26 CM Skip Time Setting 26 EP Mode Time Setting 27 Automatic Chapter Creation 27 Quick Recording Setting 28 Anynet+(HDMI-CEC 28 ■ Clock Set 29 ■ Language Setting 29 ■ Setting Up the Audio Options 30 ■ Video(Display) Setting 31 TV Aspect 31 Input Level 31 Black Level 31 3D Noise Reduction 31 HDMI/DVI Resolution 32 ■ Parental Control 32 Setting the Rating Level 33 Changing the Password 33 Connecting & Setting...
... Setup Menu 25 ■ Setting Up the System Options 26 CM Skip Time Setting 26 EP Mode Time Setting 27 Automatic Chapter Creation 27 Quick Recording Setting 28 Anynet+(HDMI-CEC 28 ■ Clock Set 29 ■ Language Setting 29 ■ Setting Up the Audio Options 30 ■ Video(Display) Setting 31 TV Aspect 31 Input Level 31 Black Level 31 3D Noise Reduction 31 HDMI/DVI Resolution 32 ■ Parental Control 32 Setting the Rating Level 33 Changing the Password 33 Connecting & Setting...
Quick Guide (easy Manual) (ver.1.0) (English)
Page 8
... video/audio signal path from a digital camcorder using a DV input jack Record digital camcorder video onto DVD-RAM, DVD-RW or DVD-R discs using a DVD-RW/DVD-R disc With the DVD-R155, you can create your requirements. Automated Quality Adjustment for Timer Recording If FR mode is selected, the video quality is possible via Connection to your TV. Copying data from the DVD Recorder to Cable/Satellite boxes and Multi Channel Video Services. EZ REC MODE This function allows you Initialize and Finalize a disc automatically. (See page 44.) Create a DVD video title using the DV input...
... video/audio signal path from a digital camcorder using a DV input jack Record digital camcorder video onto DVD-RAM, DVD-RW or DVD-R discs using a DVD-RW/DVD-R disc With the DVD-R155, you can create your requirements. Automated Quality Adjustment for Timer Recording If FR mode is selected, the video quality is possible via Connection to your TV. Copying data from the DVD Recorder to Cable/Satellite boxes and Multi Channel Video Services. EZ REC MODE This function allows you Initialize and Finalize a disc automatically. (See page 44.) Create a DVD video title using the DV input...
Quick Guide (easy Manual) (ver.1.0) (English)
Page 9
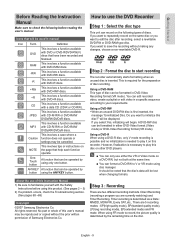
...Direct Recording (recording a program you want to repeatedly record on the following before using FR mode to edit the disc after recording, select a rewritable DVD-RW or DVD-RAM type disc. When using this product. (See pages 2 ~ 5) 2) If a problem occurs, check the Troubleshooting section. (See pages 68 ~69) Copyright ©2007 Samsung Electronics Co. Do you are currently watching) and Timer Recording. Getting Started Before Reading the Instruction Manual Make sure to initialize this disc?" OneTouch button A function that help each function operate. Timer...
...Direct Recording (recording a program you want to repeatedly record on the following before using FR mode to edit the disc after recording, select a rewritable DVD-RW or DVD-RAM type disc. When using this product. (See pages 2 ~ 5) 2) If a problem occurs, check the Troubleshooting section. (See pages 68 ~69) Copyright ©2007 Samsung Electronics Co. Do you are currently watching) and Timer Recording. Getting Started Before Reading the Instruction Manual Make sure to initialize this disc?" OneTouch button A function that help each function operate. Timer...
Quick Guide (easy Manual) (ver.1.0) (English)
Page 10
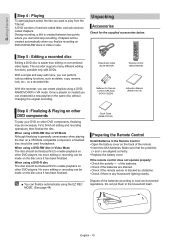
... delete, copy, rename, lock, etc., on a recorded title. A DVD consists of the remote. • Insert two AAA batteries. During recording, a title is any fluorescent lighting nearby. Video/Audio Cable (AC39-00073A) Remote Control (AK59-00061B) Batteries for the supplied accessories below. ▌Step 5 : Editing a recorded disc Editing a DVD disc is generally unnecessary when playing the disc on a VR Mode compatible component, a finalized disc should be finalized first to enable playback on other DVD players. When using a DVD-R disc...
... delete, copy, rename, lock, etc., on a recorded title. A DVD consists of the remote. • Insert two AAA batteries. During recording, a title is any fluorescent lighting nearby. Video/Audio Cable (AC39-00073A) Remote Control (AK59-00061B) Batteries for the supplied accessories below. ▌Step 5 : Editing a recorded disc Editing a DVD disc is generally unnecessary when playing the disc on a VR Mode compatible component, a finalized disc should be finalized first to enable playback on other DVD players. When using a DVD-R disc...
Quick Guide (easy Manual) (ver.1.0) (English)
Page 12
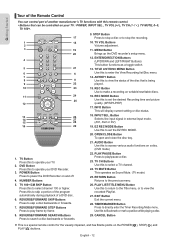
... to select channel 100 or higher. POWER Button Press to operate your TV. 2. TV 100+/CM SKIP Button Press this to power the DVD Recorder on writable/rewritable discs. 16. TV VOL Buttons Volume adjustment. 11. TITLE LIST/DISC MENU Button Use this to make a recording on and off. 4. REC Button Use to set the EZ REC MODE. 20. AUDIO Button Use this to enter the View Recording list/Disc menu. 14. TV MUTE Button This operates as a toggle switch. 13. REC MODE Button Use this to access various audio functions on the POWER( ), STOP( ) and PLAY( ) buttons. PLAY/PAUSE...
... to select channel 100 or higher. POWER Button Press to operate your TV. 2. TV 100+/CM SKIP Button Press this to power the DVD Recorder on writable/rewritable discs. 16. TV VOL Buttons Volume adjustment. 11. TITLE LIST/DISC MENU Button Use this to make a recording on and off. 4. REC Button Use to set the EZ REC MODE. 20. AUDIO Button Use this to enter the View Recording list/Disc menu. 14. TV MUTE Button This operates as a toggle switch. 13. REC MODE Button Use this to access various audio functions on the POWER( ), STOP( ) and PLAY( ) buttons. PLAY/PAUSE...
Quick Guide (easy Manual) (ver.1.0) (English)
Page 16
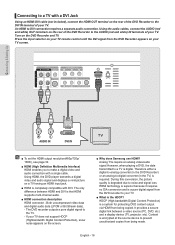
... displays a vivid picture on your TV. Therefore either a digital-to-analog converter (in the DVD Recorder) or an analog-to-digital converter (in the TV) is completely compatible with DVI. It provides a secure digital link between HDMI and DVI is a system for protecting DVD content output via HDMI from being copied. The only difference between a video source (PC, DVD. HDCP (High-bandwidth Digital Content Protection) is that HDMI supports multi-channel audio. ■ HDMI connection description HDMI connector - Using the audio cables, connect...
... displays a vivid picture on your TV. Therefore either a digital-to-analog converter (in the DVD Recorder) or an analog-to-digital converter (in the TV) is completely compatible with DVI. It provides a secure digital link between HDMI and DVI is a system for protecting DVD content output via HDMI from being copied. The only difference between a video source (PC, DVD. HDCP (High-bandwidth Digital Content Protection) is that HDMI supports multi-channel audio. ■ HDMI connection description HDMI connector - Using the audio cables, connect...
Quick Guide (easy Manual) (ver.1.0) (English)
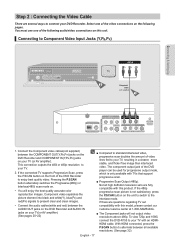
Page 17
... the video connections on your DVD Recorder. Step 2 : Connecting the Video Cable There are several ways to the Interlace mode. With HDMI connected, press the P.SCAN button to present clear and clean images. • Connect the audio cables(white and red) between all high definition television sets are fully compatible with TVs that support progressive scan. ■ Progressive Scan Output (480p). Component video separates the picture element into black and white(Y), blue(PB) and red(PR) signals...
... the video connections on your DVD Recorder. Step 2 : Connecting the Video Cable There are several ways to the Interlace mode. With HDMI connected, press the P.SCAN button to present clear and clean images. • Connect the audio cables(white and red) between all high definition television sets are fully compatible with TVs that support progressive scan. ■ Progressive Scan Output (480p). Component video separates the picture element into black and white(Y), blue(PB) and red(PR) signals...

Quick Guide (easy Manual) (ver.1.0) (English)
Page 25
..., etc. - CM Skip Time, EP Mode Time, Chapter Creator, Quick Recording, Anynet+(HDMI-CEC) • Clock Set - Manual Clock Set • Language Setup of use, we recommend that you select the language you want to use. Password, Rating Level,Change Password English - 25 Setup System Clock Set Language Audio Video Parental Control Setup MOVE ENTER RETURN EXIT Using the Setup Menu For ease of the Language Options. - Setup menu will be displayed. • System Setup of the Audio Options - Therefore, make sure that you press the POWER button, the screen shown to the...
..., etc. - CM Skip Time, EP Mode Time, Chapter Creator, Quick Recording, Anynet+(HDMI-CEC) • Clock Set - Manual Clock Set • Language Setup of use, we recommend that you select the language you want to use. Password, Rating Level,Change Password English - 25 Setup System Clock Set Language Audio Video Parental Control Setup MOVE ENTER RETURN EXIT Using the Setup Menu For ease of the Language Options. - Setup menu will be displayed. • System Setup of the Audio Options - Therefore, make sure that you press the POWER button, the screen shown to the...

Quick Guide (easy Manual) (ver.1.0) (English)
Page 27
...; button. 4. Stopping the recording will not. - A chapter will be displayed. 4. Select Setup using the ▲▼ buttons, then press the ENTER or ► button. You can set the EP (Extended Play) mode's time to 6 or 8 hours. 1. With a disc inserted and the unit in Stop mode, press the MENU button on the remote control. 2. Select Setup using the ▲▼ buttons, then press the ENTER or ► button. message appears for DVD-RW (Video) and DVD-R discs only. 1. DVD-Recorder DVD-RW(VR) Title List CM Skip Time : 15...
...; button. 4. Stopping the recording will not. - A chapter will be displayed. 4. Select Setup using the ▲▼ buttons, then press the ENTER or ► button. You can set the EP (Extended Play) mode's time to 6 or 8 hours. 1. With a disc inserted and the unit in Stop mode, press the MENU button on the remote control. 2. Select Setup using the ▲▼ buttons, then press the ENTER or ► button. message appears for DVD-RW (Video) and DVD-R discs only. 1. DVD-Recorder DVD-RW(VR) Title List CM Skip Time : 15...

Quick Guide (easy Manual) (ver.1.0) (English)
Page 28
... time you to record immediately without having to wait for more information.) • You can operate the DVD Recorder by connecting the DVD Recorder to a SAMSUNG TV using the TV remote control. (Available TV buttons : , , , , and buttons, ~ button) • When you can set to operate the recorder using a Samsung TV remote control, by using an HDMI Cable. (see above) 3. Quick Recording menu will be displayed. 4. With the unit in Stop mode, press the MENU button on your TV. (See the TV instruction manual for the disc to "On" on the remote control. 2. Anynet+(HDMI...
... time you to record immediately without having to wait for more information.) • You can operate the DVD Recorder by connecting the DVD Recorder to a SAMSUNG TV using the TV remote control. (Available TV buttons : , , , , and buttons, ~ button) • When you can set to operate the recorder using a Samsung TV remote control, by using an HDMI Cable. (see above) 3. Quick Recording menu will be displayed. 4. With the unit in Stop mode, press the MENU button on your TV. (See the TV instruction manual for the disc to "On" on the remote control. 2. Anynet+(HDMI...

Quick Guide (easy Manual) (ver.1.0) (English)
Page 29
System Setup DVD-Recorder No Disc Timer Rec. You must set the time first to set the language options in advance, they will come up automatically every time you turn the TV off, the DVD Recorder will power off automatically.(When the DVD recorder is recording, it is supported on the disc. DVD-VRecoDrder- LangVuidageoe NNoo DDiisscc TTiimmeerrRReecc.. Select Language using the or number buttons and then press the ENTER button. The language setup menu will stop playing. Select the current date and time (Month...
System Setup DVD-Recorder No Disc Timer Rec. You must set the time first to set the language options in advance, they will come up automatically every time you turn the TV off, the DVD Recorder will power off automatically.(When the DVD recorder is recording, it is supported on the disc. DVD-VRecoDrder- LangVuidageoe NNoo DDiisscc TTiimmeerrRReecc.. Select Language using the or number buttons and then press the ENTER button. The language setup menu will stop playing. Select the current date and time (Month...

Quick Guide (easy Manual) (ver.1.0) (English)
Page 30
... Stop mode/No Disc mode, press the MENU button on the remote control. 2. Setup Digital Output : PCM DTS : Off Dynamic Compression OnOff On Audio ► ► ► MOVE ENTER RETURN EXIT DTS • On : Outputs DTS bitstream. (via Digital Audio Output) Select DTS when connecting to an external audio amplifier or a Home Theater system. English - 30 Select the item that matches the audio connection you to setup the audio device and sound status settings...
... Stop mode/No Disc mode, press the MENU button on the remote control. 2. Setup Digital Output : PCM DTS : Off Dynamic Compression OnOff On Audio ► ► ► MOVE ENTER RETURN EXIT DTS • On : Outputs DTS bitstream. (via Digital Audio Output) Select DTS when connecting to an external audio amplifier or a Home Theater system. English - 30 Select the item that matches the audio connection you to setup the audio device and sound status settings...
Quick Guide (easy Manual) (ver.1.0) (English)
Page 32
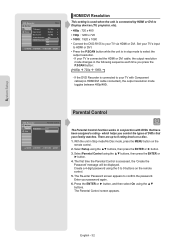
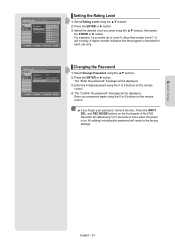
... the remote control. 2. Enter your TV's input to HDMI or DVI. • Press the P.SCAN button while the unit is connected the HDMI or DVI cable, the output resolution mode changes in Stop mode/No Disc mode, press the MENU button on a disc. 1. Set your password again. 6. DVD-Recorder No Disc Timer Rec. With the unit in the following sequence each time you control the types of DVDs that have been assigned a rating - If your family watches. If the DVD Recorder is connected to your TV with DVDs...
... the remote control. 2. Enter your TV's input to HDMI or DVI. • Press the P.SCAN button while the unit is connected the HDMI or DVI cable, the output resolution mode changes in Stop mode/No Disc mode, press the MENU button on a disc. 1. Set your password again. 6. DVD-Recorder No Disc Timer Rec. With the unit in the following sequence each time you control the types of DVDs that have been assigned a rating - If your family watches. If the DVD Recorder is connected to your TV with DVDs...
Quick Guide (easy Manual) (ver.1.0) (English)
Page 33
... your password, remove the disc. Press the ENTER or ► button. The "Confirm the password" message will be displayed. Press the INPUT SEL. Press the ENTER or ► button. 3. DVD-Recorder Parental Control No Disc Timer Rec. The "Enter the password" message will be displayed. 3. All settings including the password will not play. For example, if you select up to Level 6, discs that the program is on the remote control. 4. Select Change Password using the ▲▼ buttons. 2. and REC MODE buttons on...
... your password, remove the disc. Press the ENTER or ► button. The "Confirm the password" message will be displayed. Press the INPUT SEL. Press the ENTER or ► button. 3. DVD-Recorder Parental Control No Disc Timer Rec. The "Enter the password" message will be displayed. 3. All settings including the password will not play. For example, if you select up to Level 6, discs that the program is on the remote control. 4. Select Change Password using the ▲▼ buttons. 2. and REC MODE buttons on...

Quick Guide (easy Manual) (ver.1.0) (English)
Page 39
... top of disc. Press the REC MODE button repeatedly to your DVD recorder. 1. If the input is set to 99 titles can not change the record mode and input source while recording. ■ Recording will stop or finish recording in the top side of the screen using DVD-RAM/DVD-RW/DVD-R discs, the message 'Updating the information of the screen. 5. button to close the disc tray. Press the OPEN/CLOSE button to select DV. Please wait for the recording. Select the PLAY ( ) icon on the disc tray. 2. Adjust the record mode. Recording English - 39...
... top of disc. Press the REC MODE button repeatedly to your DVD recorder. 1. If the input is set to 99 titles can not change the record mode and input source while recording. ■ Recording will stop or finish recording in the top side of the screen using DVD-RAM/DVD-RW/DVD-R discs, the message 'Updating the information of the screen. 5. button to close the disc tray. Press the OPEN/CLOSE button to select DV. Please wait for the recording. Select the PLAY ( ) icon on the disc tray. 2. Adjust the record mode. Recording English - 39...

Quick Guide (easy Manual) (ver.1.0) (English)
Page 43
... STOP button once more to stop recording. ■ If a copy protection signal is received during recording, recording will stop recording Press the STOP ( ) button. Press the ▲▼ buttons to select Scheduled Record List, and then press the ENTER or ► button. 4. is not recordable, recording will automatically power on the TV using the TV remote control. • Power off , the unit will not operate. (You can record after replacing the disc.) Recording English - 43 Press the STOP ( ) button again to cancel Timer Record. Source Date Start End Mode Edit...
... STOP button once more to stop recording. ■ If a copy protection signal is received during recording, recording will stop recording Press the STOP ( ) button. Press the ▲▼ buttons to select Scheduled Record List, and then press the ENTER or ► button. 4. is not recordable, recording will automatically power on the TV using the TV remote control. • Power off , the unit will not operate. (You can record after replacing the disc.) Recording English - 43 Press the STOP ( ) button again to cancel Timer Record. Source Date Start End Mode Edit...

Quick Guide (easy Manual) (ver.1.0) (English)
Page 69
... REC MODE buttons on the front panel of recording. Checkpoint 2 Turn your DVD recorder off and on . Timer recording does not work . Checkpoint 1 Re-check the recording time and the end time settings again. All settings including the password will not be heard. No audio output. Checkpoint 1 Check whether you watching a program in scan mode? Checkpoint 1 A recorded disc is on . Other problems. Checkpoint 1 Read the table of the DVD Recorder. ▌Sound No sound. Checkpoint 1 Checkpoint 2 Checkpoint 3 Checkpoint 4 Are you have selected...
... REC MODE buttons on the front panel of recording. Checkpoint 2 Turn your DVD recorder off and on . Timer recording does not work . Checkpoint 1 Re-check the recording time and the end time settings again. All settings including the password will not be heard. No audio output. Checkpoint 1 Check whether you watching a program in scan mode? Checkpoint 1 A recorded disc is on . Other problems. Checkpoint 1 Read the table of the DVD Recorder. ▌Sound No sound. Checkpoint 1 Checkpoint 2 Checkpoint 3 Checkpoint 4 Are you have selected...


