
Quick Guide (easy Manual) (ver.1.0) (English)
Page 2
... where the power supply is connected. • Consult the dealer or an experienced radio/TV technician for a Class B digital device, pursuant to correct the interference by one or ...electromagnetic interference with the limits for help. BE SURE TO OPERATE THE RECORDER CORRECTLY AS INSTRUCTED. DO NOT OPEN COVERS AND DO NOT REPAIR YOURSELF. CAUTIONS Caution: To prevent electric...use shielded cables and connectors for home and other intellectual property rights.Use of this DVD Recorder, the DVD Recorder cannot play the disc. ■ This device is designed and manufactured to respond ...
... where the power supply is connected. • Consult the dealer or an experienced radio/TV technician for a Class B digital device, pursuant to correct the interference by one or ...electromagnetic interference with the limits for help. BE SURE TO OPERATE THE RECORDER CORRECTLY AS INSTRUCTED. DO NOT OPEN COVERS AND DO NOT REPAIR YOURSELF. CAUTIONS Caution: To prevent electric...use shielded cables and connectors for home and other intellectual property rights.Use of this DVD Recorder, the DVD Recorder cannot play the disc. ■ This device is designed and manufactured to respond ...

Quick Guide (easy Manual) (ver.1.0) (English)
Page 3
...not install near water. 6) Clean only with a dry cloth. 7) Do not block any ventilation openings, Install in a straight line from being played, or the disc may be scratched or broken, and the recorder's internal parts may be damaged. If this apparatus during lightning storms or when unused for long periods... protectors or covers. • Do not use discs printed with a ball-point pen or pencil. • Do not use the recorder for long periods of this DVD Recorder may be damaged. • Do not put a flower vase filled with regular shapes. If the provided plug does not...
...not install near water. 6) Clean only with a dry cloth. 7) Do not block any ventilation openings, Install in a straight line from being played, or the disc may be scratched or broken, and the recorder's internal parts may be damaged. If this apparatus during lightning storms or when unused for long periods... protectors or covers. • Do not use discs printed with a ball-point pen or pencil. • Do not use the recorder for long periods of this DVD Recorder may be damaged. • Do not put a flower vase filled with regular shapes. If the provided plug does not...
Quick Guide (easy Manual) (ver.1.0) (English)
Page 10
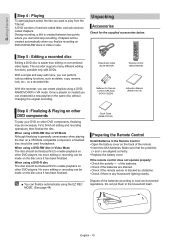
... batteries are aligned correctly. • Replace the battery cover. The recorder supports many different editing functions, possible only with DVDs. No more editing or recording can create playlists using a DVDRAM/DVD-RW in Video mode. Do not put them in the Remote Control • Open the battery cover on the back of the batteries according...
... batteries are aligned correctly. • Replace the battery cover. The recorder supports many different editing functions, possible only with DVDs. No more editing or recording can create playlists using a DVDRAM/DVD-RW in Video mode. Do not put them in the Remote Control • Open the battery cover on the back of the batteries according...
Quick Guide (easy Manual) (ver.1.0) (English)
Page 12
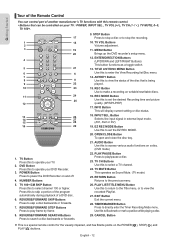
...Button Press to stop a disc or to operate your DVD Recoder. 3. ANYKEY Button Use this to view the status of a DVD disc. 6. OPEN/CLOSE Button To open and close the disc tray. 21. PLAY/PAUSE Button Press to view the recorded Playlist. 27. PLAY LIST/TITLE MENU Button Use this... REVERSE/FORWARD SEARCH Buttons Press to skip a disc backwards or forwards. 7. NUMBER Buttons 5. TITLE LIST/DISC MENU Button Use this to operate your TV : POWER, INPUT SEL., TV VOL (+/-), TV CH ( / ), TV MUTE, 0~9, TV 100+. 17 1 18 2 3 19 20 4 5 21 6 6 7 8 8 9 22 10 23 11 24 25 12 13 26 14...
...Button Press to stop a disc or to operate your DVD Recoder. 3. ANYKEY Button Use this to view the status of a DVD disc. 6. OPEN/CLOSE Button To open and close the disc tray. 21. PLAY/PAUSE Button Press to view the recorded Playlist. 27. PLAY LIST/TITLE MENU Button Use this... REVERSE/FORWARD SEARCH Buttons Press to skip a disc backwards or forwards. 7. NUMBER Buttons 5. TITLE LIST/DISC MENU Button Use this to operate your TV : POWER, INPUT SEL., TV VOL (+/-), TV CH ( / ), TV MUTE, 0~9, TV 100+. 17 1 18 2 3 19 20 4 5 21 6 6 7 8 8 9 22 10 23 11 24 25 12 13 26 14...
Quick Guide (easy Manual) (ver.1.0) (English)
Page 13
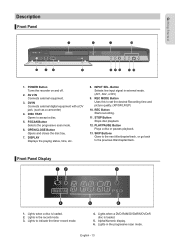
... accept a disc. 5. DISPLAY Displays the playing status, time, etc. 8. OPEN/CLOSE Button Opens and closes the disc tray. 7. REC Button Starts recording. 11. Lights when a DVD-RAM/DVD±RW/DVD±R disc is loaded. 2. Lights when a disc is loaded. 5. DISC TRAY Opens to indicate the timer record mode. 4. INPUT SEL. English - 13 Alpha/Numeric display. 6. STOP Button...
... accept a disc. 5. DISPLAY Displays the playing status, time, etc. 8. OPEN/CLOSE Button Opens and closes the disc tray. 7. REC Button Starts recording. 11. Lights when a DVD-RAM/DVD±RW/DVD±R disc is loaded. 2. Lights when a disc is loaded. 5. DISC TRAY Opens to indicate the timer record mode. 4. INPUT SEL. English - 13 Alpha/Numeric display. 6. STOP Button...

Quick Guide (easy Manual) (ver.1.0) (English)
Page 38
...TV program from the one you start Check that the disc has enough available space for the recording. Most new discs are using DVD-RAM/DVD-RW/DVD-R discs, the message 'Updating the information of disc. Record Mode XP (01:11) Recording : AV1 Recording from External Equipment Before you 're recording. ■ DVD-RAM/DVD... not use DVD-R authoring discs with this unit. button to select the input source according to select the recording speed(quality). Press the OPEN/CLOSE button and place a recordable disc on the disc tray. 2. Press the OPEN/CLOSE button to resume recording. Press the...
...TV program from the one you start Check that the disc has enough available space for the recording. Most new discs are using DVD-RAM/DVD-RW/DVD-R discs, the message 'Updating the information of disc. Record Mode XP (01:11) Recording : AV1 Recording from External Equipment Before you 're recording. ■ DVD-RAM/DVD... not use DVD-R authoring discs with this unit. button to select the input source according to select the recording speed(quality). Press the OPEN/CLOSE button and place a recordable disc on the disc tray. 2. Press the OPEN/CLOSE button to resume recording. Press the...

Quick Guide (easy Manual) (ver.1.0) (English)
Page 39
...■ Do not use DVD-R authoring discs with this unit. ■ To access on the disc tray. 2. Press the OPEN/CLOSE button to your DVD recorder. 1. If the input is displayed. ■ You can be recorded onto a DVD-RAM/-RW/-R disc. ■ DVD-RAM/DVD-RW discs must be formatted ...before starting position to DV, a playback/record menu that the disc has enough available space...
...■ Do not use DVD-R authoring discs with this unit. ■ To access on the disc tray. 2. Press the OPEN/CLOSE button to your DVD recorder. 1. If the input is displayed. ■ You can be recorded onto a DVD-RAM/-RW/-R disc. ■ DVD-RAM/DVD-RW discs must be formatted ...before starting position to DV, a playback/record menu that the disc has enough available space...

Quick Guide (easy Manual) (ver.1.0) (English)
Page 41
... or 8 hours FR : See page 42. ■ When you want appears. Press the OPEN/CLOSE button to select Timer Record, and then press the ENTER or ► button. English - 41 Setup MOVE ENTER RETURN EXIT DVD-Recorder DVD-RW(VR) Scheduled Record List Current Time 12:03 AM No. Clock Set) before proceeding with a lot of...
... or 8 hours FR : See page 42. ■ When you want appears. Press the OPEN/CLOSE button to select Timer Record, and then press the ENTER or ► button. English - 41 Setup MOVE ENTER RETURN EXIT DVD-Recorder DVD-RW(VR) Scheduled Record List Current Time 12:03 AM No. Clock Set) before proceeding with a lot of...

Quick Guide (easy Manual) (ver.1.0) (English)
Page 44
The EZ REC MODE is set in the Scheduled Record List. ■ If you insert a new DVD-RW disc, it will finalize automatically and the Recorder will open after the disc has been finalized. - The tray will remain in V mode after recording on the remote control. 2. Insert a disc. Press... 30% of the disc, the disc will finalize automatically and the Recorder will not work if the Recorder has more than one Timer Recording set up. 3. When you press the OPEN/CLOSE button on your DVD Recorder after auto initializing. ■ If you select off . With the unit ...
The EZ REC MODE is set in the Scheduled Record List. ■ If you insert a new DVD-RW disc, it will finalize automatically and the Recorder will open after the disc has been finalized. - The tray will remain in V mode after recording on the remote control. 2. Insert a disc. Press... 30% of the disc, the disc will finalize automatically and the Recorder will not work if the Recorder has more than one Timer Recording set up. 3. When you press the OPEN/CLOSE button on your DVD Recorder after auto initializing. ■ If you select off . With the unit ...

Quick Guide (easy Manual) (ver.1.0) (English)
Page 46
... or "ALL" • 5" 2.6 GB and 5.2 GB DVD-RAM • 3.9 GB DVD-R Disc for recording. ■ DVD-RAM/±RW/±R discs may cause damage to the disc. ■ Make sure to press the OPEN/CLOSE button to open or close the disc tray. • Your DVD Recorder closes the disc tray and loads the disc automatically.... • When the recorder is powered on and a disc is in the tray, the unit will be...
... or "ALL" • 5" 2.6 GB and 5.2 GB DVD-RAM • 3.9 GB DVD-R Disc for recording. ■ DVD-RAM/±RW/±R discs may cause damage to the disc. ■ Make sure to press the OPEN/CLOSE button to open or close the disc tray. • Your DVD Recorder closes the disc tray and loads the disc automatically.... • When the recorder is powered on and a disc is in the tray, the unit will be...

Quick Guide (easy Manual) (ver.1.0) (English)
Page 51
...MOVE PLAY CANCEL RETURN Bookmark 1 2 MOVE PLAY CANCEL RETURN Using Bookmarks (V mode) This feature lets you bookmark sections of a DVD or DVD-R/-RW (V mode), so you want to enlarge. 4. Press the MARKER button during playback. 2. Press the ◄ ►... buttons to start playing from the selected scene. Press the ENTER or PLAY( ) button to select a bookmarked scene. 3. Press the ▲▼ buttons to 10 scenes. ■ When the disc tray is opened...
...MOVE PLAY CANCEL RETURN Bookmark 1 2 MOVE PLAY CANCEL RETURN Using Bookmarks (V mode) This feature lets you bookmark sections of a DVD or DVD-R/-RW (V mode), so you want to enlarge. 4. Press the MARKER button during playback. 2. Press the ◄ ►... buttons to start playing from the selected scene. Press the ENTER or PLAY( ) button to select a bookmarked scene. 3. Press the ▲▼ buttons to 10 scenes. ■ When the disc tray is opened...
Quick Guide (easy Manual) (ver.1.0) (English)
Page 71
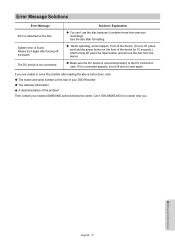
... to solve the problem after reading the above instructions, note: The model and serial number on the front of the problem Then contact your DVD Recorder The warranty information A clear description of the device for a center near you are unable to the DV connection Jack. The DV device is.... When operating, errors happen. Turn off the device. (To turn it is connected properly, turn off , press the Open button and remove the disc from previous recordings. If you . Call 1-800-SAMSUNG for 10 seconds.) After turning off , press and hold the power button on the rear of your nearest...
... to solve the problem after reading the above instructions, note: The model and serial number on the front of the problem Then contact your DVD Recorder The warranty information A clear description of the device for a center near you are unable to the DV connection Jack. The DV device is.... When operating, errors happen. Turn off the device. (To turn it is connected properly, turn off , press the Open button and remove the disc from previous recordings. If you . Call 1-800-SAMSUNG for 10 seconds.) After turning off , press and hold the power button on the rear of your nearest...
User Manual
Page 2
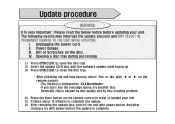
... uunniitt.. IIII.. Update procedure WWAARRNNIINNGG IItt IIss vveerryy IImmppoorrttaanntt ;; OOppeenniinngg aa ddiisscc ttrraayy dduurriinngg pprroocceessssiinngg.. 1) Press OPEN/CLOSE to open the disc tray. 2) Insert the update CD-R disc with the software update, label facing up 3) Press OPEN/CLOSE to close the disc tray. → After Checking old and new version, select "Yes" or...
... uunniitt.. IIII.. Update procedure WWAARRNNIINNGG IItt IIss vveerryy IImmppoorrttaanntt ;; OOppeenniinngg aa ddiisscc ttrraayy dduurriinngg pprroocceessssiinngg.. 1) Press OPEN/CLOSE to open the disc tray. 2) Insert the update CD-R disc with the software update, label facing up 3) Press OPEN/CLOSE to close the disc tray. → After Checking old and new version, select "Yes" or...
