
Quick Guide (easy Manual) (ver.1.0) (English)
Page 2
...TO REDUCE THE RISK OF ELECTRIC SHOCK, DO NOT REMOVE THE COVER(OR BACK). CAUTION THIS PRODUCT UTILIZES A LASER. DO NOT OPEN COVERS AND DO NOT REPAIR YOURSELF. Patent Nos.4,631,60 3;4,577,216;4,819,098;4,907,093; and 6,516,132.This product ...Management Information. WARNING : To prevent damage which the receiver is connected. • Consult the dealer or an experienced radio/TV technician for connections. CAUTION : DVD RECORDERS USE AN INVISIBLE LASER BEAM WHICH CAN CAUSE HAZARDOUS RADIATION EXPOSURE IF DIRECTED. REFER SERVICING TO QUALIFIED PERSONNEL. CAUTIONS Caution:...
...TO REDUCE THE RISK OF ELECTRIC SHOCK, DO NOT REMOVE THE COVER(OR BACK). CAUTION THIS PRODUCT UTILIZES A LASER. DO NOT OPEN COVERS AND DO NOT REPAIR YOURSELF. Patent Nos.4,631,60 3;4,577,216;4,819,098;4,907,093; and 6,516,132.This product ...Management Information. WARNING : To prevent damage which the receiver is connected. • Consult the dealer or an experienced radio/TV technician for connections. CAUTION : DVD RECORDERS USE AN INVISIBLE LASER BEAM WHICH CAN CAUSE HAZARDOUS RADIATION EXPOSURE IF DIRECTED. REFER SERVICING TO QUALIFIED PERSONNEL. CAUTIONS Caution:...

Quick Guide (easy Manual) (ver.1.0) (English)
Page 3
...If an irregular disc (a disc with a dry cloth. 7) Do not block any time. ▌Maintenance of the polarized or grounding- Do not use this recorder. DVD-Video, Audio CD • Wipe off dirt or contamination on the disc with a soft cloth. ▌Handling Cautions • Before connecting other than the other... that produce heat. 9) Do not defeat the safety purpose of Cabinet For safety reasons, be placed on or pinched particularly at any ventilation openings, Install in a straight line from the inside to the outside of time. 14) Refer all the safety instructions listed below.
...If an irregular disc (a disc with a dry cloth. 7) Do not block any time. ▌Maintenance of the polarized or grounding- Do not use this recorder. DVD-Video, Audio CD • Wipe off dirt or contamination on the disc with a soft cloth. ▌Handling Cautions • Before connecting other than the other... that produce heat. 9) Do not defeat the safety purpose of Cabinet For safety reasons, be placed on or pinched particularly at any ventilation openings, Install in a straight line from the inside to the outside of time. 14) Refer all the safety instructions listed below.
Quick Guide (easy Manual) (ver.1.0) (English)
Page 10
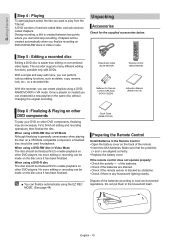
... Batteries for the supplied accessories below. ▌Step 5 : Editing a recorded disc Editing a DVD disc is created you can be necessary. The recorder supports many different editing functions, possible only with DVDs. When using a DVD-R disc The disc should be finalized first to local environmental...chapters. Do not put them in the Remote Control • Open the battery cover on conventional video tapes. Getting Started ▌Step 4 : Playing To start and stop recording. No more editing or recording can create playlists using the EZ REC MODE. (See page ...
... Batteries for the supplied accessories below. ▌Step 5 : Editing a recorded disc Editing a DVD disc is created you can be necessary. The recorder supports many different editing functions, possible only with DVDs. When using a DVD-R disc The disc should be finalized first to local environmental...chapters. Do not put them in the Remote Control • Open the battery cover on conventional video tapes. Getting Started ▌Step 4 : Playing To start and stop recording. No more editing or recording can create playlists using the EZ REC MODE. (See page ...
Quick Guide (easy Manual) (ver.1.0) (English)
Page 12
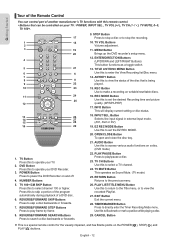
... 25 12 13 26 14 27 15 28 16 29 1. POWER Button Press to select channel 100 or higher. NUMBER Buttons 5. TV 100+/CM SKIP Button Press this to power the DVD Recorder on the POWER( ), STOP( ) and PLAY( ) buttons. STOP Button Press to stop a disc or to enter the View... TIMER/MARKER Button Press to select a TV channel. 24. ANYKEY Button Use this remote control. • Buttons that is a special remote control for the visually impaired, and has Braille points on and off. 4. OPEN/CLOSE Button To open and close the disc tray. 21. TV CH Buttons Use this to the previous ...
... 25 12 13 26 14 27 15 28 16 29 1. POWER Button Press to select channel 100 or higher. NUMBER Buttons 5. TV 100+/CM SKIP Button Press this to power the DVD Recorder on the POWER( ), STOP( ) and PLAY( ) buttons. STOP Button Press to stop a disc or to enter the View... TIMER/MARKER Button Press to select a TV channel. 24. ANYKEY Button Use this remote control. • Buttons that is a special remote control for the visually impaired, and has Braille points on and off. 4. OPEN/CLOSE Button To open and close the disc tray. 21. TV CH Buttons Use this to the previous ...
Quick Guide (easy Manual) (ver.1.0) (English)
Page 13
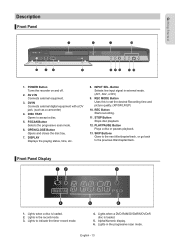
... progressive scan mode. 6. INPUT SEL. Lights in external mode. (AV1, AV2, or DV) 9. DISC TRAY Opens to indicate the timer record mode. 4. Button Selects line input signal in the progressive scan mode. Lights when a DVD-RAM/DVD±RW/DVD±R disc is loaded. 2. DISPLAY Displays the playing status, time, etc. 8. Lights when a disc is...
... progressive scan mode. 6. INPUT SEL. Lights in external mode. (AV1, AV2, or DV) 9. DISC TRAY Opens to indicate the timer record mode. 4. Button Selects line input signal in the progressive scan mode. Lights when a DVD-RAM/DVD±RW/DVD±R disc is loaded. 2. DISPLAY Displays the playing status, time, etc. 8. Lights when a disc is...

Quick Guide (easy Manual) (ver.1.0) (English)
Page 38
.../DVD-RW/DVD-R discs, the message 'Updating the information of disc. The front panel display changes in progress. is displayed. ■ You can not change the recording mode and input source during recording. ■ Recording will stop or finish recording in progress. • When using a Cable Box(no antenna), you cannot watch a different cable TV program...
.../DVD-RW/DVD-R discs, the message 'Updating the information of disc. The front panel display changes in progress. is displayed. ■ You can not change the recording mode and input source during recording. ■ Recording will stop or finish recording in progress. • When using a Cable Box(no antenna), you cannot watch a different cable TV program...

Quick Guide (easy Manual) (ver.1.0) (English)
Page 39
... REC( ) icon in progress. • When using DVD-RAM/DVD-RW/DVD-R discs, the message 'Updating the information of the screen to playback the camcorder and find the starting to copy. 6. Press the OPEN/CLOSE button, and place a recordable disc on -screen controls during recording, press the ◄ or ► buttons. ■ When copying from...
... REC( ) icon in progress. • When using DVD-RAM/DVD-RW/DVD-R discs, the message 'Updating the information of the screen to playback the camcorder and find the starting to copy. 6. Press the OPEN/CLOSE button, and place a recordable disc on -screen controls during recording, press the ◄ or ► buttons. ■ When copying from...

Quick Guide (easy Manual) (ver.1.0) (English)
Page 41
... the date. see below: To make a recording on a specific day of . • Date: Date that a timer recording is set. • Recording is automatically performed when the set a timer recording via the TIMER button. 4. Press the OPEN/CLOSE button to select Timer Rec., and then... 12:03 AM Recordable Time : 01:59 SP 02:03 AM SP DVD-Recorder DVD-RW(VR) Scheduled Record List Current Time 12:03 AM No. Recording DVD-Recorder Timer Record DVD-RW(VR) Title List Timer Record ► Playlist Scheduled Record List ► Disc Manager Timer Rec. If an unused DVD-RW disc is ...
... the date. see below: To make a recording on a specific day of . • Date: Date that a timer recording is set. • Recording is automatically performed when the set a timer recording via the TIMER button. 4. Press the OPEN/CLOSE button to select Timer Rec., and then... 12:03 AM Recordable Time : 01:59 SP 02:03 AM SP DVD-Recorder DVD-RW(VR) Scheduled Record List Current Time 12:03 AM No. Recording DVD-Recorder Timer Record DVD-RW(VR) Title List Timer Record ► Playlist Scheduled Record List ► Disc Manager Timer Rec. If an unused DVD-RW disc is ...

Quick Guide (easy Manual) (ver.1.0) (English)
Page 44
...EZ REC MODE will be formatted in the Scheduled Record List. ■ If you press the OPEN/CLOSE button on your DVD Recorder after recording on the remote control. 2. Press the REC button. 5. When the disc is different according to recording mode. (see page 66) ■ The length...64257;nalization will power off , you Initialize and Finalize a disc automatically. 1. When you insert a new DVD-RW disc, it occupies at least 30% of the Recording is full, it will open after auto initializing. ■ If you select off . The tray will initialize automatically. 4. When you...
...EZ REC MODE will be formatted in the Scheduled Record List. ■ If you press the OPEN/CLOSE button on your DVD Recorder after recording on the remote control. 2. Press the REC button. 5. When the disc is different according to recording mode. (see page 66) ■ The length...64257;nalization will power off , you Initialize and Finalize a disc automatically. 1. When you insert a new DVD-RW disc, it occupies at least 30% of the Recording is full, it will open after auto initializing. ■ If you select off . The tray will initialize automatically. 4. When you...

Quick Guide (easy Manual) (ver.1.0) (English)
Page 46
...chassis when it closes. ■ You must only insert one DVD disc at a time. Press the OPEN/CLOSE button to close the disc tray. ■ Do not push the disc tray while it is a disc in a different manufacturer's recorder. • PALdiscs • DVD-ROM/PD/MV-Disc, etc. • Video CD/CVD... this may cause damage to the disc. ■ Make sure to press the OPEN/CLOSE button to open or close the disc tray. • Your DVD Recorder closes the disc tray and loads the disc automatically. • When the recorder is powered on and a disc is unplugged, or if you stopped. Fingerprints, ...
...chassis when it closes. ■ You must only insert one DVD disc at a time. Press the OPEN/CLOSE button to close the disc tray. ■ Do not push the disc tray while it is a disc in a different manufacturer's recorder. • PALdiscs • DVD-ROM/PD/MV-Disc, etc. • Video CD/CVD... this may cause damage to the disc. ■ Make sure to press the OPEN/CLOSE button to open or close the disc tray. • Your DVD Recorder closes the disc tray and loads the disc automatically. • When the recorder is powered on and a disc is unplugged, or if you stopped. Fingerprints, ...

Quick Guide (easy Manual) (ver.1.0) (English)
Page 51
... PLAY CANCEL RETURN Bookmark 1 2 MOVE PLAY CANCEL RETURN Using Bookmarks (V mode) This feature lets you bookmark sections of a DVD or DVD-R/-RW (V mode), so you want to enlarge. 4. Press the MARKER button during playback. Press the MARKER button during playback.... 2. Press the ENTER button when the desired scene appears. Playing Back a Bookmark 1. Press the ◄ ► button to move to 10 scenes. ■ When the disc tray is opened...
... PLAY CANCEL RETURN Bookmark 1 2 MOVE PLAY CANCEL RETURN Using Bookmarks (V mode) This feature lets you bookmark sections of a DVD or DVD-R/-RW (V mode), so you want to enlarge. 4. Press the MARKER button during playback. Press the MARKER button during playback.... 2. Press the ENTER button when the desired scene appears. Playing Back a Bookmark 1. Press the ◄ ► button to move to 10 scenes. ■ When the disc tray is opened...
Quick Guide (easy Manual) (ver.1.0) (English)
Page 71
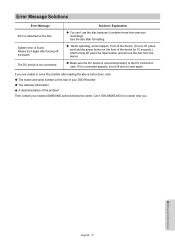
... disc after reading the above instructions, note: The model and serial number on once again. Call 1-800-SAMSUNG for 10 seconds.) After turning off and on the rear of your DVD Recorder The warranty information A clear description of the device for a center near you are unable to the DV ...you . Please try it contains errors from the device. Turn off the device. (To turn it off , press the Open button and remove the disc from previous recordings. Error Message Solutions Error Message Error is connected properly, turn off, press and hold the power button on the disc. Make...
... disc after reading the above instructions, note: The model and serial number on once again. Call 1-800-SAMSUNG for 10 seconds.) After turning off and on the rear of your DVD Recorder The warranty information A clear description of the device for a center near you are unable to the DV ...you . Please try it contains errors from the device. Turn off the device. (To turn it off , press the Open button and remove the disc from previous recordings. Error Message Solutions Error Message Error is connected properly, turn off, press and hold the power button on the disc. Make...
User Manual
Page 2
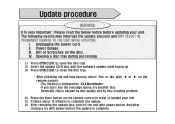
.... PPlleeaassee rreeaadd tthhee bbeellooww nnoottiiccee bbeeffoorree uuppddaattiinngg yyoouurr uunniitt.. OOppeenniinngg aa ddiisscc ttrraayy dduurriinngg pprroocceessssiinngg.. 1) Press OPEN/CLOSE to open the disc tray. 2) Insert the update CD-R disc with the software update, label facing up 3) Press OPEN/CLOSE to close the disc tray. → After Checking old and new version, select "Yes" or...
.... PPlleeaassee rreeaadd tthhee bbeellooww nnoottiiccee bbeeffoorree uuppddaattiinngg yyoouurr uunniitt.. OOppeenniinngg aa ddiisscc ttrraayy dduurriinngg pprroocceessssiinngg.. 1) Press OPEN/CLOSE to open the disc tray. 2) Insert the update CD-R disc with the software update, label facing up 3) Press OPEN/CLOSE to close the disc tray. → After Checking old and new version, select "Yes" or...
