User Manual Ver.1.1 (English)
Page 9
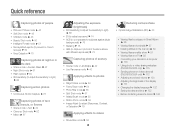
..., or Saturation) f 79 Applying effects to videos • Movie Filter mode f 56 8 Reducing camera shake • Optical Image Stabilization (OIS) f 33 • Viewing files by category in Smart Album f 86 • Viewing files as thumbnails f 87 • Deleting all fi...les on the memory f 89 • Viewing files as a slide show f 91 • Viewing files on a TV f 99 • Connecting your camera to a computer f 100 • Using photo or video sharing websites (DV300F...
..., or Saturation) f 79 Applying effects to videos • Movie Filter mode f 56 8 Reducing camera shake • Optical Image Stabilization (OIS) f 33 • Viewing files by category in Smart Album f 86 • Viewing files as thumbnails f 87 • Deleting all fi...les on the memory f 89 • Viewing files as a slide show f 91 • Viewing files on a TV f 99 • Connecting your camera to a computer f 100 • Using photo or video sharing websites (DV300F...
User Manual Ver.1.1 (English)
Page 10
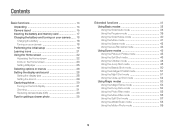
... 15 Inserting the battery and memory card 17 Charging the battery and turning on your camera ...... 18 Charging the battery 18 Turning on your camera 18 Performing the initial setup 19 Learning icons 21 Using the Home screen 22 Accessing the Home screen 22 Icons on the Home screen 23 ... photos 30 Turning on the front display 31 Zooming 31 Reducing camera shake (OIS 33 Tips for getting a clearer photo 35 Extended functions 37 Using Basic modes 38 Using the Smart Auto mode 38 Using the Program mode 39 Using the Smart Movie mode 40 Using the Movie mode 41 Using the Scene...
... 15 Inserting the battery and memory card 17 Charging the battery and turning on your camera ...... 18 Charging the battery 18 Turning on your camera 18 Performing the initial setup 19 Learning icons 21 Using the Home screen 22 Accessing the Home screen 22 Icons on the Home screen 23 ... photos 30 Turning on the front display 31 Zooming 31 Reducing camera shake (OIS 33 Tips for getting a clearer photo 35 Extended functions 37 Using Basic modes 38 Using the Smart Auto mode 38 Using the Program mode 39 Using the Smart Movie mode 40 Using the Movie mode 41 Using the Scene...
User Manual Ver.1.1 (English)
Page 11
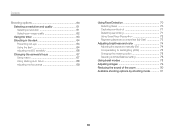
... the timer 63 Shooting in the dark 64 Preventing red-eye 64 Using the flash 64 Adjusting the ISO sensitivity 66 Changing the camera's focus 67 Using macro 67 Using tracking auto focus 68 Adjusting the focus area 69 Using Face Detection 70 Detecting faces 70 Capturing a... smile shot 71 Detecting eye blinking 71 Using Smart Face Recognition 72 Registering faces as your favorites (My Star 73 Adjusting brightness and color 74 Adjusting the exposure manually (EV 74 Compensating ...
... the timer 63 Shooting in the dark 64 Preventing red-eye 64 Using the flash 64 Adjusting the ISO sensitivity 66 Changing the camera's focus 67 Using macro 67 Using tracking auto focus 68 Adjusting the focus area 69 Using Face Detection 70 Detecting faces 70 Capturing a... smile shot 71 Detecting eye blinking 71 Using Smart Face Recognition 72 Registering faces as your favorites (My Star 73 Adjusting brightness and color 74 Adjusting the exposure manually (EV 74 Compensating ...
User Manual Ver.1.1 (English)
Page 12
...les to your Windows computer 100 Transferring files with Intelli-studio 101 Transferring files by connecting the camera as a removable disk 103 Disconnecting the camera (for Windows XP 104 Transferring files to your Mac computer 105 Printing photos with a PictBridge photo printer ... 106 Wireless network (DV300F/DV305F only 107 Connecting to a WLAN and configuring network settings 108 Connecting to a WLAN 108 Using the login browser 109 Network connection tips 110 Entering text 111 Sending photos or videos to a smart phone 112 Using a smart phone as a remote ...
...les to your Windows computer 100 Transferring files with Intelli-studio 101 Transferring files by connecting the camera as a removable disk 103 Disconnecting the camera (for Windows XP 104 Transferring files to your Mac computer 105 Printing photos with a PictBridge photo printer ... 106 Wireless network (DV300F/DV305F only 107 Connecting to a WLAN and configuring network settings 108 Connecting to a WLAN 108 Using the login browser 109 Network connection tips 110 Entering text 111 Sending photos or videos to a smart phone 112 Using a smart phone as a remote ...
User Manual Ver.1.1 (English)
Page 24
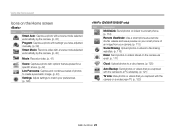
...) Settings: Adjust settings to match your preferences. (p. 129) (DV300F/DV305F only) Icon Description MobileLink: Send photos or videos to a smart phone. (p. 112) Remote Viewfinder: Use a smart phone as a remote shutter release and see a preview on your smart phone of an image from your camera. (p. 113) Social Sharing: Upload photos or videos to fi...
...) Settings: Adjust settings to match your preferences. (p. 129) (DV300F/DV305F only) Icon Description MobileLink: Send photos or videos to a smart phone. (p. 112) Remote Viewfinder: Use a smart phone as a remote shutter release and see a preview on your smart phone of an image from your camera. (p. 113) Social Sharing: Upload photos or videos to fi...

User Manual Ver.1.1 (English)
Page 39
.... Icon Description Landscapes Scenes with bright white backgrounds Icon Description Landscapes at night Portraits at the top left of colorful subjects Camera is helpful if you are listed below. The Smart Auto mode is stabilized or on the type of scene it detects. Using Basic modes Capture photos or record videos using...
.... Icon Description Landscapes Scenes with bright white backgrounds Icon Description Landscapes at night Portraits at the top left of colorful subjects Camera is helpful if you are listed below. The Smart Auto mode is stabilized or on the type of scene it detects. Using Basic modes Capture photos or record videos using...
User Manual Ver.1.1 (English)
Page 40
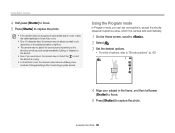
...to focus. 5 Press [Shutter] to capture the photo. • If the camera does not recognize an appropriate scene mode, it uses the default settings for Smart Auto mode. • Even if it detects a face, the camera may not select a portrait mode depending on the subject's position or lighting. &#...to select appropriate scenes. Using the Program mode In Program mode, you use a tripod, the camera may not detect the mode if the subject is moving. • In Smart Auto mode, the camera consumes more battery power, because it changes settings often to capture the photo. Extended functions 39
...to focus. 5 Press [Shutter] to capture the photo. • If the camera does not recognize an appropriate scene mode, it uses the default settings for Smart Auto mode. • Even if it detects a face, the camera may not select a portrait mode depending on the subject's position or lighting. &#...to select appropriate scenes. Using the Program mode In Program mode, you use a tripod, the camera may not detect the mode if the subject is moving. • In Smart Auto mode, the camera consumes more battery power, because it changes settings often to capture the photo. Extended functions 39

User Manual Ver.1.1 (English)
Page 41
...it has detected. 1 On the Home screen, scroll to . 2 Select . 3 Align your camera automatically chooses the appropriate camera settings based on the scene it uses the default settings for Smart Movie mode. • The camera may not select the correct scene depending on the shooting conditions, such as... camera shake, lighting, and distance to the subject. Using Basic modes Using the Smart Movie mode In Smart Movie mode, your subject in the...
...it has detected. 1 On the Home screen, scroll to . 2 Select . 3 Align your camera automatically chooses the appropriate camera settings based on the scene it uses the default settings for Smart Movie mode. • The camera may not select the correct scene depending on the shooting conditions, such as... camera shake, lighting, and distance to the subject. Using Basic modes Using the Smart Movie mode In Smart Movie mode, your subject in the...
User Manual Ver.1.1 (English)
Page 61
...to set the options in the dark 64 Preventing red-eye 64 Using the flash 64 Adjusting the ISO sensitivity 66 Changing the camera's focus 67 Using macro 67 Using tracking auto focus 68 Adjusting the focus area 69 Using Face Detection 70 Detecting faces 70 Capturing a... smile shot 71 Detecting eye blinking 71 Using Smart Face Recognition 72 Registering faces as your favorites (My Star 73 Adjusting brightness and color 74 Adjusting the exposure manually (EV) ...... 74 ...
...to set the options in the dark 64 Preventing red-eye 64 Using the flash 64 Adjusting the ISO sensitivity 66 Changing the camera's focus 67 Using macro 67 Using tracking auto focus 68 Adjusting the focus area 69 Using Face Detection 70 Detecting faces 70 Capturing a... smile shot 71 Detecting eye blinking 71 Using Smart Face Recognition 72 Registering faces as your favorites (My Star 73 Adjusting brightness and color 74 Adjusting the exposure manually (EV) ...... 74 ...
User Manual Ver.1.1 (English)
Page 65
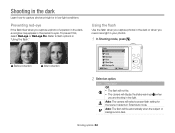
... flash Use the flash when you capture photos in the dark or when you are shooting in low light. when Auto: The camera will fire automatically when the subject or background is dark. Flash Off Auto Red-eye Fill in the person's eyes. Shooting options 64 ...Fix. Auto: The flash will select a proper flash setting for the scene it detects in Smart Auto mode. Icon Description Off: • The flash will not fire. • The camera will display the shake warning you need more light in your photos. 1 In Shooting mode, press [F]. Refer...
... flash Use the flash when you capture photos in the dark or when you are shooting in low light. when Auto: The camera will fire automatically when the subject or background is dark. Flash Off Auto Red-eye Fill in the person's eyes. Shooting options 64 ...Fix. Auto: The flash will select a proper flash setting for the scene it detects in Smart Auto mode. Icon Description Off: • The flash will not fire. • The camera will display the shake warning you need more light in your photos. 1 In Shooting mode, press [F]. Refer...

User Manual Ver.1.1 (English)
Page 71
...too bright or too dark - the subject's facial expression changes drastically - The face nearest the camera or nearest the center of the scene appears in the face list or Smart Album. the subject is backlit or the lighting conditions are unstable • Face Detection is not ... up to capture a smiling face. the subject is wearing sunglasses or a mask - When you use Smart Face Recognition to the subjects, the quicker your camera detects a face, it is far from the camera (The focus frame will be registered in one scene. 1 In Shooting mode, press [m]. 2 Select Face...
...too bright or too dark - the subject's facial expression changes drastically - The face nearest the camera or nearest the center of the scene appears in the face list or Smart Album. the subject is backlit or the lighting conditions are unstable • Face Detection is not ... up to capture a smiling face. the subject is wearing sunglasses or a mask - When you use Smart Face Recognition to the subjects, the quicker your camera detects a face, it is far from the camera (The focus frame will be registered in one scene. 1 In Shooting mode, press [m]. 2 Select Face...
User Manual Ver.1.1 (English)
Page 73
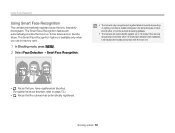
... automatically register up to page 73.) • : Faces that the camera has automatically registered. Using Face Detection Using Smart Face Recognition The camera automatically registers faces that you have registered as favorites. (To register faces as favorites, refer to 12 faces. If the camera recognizes a new face when 12 faces have already been registered...
... automatically register up to page 73.) • : Faces that the camera has automatically registered. Using Face Detection Using Smart Face Recognition The camera automatically registers faces that you have registered as favorites. (To register faces as favorites, refer to 12 faces. If the camera recognizes a new face when 12 faces have already been registered...
User Manual Ver.1.1 (English)
Page 76
..., press [m]. 2 Select Metering. 3 Select an option. Center-weighted: • Your camera averages the meter reading of the entire frame with emphasis placed on the center. • Suitable for a subject with subjects in Smart Auto mode. • The ACB feature is deactivated. In this case, set Burst options.... On: ACB (Auto Contrast Balance) is activated. • The ACB feature is likely to the way in which a camera measures the quantity of your photos will...
..., press [m]. 2 Select Metering. 3 Select an option. Center-weighted: • Your camera averages the meter reading of the entire frame with emphasis placed on the center. • Suitable for a subject with subjects in Smart Auto mode. • The ACB feature is deactivated. In this case, set Burst options.... On: ACB (Auto Contrast Balance) is activated. • The ACB feature is likely to the way in which a camera measures the quantity of your photos will...

User Manual Ver.1.1 (English)
Page 84
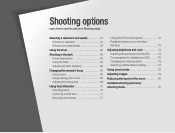
... mode 84 Viewing photos 89 Playing a video 92 Editing a photo 94 Resizing photos 94 Cropping portraits automatically 94 Rotating a photo 95 Applying Smart Filter effects 95 Adjusting your photos 96 Creating a print order (DPOF 98 Viewing files on a TV 99 Transferring files to... Learn how to your Mac computer 105 Printing photos with Intelli-studio ......... 101 Transferring files by connecting the camera as a removable disk 103 Disconnecting the camera (for Windows XP 104 Transferring files to play back photos or videos, and edit photos or videos. Also...
... mode 84 Viewing photos 89 Playing a video 92 Editing a photo 94 Resizing photos 94 Cropping portraits automatically 94 Rotating a photo 95 Applying Smart Filter effects 95 Adjusting your photos 96 Creating a print order (DPOF 98 Viewing files on a TV 99 Transferring files to... Learn how to your Mac computer 105 Printing photos with Intelli-studio ......... 101 Transferring files by connecting the camera as a removable disk 103 Disconnecting the camera (for Windows XP 104 Transferring files to play back photos or videos, and edit photos or videos. Also...
User Manual Ver.1.1 (English)
Page 87
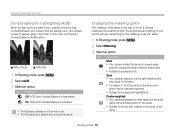
The favorite face feature is available only when you insert a memory card into the camera. 1 In Playback mode, press [m]. 2 Select Face List. 3 Press [o]. 4 Select Cancel My Star....appears, select Yes. Viewing files by category in Playback mode Deleting favorite faces You can also access Smart Album by scrolling to 20 people) File Type: View files by the file type. Playback...les normally. Face List: View files by the date they were saved. Viewing photos or videos in Smart Album View files by category, such as date, face, or file type. 1 In ...
The favorite face feature is available only when you insert a memory card into the camera. 1 In Playback mode, press [m]. 2 Select Face List. 3 Press [o]. 4 Select Cancel My Star....appears, select Yes. Viewing files by category in Playback mode Deleting favorite faces You can also access Smart Album by scrolling to 20 people) File Type: View files by the file type. Playback...les normally. Face List: View files by the date they were saved. Viewing photos or videos in Smart Album View files by category, such as date, face, or file type. 1 In ...

User Manual Ver.1.1 (English)
Page 88
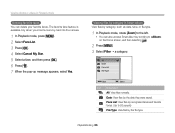
...;les as thumbnails Scan thumbnails of files. Viewing photos or videos in Playback mode 4 Scroll to a desired list, and then press [o] to open Smart Album, change the category, or reorganize files. Press [D/c/F/t] to on the Home screen, and then selecting . Rotate [Zoom] to the right to return.... 6 Rotate [Zoom] to the left once more to display more thumbnails (24 at a time). Playback/Editing 87 It may take some time for the camera to the previous view. Rotate [Zoom] to the left to return to view thumbnails (12 at a time). In Playback mode, rotate [Zoom] to the...
...;les as thumbnails Scan thumbnails of files. Viewing photos or videos in Playback mode 4 Scroll to a desired list, and then press [o] to open Smart Album, change the category, or reorganize files. Press [D/c/F/t] to on the Home screen, and then selecting . Rotate [Zoom] to the right to return.... 6 Rotate [Zoom] to the left once more to display more thumbnails (24 at a time). Playback/Editing 87 It may take some time for the camera to the previous view. Rotate [Zoom] to the left to return to view thumbnails (12 at a time). In Playback mode, rotate [Zoom] to the...

User Manual Ver.1.1 (English)
Page 96
Smart Filter : Miniature Back Option Normal Miniature Vignetting Set Description No effect Apply a tilt-shift effect to rotate a photo. Playback/Editing 95 Rotate : Right 90˚ Cancel Save • The camera will overwrite the original file. • In Playback mode, press [m], and... then select Rotate to make the subject appear in miniature. Apply the retro-looking colors, high contrast, and strong vignette effect of Lomo cameras. Applying Smart Filter effects Apply special effects to your photos. 1 On the Home screen, scroll to . 2 Select . 3 Rotate [Zoom] to the...
Smart Filter : Miniature Back Option Normal Miniature Vignetting Set Description No effect Apply a tilt-shift effect to rotate a photo. Playback/Editing 95 Rotate : Right 90˚ Cancel Save • The camera will overwrite the original file. • In Playback mode, press [m], and... then select Rotate to make the subject appear in miniature. Apply the retro-looking colors, high contrast, and strong vignette effect of Lomo cameras. Applying Smart Filter effects Apply special effects to your photos. 1 On the Home screen, scroll to . 2 Select . 3 Rotate [Zoom] to the...

User Manual Ver.1.1 (English)
Page 97
The camera will save . Soft Focus Hide facial imperfections or apply dreamy effects. Zooming Shot Blur the edges of a fisheye lens. Fish-eye Distort close objects ... a lower resolution. • You can adjust it to imitate the visual effect of a photo is dark, you can adjust brightness, contrast, and saturation and apply Smart Filter effects at the same time. • You cannot apply the ACB, Face Retouch, and Red-eye Fix effects at the same time. Half Tone...
The camera will save . Soft Focus Hide facial imperfections or apply dreamy effects. Zooming Shot Blur the edges of a fisheye lens. Fish-eye Distort close objects ... a lower resolution. • You can adjust it to imitate the visual effect of a photo is dark, you can adjust brightness, contrast, and saturation and apply Smart Filter effects at the same time. • You cannot apply the ACB, Face Retouch, and Red-eye Fix effects at the same time. Half Tone...
User Manual Ver.1.1 (English)
Page 113
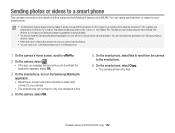
Wireless network (DV300F/DV305F only) 112 This feature may be supported by other devices with the Android 2.2 OS or higher. This feature is supported by the 7 and 10.1 inch Galaxy Tab. You can download the application from Samsung Apps or Android market. • When there are no... the application appears, select OK. 3 On the smart phone, turn on the Samsung MobileLink application. • Read the on your camera. • The smart phone can connect to only one camera at a time. 1 On the camera's Home screen, scroll to . 2 On the camera, select . • If the pop-up message...
Wireless network (DV300F/DV305F only) 112 This feature may be supported by other devices with the Android 2.2 OS or higher. This feature is supported by the 7 and 10.1 inch Galaxy Tab. You can download the application from Samsung Apps or Android market. • When there are no... the application appears, select OK. 3 On the smart phone, turn on the Samsung MobileLink application. • Read the on your camera. • The smart phone can connect to only one camera at a time. 1 On the camera's Home screen, scroll to . 2 On the camera, select . • If the pop-up message...
User Manual Ver.1.1 (English)
Page 114
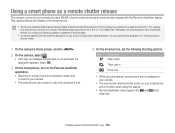
...DV300F/DV305F only) 113 Icon Description Flash option Timer option Photo size • While using this feature, some buttons are not available on your camera. • The zoom button and the shutter button on -screen instructions carefully to select and connect to your camera. • The smart phone can download the application from Samsung... Apps or Android market. 1 On the camera's Home screen, scroll to . 2 On the camera, select . • If the pop-up ...
...DV300F/DV305F only) 113 Icon Description Flash option Timer option Photo size • While using this feature, some buttons are not available on your camera. • The zoom button and the shutter button on -screen instructions carefully to select and connect to your camera. • The smart phone can download the application from Samsung... Apps or Android market. 1 On the camera's Home screen, scroll to . 2 On the camera, select . • If the pop-up ...


