

User Manual
Page 2
...-ROM. (p.66) Take a picture Take a picture. (p.14) Insert the USB cable Insert the supplied USB cable into the PC's USB port and the camera's USB connection terminal. (p.67) Getting to know your camera Thank you for buying a Samsung Digital Camera. ● Prior to using this manual are registered trademarks of Microsoft Corporation incorporated in this...
...-ROM. (p.66) Take a picture Take a picture. (p.14) Insert the USB cable Insert the supplied USB cable into the PC's USB port and the camera's USB connection terminal. (p.67) Getting to know your camera Thank you for buying a Samsung Digital Camera. ● Prior to using this manual are registered trademarks of Microsoft Corporation incorporated in this...

User Manual
Page 7
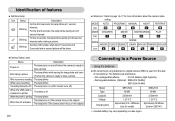
Identification of features Back & Bottom LCD monitor Tripod 《6》 Camera status lamp Zoom W button (Thumbnail) Zoom T button (Digital zoom) E (Effects) button +/- button, Delete button Play mode / Printer button 5 function button USB / AV connection terminal Cradle connector
Identification of features Back & Bottom LCD monitor Tripod 《6》 Camera status lamp Zoom W button (Thumbnail) Zoom T button (Digital zoom) E (Effects) button +/- button, Delete button Play mode / Printer button 5 function button USB / AV connection terminal Cradle connector
User Manual
Page 9
...lamp blinks quickly at 0.25-second intervals before taking a picture The lamp blinks while saving the image data and turns off when the camera is ready to take a picture While voice memo recording The lamp blinks While voice recording The lamp blinks Transmitting Data with a PC ...240 Minutes (Use for SBC-N1) ※ Included battery may vary depending on the subject) 《8》 Connecting to page 14~17 for a digital camera (Within a year from the date of features ■ Self-timer lamp Icon Status Blinking Blinking Blinking Description For the first 8 seconds, the lamp ...
...lamp blinks quickly at 0.25-second intervals before taking a picture The lamp blinks while saving the image data and turns off when the camera is ready to take a picture While voice memo recording The lamp blinks While voice recording The lamp blinks Transmitting Data with a PC ...240 Minutes (Use for SBC-N1) ※ Included battery may vary depending on the subject) 《8》 Connecting to page 14~17 for a digital camera (Within a year from the date of features ■ Self-timer lamp Icon Status Blinking Blinking Blinking Description For the first 8 seconds, the lamp ...

User Manual
Page 11
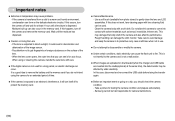
... (formatting) or reading. ● Samsung cannot be the case, you may become dirty or to come into contact with a different camera. ● Turn off or the memory card is perfectly normal. ● Do not use the memory card in another digital camera or memory card reader. ● If... the memory card is insufficient memory available : A [Memory Full!] message will appear and the camera will need to become corrupted : - To use a memory card that is...
... (formatting) or reading. ● Samsung cannot be the case, you may become dirty or to come into contact with a different camera. ● Turn off or the memory card is perfectly normal. ● Do not use the memory card in another digital camera or memory card reader. ● If... the memory card is insufficient memory available : A [Memory Full!] message will appear and the camera will need to become corrupted : - To use a memory card that is...
User Manual
Page 12
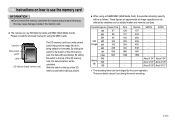
... the top of the SD memory card, the data protection will be affected by the zoom operation. Card pins Write protect switch Label [ SD (Secure Digital) memory card ] The SD memory card has a write protect switch that prevents image files from being deleted or formatted. About 3' 34'' About 6' 24''... ※ The recording times can be protected. Instructions on how to use the memory card INFORMATION ● Don't remove the memory card when the camera status lamp is blinking as this may cause damage to the top of the SD memory card before taking a picture. ■ When using the MMC...
... the top of the SD memory card, the data protection will be affected by the zoom operation. Card pins Write protect switch Label [ SD (Secure Digital) memory card ] The SD memory card has a write protect switch that prevents image files from being deleted or formatted. About 3' 34'' About 6' 24''... ※ The recording times can be protected. Instructions on how to use the memory card INFORMATION ● Don't remove the memory card when the camera status lamp is blinking as this may cause damage to the top of the SD memory card before taking a picture. ■ When using the MMC...

User Manual
Page 14
... p.14~17 p.9 p.14 No. Description 4 Continuous shot 5 Flash / Without Sound 6 Self-timer 7 Macro 8 Metering 9 Card inserted indicator 10 Auto focus frame 11 Camera shake warning 12 Date / Time 13 Exposure compensation 14 White Balance 15 ISO 16 RGB 17 Sharpness 18 Image quality / Frame rate 19 Image size... Number of available shots remaining 20 Remaining time (Movie clip / Voice recording) 21 Voice memo 22 Optical / Digital Zoom bar / Digital Zoom rate Icons 2006/08/01 01:00 PM RGB 10 00:01:30/ 01:00:00 Page p.33 p.21~23 p.23 p.20...
... p.14~17 p.9 p.14 No. Description 4 Continuous shot 5 Flash / Without Sound 6 Self-timer 7 Macro 8 Metering 9 Card inserted indicator 10 Auto focus frame 11 Camera shake warning 12 Date / Time 13 Exposure compensation 14 White Balance 15 ISO 16 RGB 17 Sharpness 18 Image quality / Frame rate 19 Image size... Number of available shots remaining 20 Remaining time (Movie clip / Voice recording) 21 Voice memo 22 Optical / Digital Zoom bar / Digital Zoom rate Icons 2006/08/01 01:00 PM RGB 10 00:01:30/ 01:00:00 Page p.33 p.21~23 p.23 p.20...

User Manual
Page 19
... allows. This will offer a total zoom ratio of the flash. Once the maximum digital zoom (5X) is selected, pressing the ZOOM T button activates the digital zoom software. If you wish to set the camera ■ The recording mode function can be turned off automatically to page 54 for ...as long as the OPTICAL ZOOM or DIGITAL ZOOM button. ● This camera has a 3X optical zoom and a 5X digital zoom function. ZOOM W / T button ● If the menu is recorded for more information about the auto power off...
... allows. This will offer a total zoom ratio of the flash. Once the maximum digital zoom (5X) is selected, pressing the ZOOM T button activates the digital zoom software. If you wish to set the camera ■ The recording mode function can be turned off automatically to page 54 for ...as long as the OPTICAL ZOOM or DIGITAL ZOOM button. ● This camera has a 3X optical zoom and a 5X digital zoom function. ZOOM W / T button ● If the menu is recorded for more information about the auto power off...

User Manual
Page 20
...halfway at its minimum zoom setting i.e. Pressing the ZOOM W button continuously will set the camera to its furthest from the subject i.e. Pressing the ZOOM W button will reduce the digital zoom and then it will reduce the digital zooming in the Nightscene mode, Children mode and two scene modes (Close up, Fireworks...may cause the resulting image to reduce the optical zoom until the minimum setting is reached. Releasing ZOOM W button stops digital zooming. If the image is dim, turn the camera power off and on again to modify the lens position. ● Take care not to press the lens as ...
...halfway at its minimum zoom setting i.e. Pressing the ZOOM W button continuously will set the camera to its furthest from the subject i.e. Pressing the ZOOM W button will reduce the digital zoom and then it will reduce the digital zooming in the Nightscene mode, Children mode and two scene modes (Close up, Fireworks...may cause the resulting image to reduce the optical zoom until the minimum setting is reached. Releasing ZOOM W button stops digital zooming. If the image is dim, turn the camera power off and on again to modify the lens position. ● Take care not to press the lens as ...

User Manual
Page 26
.... The subject will appear. Press the E button in any recording mode (except for MOVIE CLIP and AUTO mode). 2. Special Effect : Colour ■ By using the camera's digital processor, it is added to your images 1. Select the ( ) menu tab by pressing the Up / Down button and press the OK button. : No effect is...
.... The subject will appear. Press the E button in any recording mode (except for MOVIE CLIP and AUTO mode). 2. Special Effect : Colour ■ By using the camera's digital processor, it is added to your images 1. Select the ( ) menu tab by pressing the Up / Down button and press the OK button. : No effect is...
User Manual
Page 58
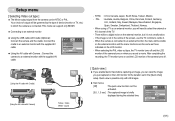
... Setup menu [ Selecting Video out type ] ■ The Movie output signal from the camera can 't be activated. [0.5, 1, 3 sec] : The captured image is briefly displayed ...NTSC or PAL. sound - When the camera is connected. Your choice of the camera turns on when you will be a digital noise on the LCD monitor for the ...duration set in the centre of the screen, use the TV controls to an external monitor, the menu will be visible on the LCD monitor. - After completing the recording, the TV monitor turns on and the LCD monitor of the camera...
... Setup menu [ Selecting Video out type ] ■ The Movie output signal from the camera can 't be activated. [0.5, 1, 3 sec] : The captured image is briefly displayed ...NTSC or PAL. sound - When the camera is connected. Your choice of the camera turns on when you will be a digital noise on the LCD monitor for the ...duration set in the centre of the screen, use the TV controls to an external monitor, the menu will be visible on the LCD monitor. - After completing the recording, the TV monitor turns on and the LCD monitor of the camera...
User Manual
Page 61
... into contact with care. ■ If the digital camera is transferred from photo stores) to a warm and humid environment, condensation can damage the LCD monitor. This may damage the body shell of the lens. - This is dispersed. Samsung cannot be used for auto focus. Wait until ...all times when not in discoloration and deterioration of the image sensor. - It is exposed to an electronic interference, it could result in use. ■ Do not attempt to disassemble or modify the camera. ■ Under...
... into contact with care. ■ If the digital camera is transferred from photo stores) to a warm and humid environment, condensation can damage the LCD monitor. This may damage the body shell of the lens. - This is dispersed. Samsung cannot be used for auto focus. Wait until ...all times when not in discoloration and deterioration of the image sensor. - It is exposed to an electronic interference, it could result in use. ■ Do not attempt to disassemble or modify the camera. ■ Under...

User Manual
Page 64
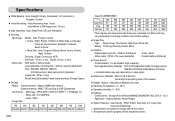
... : Multi, Spot - ISO Equivalent : Auto, 80,100, 200, 400, 800, 1000 ■ Flash - Total Pixel Approx. 7.4 Mega-pixel ■ Lens - Digital Zoom :·Still Image mode : 1.0X ~ 5.0X ·Play mode : 1.0X ~ 12.0X (depends on •The operating system is not Windows 98, 98SE...Image Sensor - Type : 1/2.5" CCD - Modes : Auto, Auto & Red-eye reduction, Fill-in the memory card → Insert a memory card that supports USB. •The camera driver is off - Range : ·Normal : 80cm ~ infinity ·Macro : 5cm ~ 80cm (Wide), 40cm ~ 80cm (Tele) ·Auto Macro : 5cm ~ Infinity ...
... : Multi, Spot - ISO Equivalent : Auto, 80,100, 200, 400, 800, 1000 ■ Flash - Total Pixel Approx. 7.4 Mega-pixel ■ Lens - Digital Zoom :·Still Image mode : 1.0X ~ 5.0X ·Play mode : 1.0X ~ 12.0X (depends on •The operating system is not Windows 98, 98SE...Image Sensor - Type : 1/2.5" CCD - Modes : Auto, Auto & Red-eye reduction, Fill-in the memory card → Insert a memory card that supports USB. •The camera driver is off - Range : ·Normal : 80cm ~ infinity ·Macro : 5cm ~ 80cm (Wide), 40cm ~ 80cm (Tele) ·Auto Macro : 5cm ~ Infinity ...
User Manual
Page 65
... 1600x1200 1024x768 640x480 《64》 - Audio : Mono - Application : Digimax Master, Adobe Reader ■ Special Features : User-friendly"Effect" button, Easy Grip, 2.5" Large LCD, Convenient Mode Dial ※ Specifications are measured under Samsung's standard conditions and may vary depending on shooting conditions and camera settings. ■ Image Play - Still Image: ·Modes : Auto...
... 1600x1200 1024x768 640x480 《64》 - Audio : Mono - Application : Digimax Master, Adobe Reader ■ Special Features : User-friendly"Effect" button, Easy Grip, 2.5" Large LCD, Convenient Mode Dial ※ Specifications are measured under Samsung's standard conditions and may vary depending on shooting conditions and camera settings. ■ Image Play - Still Image: ·Modes : Auto...

User Manual
Page 66
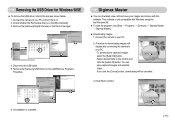
... for Windows. This software is only compatible with Windows. You can use the camera with Mac OS 9.2 ~ 10.3. ■ Digimax Master : This is the all or part of a manufacturing fault, we will repair or exchange your camera. If the frame does not show, run . System Requirements For Windows For... is not covered by the Samsung warranty. •Before reading this manual, you can download, view, edit and save your digital images and movie clips with this software. You can find [Removable Disk] in any way for damage caused by inappropriate use the camera as the camera driver.
... for Windows. This software is only compatible with Windows. You can use the camera with Mac OS 9.2 ~ 10.3. ■ Digimax Master : This is the all or part of a manufacturing fault, we will repair or exchange your camera. If the frame does not show, run . System Requirements For Windows For... is not covered by the Samsung warranty. •Before reading this manual, you can download, view, edit and save your digital images and movie clips with this software. You can find [Removable Disk] in any way for damage caused by inappropriate use the camera as the camera driver.
User Manual
Page 72
... will be cancelled. 3. Digimax Master ■ You can save your PC. - Connect the camera to your images and movies with Windows except for the Windows 98. ■ To start the program, click [Start → Programs → Samsung → Digimax Master → Digimax Master]. ● Downloading ...] button. Disconnect the USB cable. 5. You can download, view, edit and save captured images and selected folder. - Remove the [Samsung Digital Camera] on the [My Computer]. 3. To download the captured images, select the [Select All] button. - Uninstallation is complete. 《71...
... will be cancelled. 3. Digimax Master ■ You can save your PC. - Connect the camera to your images and movies with Windows except for the Windows 98. ■ To start the program, click [Start → Programs → Samsung → Digimax Master → Digimax Master]. ● Downloading ...] button. Disconnect the USB cable. 5. You can download, view, edit and save captured images and selected folder. - Remove the [Samsung Digital Camera] on the [My Computer]. 3. To download the captured images, select the [Select All] button. - Uninstallation is complete. 《71...


