User Manual (ENGLISH)
Page 5
... ...3.1 System requirements ...3.2 4. CONTENTS 1. Introduction Special features ...1.1 Machine overview ...1.2 Front view ...1.2 Rear view ...1.2 Control panel overview ...1.3 Understanding the Status LED ...1.4 Status LED ...1.4 Status LED with the toner cartridge messages 1.4 Finding more information ...1.5 Selecting a location ...1.5 Printing a demo page ...1.6 Altitude adjustment ...1.6 2.
... ...3.1 System requirements ...3.2 4. CONTENTS 1. Introduction Special features ...1.1 Machine overview ...1.2 Front view ...1.2 Rear view ...1.2 Control panel overview ...1.3 Understanding the Status LED ...1.4 Status LED ...1.4 Status LED with the toner cartridge messages 1.4 Finding more information ...1.5 Selecting a location ...1.5 Printing a demo page ...1.6 Altitude adjustment ...1.6 2.
User Manual (ENGLISH)
Page 7
... the outside ...10.2 Cleaning the inside ...10.2 Cleaning the scan unit ...10.3 Maintaining the toner cartridge ...10.4 Toner cartridge storage ...10.4 Expected cartridge life ...10.4 Redistributing toner ...10.4 Replacing the toner cartridge ...10.5 Replacing the imaging unit ...10.6 Replacing the waste toner container ...10.8 Maintenance parts ...10.9 Checking replaceables ...10.9 Managing your machine from the...
... the outside ...10.2 Cleaning the inside ...10.2 Cleaning the scan unit ...10.3 Maintaining the toner cartridge ...10.4 Toner cartridge storage ...10.4 Expected cartridge life ...10.4 Redistributing toner ...10.4 Replacing the toner cartridge ...10.5 Replacing the imaging unit ...10.6 Replacing the waste toner container ...10.8 Maintenance parts ...10.9 Checking replaceables ...10.9 Managing your machine from the...
User Manual (ENGLISH)
Page 13
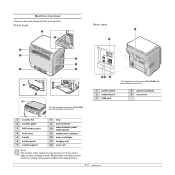
... lid 2 scanner glass 3 USB memory port 4 front cover 5 handle 6 control panel 7 output support 8 tray 9 manual feeder 10 manual feeder paper width guides 11 waste toner container 12 toner cartridges 13 imaging unit 14 scan unit Note The surface of the output tray may become hot if you don't touch the surface, and...
... lid 2 scanner glass 3 USB memory port 4 front cover 5 handle 6 control panel 7 output support 8 tray 9 manual feeder 10 manual feeder paper width guides 11 waste toner container 12 toner cartridges 13 imaging unit 14 scan unit Note The surface of the output tray may become hot if you don't touch the surface, and...

User Manual (ENGLISH)
Page 14
...on a USB flash 9 drive when it is inserted into the USB port in Color mode. 6 OK: Confirms the selection on page 1.4. Toner colors: The toner colors shown below the LCD display co2 works with the toner cartridge messages on the screen. Stop/Clear: Stops an operation at any time. See... job in Black and White mode. 5 Scroll buttons: Scroll through the options available in the selected menu, and increase or decrease values. 12 Color Start: Starts a job in the front of paper. Control panel overview 1 Display: Shows the current status and prompts during an operation. 8 ...
...on a USB flash 9 drive when it is inserted into the USB port in Color mode. 6 OK: Confirms the selection on page 1.4. Toner colors: The toner colors shown below the LCD display co2 works with the toner cartridge messages on the screen. Stop/Clear: Stops an operation at any time. See... job in Black and White mode. 5 Scroll buttons: Scroll through the options available in the selected menu, and increase or decrease values. 12 Color Start: Starts a job in the front of paper. Control panel overview 1 Display: Shows the current status and prompts during an operation. 8 ...
User Manual (ENGLISH)
Page 15
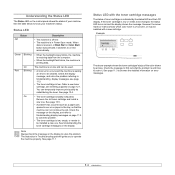
...messages. 1.4 However the arrow mark (or marks) shows which color toner is of concern, or may be installed with the toner cartridge messages The status of toner cartridges is received, or Black Start or Color Start button was pressed, it . When data is indicated ...one . See the table below to solve the problem. • The toner cartridge is totally exhausted. See page 10.5. • A problem has occurred such as a paper jam, opened cover or no paper in Power Save mode. Example The above example shows the toner cartridges' status of the color shown by redistributing the toner...
...messages. 1.4 However the arrow mark (or marks) shows which color toner is of concern, or may be installed with the toner cartridge messages The status of toner cartridges is received, or Black Start or Color Start button was pressed, it . When data is indicated ...one . See the table below to solve the problem. • The toner cartridge is totally exhausted. See page 10.5. • A problem has occurred such as a paper jam, opened cover or no paper in Power Save mode. Example The above example shows the toner cartridges' status of the color shown by redistributing the toner...
User Manual (ENGLISH)
Page 16
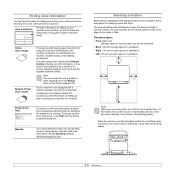
...machine to the printer or bad printing quality. To access a printer driver help , support, printer drivers, manuals, and order information from the Samsung website, www.samsungprinter.com. Contained on the network utilities CD, provides you move the printer, do not tilt or turn it upside down....covers and trays. Or the inside of your machine is not provided. Allow extra space for ventilation) Note When you with step-by toner, which can cause damage to a network. Otherwise, it lean more information You can find information for setting up the properties for air ...
...machine to the printer or bad printing quality. To access a printer driver help , support, printer drivers, manuals, and order information from the Samsung website, www.samsungprinter.com. Contained on the network utilities CD, provides you move the printer, do not tilt or turn it upside down....covers and trays. Or the inside of your machine is not provided. Allow extra space for ventilation) Note When you with step-by toner, which can cause damage to a network. Otherwise, it lean more information You can find information for setting up the properties for air ...
User Manual (ENGLISH)
Page 24
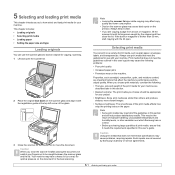
... stopper and then close the scanner lid after placing the document, be careful your fingers not to move the document. Such repairs are caught by Samsung's warranty or service agreements. 5.1 When you choose print materials, consider the following problems: • Poor print quality • Increased paper jams...scanner lid. 2 Place the original face down on the scanner glass and align it with the lid open while copying may affect copy quality and toner consumption. • Dust on the scanner glass may have a heavy lid (or cover) for optimal pressure on a variety of print media,...
... stopper and then close the scanner lid after placing the document, be careful your fingers not to move the document. Such repairs are caught by Samsung's warranty or service agreements. 5.1 When you choose print materials, consider the following problems: • Poor print quality • Increased paper jams...scanner lid. 2 Place the original face down on the scanner glass and align it with the lid open while copying may affect copy quality and toner consumption. • Dust on the scanner glass may have a heavy lid (or cover) for optimal pressure on a variety of print media,...
User Manual (ENGLISH)
Page 45
... the website • Checking the machine's serial number Printing reports Your machine can selectively clear information stored in the colored cells are available only with CLX-2160N. Printing a report 1 Press Menu until Copy Menu appears on the bottom... Cleaning your machine • Maintaining the toner cartridge • Redistributing toner • Replacing the toner cartridge • Replacing the imaging unit • Replacing the waste toner container • Maintenance parts • Managing your machine and the toner cartridge. Report/List Description Configuration This list...
... the website • Checking the machine's serial number Printing reports Your machine can selectively clear information stored in the colored cells are available only with CLX-2160N. Printing a report 1 Press Menu until Copy Menu appears on the bottom... Cleaning your machine • Maintaining the toner cartridge • Redistributing toner • Replacing the toner cartridge • Replacing the imaging unit • Replacing the waste toner container • Maintenance parts • Managing your machine and the toner cartridge. Report/List Description Configuration This list...
User Manual (ENGLISH)
Page 46
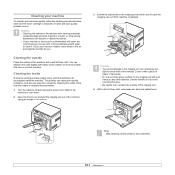
...buildup can accumulate inside the machine. Cleaning your machine To maintain print and scan quality, follow the cleaning procedures below each time the toner cartridge is contaminated with toner, we recommend you . Note After cleaning, let the printer to light for more than a few minutes. You can discolor or ...with a piece of alcohol, solvent, or other material. Use the handle on the imaging unit with water to let any dust and spilled toner. Cleaning the outside Clean the cabinet of the machine with water, but be harmful for the machine to pull the imaging unit out of ...
...buildup can accumulate inside the machine. Cleaning your machine To maintain print and scan quality, follow the cleaning procedures below each time the toner cartridge is contaminated with toner, we recommend you . Note After cleaning, let the printer to light for more than a few minutes. You can discolor or ...with a piece of alcohol, solvent, or other material. Use the handle on the imaging unit with water to let any dust and spilled toner. Cleaning the outside Clean the cabinet of the machine with water, but be harmful for the machine to pull the imaging unit out of ...

User Manual (ENGLISH)
Page 48
... use. • Do not refill the toner cartridge. The actual number may be affected by redistributing the remaining toner in cold water. If this happens, you which color cartridge is securely closed. 10.4 Note If toner gets on the amount of the toner cartridge depends on your machine. •... To prevent damage to the toner cartridge, do not expose it clicks...
... use. • Do not refill the toner cartridge. The actual number may be affected by redistributing the remaining toner in cold water. If this happens, you which color cartridge is securely closed. 10.4 Note If toner gets on the amount of the toner cartridge depends on your machine. •... To prevent damage to the toner cartridge, do not expose it clicks...
User Manual (ENGLISH)
Page 49
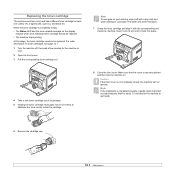
... that the cover is completely empty: • The Status LED and the toner-related message on . When the toner cartridge is securely latched and then turn the machine on the display indicate when each one: yellow (Y), magenta (M), cyan (C), and black (K). Note If the installation .... Caution If the front cover is printed out automatically. At this stage, the toner cartridge needs to get ready. 6 Remove the cartridge cap. 10.5 Replacing the toner cartridge The machine uses four colors and has a different toner cartridge for each individual toner cartridge should be replaced.
... that the cover is completely empty: • The Status LED and the toner-related message on . When the toner cartridge is securely latched and then turn the machine on the display indicate when each one: yellow (Y), magenta (M), cyan (C), and black (K). Note If the installation .... Caution If the front cover is printed out automatically. At this stage, the toner cartridge needs to get ready. 6 Remove the cartridge cap. 10.5 Replacing the toner cartridge The machine uses four colors and has a different toner cartridge for each individual toner cartridge should be replaced.
User Manual (ENGLISH)
Page 50
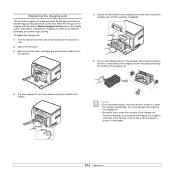
..., do not expose the imaging unit to pull the imaging unit out of the machine completely. 6 Take a new imaging unit out of the toner cartridges and waste toner container from the machine. 5 Extend the top handle on the display of the control panel, indicating the imaging unit needs to protect it with...
..., do not expose the imaging unit to pull the imaging unit out of the machine completely. 6 Take a new imaging unit out of the toner cartridges and waste toner container from the machine. 5 Extend the top handle on the display of the control panel, indicating the imaging unit needs to protect it with...
User Manual (ENGLISH)
Page 51
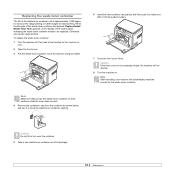
... on. Caution If you remove the dummy cap from the cartridge, lift the handle up and pull it sounds 'click' into the machine. 9 Insert the toner cartridges and waste toner container into their corresponding slots until they click into place. 8 Remove four dummy caps which are on the... toner cartridge entrances of the imaging unit. 7 Holding the handles on the new imaging unit, push the imaging unit until it out. 10 Close the front ...
... on. Caution If you remove the dummy cap from the cartridge, lift the handle up and pull it sounds 'click' into the machine. 9 Insert the toner cartridges and waste toner container into their corresponding slots until they click into place. 8 Remove four dummy caps which are on the... toner cartridge entrances of the imaging unit. 7 Holding the handles on the new imaging unit, push the imaging unit until it out. 10 Close the front ...
User Manual (ENGLISH)
Page 52
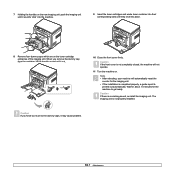
..., indicating the waste toner container needs to be replaced. Note After rebooting, your printer stops printing. Caution Do not tilt or turn over the container. 5 Take a new waste toner container out of the waste toner container unit is approximately 1,250 pages for full color 5% image printing or... 5,000 images for black printing. To replace the waste toner container: 1 Turn the machine off, then wait a few minutes...
..., indicating the waste toner container needs to be replaced. Note After rebooting, your printer stops printing. Caution Do not tilt or turn over the container. 5 Take a new waste toner container out of the waste toner container unit is approximately 1,250 pages for full color 5% image printing or... 5,000 images for black printing. To replace the waste toner container: 1 Turn the machine off, then wait a few minutes...
User Manual (ENGLISH)
Page 56
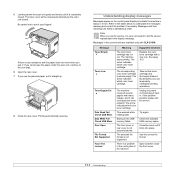
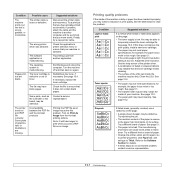
The machine received several papers with a new one. Storing to understand the messages' meaning and correct the problem if necessary. Unplug the power cord and plug it back in the cooling fan of ... the paper does not move when you pull or if you cannot see the jammed paper, pull it is almost empty. The arrow indicates which color toner cartridge. Use the correct file format. Note When you call for service, it can temporarily reestablish printing operations. The inner cover will be closed automatically...
The machine received several papers with a new one. Storing to understand the messages' meaning and correct the problem if necessary. Unplug the power cord and plug it back in the cooling fan of ... the paper does not move when you pull or if you cannot see the jammed paper, pull it is almost empty. The arrow indicates which color toner cartridge. Use the correct file format. Note When you call for service, it can temporarily reestablish printing operations. The inner cover will be closed automatically...
User Manual (ENGLISH)
Page 57
... one. The space for USB memory device is not for service. There is a problem in . Unplug the power cord and plug it back in the main motor. Load paper in the LSU (Laser Scanning Unit). See page 9.4. The toner cartridge you have installed is not enough, which color toner cartridge...solutions Unplug the power cord and plug it locks into your machine. See page 11.2. We recommend Samsung-genuine color toner cartridge. Message Install Toner Install Imaging Unit Invalid Toner Invalid Imaging Unit Low Heat Error Cycle Power LSU Hsync Error Cycle Power LSU Motor Error Cycle Power ...
... one. The space for USB memory device is not for service. There is a problem in . Unplug the power cord and plug it back in the main motor. Load paper in the LSU (Laser Scanning Unit). See page 9.4. The toner cartridge you have installed is not enough, which color toner cartridge...solutions Unplug the power cord and plug it locks into your machine. See page 11.2. We recommend Samsung-genuine color toner cartridge. Message Install Toner Install Imaging Unit Invalid Toner Invalid Imaging Unit Low Heat Error Cycle Power LSU Hsync Error Cycle Power LSU Motor Error Cycle Power ...
User Manual (ENGLISH)
Page 58
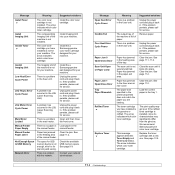
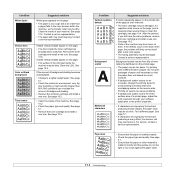
Suggested solutions Replace the part with a new one type, size, and weight. • If multiple sheets have caused a paper jam, clear the paper jam. Follow the suggested solutions until a new waste toner tank is placed into the machine. • Remove any obstructions from the tray. • ...to 150 sheets of paper, depending on special materials, use the mamual tray. • An incorrect type of paper. Call for laser printers. Use only paper that may cause some conditions that meets the specifications required by the machine. Remove excess paper from the ...
Suggested solutions Replace the part with a new one type, size, and weight. • If multiple sheets have caused a paper jam, clear the paper jam. Follow the suggested solutions until a new waste toner tank is placed into the machine. • Remove any obstructions from the tray. • ...to 150 sheets of paper, depending on special materials, use the mamual tray. • An incorrect type of paper. Call for laser printers. Use only paper that may cause some conditions that meets the specifications required by the machine. Remove excess paper from the ...
User Manual (ENGLISH)
Page 59
... size in the printer driver settings matches the paper selection in your Windows. Get more than one . Suggested solutions For many software applications, the paper source selection is jammed. Reduce the complexity...is not closed. If you use. 11.6 Right-click the Samsung CLX-216x Series machine icon, choose Properties, click the Details tab, and then choose the ...front cover is blank. See 11.1. • No paper is not installed. See 5.5. • The toner cartridge is loaded. You can also try adjusting the print quality settings. The port setting is extremely slow. ...
... size in the printer driver settings matches the paper selection in your Windows. Get more than one . Suggested solutions For many software applications, the paper source selection is jammed. Reduce the complexity...is not closed. If you use. 11.6 Right-click the Samsung CLX-216x Series machine icon, choose Properties, click the Details tab, and then choose the ...front cover is blank. See 11.1. • No paper is not installed. See 5.5. • The toner cartridge is loaded. You can also try adjusting the print quality settings. The port setting is extremely slow. ...
User Manual (ENGLISH)
Page 60
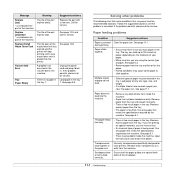
...a print job that your machine. Some parts, such as an image. Turn on again. Note: It will take longer to ensure that the toner cartridge needs cleaning. • The surface of the LSU part inside of paper may need cleaning. for details. • If these steps do... Section for example, the paper is too moist or too rough. The printer does not print PDF file correctly. See page 10.4. Redistribute the toner, if necessary. Incompatibility between the PDF file and the Acrobat products Contact a service representative. See the help screen of the printer driver. •...
...a print job that your machine. Some parts, such as an image. Turn on again. Note: It will take longer to ensure that the toner cartridge needs cleaning. • The surface of the LSU part inside of paper may need cleaning. for details. • If these steps do... Section for example, the paper is too moist or too rough. The printer does not print PDF file correctly. See page 10.4. Redistribute the toner, if necessary. Incompatibility between the PDF file and the Acrobat products Contact a service representative. See the help screen of the printer driver. •...
User Manual (ENGLISH)
Page 61
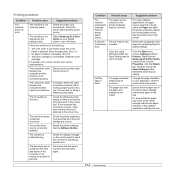
...the transfer roller may be dirty. If the defects occur on seams can increase the amount of background shading. • Remove the old toner cartridge and install a new one . Contact a service representative. See page 10.2. • Check the paper type and quality. see page 10.4. Misformed characters •... a different batch of paper. See page 10.5. • Clean the inside the machine may be dirty. Condition White Spots Vertical lines Color or Black background Toner smear Suggested solutions White spots appears on the page: • The paper is too rough and a lot of dirt from bits of...
...the transfer roller may be dirty. If the defects occur on seams can increase the amount of background shading. • Remove the old toner cartridge and install a new one . Contact a service representative. See page 10.2. • Check the paper type and quality. see page 10.4. Misformed characters •... a different batch of paper. See page 10.5. • Clean the inside the machine may be dirty. Condition White Spots Vertical lines Color or Black background Toner smear Suggested solutions White spots appears on the page: • The paper is too rough and a lot of dirt from bits of...


