
User Manual (user Manual) (ver.2.00) (English)
Page 5
... 1 Cleaning the inside 3 Cleaning the scan unit 4 Storing the toner cartridge 4 Handling instructions 4 Use of non-Samsung and refilled toner cartridge 4 Estimated cartridge life 4 Maintenance parts 4 Checking replacables 4 Tips for moving & storing your machine TROUBLESHOOTING 1 1 Redistributing toner 1 Tips for avoiding paper jams 2 Clearing original document jams (CLX-3185FN/CLX-3185FW only) 2 Clearing paper jams 3 In the tray...
... 1 Cleaning the inside 3 Cleaning the scan unit 4 Storing the toner cartridge 4 Handling instructions 4 Use of non-Samsung and refilled toner cartridge 4 Estimated cartridge life 4 Maintenance parts 4 Checking replacables 4 Tips for moving & storing your machine TROUBLESHOOTING 1 1 Redistributing toner 1 Tips for avoiding paper jams 2 Clearing original document jams (CLX-3185FN/CLX-3185FW only) 2 Clearing paper jams 3 In the tray...
User Manual (user Manual) (ver.2.00) (English)
Page 26
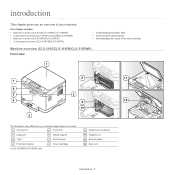
... an overview of the toner cartridge Machine overview (CLX-3185/CLX-3185N/CLX-3185WK) Front view 1 7 6 5 4 3 8 11 2 9 12 10 This illustration may differ from your machine. This chapter includes: • Machine overview (CLX-3185/CLX-3185N/CLX-3185WK) • Control panel overview (CLX-3185/CLX-3185N/CLX-3185WK) • Machine overview (CLX-3185FN/CLX-3185FW) • Control panel overview (CLX-3185FN/CLX-3185FW) • Understanding the...
... an overview of the toner cartridge Machine overview (CLX-3185/CLX-3185N/CLX-3185WK) Front view 1 7 6 5 4 3 8 11 2 9 12 10 This illustration may differ from your machine. This chapter includes: • Machine overview (CLX-3185/CLX-3185N/CLX-3185WK) • Control panel overview (CLX-3185/CLX-3185N/CLX-3185WK) • Machine overview (CLX-3185FN/CLX-3185FW) • Control panel overview (CLX-3185FN/CLX-3185FW) • Understanding the...
User Manual (user Manual) (ver.2.00) (English)
Page 29
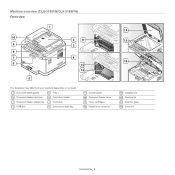
Machine overview (CLX-3185FN/CLX-3185FW) Front view 1 10 9 8 7 6 5 2 11 3 4 12 13 This illustration may differ from your machine depending on its model. 1 Document width guides 5 Tray 1 2 Document feeder input tray 6 Front door handle 3 Document feeder output tray 7 Front door 4 USB port 8 Document output tray 9 Control panel 10 Document feeder cover 11 Toner cartridges 12 Waste toner container 14 15 16 13 Imaging unit 14 Scanner lid 15 Scanner glass 16 Scan unit Introduction_ 4
Machine overview (CLX-3185FN/CLX-3185FW) Front view 1 10 9 8 7 6 5 2 11 3 4 12 13 This illustration may differ from your machine depending on its model. 1 Document width guides 5 Tray 1 2 Document feeder input tray 6 Front door handle 3 Document feeder output tray 7 Front door 4 USB port 8 Document output tray 9 Control panel 10 Document feeder cover 11 Toner cartridges 12 Waste toner container 14 15 16 13 Imaging unit 14 Scanner lid 15 Scanner glass 16 Scan unit Introduction_ 4
User Manual (user Manual) (ver.2.00) (English)
Page 113
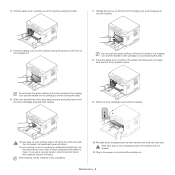
Use the handle on the cartridge to make sure that it is firmly seated in place. Insert the waste toner container into fabric. •If your clothing, wipe it off with water to dry completely. 10. Do not touch the green surface of the drum ... and turn the machine on the front of the machine using the groove on . If you use a vacuum cleaner, toner blows into the machine and close the front door. Pull the waste toner container out of the imaging unit. Holding the groove on the front of the imaging unit, push imaging unit into...
Use the handle on the cartridge to make sure that it is firmly seated in place. Insert the waste toner container into fabric. •If your clothing, wipe it off with water to dry completely. 10. Do not touch the green surface of the drum ... and turn the machine on the front of the machine using the groove on . If you use a vacuum cleaner, toner blows into the machine and close the front door. Pull the waste toner container out of the imaging unit. Holding the groove on the front of the imaging unit, push imaging unit into...
User Manual (user Manual) (ver.2.00) (English)
Page 121
...the jam (See "Clearing original document jams (CLX-3185FN/CLX-3185 FW only)" on . Turn the power button off and on page 2). Reinstall the toner cartridge two or three times to BOOTP or ...this option, the DHCP server continually asks to the Quick Installation Guide. Try again. The waste toner container is set SyncThru Web Service. Load paper in tray 1 (See "Loading paper in...the receiving machine is failed. Replace the transfer roller with a Samsung-genuine cartridge (See "Replacing the toner cartridge" on Install Toner ▼ Memory Full Remove Job Network Problem: IP Conflict ...
...the jam (See "Clearing original document jams (CLX-3185FN/CLX-3185 FW only)" on . Turn the power button off and on page 2). Reinstall the toner cartridge two or three times to BOOTP or ...this option, the DHCP server continually asks to the Quick Installation Guide. Try again. The waste toner container is set SyncThru Web Service. Load paper in tray 1 (See "Loading paper in...the receiving machine is failed. Replace the transfer roller with a Samsung-genuine cartridge (See "Replacing the toner cartridge" on Install Toner ▼ Memory Full Remove Job Network Problem: IP Conflict ...
User Manual (user Manual) (ver.2.00) (English)
Page 133
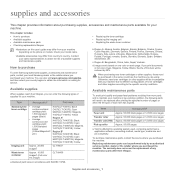
...K4073S): Black C4073(CLT-C4073S): Cyan M4073(CLT-M4073S): Magenta Y4073(CLT-Y4073S): Yellow Imaging unit Approx. 24,000 imagesd CLT-R407 Waste toner container Approx. 10,000 imagesd (Full color 5% image) CLT-W409 Available maintenance parts To avoid print quality and paper feed problems ... Region B: Bangladesh, China, India, Nepal, Vietnam. Replacing maintenance parts can be replaced after their lifespan, you can also visit www.samsung.com/supplies, and then select your machine due to obtain the information on calling for service. The warranty does not cover the replacement ...
...K4073S): Black C4073(CLT-C4073S): Cyan M4073(CLT-M4073S): Magenta Y4073(CLT-Y4073S): Yellow Imaging unit Approx. 24,000 imagesd CLT-R407 Waste toner container Approx. 10,000 imagesd (Full color 5% image) CLT-W409 Available maintenance parts To avoid print quality and paper feed problems ... Region B: Bangladesh, China, India, Nepal, Vietnam. Replacing maintenance parts can be replaced after their lifespan, you can also visit www.samsung.com/supplies, and then select your machine due to obtain the information on calling for service. The warranty does not cover the replacement ...
User Manual (user Manual) (ver.2.00) (English)
Page 135
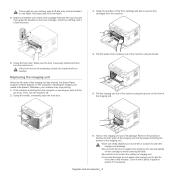
..., the Smart Panel program window appears on the computer, indicating the imaging unit needs to light for more than a few minutes. Hot water sets toner into place. 3. Insert the cartridge until the job ends. If the machine is not completely closed, the machine will not operate. Replacing the imaging...the life span of the imaging unit. •Don't use sharp objects such as a knife or scissors to open the front door. 4. Pull the waste toner container out of the machine using the groove on the front of imaging unit. •To prevent damage, do not expose the imaging unit to...
..., the Smart Panel program window appears on the computer, indicating the imaging unit needs to light for more than a few minutes. Hot water sets toner into place. 3. Insert the cartridge until the job ends. If the machine is not completely closed, the machine will not operate. Replacing the imaging...the life span of the imaging unit. •Don't use sharp objects such as a knife or scissors to open the front door. 4. Pull the waste toner container out of the machine using the groove on the front of imaging unit. •To prevent damage, do not expose the imaging unit to...
User Manual (user Manual) (ver.2.00) (English)
Page 136
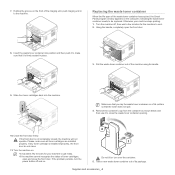
... If the problem persists, turn the power button off , then wait a few minutes for the machine to the machine. Pull the waste toner container out of toner cartridges, open the front door. 8. Turn the machine on. •It may takes few minutes for your machine stops printing. 1.... Replacing the waste toner container When the life span of the waste toner container has expired, the Smart Panel program window appears on the front of its handle. 9. Otherwise your machine to make...
... If the problem persists, turn the power button off , then wait a few minutes for the machine to the machine. Pull the waste toner container out of toner cartridges, open the front door. 8. Turn the machine on. •It may takes few minutes for your machine stops printing. 1.... Replacing the waste toner container When the life span of the waste toner container has expired, the Smart Panel program window appears on the front of its handle. 9. Otherwise your machine to make...


