

User Manual (user Manual) (ver.2.00) (English)
Page 2
.../CLX-3185N/CLX-3185WK) 4 Machine overview (CLX-3185FN/CLX-3185FW) 4 Front view 5 Rear view 6 Control panel overview (CLX-3185FN/CLX-3185FW) 8 Understanding the Status LED 8 Introducing the useful buttons 8 Menu button 8 Power button 8 Print screen button (CLX-3185 only) 8 Eco Copy button (CLX-3185/CLX-3185N/CLX-3185FN only) 9 WPS button (CLX-3185WK/CLX-3185FW only) 9 Acknowledging the status of the toner cartridge GETTING STARTED 1 1 Setting up the hardware 1 Supplied software 2 System requirements 2 Microsoft® Windows® 2 Macintosh 3 Linux 3 Installing USB connected machine's driver...
.../CLX-3185N/CLX-3185WK) 4 Machine overview (CLX-3185FN/CLX-3185FW) 4 Front view 5 Rear view 6 Control panel overview (CLX-3185FN/CLX-3185FW) 8 Understanding the Status LED 8 Introducing the useful buttons 8 Menu button 8 Power button 8 Print screen button (CLX-3185 only) 8 Eco Copy button (CLX-3185/CLX-3185N/CLX-3185FN only) 9 WPS button (CLX-3185WK/CLX-3185FW only) 9 Acknowledging the status of the toner cartridge GETTING STARTED 1 1 Setting up the hardware 1 Supplied software 2 System requirements 2 Microsoft® Windows® 2 Macintosh 3 Linux 3 Installing USB connected machine's driver...
User Manual (user Manual) (ver.2.00) (English)
Page 3
...media 2 Media sizes supported in each mode 2 Changing the tray size for print media 4 Loading paper in the tray 4 In the tray 4 Manual feeding in the tray 4 Printing on special media 5 Envelopes 5 Transparencies 5 Labels 6 CardStock/Custom-sized paper 6 Letterhead/Preprinted paper 6 Glossy photo 6 Matte photo 6 Setting the paper size and type 6 Setting the paper size 6 Setting the paper type 6 Using the output support _ 2 1 Introducing useful software program 1 Samsung AnyWeb Print 1 Samsung Easy Color Manager 1 Printer driver features 1 Printer driver 1 Basic printing 2 Canceling a print job...
...media 2 Media sizes supported in each mode 2 Changing the tray size for print media 4 Loading paper in the tray 4 In the tray 4 Manual feeding in the tray 4 Printing on special media 5 Envelopes 5 Transparencies 5 Labels 6 CardStock/Custom-sized paper 6 Letterhead/Preprinted paper 6 Glossy photo 6 Matte photo 6 Setting the paper size and type 6 Setting the paper size 6 Setting the paper type 6 Using the output support _ 2 1 Introducing useful software program 1 Samsung AnyWeb Print 1 Samsung Easy Color Manager 1 Printer driver features 1 Printer driver 1 Basic printing 2 Canceling a print job...
User Manual (user Manual) (ver.2.00) (English)
Page 33
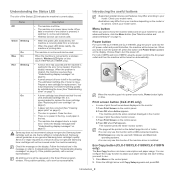
... of toner is no paper in power saver mode. Samsung cannot guarantee a non-genuine Samsung toner cartridge's quality. If the problem persists, call a service representative. All printing errors will be used. Print screen button (CLX-3185 only) • In case of the Status LED indicates the machine's current status. Prepare a new cartridge for the error to a major error. Service or repair required as one that is on-line and can not be turned on page 5). Introducing the useful buttons •Supported optional devices...
... of toner is no paper in power saver mode. Samsung cannot guarantee a non-genuine Samsung toner cartridge's quality. If the problem persists, call a service representative. All printing errors will be used. Print screen button (CLX-3185 only) • In case of the Status LED indicates the machine's current status. Prepare a new cartridge for the error to a major error. Service or repair required as one that is on-line and can not be turned on page 5). Introducing the useful buttons •Supported optional devices...
User Manual (user Manual) (ver.2.00) (English)
Page 38
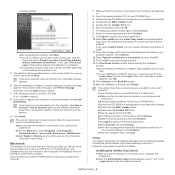
... download Linux software packages from the Printer Name list and click Create. d)Double-click the MAC_Installer folder. Linux You need to use . 5. In this User's Guide may differ depending on . 2. Select the one machine, the confirmation window appears. 6. If you with your machine provides you want to your computer appears, click Continue. Follow the instructions in this case, Print a test page window will be skipped and installation...
... download Linux software packages from the Printer Name list and click Create. d)Double-click the MAC_Installer folder. Linux You need to use . 5. In this User's Guide may differ depending on . 2. Select the one machine, the confirmation window appears. 6. If you with your machine provides you want to your computer appears, click Continue. Follow the instructions in this case, Print a test page window will be skipped and installation...
User Manual (user Manual) (ver.2.00) (English)
Page 42
.../IP configuration window. 5.Enter the machine's new information into the configuration window as explained above. IPv4 setting using control panel (Windows) 1.Connect your machine to the network with a network cable. 2.Turn on the machine. 3.From the Windows Start menu, select All Programs > Samsung Printers > SetIP > SetIP. 4.Click on page 3. Repeat this Network Configuration Report, you can print Network Configuration Report from the machine's control panel that you may need to change IP address using the machine's control panel. Now go to ready mode...
.../IP configuration window. 5.Enter the machine's new information into the configuration window as explained above. IPv4 setting using control panel (Windows) 1.Connect your machine to the network with a network cable. 2.Turn on the machine. 3.From the Windows Start menu, select All Programs > Samsung Printers > SetIP > SetIP. 4.Click on page 3. Repeat this Network Configuration Report, you can print Network Configuration Report from the machine's control panel that you may need to change IP address using the machine's control panel. Now go to ready mode...
User Manual (user Manual) (ver.2.00) (English)
Page 43
... Clear. 8.Click Yes when the confirmation window appears. 9.Click OK when the success window appears. 10.Turn off and restart machine to close and eject the installation CD-ROM. Restoring factory default settings using is the second icon from your model. 1.Connect your machine to open the TCP/IP configuration window. 5.Enter the network card's MAC address, IP address, subnet mask, default gateway, and then click Apply. If it is number...
... Clear. 8.Click Yes when the confirmation window appears. 9.Click OK when the success window appears. 10.Turn off and restart machine to close and eject the installation CD-ROM. Restoring factory default settings using is the second icon from your model. 1.Connect your machine to open the TCP/IP configuration window. 5.Enter the network card's MAC address, IP address, subnet mask, default gateway, and then click Apply. If it is number...
User Manual (user Manual) (ver.2.00) (English)
Page 44
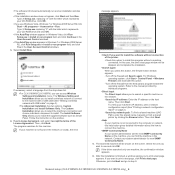
... install a wireless network to connect to connect the machine. •SNMP Community Name If your CD-ROM drive. The Wireless Setting and Installation allows you use and click OK. The Install Software Only allows you to print a test page, click Print a test page. Read License Agreement, and select I accept the terms of the printer. -Check this button, the firewall notice window appears. -Turn off the firewall from the drop-down list. •For CLX-3185WK/CLX...
... install a wireless network to connect to connect the machine. •SNMP Community Name If your CD-ROM drive. The Wireless Setting and Installation allows you use and click OK. The Install Software Only allows you to print a test page, click Print a test page. Read License Agreement, and select I accept the terms of the printer. -Check this button, the firewall notice window appears. -Turn off the firewall from the drop-down list. •For CLX-3185WK/CLX...
User Manual (user Manual) (ver.2.00) (English)
Page 45
.... 21. Select HP Jetdirect - c)Double-click CD-ROM icon that the machine is not connected yet to the network, click How to reprint it . To install other software: •See "Installing the SmartPanel" on page 5. •See "Installing the Printer Settings Utility" on the Printer List. •For Mac OS X 10.5~10.6, click the "+" icon. Network setup (CLX-3185N/CLX-3185WK/CLX-3185FN/CLX-3185FW only)_ 5 If the test page prints out correctly, click...
.... 21. Select HP Jetdirect - c)Double-click CD-ROM icon that the machine is not connected yet to the network, click How to reprint it . To install other software: •See "Installing the SmartPanel" on page 5. •See "Installing the Printer Settings Utility" on the Printer List. •For Mac OS X 10.5~10.6, click the "+" icon. Network setup (CLX-3185N/CLX-3185WK/CLX-3185FN/CLX-3185FW only)_ 5 If the test page prints out correctly, click...
User Manual (user Manual) (ver.2.00) (English)
Page 46
... Manual Address check box. a)Press Menu on the control panel. 2. Refer to access the required value. •DHCPv6 Addr.: Always use DHCPv6 regardless of the following IPv6 addresses for default dynamic host configuration. 1.Press Menu on page 2). 3. Press Menu on the control panel. Press the left /right arrow until TCP/IP (IPv6) appears and press OK. 4. Network setup (CLX-3185N/CLX-3185WK/CLX-3185FN/CLX-3185FW only)_ 6 Select Start > Control Panel > Printers and Faxes. 5. The Add Printer Wizard window...
... Manual Address check box. a)Press Menu on the control panel. 2. Refer to access the required value. •DHCPv6 Addr.: Always use DHCPv6 regardless of the following IPv6 addresses for default dynamic host configuration. 1.Press Menu on page 2). 3. Press Menu on the control panel. Press the left /right arrow until TCP/IP (IPv6) appears and press OK. 4. Network setup (CLX-3185N/CLX-3185WK/CLX-3185FN/CLX-3185FW only)_ 6 Select Start > Control Panel > Printers and Faxes. 5. The Add Printer Wizard window...
User Manual (user Manual) (ver.2.00) (English)
Page 48
... the display. Press the left /right arrow until WPS Setting appears and press OK. 5. Press Stop/Clear to return to the wireless network. Then, the machine tries to re-connect to ready mode. You can also install a wireless network in Printer Settings Utility with a USB cable after installing driver (Windows and Macintosh operating system are supported (See "Setting a wireless network with network cable" on a Wi-Fi Protected Setup™(WPS)-enabled access point (or wireless router). The Push Button Configuration...
... the display. Press the left /right arrow until WPS Setting appears and press OK. 5. Press Stop/Clear to return to the wireless network. Then, the machine tries to re-connect to ready mode. You can also install a wireless network in Printer Settings Utility with a USB cable after installing driver (Windows and Macintosh operating system are supported (See "Setting a wireless network with network cable" on a Wi-Fi Protected Setup™(WPS)-enabled access point (or wireless router). The Push Button Configuration...
User Manual (user Manual) (ver.2.00) (English)
Page 54
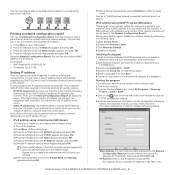
... change the IP address from your computer. In most cases, a new IP address will be automatically assigned by performing the following: 1.Open Start > All programs > Control Panel. 2.Double-click Security Center. 3.Click Windows Firewall. 4.Disable the firewall. IP setting using SetIP Program (Windows) This program is for manually setting the network IP address of your machine using SetIP program, disable the computer firewall before continuing by a DHCP (Dynamic Host Configuration Protocol) server located...
... change the IP address from your computer. In most cases, a new IP address will be automatically assigned by performing the following: 1.Open Start > All programs > Control Panel. 2.Double-click Security Center. 3.Click Windows Firewall. 4.Disable the firewall. IP setting using SetIP Program (Windows) This program is for manually setting the network IP address of your machine using SetIP program, disable the computer firewall before continuing by a DHCP (Dynamic Host Configuration Protocol) server located...

User Manual (user Manual) (ver.2.00) (English)
Page 55
... machine's MAC address from the Network Configuration Report and enter it without the colons. If not, connect the machine with a network cable. 2.Insert the Installation CD-ROM, and open the disk window, select MAC_Installer > MAC_Printer > SetIP > SetIPApplet.html. 3.Double-click the file and Safari will open the TCP/IP configuration window. 5.Enter the machine's new information into SyncThru™ Web Service, type in a peer-to-peer environment. -Infrastructure: Allows wireless devices to...
... machine's MAC address from the Network Configuration Report and enter it without the colons. If not, connect the machine with a network cable. 2.Insert the Installation CD-ROM, and open the disk window, select MAC_Installer > MAC_Printer > SetIP > SetIPApplet.html. 3.Double-click the file and Safari will open the TCP/IP configuration window. 5.Enter the machine's new information into SyncThru™ Web Service, type in a peer-to-peer environment. -Infrastructure: Allows wireless devices to...
User Manual (user Manual) (ver.2.00) (English)
Page 56
... not support wireless network. Open a browser such as SyncThru™ Web Admin Service and SyncThru™ Web Service. Click Restore Default in the left side bar, and click the Clear button next to search network name (SSID), which is not connected between the printer and the Macintosh. 2. Network parameter setting You can use your new Samsung wireless printer on the software CD supplied with the network. Turn on your computer or machine. •USB cable is you have installed your network. Open...
... not support wireless network. Open a browser such as SyncThru™ Web Admin Service and SyncThru™ Web Service. Click Restore Default in the left side bar, and click the Clear button next to search network name (SSID), which is not connected between the printer and the Macintosh. 2. Network parameter setting You can use your new Samsung wireless printer on the software CD supplied with the network. Turn on your computer or machine. •USB cable is you have installed your network. Open...

User Manual (user Manual) (ver.2.00) (English)
Page 58
...: • Altitude adjustment • Changing the display language • Setting the date and time (CLX-3185FN/CLX-3185FW only) • Changing the clock mode (CLX-3185FN/CLX-3185FW only) • Changing the default mode (CLX-3185FN/CLX-3185FW only) • Setting sounds • Entering characters using the number keypad (CLX-3185FN/CLX-3185FW only) • Using the save modes • Setting the default paper • Setting job timeout • Setting the humidity mode Altitude adjustment The print quality is affected by using the number keypad. 6. You can set your machine is...
...: • Altitude adjustment • Changing the display language • Setting the date and time (CLX-3185FN/CLX-3185FW only) • Changing the clock mode (CLX-3185FN/CLX-3185FW only) • Changing the default mode (CLX-3185FN/CLX-3185FW only) • Setting sounds • Entering characters using the number keypad (CLX-3185FN/CLX-3185FW only) • Using the save modes • Setting the default paper • Setting job timeout • Setting the humidity mode Altitude adjustment The print quality is affected by using the number keypad. 6. You can set your machine is...
User Manual (user Manual) (ver.2.00) (English)
Page 90
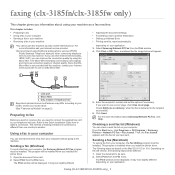
... the machine. The Print window will appear. 1 Line port 2 Micro filter 3 DSL modem / Telephone line Supported optional devices and features may differ according to use other Internet services (DSL, ISDN, VolP), you can check a sent fax list on DSL Micro-filter. It may look slightly different depending on your computer, the Samsung Network PC Fax program must be installed. faxing (clx-3185fn/clx-3185fw only) 1. Check your model name. (See...
... the machine. The Print window will appear. 1 Line port 2 Micro filter 3 DSL modem / Telephone line Supported optional devices and features may differ according to use other Internet services (DSL, ISDN, VolP), you can check a sent fax list on DSL Micro-filter. It may look slightly different depending on your computer, the Samsung Network PC Fax program must be installed. faxing (clx-3185fn/clx-3185fw only) 1. Check your model name. (See...

User Manual (user Manual) (ver.2.00) (English)
Page 107
...; Web Service overview Some tabs may differ according to set configurations provided by print types: simplex, duplex. •Current Settings: This item allows you to check the machine and network information. •Print information: This item allows you to your machine conveniently. • "Using SyncThru™ Web Service (CLX-3185N/CLX-3185WK/CLX-3185FN/CLX-3185FW only)" on page 1. • "Using the Smart Panel program" on page 2. • "SmarThru" on page 3. • "Using the Linux Unified Driver Configurator...
...; Web Service overview Some tabs may differ according to set configurations provided by print types: simplex, duplex. •Current Settings: This item allows you to check the machine and network information. •Print information: This item allows you to your machine conveniently. • "Using SyncThru™ Web Service (CLX-3185N/CLX-3185WK/CLX-3185FN/CLX-3185FW only)" on page 1. • "Using the Smart Panel program" on page 2. • "SmarThru" on page 3. • "Using the Linux Unified Driver Configurator...

User Manual (user Manual) (ver.2.00) (English)
Page 108
... Mac OS 10.5 1. Click Apply. For Linux, you to configure network environment before setting e-mail notification. 4. Click System Preferences > Print & Fax 2. In case of the administrator, phone number, location and E-mail address. 5. Click Utility. Select printer in list and click Open Printer Queue.... 3. •System Security: You can set settings for flash animation in HTML Help. Maintenance tab This tab allows you can check the error from the Start menu...
... Mac OS 10.5 1. Click Apply. For Linux, you to configure network environment before setting e-mail notification. 4. Click System Preferences > Print & Fax 2. In case of the administrator, phone number, location and E-mail address. 5. Click Utility. Select printer in list and click Open Printer Queue.... 3. •System Security: You can set settings for flash animation in HTML Help. Maintenance tab This tab allows you can check the error from the Start menu...
User Manual (user Manual) (ver.2.00) (English)
Page 121
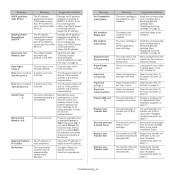
... transfer unit (ITB) is failed. If you select Cancel, the machine stops the fax job. Check the IP address or obtain a new IP address. Try again. Message Not Compatible [color] toner Not installed Waste tank Not original [color] toner Output bin full Remove media Paper Empty in Tray1 Paper jam in exit area Paper jam in SyncThru Web Service. The toner cartridge is not facing down. Or the sensor is not a Samsung-genuine toner cartridge. Paper has jammed in the Tray 1 area. Install the corresponding toner cartridge with a Samsung-genuine cartridge...
... transfer unit (ITB) is failed. If you select Cancel, the machine stops the fax job. Check the IP address or obtain a new IP address. Try again. Message Not Compatible [color] toner Not installed Waste tank Not original [color] toner Output bin full Remove media Paper Empty in Tray1 Paper jam in exit area Paper jam in SyncThru Web Service. The toner cartridge is not facing down. Or the sensor is not a Samsung-genuine toner cartridge. Paper has jammed in the Tray 1 area. Install the corresponding toner cartridge with a Samsung-genuine cartridge...
User Manual (user Manual) (ver.2.00) (English)
Page 129
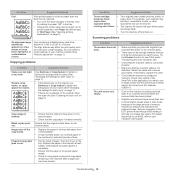
... the printed paper is printing received data. Frequent copy paper • Fan the stack of paper, then turn it over the stack of copy paper remaining in the jams occur. tray. Try lowering the scan resolution rate. • Check that the machine cable is connected properly. • Make sure that the scanner job is being used at an altitude of your copies (See "Changing the settings for each copy" on page 2). Check scan setting in Copy...
... the printed paper is printing received data. Frequent copy paper • Fan the stack of paper, then turn it over the stack of copy paper remaining in the jams occur. tray. Try lowering the scan resolution rate. • Check that the machine cable is connected properly. • Make sure that the scanner job is being used at an altitude of your copies (See "Changing the settings for each copy" on page 2). Check scan setting in Copy...
User Manual (user Manual) (ver.2.00) (English)
Page 151
... Web Service general information 1 T toner cartridge estimated life 4 handling instructions 4 non-Samsung and refilled 4 redistributing toner 1 storing 4 toner color 3, 7 tray adjusting the width and length 2 changing the tray size 2 setting the paper size and type 6 TWAIN, scan 6 U USB cable driver installation 3 USB flash memory data backup 2 managing 3 printing 2 scanning 1 using help 3 W watermark create 4 delete 5 edit 4 print 4 WIA scan 6 Wi-Fi Protected Setup™ (WPS) 9 Windows common Windows problems 15 driver installation for network connected 3 driver installation for USB cable...
... Web Service general information 1 T toner cartridge estimated life 4 handling instructions 4 non-Samsung and refilled 4 redistributing toner 1 storing 4 toner color 3, 7 tray adjusting the width and length 2 changing the tray size 2 setting the paper size and type 6 TWAIN, scan 6 U USB cable driver installation 3 USB flash memory data backup 2 managing 3 printing 2 scanning 1 using help 3 W watermark create 4 delete 5 edit 4 print 4 WIA scan 6 Wi-Fi Protected Setup™ (WPS) 9 Windows common Windows problems 15 driver installation for network connected 3 driver installation for USB cable...


