User Manual (KOREAN)
Page 186
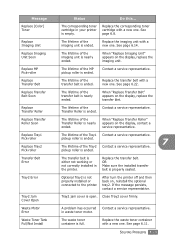
Replace [ ] Toner Replace Imaging Unit Replace Imaging Unit Soon Replace MP Pick-roller Replace Transfer Roller Replace Transfer Roller Soon Replace Transfer Belt Replace Transfer Belt Soon Replace Tray1 Pick-roller Replace Tray2 Pick-roller Transfer Belt Error Tray2 Error Tray2 Jam Cover Open Waste Toner Tank Full/Not Install . 6.8 . . 6.15 . "Replace Transfer Roller" . . 6.23 . "Replace Transfer Belt" . . 1 . . 2 . . . . 7 . . 2 2 . . . 2 2 . . 6.11 . . 7.31 "Replace Imaging Unit" . . . . . .
Replace [ ] Toner Replace Imaging Unit Replace Imaging Unit Soon Replace MP Pick-roller Replace Transfer Roller Replace Transfer Roller Soon Replace Transfer Belt Replace Transfer Belt Soon Replace Tray1 Pick-roller Replace Tray2 Pick-roller Transfer Belt Error Tray2 Error Tray2 Jam Cover Open Waste Toner Tank Full/Not Install . 6.8 . . 6.15 . "Replace Transfer Roller" . . 6.23 . "Replace Transfer Belt" . . 1 . . 2 . . . . 7 . . 2 2 . . . 2 2 . . 6.11 . . 7.31 "Replace Imaging Unit" . . . . . .
User Manual (ENGLISH)
Page 8
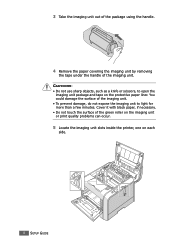
... unit. Cover it with black paper, if necessary. • Do not touch the surface of the green roller on the imaging unit or print quality problems can occur. 5 Locate the imaging unit slots inside the printer, one on the protective paper liner. CAUTIONS: • Do not use sharp objects, such as a knife...
... unit. Cover it with black paper, if necessary. • Do not touch the surface of the green roller on the imaging unit or print quality problems can occur. 5 Locate the imaging unit slots inside the printer, one on the protective paper liner. CAUTIONS: • Do not use sharp objects, such as a knife...
User Manual (ENGLISH)
Page 9
... unit slide into the corresponding colors of the green roller. 7 Slide the imaging unit down into the printer until it cannot be halted for more than a few minutes. Close the top and left cover should the setup need to be pushed in your printer so that the colors on the imaging unit with ...the slots in any reason. SETUP GUIDE 9 CAUTION: To prevent damage, do not expose the imaging unit to scratch and damage the surface of the slots. Align the imaging unit with the green roller facing you. CAUTION: ...
... unit slide into the corresponding colors of the green roller. 7 Slide the imaging unit down into the printer until it cannot be halted for more than a few minutes. Close the top and left cover should the setup need to be pushed in your printer so that the colors on the imaging unit with ...the slots in any reason. SETUP GUIDE 9 CAUTION: To prevent damage, do not expose the imaging unit to scratch and damage the surface of the slots. Align the imaging unit with the green roller facing you. CAUTION: ...
User Manual (ENGLISH)
Page 84
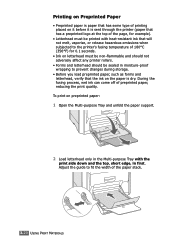
... changes during storage. • Before you load preprinted paper, such as forms and letterhead, verify that the ink on the paper is sent through the printer (paper that has a preprinted logo at the top of the page, for 0.1 seconds. • Ink on letterhead must be printed with the print side... temperature of 180°C (356°F) for example). • Letterhead must be non-flammable and should not adversely affect any printer rollers. • Forms and letterhead should be sealed in first. Printing on Preprinted Paper • Preprinted paper is paper that has some type of printing ...
... changes during storage. • Before you load preprinted paper, such as forms and letterhead, verify that the ink on the paper is sent through the printer (paper that has a preprinted logo at the top of the page, for 0.1 seconds. • Ink on letterhead must be printed with the print side... temperature of 180°C (356°F) for example). • Letterhead must be non-flammable and should not adversely affect any printer rollers. • Forms and letterhead should be sealed in first. Printing on Preprinted Paper • Preprinted paper is paper that has some type of printing ...

User Manual (ENGLISH)
Page 135
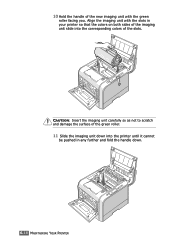
... black paper, if necessary. • Close the top and left cover should the setup need to be halted for more than a few minutes. MAINTAINING YOUR PRINTER 6.17 You could damage the surface of the imaging unit. • To prevent damage, do not expose the imaging unit to open the imaging unit... unit out of the package using the handle. 8 Remove the paper covering the imaging unit by removing the tape under the handle of the green roller on the imaging unit 6 or print quality problems can occur. 9 Locate the imaging unit slots inside the...
... black paper, if necessary. • Close the top and left cover should the setup need to be halted for more than a few minutes. MAINTAINING YOUR PRINTER 6.17 You could damage the surface of the imaging unit. • To prevent damage, do not expose the imaging unit to open the imaging unit... unit out of the package using the handle. 8 Remove the paper covering the imaging unit by removing the tape under the handle of the green roller on the imaging unit 6 or print quality problems can occur. 9 Locate the imaging unit slots inside the...
User Manual (ENGLISH)
Page 136
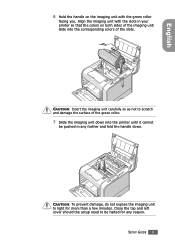
CAUTION: Insert the imaging unit carefully so as not to scratch and damage the surface of the green roller. 11 Slide the imaging unit down . 6.18 MAINTAINING YOUR PRINTER 10 Hold the handle of the slots. Align the imaging unit with the slots in your printer so that the colors on both sides of the imaging unit slide into the printer until it cannot be pushed in any further and fold the handle down into the corresponding colors of the new imaging unit with the green roller facing you.
CAUTION: Insert the imaging unit carefully so as not to scratch and damage the surface of the green roller. 11 Slide the imaging unit down . 6.18 MAINTAINING YOUR PRINTER 10 Hold the handle of the slots. Align the imaging unit with the slots in your printer so that the colors on both sides of the imaging unit slide into the printer until it cannot be pushed in any further and fold the handle down into the corresponding colors of the new imaging unit with the green roller facing you.
User Manual (ENGLISH)
Page 147
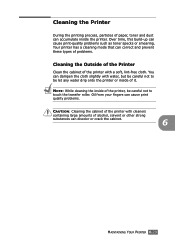
... be careful not to be careful not to touch the transfer roller. Oil from your fingers can cause print quality problems. CAUTION: Cleaning the cabinet of the printer with a soft, lint-free cloth. Cleaning the Printer During the printing process, particles of alcohol, solvent or other ...strong substances can discolor or crack the cabinet. 6 MAINTAINING YOUR PRINTER 6.29 Over time, this build-up can accumulate inside of the printer, be let any water drip onto the printer or inside the printer. Your printer has a cleaning mode that can correct and prevent these types of ...
... be careful not to be careful not to touch the transfer roller. Oil from your fingers can cause print quality problems. CAUTION: Cleaning the cabinet of the printer with a soft, lint-free cloth. Cleaning the Printer During the printing process, particles of alcohol, solvent or other ...strong substances can discolor or crack the cabinet. 6 MAINTAINING YOUR PRINTER 6.29 Over time, this build-up can accumulate inside of the printer, be let any water drip onto the printer or inside the printer. Your printer has a cleaning mode that can correct and prevent these types of ...
User Manual (ENGLISH)
Page 149
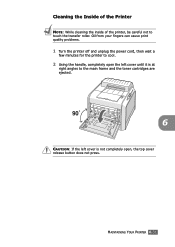
Cleaning the Inside of the Printer NOTE: While cleaning the inside of the printer, be careful not to the main frame and the toner cartridges are ejected. 6 CAUTION: If the left cover is not completely open, the top cover release button does not press. Oil from your fingers can cause print quality problems. 1 Turn the printer off and unplug the power cord, then wait a few minutes for the printer to cool. 2 Using the handle, completely open the left cover until it is at right angles to touch the transfer roller. MAINTAINING YOUR PRINTER 6.31
Cleaning the Inside of the Printer NOTE: While cleaning the inside of the printer, be careful not to the main frame and the toner cartridges are ejected. 6 CAUTION: If the left cover is not completely open, the top cover release button does not press. Oil from your fingers can cause print quality problems. 1 Turn the printer off and unplug the power cord, then wait a few minutes for the printer to cool. 2 Using the handle, completely open the left cover until it is at right angles to touch the transfer roller. MAINTAINING YOUR PRINTER 6.31
User Manual (ENGLISH)
Page 152
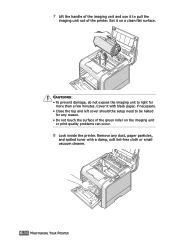
... of the imaging unit and use it to pull the imaging unit out of the green roller on a clean flat surface. Cover it on the imaging unit or print quality problems can occur. 8 Look inside the printer. CAUTIONS: • To prevent damage, do not expose the imaging unit to be halted for... more than a few minutes. Remove any reason. • Do not touch the surface of the printer. Set it with black paper, if necessary. • Close the top and left cover should the setup need to light for any dust, paper particles...
... of the imaging unit and use it to pull the imaging unit out of the green roller on a clean flat surface. Cover it on the imaging unit or print quality problems can occur. 8 Look inside the printer. CAUTIONS: • To prevent damage, do not expose the imaging unit to be halted for... more than a few minutes. Remove any reason. • Do not touch the surface of the printer. Set it with black paper, if necessary. • Close the top and left cover should the setup need to light for any dust, paper particles...
User Manual (ENGLISH)
Page 153
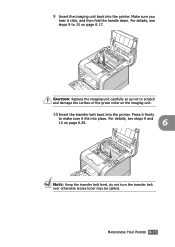
CAUTION: Replace the imaging unit carefully so as not to scratch and damage the surface of the green roller on the imaging unit. 10 Insert the transfer belt back into the printer. 9 Insert the imaging unit back into the printer. For details, see steps 9 and 10 on page 6.17. For details, see steps 9 to make sure it click, and then fold the handle down. MAINTAINING YOUR PRINTER 6.35 Make sure you hear it fits into place. Press it firmly to 10 on page 6.25. 6 NOTE: Keep the transfer belt level, do not turn the transfer belt over otherwise looses toner may be spilled.
CAUTION: Replace the imaging unit carefully so as not to scratch and damage the surface of the green roller on the imaging unit. 10 Insert the transfer belt back into the printer. 9 Insert the imaging unit back into the printer. For details, see steps 9 and 10 on page 6.17. For details, see steps 9 to make sure it click, and then fold the handle down. MAINTAINING YOUR PRINTER 6.35 Make sure you hear it fits into place. Press it firmly to 10 on page 6.25. 6 NOTE: Keep the transfer belt level, do not turn the transfer belt over otherwise looses toner may be spilled.
User Manual (ENGLISH)
Page 156
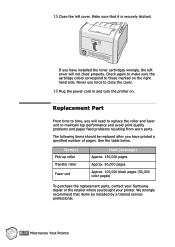
...the toner cartridges wrongly, the left cover. Item(s) Pick-up roller Transfer roller Fuser unit Yield (Average) Approx. 150,000 pages Approx. 50,000 pages Approx. 100,000 black pages (50,000 color pages) To purchase the replacement parts, contact your Samsung dealer or the retailer where you have printed a specified number...Make sure that items be replaced after you will not close the cover. 16 Plug the power cord in and turn the printer on the right hand side. 15 Close the left cover will need to replace the roller and fuser unit to those marked on . If you bought your...
...the toner cartridges wrongly, the left cover. Item(s) Pick-up roller Transfer roller Fuser unit Yield (Average) Approx. 150,000 pages Approx. 50,000 pages Approx. 100,000 black pages (50,000 color pages) To purchase the replacement parts, contact your Samsung dealer or the retailer where you have printed a specified number...Make sure that items be replaced after you will not close the cover. 16 Plug the power cord in and turn the printer on the right hand side. 15 Close the left cover will need to replace the roller and fuser unit to those marked on . If you bought your...
User Manual (ENGLISH)
Page 178
...paper is bad. See "Paper Specifications" on page 6.5. Clean the LSU. Try a different brand of the Printer" on page 6.31. See "Redistributing the Toner" on page D.4. • A combination of faded or... rough). If this does not improve the print quality, install a new toner cartridge of faded color. • The paper may indicate that the toner cartridge needs cleaning. See "Paper Specifications" ... sheet of paper may be dirty. See "Paper Specifications" on page D.4. • The transfer roller or the paper path may be defective. See page 6.31. • The surface of the LSU...
...paper is bad. See "Paper Specifications" on page 6.5. Clean the LSU. Try a different brand of the Printer" on page 6.31. See "Redistributing the Toner" on page D.4. • A combination of faded or... rough). If this does not improve the print quality, install a new toner cartridge of faded color. • The paper may indicate that the toner cartridge needs cleaning. See "Paper Specifications" ... sheet of paper may be dirty. See "Paper Specifications" on page D.4. • The transfer roller or the paper path may be defective. See page 6.31. • The surface of the LSU...
User Manual (ENGLISH)
Page 181
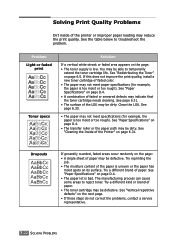
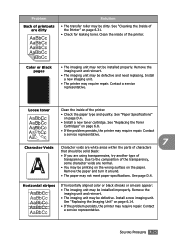
... turn it around. • The paper may be defective and need replacing. Horizontal stripes AaBbCc AaBbCc AaBbCc AaBbCc AaBbCc If horizontally aligned color or black streaks or smears appear: • The imaging unit may not meet paper specifications. See "Replacing the Imaging Unit" on... the parts of characters that should be dirty. SOLVING PROBLEMS 7.25 See "Cleaning the Inside of the printer. Problem Back of printouts are dirty Solution • The transfer roller may require repair. Install a new imaging unit. Clean the inside of transparency. Contact a service representative...
... turn it around. • The paper may be defective and need replacing. Horizontal stripes AaBbCc AaBbCc AaBbCc AaBbCc AaBbCc If horizontally aligned color or black streaks or smears appear: • The imaging unit may not meet paper specifications. See "Replacing the Imaging Unit" on... the parts of characters that should be dirty. SOLVING PROBLEMS 7.25 See "Cleaning the Inside of the printer. Problem Back of printouts are dirty Solution • The transfer roller may require repair. Install a new imaging unit. Clean the inside of transparency. Contact a service representative...
User Manual (ENGLISH)
Page 185
...open. Tray2 jam cover is not properly installed or connected to the printer. Close Tray2 cover firmly. The waste toner container is either not working or not correctly installed in the printer. See page 6.14. The lifetime of the Contact a service ... a service representative. Message Replace [Color] Toner Replace Imaging Unit Replace Imaging Unit Soon Replace MP Pick-roller Replace Transfer Belt Replace Transfer Belt Soon Replace Transfer Roller Replace Transfer Roller Soon Replace Tray1 Pick-roller Replace Tray2 Pick-roller Transfer Belt Error Tray2 Error Tray2 Jam...
...open. Tray2 jam cover is not properly installed or connected to the printer. Close Tray2 cover firmly. The waste toner container is either not working or not correctly installed in the printer. See page 6.14. The lifetime of the Contact a service ... a service representative. Message Replace [Color] Toner Replace Imaging Unit Replace Imaging Unit Soon Replace MP Pick-roller Replace Transfer Belt Replace Transfer Belt Soon Replace Transfer Roller Replace Transfer Roller Soon Replace Tray1 Pick-roller Replace Tray2 Pick-roller Transfer Belt Error Tray2 Error Tray2 Jam...


