Universal Print Driver Guide (ENGLISH)
Page 4
...; Install via executing the installer file. Manually discover devices. The Samsung Universal Print Driver is automatically set to see the supported Samsung device list). Easily locate and access suggested devices from the whole Samsung printer products. Available on the Samsung web site. For unsupported Samsung models, driver is a single driver that are as follows: OPERATING SYSTEM Windows...
...; Install via executing the installer file. Manually discover devices. The Samsung Universal Print Driver is automatically set to see the supported Samsung device list). Easily locate and access suggested devices from the whole Samsung printer products. Available on the Samsung web site. For unsupported Samsung models, driver is a single driver that are as follows: OPERATING SYSTEM Windows...
Universal Print Driver Guide (ENGLISH)
Page 8
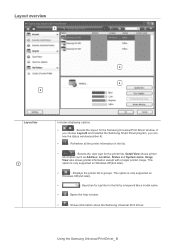
... the view type for the Samsung Universal Print Driver window. This option is only supported on Windows XP(and later). • : Displays the printer list in groups. Using the Samsung Universal Print Driver_ 8 Image View also shows printer information except with a larger printer image. If you choose Layout2 and installed the Samsung Smart Panel program, you can...
... the view type for the Samsung Universal Print Driver window. This option is only supported on Windows XP(and later). • : Displays the printer list in groups. Using the Samsung Universal Print Driver_ 8 Image View also shows printer information except with a larger printer image. If you choose Layout2 and installed the Samsung Smart Panel program, you can...
Universal Print Driver Guide (ENGLISH)
Page 11
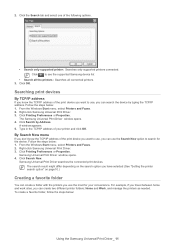
... the print device you want to use, you use the Search Now option to see the supported Samsung device list • Search all the printers: Searches all connected printers. 3. From the Windows Start menu, select Printers and Faxes. 2. Right-click Samsung Universal Print Driver. 3. Click Search by typing the TCP/IP address. By Search Now menu...
... the print device you want to use, you use the Search Now option to see the supported Samsung device list • Search all the printers: Searches all connected printers. 3. From the Windows Start menu, select Printers and Faxes. 2. Right-click Samsung Universal Print Driver. 3. Click Search by typing the TCP/IP address. By Search Now menu...
Open Source Guide (ENGLISH)
Page 5
... described below, indicates your acceptance of the Project Athena, Athena, Athena MUSE, Discuss, Hesiod, Kerberos, Moira, and Zephyr are copyright MIT, Cygnus Support, OpenVision, Oracle, Sun Soft, and others. No commercial use of a name in advertising or publicity pertaining to distribution of the software without fee ...rights reserved. M.I .T. "Commercial use" means use of these trademarks may require a specific license from referring to the MIT trademarks in supporting documentation, and that the name of Technology. not be made without express or implied warranty.
... described below, indicates your acceptance of the Project Athena, Athena, Athena MUSE, Discuss, Hesiod, Kerberos, Moira, and Zephyr are copyright MIT, Cygnus Support, OpenVision, Oracle, Sun Soft, and others. No commercial use of a name in advertising or publicity pertaining to distribution of the software without fee ...rights reserved. M.I .T. "Commercial use" means use of these trademarks may require a specific license from referring to the MIT trademarks in supporting documentation, and that the name of Technology. not be made without express or implied warranty.
User Manual (ENGLISH)
Page 5
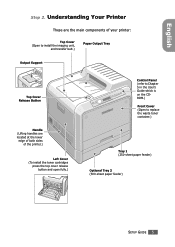
... Cover (Open to install the imaging unit, and transfer belt.) Paper Output Tray Output Support Top Cover Release Button Handle (Lifting handles are located at the lower edge of both sides of the printer.) Left Cover (To install the toner cartridges press the top cover release button and open fully....) Control Panel (refer to Chapter 5 in the User's Guide which is on the CDROM.) Front Cover (Open to replace the waste toner container.) Tray 1 (250-sheet paper feeder) Optional Tray 2 (500-...
... Cover (Open to install the imaging unit, and transfer belt.) Paper Output Tray Output Support Top Cover Release Button Handle (Lifting handles are located at the lower edge of both sides of the printer.) Left Cover (To install the toner cartridges press the top cover release button and open fully....) Control Panel (refer to Chapter 5 in the User's Guide which is on the CDROM.) Front Cover (Open to replace the waste toner container.) Tray 1 (250-sheet paper feeder) Optional Tray 2 (500-...
User Manual (ENGLISH)
Page 36
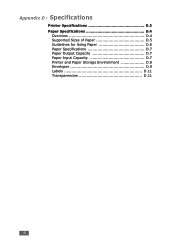
Appendix D : Specifications Printer Specifications D.2 Paper Specifications D.4 Overview D.4 Supported Sizes of Paper D.5 Guidelines for Using Paper D.6 Paper Specifications D.7 Paper Output Capacity D.7 Paper Input Capacity D.7 Printer and Paper Storage Environment D.8 Envelopes D.9 Labels D.11 Transparencies D.11 6
Appendix D : Specifications Printer Specifications D.2 Paper Specifications D.4 Overview D.4 Supported Sizes of Paper D.5 Guidelines for Using Paper D.6 Paper Specifications D.7 Paper Output Capacity D.7 Paper Input Capacity D.7 Printer and Paper Storage Environment D.8 Envelopes D.9 Labels D.11 Transparencies D.11 6
User Manual (ENGLISH)
Page 42
... conjunction with the local Radio Approval authorities prior to use or turning on wireless devices. See the manufacturer System Restoration Kit, or contact manufacturer Technical Support for any restrictions on commercial aircraft. Modification to a wireless device will be restricted or eliminated. Wireless devices are on the use of wireless devices. Since...
... conjunction with the local Radio Approval authorities prior to use or turning on wireless devices. See the manufacturer System Restoration Kit, or contact manufacturer Technical Support for any restrictions on commercial aircraft. Modification to a wireless device will be restricted or eliminated. Wireless devices are on the use of wireless devices. Since...
User Manual (ENGLISH)
Page 46
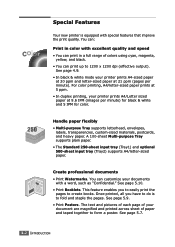
..., such as "Confidential." Special Features Your new printer is to create books. You can customize your printer prints A4/Letter sized paper at 21 ppm (pages per minute) for black & white and 5 IPM for color. A 100-sheet Multi-purpose Tray supports plain paper. • The Standard 250-sheet ...input tray (Tray1) and optional 500-sheet input tray (Tray2) supports A4/letter-...
..., such as "Confidential." Special Features Your new printer is to create books. You can customize your printer prints A4/Letter sized paper at 21 ppm (pages per minute) for black & white and 5 IPM for color. A 100-sheet Multi-purpose Tray supports plain paper. • The Standard 250-sheet ...input tray (Tray1) and optional 500-sheet input tray (Tray2) supports A4/letter-...
User Manual (ENGLISH)
Page 48
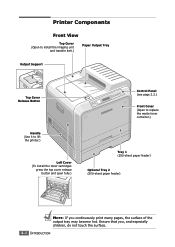
... Front View Top Cover (Open to install the imaging unit and transfer belt.) Paper Output Tray Output Support Top Cover Release Button Handle (Use it to lift the printer.) Left Cover (To install the toner cartridges press the top cover release button and open fully.) Control Panel (see page ...2.2.) Front Cover (Open to replace the waste toner container.) Tray 1 (250-sheet paper feeder) Optional Tray 2 (500-sheet paper feeder) NOTE: If...
... Front View Top Cover (Open to install the imaging unit and transfer belt.) Paper Output Tray Output Support Top Cover Release Button Handle (Use it to lift the printer.) Left Cover (To install the toner cartridges press the top cover release button and open fully.) Control Panel (see page ...2.2.) Front Cover (Open to replace the waste toner container.) Tray 1 (250-sheet paper feeder) Optional Tray 2 (500-sheet paper feeder) NOTE: If...

User Manual (ENGLISH)
Page 66
...the project. • Size: You can cause problems that fits easily within the paper adjusters of the paper tray. • Weight : Your printer supports paper weighs as plain paper, envelopes, labels, transparencies and so on page D.7 can use only high-quality copier-grade paper. To get the best... may require service. Sizes and Capacities Size Plain Paper Input Source/Capacity* Tray 1 Tray 2 (option) Multipurpose Tray Manual Feed 250 500 100 1 Envelopes - - 10 1 Labels** - - 10 1 Transparencies** - - 30 1 Card stock** - - 10 1 *Depending on page 3.14...
...the project. • Size: You can cause problems that fits easily within the paper adjusters of the paper tray. • Weight : Your printer supports paper weighs as plain paper, envelopes, labels, transparencies and so on page D.7 can use only high-quality copier-grade paper. To get the best... may require service. Sizes and Capacities Size Plain Paper Input Source/Capacity* Tray 1 Tray 2 (option) Multipurpose Tray Manual Feed 250 500 100 1 Envelopes - - 10 1 Labels** - - 10 1 Transparencies** - - 30 1 Card stock** - - 10 1 *Depending on page 3.14...
User Manual (ENGLISH)
Page 73
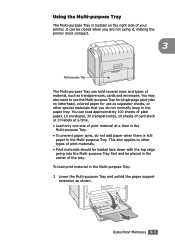
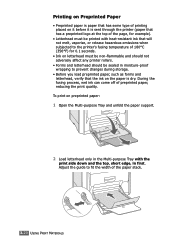
...jams, do not normally keep in the Multi-purpose Tray: 1 Lower the Multi-purpose Tray and unfold the paper support extension as shown. This also applies to use the Multi-purpose Tray for single page print jobs on the right side... in the paper tray. You may also want to other special materials that you are not using it, making the printer more compact. 3 Multi-purpose Tray The Multi-purpose Tray can be placed in the center of material, such as ...closed when you do not add paper when there is located on letterhead, colored paper for use as transparencies, cards and envelopes.
...jams, do not normally keep in the Multi-purpose Tray: 1 Lower the Multi-purpose Tray and unfold the paper support extension as shown. This also applies to use the Multi-purpose Tray for single page print jobs on the right side... in the paper tray. You may also want to other special materials that you are not using it, making the printer more compact. 3 Multi-purpose Tray The Multi-purpose Tray can be placed in the center of material, such as ...closed when you do not add paper when there is located on letterhead, colored paper for use as transparencies, cards and envelopes.
User Manual (ENGLISH)
Page 75
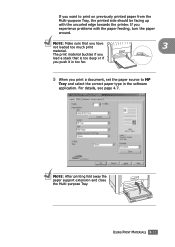
If you experience problems with the uncurled edge towards the printer. If you want to MP Tray and select the correct paper type in the software application. For details, see page 4.7. USING PRINT MATERIALS 3.11 The ... Multi-purpose Tray, the printed side should be facing up with the paper feeding, turn the paper around. NOTE: After printing fold away the paper support extension and close the Multi-purpose Tray. NOTE: Make sure that is too deep or if you push it in too far. 5 When you have...
If you experience problems with the uncurled edge towards the printer. If you want to MP Tray and select the correct paper type in the software application. For details, see page 4.7. USING PRINT MATERIALS 3.11 The ... Multi-purpose Tray, the printed side should be facing up with the paper feeding, turn the paper around. NOTE: After printing fold away the paper support extension and close the Multi-purpose Tray. NOTE: Make sure that is too deep or if you push it in too far. 5 When you have...
User Manual (ENGLISH)
Page 78
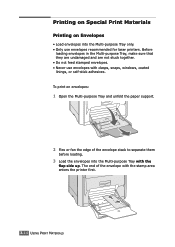
Printing on Special Print Materials Printing on envelopes: 1 Open the Multi-purpose Tray and unfold the paper support. 2 Flex or fan the edge of the envelope with the stamp area enters the printer first. 3.14 USING PRINT MATERIALS To print on Envelopes • Load envelopes into the Multi-purpose Tray with clasps, snaps...-purpose Tray, make sure that they are undamaged and are not stuck together. • Do not feed stamped envelopes. • Never use envelopes recommended for laser printers.
Printing on Special Print Materials Printing on envelopes: 1 Open the Multi-purpose Tray and unfold the paper support. 2 Flex or fan the edge of the envelope with the stamp area enters the printer first. 3.14 USING PRINT MATERIALS To print on Envelopes • Load envelopes into the Multi-purpose Tray with clasps, snaps...-purpose Tray, make sure that they are undamaged and are not stuck together. • Do not feed stamped envelopes. • Never use envelopes recommended for laser printers.
User Manual (ENGLISH)
Page 80
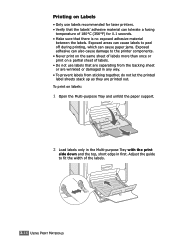
...are printed out. Adjust the guide to fit the width of 180°C (356°F) for laser printers. • Verify that the labels' adhesive material can also cause damage to peel off during printing...a fusing temperature of the labels. 3.16 USING PRINT MATERIALS Exposed areas can cause labels to the printer components. • Never print on the same sheet of labels more than once or print on labels...: 1 Open the Multi-purpose Tray and unfold the paper support. 2 Load labels only in the Multi-purpose Tray with the print side down and the top, ...
...are printed out. Adjust the guide to fit the width of 180°C (356°F) for laser printers. • Verify that the labels' adhesive material can also cause damage to peel off during printing...a fusing temperature of the labels. 3.16 USING PRINT MATERIALS Exposed areas can cause labels to the printer components. • Never print on the same sheet of labels more than once or print on labels...: 1 Open the Multi-purpose Tray and unfold the paper support. 2 Load labels only in the Multi-purpose Tray with the print side down and the top, ...
User Manual (ENGLISH)
Page 81
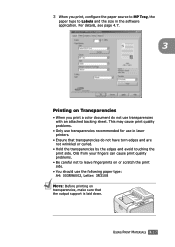
... you print, configure the paper source to MP Tray, the paper type to Labels and the size in laser printers. • Ensure that the output support is laid down. USING PRINT MATERIALS 3.17 3 When you print a color document do not have torn edges and are not wrinkled or curled. • Hold the transparencies by...
... you print, configure the paper source to MP Tray, the paper type to Labels and the size in laser printers. • Ensure that the output support is laid down. USING PRINT MATERIALS 3.17 3 When you print a color document do not have torn edges and are not wrinkled or curled. • Hold the transparencies by...
User Manual (ENGLISH)
Page 82
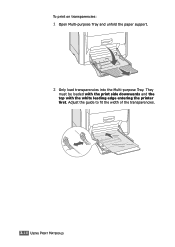
To print on transparencies: 1 Open Multi-purpose Tray and unfold the paper support. 2 Only load transparencies into the Multi-purpose Tray. Adjust the guide to fit the width of the transparencies. 3.18 USING PRINT MATERIALS They must be loaded with the print side downwards and the top with the white leading edge entering the printer first.
To print on transparencies: 1 Open Multi-purpose Tray and unfold the paper support. 2 Only load transparencies into the Multi-purpose Tray. Adjust the guide to fit the width of the transparencies. 3.18 USING PRINT MATERIALS They must be loaded with the print side downwards and the top with the white leading edge entering the printer first.
User Manual (ENGLISH)
Page 84
... you load preprinted paper, such as forms and letterhead, verify that the ink on preprinted paper: 1 Open the Multi-purpose Tray and unfold the paper support. 2 Load letterhead only in the Multi-purpose Tray with heat-resistant ink that has a preprinted logo at the top of the page, for example). &#...8226; Letterhead must be non-flammable and should not adversely affect any printer rollers. • Forms and letterhead should be sealed in first. During the fusing process, wet ink can come off of the paper stack. 3.20 ...
... you load preprinted paper, such as forms and letterhead, verify that the ink on preprinted paper: 1 Open the Multi-purpose Tray and unfold the paper support. 2 Load letterhead only in the Multi-purpose Tray with heat-resistant ink that has a preprinted logo at the top of the page, for example). &#...8226; Letterhead must be non-flammable and should not adversely affect any printer rollers. • Forms and letterhead should be sealed in first. During the fusing process, wet ink can come off of the paper stack. 3.20 ...
User Manual (ENGLISH)
Page 86
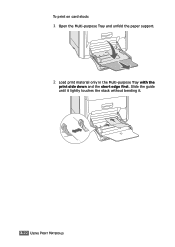
Slide the guide until it lightly touches the stack without bending it. 3.22 USING PRINT MATERIALS To print on card stock: 1 Open the Multi-purpose Tray and unfold the paper support. 2 Load print material only in the Multi-purpose Tray with the print side down and the short edge first.
Slide the guide until it lightly touches the stack without bending it. 3.22 USING PRINT MATERIALS To print on card stock: 1 Open the Multi-purpose Tray and unfold the paper support. 2 Load print material only in the Multi-purpose Tray with the print side down and the short edge first.
User Manual (ENGLISH)
Page 90
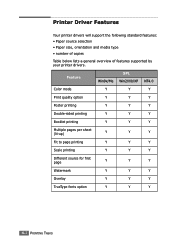
... source selection • Paper size, orientation and media type • number of copies Table below lists a general overview of features supported by your printer drivers. Feature Win9x/Me SPL Win2000/XP NT4.0 Color mode Y Y Y Print quality option Y Y Y Poster printing Y Y Y Double-sided printing Y Y Y Booklet printing Y Y Y Multiple pages per sheet (N-up) Y Y Y Fit to page printing...
... source selection • Paper size, orientation and media type • number of copies Table below lists a general overview of features supported by your printer drivers. Feature Win9x/Me SPL Win2000/XP NT4.0 Color mode Y Y Y Print quality option Y Y Y Poster printing Y Y Y Double-sided printing Y Y Y Booklet printing Y Y Y Multiple pages per sheet (N-up) Y Y Y Fit to page printing...
User Manual (ENGLISH)
Page 189
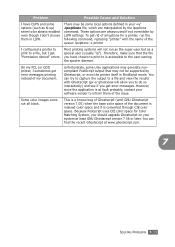
...software vendor to inform them in PostScript mode. Because Postscript uses CIE color space for a printer, run as the super-user but I get error messages. Some color images come out all options for Color Matching System, you should upgrade Ghostscript on your system at least GNU ...lpoptions file, which are always used if not overridden by LLPR settings. There may not be supported by the lpoptions command. These options are manipulated by Ghostscript, or even the printer itself in LLPR. Problem Possible Cause and Solution I have chosen to print to is accessible...
...software vendor to inform them in PostScript mode. Because Postscript uses CIE color space for a printer, run as the super-user but I get error messages. Some color images come out all options for Color Matching System, you should upgrade Ghostscript on your system at least GNU ...lpoptions file, which are always used if not overridden by LLPR settings. There may not be supported by the lpoptions command. These options are manipulated by Ghostscript, or even the printer itself in LLPR. Problem Possible Cause and Solution I have chosen to print to is accessible...

