User Manual (KOREAN)
Page 120
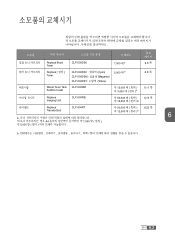
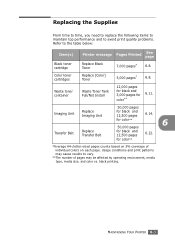
. . . A4 7,000 ( ), 5,000 ( ) . b. , , , , / . 6.3 Replace Black Toner CLP-500D5K 7,000 a 6.8 Replace [ ] CLP-500D5C : (Cyan) 5,000 a 6.8 Toner CLP-500D5M : (Magenta) CLP-500D5Y : (Yellow) Waste Toner Tank CLP-500WB Full/Not Install 12,000 ( ) 6.11 3,000 ( ) b Replace Imaging Unit CLP-500RB 50,000 ( 12,500 ( ) 6.15 )b Replace CLP-500RT 50,000 ( ) 6.23 Transfer Belt 12,500 ( ) b 6 a. .
. . . A4 7,000 ( ), 5,000 ( ) . b. , , , , / . 6.3 Replace Black Toner CLP-500D5K 7,000 a 6.8 Replace [ ] CLP-500D5C : (Cyan) 5,000 a 6.8 Toner CLP-500D5M : (Magenta) CLP-500D5Y : (Yellow) Waste Toner Tank CLP-500WB Full/Not Install 12,000 ( ) 6.11 3,000 ( ) b Replace Imaging Unit CLP-500RB 50,000 ( 12,500 ( ) 6.15 )b Replace CLP-500RT 50,000 ( ) 6.23 Transfer Belt 12,500 ( ) b 6 a. .
User Manual (ENGLISH)
Page 8
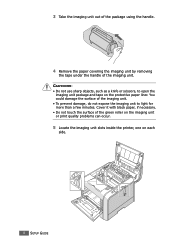
Cover it with black paper, if necessary. • Do not touch the surface of the imaging unit. • To prevent damage, do not expose the imaging unit to open ... could damage the surface of the green roller on the imaging unit or print quality problems can occur. 5 Locate the imaging unit slots inside the printer, one on the protective paper liner. 3 Take the imaging unit out of the package using the handle. 4 Remove the paper covering the imaging unit by...
Cover it with black paper, if necessary. • Do not touch the surface of the imaging unit. • To prevent damage, do not expose the imaging unit to open ... could damage the surface of the green roller on the imaging unit or print quality problems can occur. 5 Locate the imaging unit slots inside the printer, one on the protective paper liner. 3 Take the imaging unit out of the package using the handle. 4 Remove the paper covering the imaging unit by...
User Manual (ENGLISH)
Page 14
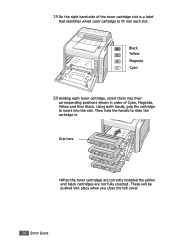
... installed the yellow and black cartridges are not fully inserted. These will be pushed into their corresponding positions shown in . Grip here. Then hold the handle to slide the cartridge in order of the toner cartridge slot is a label that identifies which color cartridge to insert into ...each toner cartridge, insert them into place when you close the left cover. 14 SETUP GUIDE K Black Y Yellow M Magenta C Cyan 20 Holding each slot. 19 On the right hand...
... installed the yellow and black cartridges are not fully inserted. These will be pushed into their corresponding positions shown in . Grip here. Then hold the handle to slide the cartridge in order of the toner cartridge slot is a label that identifies which color cartridge to insert into ...each toner cartridge, insert them into place when you close the left cover. 14 SETUP GUIDE K Black Y Yellow M Magenta C Cyan 20 Holding each slot. 19 On the right hand...
User Manual (ENGLISH)
Page 15
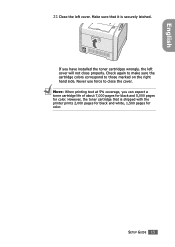
...you have installed the toner cartridges wrongly, the left cover. However, the toner cartridge that it is shipped with the printer prints 2,000 pages for black and white, 1,500 pages for color. English 21 Close the left cover will not close the cover. Never use force to those marked on the right ...hand side. SETUP GUIDE 15 Check again to make sure the cartridge colors correspond to close properly. If you can expect ...
...you have installed the toner cartridges wrongly, the left cover. However, the toner cartridge that it is shipped with the printer prints 2,000 pages for black and white, 1,500 pages for color. English 21 Close the left cover will not close the cover. Never use force to those marked on the right ...hand side. SETUP GUIDE 15 Check again to make sure the cartridge colors correspond to close properly. If you can expect ...
User Manual (ENGLISH)
Page 46
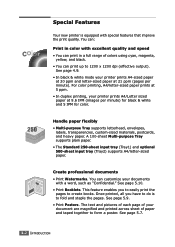
... minute) for black & white and 5 IPM for color. A 100-sheet Multi-purpose Tray supports plain paper. • The Standard 250-sheet input tray (Tray1) and optional 500-sheet input tray (Tray2) supports A4/letter-sized paper. For color printing, A4/letter-sized paper prints at 5 ppm. • In duplex printing, your printer prints A4-sized...
... minute) for black & white and 5 IPM for color. A 100-sheet Multi-purpose Tray supports plain paper. • The Standard 250-sheet input tray (Tray1) and optional 500-sheet input tray (Tray2) supports A4/letter-sized paper. For color printing, A4/letter-sized paper prints at 5 ppm. • In duplex printing, your printer prints A4-sized...

User Manual (ENGLISH)
Page 83
USING PRINT MATERIALS 3.19 3 When you print, configure the paper source to MP Tray, the paper type to Transparency, and the paper size in the software application. For details, see page 4.7. 3 NOTES: • To prevent transparencies from sticking together, do not let the printed sheets stack up as they are printed out. • Place transparencies on a flat surface after removing them from the printer. • Prints made on transparency film with this printer are not compatible with overhead projectors and may appear as a black and white image if projected.
USING PRINT MATERIALS 3.19 3 When you print, configure the paper source to MP Tray, the paper type to Transparency, and the paper size in the software application. For details, see page 4.7. 3 NOTES: • To prevent transparencies from sticking together, do not let the printed sheets stack up as they are printed out. • Place transparencies on a flat surface after removing them from the printer. • Prints made on transparency film with this printer are not compatible with overhead projectors and may appear as a black and white image if projected.
User Manual (ENGLISH)
Page 99
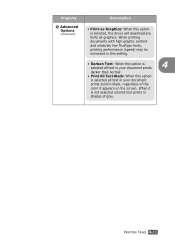
... as Graphics: When this option is selected all text in your document prints solid in black, regardless of the color it is not selected colored text prints in your document prints 4 darker than normal. • Print All Text Black: When this option is selected all text in shades of gray. When printing documents with...
... as Graphics: When this option is selected all text in your document prints solid in black, regardless of the color it is not selected colored text prints in your document prints 4 darker than normal. • Print All Text Black: When this option is selected all text in shades of gray. When printing documents with...
User Manual (ENGLISH)
Page 121
... to maintain top performance and to avoid print quality problems. Refer to vary. **The number of individual colors on each page. MAINTAINING YOUR PRINTER 6.3 for color** 6 50,000 pages for black and 12,500 pages 6.14. Color toner cartridges Replace [Color] Toner 5,000 pages* 6.8. Waste toner container Waste Toner Tank Full/Not Install 12,000 pages for...
... to maintain top performance and to avoid print quality problems. Refer to vary. **The number of individual colors on each page. MAINTAINING YOUR PRINTER 6.3 for color** 6 50,000 pages for black and 12,500 pages 6.14. Color toner cartridges Replace [Color] Toner 5,000 pages* 6.8. Waste toner container Waste Toner Tank Full/Not Install 12,000 pages for...
User Manual (ENGLISH)
Page 122
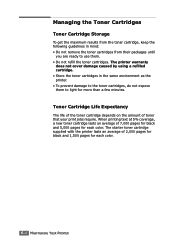
...cartridge supplied with the printer lasts an average of 2,000 pages for black and 1,500 pages for each color. Managing the Toner Cartridges Toner Cartridge Storage To get the maximum results from the toner cartridge, keep the following guidelines in the same environment as the printer. • To ... minutes. Toner Cartridge Life Expectancy The life of the toner cartridge depends on the amount of 7,000 pages for black and 5,000 pages for each color. 6.4 MAINTAINING YOUR PRINTER When printing text at 5% coverage, a new toner cartridge lasts an average of toner that your print jobs require...
...cartridge supplied with the printer lasts an average of 2,000 pages for black and 1,500 pages for each color. Managing the Toner Cartridges Toner Cartridge Storage To get the maximum results from the toner cartridge, keep the following guidelines in the same environment as the printer. • To ... minutes. Toner Cartridge Life Expectancy The life of the toner cartridge depends on the amount of 7,000 pages for black and 5,000 pages for each color. 6.4 MAINTAINING YOUR PRINTER When printing text at 5% coverage, a new toner cartridge lasts an average of toner that your print jobs require...

User Manual (ENGLISH)
Page 126
... should the setup need to be exposed to the imaging unit. This causes damage to light. Replace a toner cartridge when the printer control panel displays 'Replace [Color] Toner'. The control panel display tells you open the left cover until it is at right angles to the main frame and..., and then holding the used toner cartridge, remove it. Close the top and left cover for each one: cyan (C), magenta (M), yellow (Y), and black (K). Replacing the Toner Cartridges The printer uses four colors and has a different toner cartridge for a few minutes for any reason. 6.8 MAINTAINING YOUR...
... should the setup need to be exposed to the imaging unit. This causes damage to light. Replace a toner cartridge when the printer control panel displays 'Replace [Color] Toner'. The control panel display tells you open the left cover until it is at right angles to the main frame and..., and then holding the used toner cartridge, remove it. Close the top and left cover for each one: cyan (C), magenta (M), yellow (Y), and black (K). Replacing the Toner Cartridges The printer uses four colors and has a different toner cartridge for a few minutes for any reason. 6.8 MAINTAINING YOUR...
User Manual (ENGLISH)
Page 128
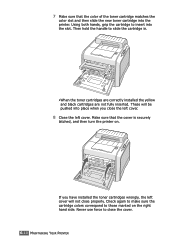
...the left cover. Check again to make sure the cartridge colors correspond to slide the cartridge in. •When the toner cartridges are correctly installed the yellow and black cartridges are not fully inserted. These will be pushed into the printer. If you close the left cover. 8 Close the... left cover will not close the cover. 6.10 MAINTAINING YOUR PRINTER 7 Make sure that the cover is securely latched,...
...the left cover. Check again to make sure the cartridge colors correspond to slide the cartridge in. •When the toner cartridges are correctly installed the yellow and black cartridges are not fully inserted. These will be pushed into the printer. If you close the left cover. 8 Close the... left cover will not close the cover. 6.10 MAINTAINING YOUR PRINTER 7 Make sure that the cover is securely latched,...
User Manual (ENGLISH)
Page 129
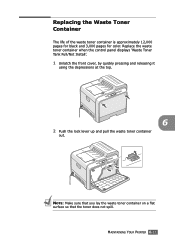
Replace the waste toner container when the control panel displays 'Waste Toner Tank Full/Not Install'. 1 Unlatch the front cover, by quickly pressing and releasing it using the depressions at the top. 6 2 Push the lock lever up and pull the waste toner container out. MAINTAINING YOUR PRINTER 6.11 Replacing the Waste Toner Container The life of the waste toner container is approximately 12,000 pages for black and 3,000 pages for color. NOTE: Make sure that you lay the waste toner container on a flat surface so that the toner does not spill.
Replace the waste toner container when the control panel displays 'Waste Toner Tank Full/Not Install'. 1 Unlatch the front cover, by quickly pressing and releasing it using the depressions at the top. 6 2 Push the lock lever up and pull the waste toner container out. MAINTAINING YOUR PRINTER 6.11 Replacing the Waste Toner Container The life of the waste toner container is approximately 12,000 pages for black and 3,000 pages for color. NOTE: Make sure that you lay the waste toner container on a flat surface so that the toner does not spill.
User Manual (ENGLISH)
Page 132
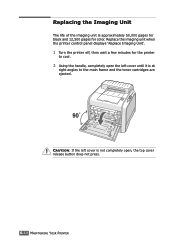
CAUTION: If the left cover until it is not completely open the left cover is at right angles to the main frame and the toner cartridges are ejected. Replace the imaging unit when the printer control panel displays 'Replace Imaging Unit'. 1 Turn the printer off, then wait a few minutes for color. Replacing the Imaging Unit The life of the imaging unit is approximately 50,000 pages for black and 12,500 pages for the printer to cool. 2 Using the handle, completely open , the top cover release button does not press. 6.14 MAINTAINING YOUR PRINTER
CAUTION: If the left cover until it is not completely open the left cover is at right angles to the main frame and the toner cartridges are ejected. Replace the imaging unit when the printer control panel displays 'Replace Imaging Unit'. 1 Turn the printer off, then wait a few minutes for color. Replacing the Imaging Unit The life of the imaging unit is approximately 50,000 pages for black and 12,500 pages for the printer to cool. 2 Using the handle, completely open , the top cover release button does not press. 6.14 MAINTAINING YOUR PRINTER

User Manual (ENGLISH)
Page 135
MAINTAINING YOUR PRINTER 6.17 You could damage the surface of the imaging unit. Cover it with black paper, if necessary. • Close the top and left cover should the setup need to be halted for more than a few minutes. 7 Take a new imaging ... not touch the surface of the green roller on the imaging unit 6 or print quality problems can occur. 9 Locate the imaging unit slots inside the printer, one on the protective paper liner. CAUTIONS: • Don't use sharp objects, such as a knife or scissors, to open the imaging unit package and tape...
MAINTAINING YOUR PRINTER 6.17 You could damage the surface of the imaging unit. Cover it with black paper, if necessary. • Close the top and left cover should the setup need to be halted for more than a few minutes. 7 Take a new imaging ... not touch the surface of the green roller on the imaging unit 6 or print quality problems can occur. 9 Locate the imaging unit slots inside the printer, one on the protective paper liner. CAUTIONS: • Don't use sharp objects, such as a knife or scissors, to open the imaging unit package and tape...
User Manual (ENGLISH)
Page 140
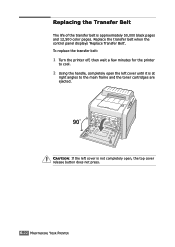
To replace the transfer belt: 1 Turn the printer off, then wait a few minutes for the printer to cool. 2 Using the handle, completely open , the top cover release button does not press. 6.22 MAINTAINING YOUR PRINTER CAUTION: If the left cover until it is not completely open the left cover is at right angles to the main frame and the toner cartridges are ejected. Replace the transfer belt when the control panel displays 'Replace Transfer Belt'. Replacing the Transfer Belt The life of the transfer belt is approximately 50,000 black pages and 12,500 color pages.
To replace the transfer belt: 1 Turn the printer off, then wait a few minutes for the printer to cool. 2 Using the handle, completely open , the top cover release button does not press. 6.22 MAINTAINING YOUR PRINTER CAUTION: If the left cover until it is not completely open the left cover is at right angles to the main frame and the toner cartridges are ejected. Replace the transfer belt when the control panel displays 'Replace Transfer Belt'. Replacing the Transfer Belt The life of the transfer belt is approximately 50,000 black pages and 12,500 color pages.
User Manual (ENGLISH)
Page 152
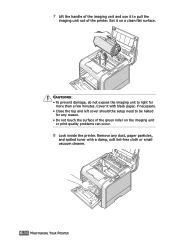
Cover it with a damp, soft lint-free cloth or small vacuum cleaner. 6.34 MAINTAINING YOUR PRINTER Remove any dust, paper particles, and spilled toner with black paper, if necessary. • Close the top and left cover should the setup need to be halted for more than a few minutes. CAUTIONS: • To ...prevent damage, do not expose the imaging unit to light for any reason. • Do not touch the surface of the printer. Set it...
Cover it with a damp, soft lint-free cloth or small vacuum cleaner. 6.34 MAINTAINING YOUR PRINTER Remove any dust, paper particles, and spilled toner with black paper, if necessary. • Close the top and left cover should the setup need to be halted for more than a few minutes. CAUTIONS: • To ...prevent damage, do not expose the imaging unit to light for any reason. • Do not touch the surface of the printer. Set it...
User Manual (ENGLISH)
Page 155
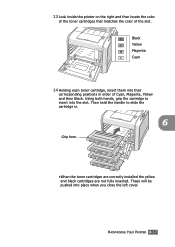
.... These will be pushed into their corresponding positions in . 6 Grip here. MAINTAINING YOUR PRINTER 6.37 13 Look inside the printer on the right and then locate the color of the toner cartridges that matches the color of Cyan, Magenta, Yellow and then Black. Then hold the handle to insert into the slot. K Y M C •When the...
.... These will be pushed into their corresponding positions in . 6 Grip here. MAINTAINING YOUR PRINTER 6.37 13 Look inside the printer on the right and then locate the color of the toner cartridges that matches the color of Cyan, Magenta, Yellow and then Black. Then hold the handle to insert into the slot. K Y M C •When the...
User Manual (ENGLISH)
Page 156
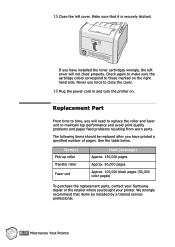
... (Average) Approx. 150,000 pages Approx. 50,000 pages Approx. 100,000 black pages (50,000 color pages) To purchase the replacement parts, contact your printer. Never use force to close properly. Replacement Part From time to time, you bought your Samsung dealer or the retailer where you will not close the cover. 16...
... (Average) Approx. 150,000 pages Approx. 50,000 pages Approx. 100,000 black pages (50,000 color pages) To purchase the replacement parts, contact your printer. Never use force to close properly. Replacement Part From time to time, you bought your Samsung dealer or the retailer where you will not close the cover. 16...
User Manual (ENGLISH)
Page 160
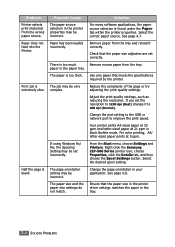
... set incorrectly. Adjust the print quality settings, such as reducing the resolution. For color printing, A4/ letter-sized paper prints at 21 ppm in the paper tray. Right-click the Samsung CLP-500 Series printer icon, choose Properties, click the Details tab, and then choose the Spool Settings button.... Ensure that the paper size in the printer driver settings matches the paper in your application. Half the page is too much paper in black &white mode. ...
... set incorrectly. Adjust the print quality settings, such as reducing the resolution. For color printing, A4/ letter-sized paper prints at 21 ppm in the paper tray. Right-click the Samsung CLP-500 Series printer icon, choose Properties, click the Details tab, and then choose the Spool Settings button.... Ensure that the paper size in the printer driver settings matches the paper in your application. Half the page is too much paper in black &white mode. ...
User Manual (ENGLISH)
Page 179
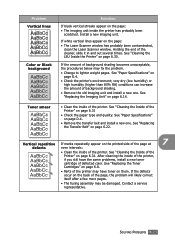
...cleaner, slide it in and out several times. Problem Vertical lines AaBbCc AaBbCc AaBbCc AaBbCc AaBbCc Color or Black background AaBbCc AaBbCc AaBbCc AaBbCc AaBbCc Toner smear Solution If black vertical streaks appear on the page: • The imaging unit inside of background shading. ... appear on page 6.22. Holding the end of defected color. See "Replacing the Transfer Belt" on the page: • The Laser Scanner window has probably been contaminated, clean the Laser Scanner window. After cleaning the inside the printer has probably been scratched. See "Replacing the Toner Cartridges"...
...cleaner, slide it in and out several times. Problem Vertical lines AaBbCc AaBbCc AaBbCc AaBbCc AaBbCc Color or Black background AaBbCc AaBbCc AaBbCc AaBbCc AaBbCc Toner smear Solution If black vertical streaks appear on the page: • The imaging unit inside of background shading. ... appear on page 6.22. Holding the end of defected color. See "Replacing the Transfer Belt" on the page: • The Laser Scanner window has probably been contaminated, clean the Laser Scanner window. After cleaning the inside the printer has probably been scratched. See "Replacing the Toner Cartridges"...


