

Open Source Guide (ENGLISH)
Page 1
... (version 2.1). If the Program does not specify a version number of having been made by running the Program is not restricted, and the output from time to distribute software through that is true depends on the Program is to exercise the right to accept this , we want to make it free software which is a work based on the Program, the distribution of the...
... (version 2.1). If the Program does not specify a version number of having been made by running the Program is not restricted, and the output from time to distribute software through that is true depends on the Program is to exercise the right to accept this , we want to make it free software which is a work based on the Program, the distribution of the...

Open Source Guide (ENGLISH)
Page 2
... OR THIRD PARTIES OR A FAILURE OF THE LIBRARY TO OPERATE WITH ANY OTHER SOFTWARE), EVEN IF SUCH HOLDER OR OTHER PARTY HAS BEEN ADVISED OF THE POSSIBILITY OF SUCH DAMAGES. It is found. 16. You can redistribute and change. and each source file to where the full notice is safest to attach ...convey the exclusion of warranty; How to Apply These Terms to Your New Libraries If you develop a new library, and you want it to be of the ordinary General Public License). To apply these terms, attach the following notices to the public, we recommend making it free software that everyone can ...
... OR THIRD PARTIES OR A FAILURE OF THE LIBRARY TO OPERATE WITH ANY OTHER SOFTWARE), EVEN IF SUCH HOLDER OR OTHER PARTY HAS BEEN ADVISED OF THE POSSIBILITY OF SUCH DAMAGES. It is found. 16. You can redistribute and change. and each source file to where the full notice is safest to attach ...convey the exclusion of warranty; How to Apply These Terms to Your New Libraries If you develop a new library, and you want it to be of the ordinary General Public License). To apply these terms, attach the following notices to the public, we recommend making it free software that everyone can ...
User Manual (user Manual) (ver.1.0) (English)
Page 2
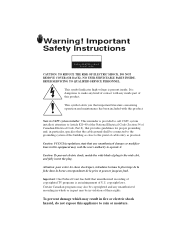
... moisture. Important Safety Instructions RISK OF ELECTRIC SHOCK D O NOT OPEN CAUTION: TO REDUCE THE RISK OF ELECTRIC SHOCK, DO NOT REMOVE COVER (OR BACK). It is present inside part of contact with this appliance to operate it. Warning! Caution: FCC/CSA regulations state that any inside . NO USER SERVICEABLE PARTS INSIDE. Note to CATV system installer: This reminder...
... moisture. Important Safety Instructions RISK OF ELECTRIC SHOCK D O NOT OPEN CAUTION: TO REDUCE THE RISK OF ELECTRIC SHOCK, DO NOT REMOVE COVER (OR BACK). It is present inside part of contact with this appliance to operate it. Warning! Caution: FCC/CSA regulations state that any inside . NO USER SERVICEABLE PARTS INSIDE. Note to CATV system installer: This reminder...

User Manual (user Manual) (ver.1.0) (English)
Page 3
... Samsung! If you are not sure of the type of fire, electric shock, or other similar surface. We are proud to -use on an unstable cart, stand, tripod, bracket, or table where it near bath tubs, sinks, washing machines, swimming pools, etc. • Do not place the TV on -screen menus and closed captioning capabilities, making it one way. Quick...
... Samsung! If you are not sure of the type of fire, electric shock, or other similar surface. We are proud to -use on an unstable cart, stand, tripod, bracket, or table where it near bath tubs, sinks, washing machines, swimming pools, etc. • Do not place the TV on -screen menus and closed captioning capabilities, making it one way. Quick...
User Manual (user Manual) (ver.1.0) (English)
Page 4
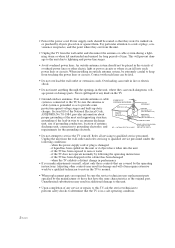
... has been damaged - Adjusting other electric light or power circuits or where it can be walked on or against voltage surges and built-up static charges. Unauthorized substitutions may result in a safe operating condition. 2 SAFETY If an outside antenna system should be sure the antenna or cable system is damaged - when the power-supply cord or plug is grounded so as...
... has been damaged - Adjusting other electric light or power circuits or where it can be walked on or against voltage surges and built-up static charges. Unauthorized substitutions may result in a safe operating condition. 2 SAFETY If an outside antenna system should be sure the antenna or cable system is damaged - when the power-supply cord or plug is grounded so as...
User Manual (user Manual) (ver.1.0) (English)
Page 5
... from the TV 2.7 Connecting a DVD Player 2.7 Connecting a Camcorder 2.8 Installing Batteries in the Remote Control 2.9 Chapter 3: Operation 3.1 Turning the TV On and Off 3.1 Plug & Play Feature 3.1 Viewing the Menus and On-Screen Displays 3.3 Viewing the Menus 3.3 Viewing the Display 3.3 Selecting a Menu Language 3.4 Memorizing the Channels 3.5 Selecting the Video Signal-source 3.5 Storing Channels in Memory (Automatic Method 3.6 Adding and Erasing Channels (Manual Method 3.7 Changing Channels 3.8 Using the Channel Buttons 3.8 Directly Accessing Channels 3.8 Using the PRE-CH...
... from the TV 2.7 Connecting a DVD Player 2.7 Connecting a Camcorder 2.8 Installing Batteries in the Remote Control 2.9 Chapter 3: Operation 3.1 Turning the TV On and Off 3.1 Plug & Play Feature 3.1 Viewing the Menus and On-Screen Displays 3.3 Viewing the Menus 3.3 Viewing the Display 3.3 Selecting a Menu Language 3.4 Memorizing the Channels 3.5 Selecting the Video Signal-source 3.5 Storing Channels in Memory (Automatic Method 3.6 Adding and Erasing Channels (Manual Method 3.7 Changing Channels 3.8 Using the Channel Buttons 3.8 Directly Accessing Channels 3.8 Using the PRE-CH...

User Manual (user Manual) (ver.1.0) (English)
Page 6
... Your Remote Control to Operate Your Cable Box 4.3 Fine Tuning Channels 4.4 Digital Noise Reduction 4.5 LNA (Low Noise Amplifier 4.6 Tilt 4.7 Changing the Screen Size 4.8 Using the R.Surf 4.9 Setting the On/Off Timer 4.10 Setting the Sleep Timer 4.11 Sound Features 4.12 Choosing a Multi-Channel Sound (MTS) Soundtrack. . . . . 4.12 Extra sound settings (Turbo Sound, Surround, Auto Volume or Virtual surround 4.13 Viewing Closed Captions 4.14 Viewing Picture-in-Picture 4.15 Activation Picture-in-Picture 4.15 Selecting a Signal Source (External A/V) for PIP 4.15 Changing the Size of...
... Your Remote Control to Operate Your Cable Box 4.3 Fine Tuning Channels 4.4 Digital Noise Reduction 4.5 LNA (Low Noise Amplifier 4.6 Tilt 4.7 Changing the Screen Size 4.8 Using the R.Surf 4.9 Setting the On/Off Timer 4.10 Setting the Sleep Timer 4.11 Sound Features 4.12 Choosing a Multi-Channel Sound (MTS) Soundtrack. . . . . 4.12 Extra sound settings (Turbo Sound, Surround, Auto Volume or Virtual surround 4.13 Viewing Closed Captions 4.14 Viewing Picture-in-Picture 4.15 Activation Picture-in-Picture 4.15 Selecting a Signal Source (External A/V) for PIP 4.15 Changing the Size of...
User Manual (user Manual) (ver.1.0) (English)
Page 7
...-to-use remote control • Easy-to-use on-screen menu system • Automatic timer to turn the TV on and off • Adjustable picture and sound settings that can be stored in the TV's memory • Automatic channel tuning for up to 181 channels • A special filter to reduce or eliminate reception problems • Fine tuning control for the sharpest picture possible • A built-in multi-channel sound...
...-to-use remote control • Easy-to-use on-screen menu system • Automatic timer to turn the TV on and off • Adjustable picture and sound settings that can be stored in the TV's memory • Automatic channel tuning for up to 181 channels • A special filter to reduce or eliminate reception problems • Fine tuning control for the sharpest picture possible • A built-in multi-channel sound...
User Manual (user Manual) (ver.1.0) (English)
Page 8
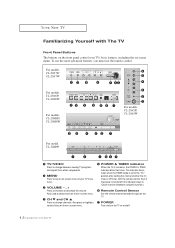
... Off timer, with The TV Front Panel Buttons The buttons on , the POWER & TIMER indicator blinks ten times. Also press to change between viewing TV programs and signals from other components. ´ MENU Press to turn the TV on -screen menu. To use the remote control. YOUR NEW TV Familiarizing Yourself with the remote control. For models CL-29A7P/ CL-29A7W For models CL-29A6P/ CL-29A6W For models CL-29M6P/ CL-29M6W For models CL-29A5P/ CL-29A5W For model CL-34M9P Œ TV/VIDEO Press to change channels.
... Off timer, with The TV Front Panel Buttons The buttons on , the POWER & TIMER indicator blinks ten times. Also press to change between viewing TV programs and signals from other components. ´ MENU Press to turn the TV on -screen menu. To use the remote control. YOUR NEW TV Familiarizing Yourself with the remote control. For models CL-29A7P/ CL-29A7W For models CL-29A6P/ CL-29A6W For models CL-29M6P/ CL-29M6W For models CL-29A5P/ CL-29A5W For model CL-34M9P Œ TV/VIDEO Press to change channels.
User Manual (user Manual) (ver.1.0) (English)
Page 9
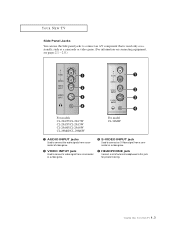
... panel jacks to connect an A/V component that is used only occasionally, such as a camcorde or video game. (For information on connecting equipment, see pages 2.1 - 2.8.) For models CL-29A7P/CL-29A7W CL-29A5P/CL-29A5W CL-29A6P/CL-29A6W CL-29M6P/CL-29M6W For model CL-34M9P Œ AUDIO INPUT jacks Used to connect the audio signals from a camcorder of video game. ˇ S-VIDEO INPUT jack Used to connect an S-Video signal from a camcorder or a video game. ´ VIDEO INPUT jack Used to connect a video signal from a camcorder or a video game. ¨ HEADPHONE jack Connect a set...
... panel jacks to connect an A/V component that is used only occasionally, such as a camcorde or video game. (For information on connecting equipment, see pages 2.1 - 2.8.) For models CL-29A7P/CL-29A7W CL-29A5P/CL-29A5W CL-29A6P/CL-29A6W CL-29M6P/CL-29M6W For model CL-34M9P Œ AUDIO INPUT jacks Used to connect the audio signals from a camcorder of video game. ˇ S-VIDEO INPUT jack Used to connect an S-Video signal from a camcorder or a video game. ´ VIDEO INPUT jack Used to connect a video signal from a camcorder or a video game. ¨ HEADPHONE jack Connect a set...
User Manual (user Manual) (ver.1.0) (English)
Page 10
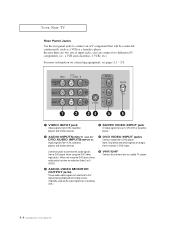
... to connect the audio signals from a DVD player when using the DVD jacks, these audio jacks function as audio for Video 2 or SVIDEO). Ø VHF/UHF Connect to an antenna or to a cable TV system. ˇ AUDIO-VIDEO MONITOR OUTPUT jacks These audio-video signals are identical to connect an A/V component that will be connected continuously, such as the input signals for a recoding VCR.) 1.4 CHAPTER ONE: YOUR NEW TV Note: Only black and white signals are two sets of input...
... to connect the audio signals from a DVD player when using the DVD jacks, these audio jacks function as audio for Video 2 or SVIDEO). Ø VHF/UHF Connect to an antenna or to a cable TV system. ˇ AUDIO-VIDEO MONITOR OUTPUT jacks These audio-video signals are identical to connect an A/V component that will be connected continuously, such as the input signals for a recoding VCR.) 1.4 CHAPTER ONE: YOUR NEW TV Note: Only black and white signals are two sets of input...
User Manual (user Manual) (ver.1.0) (English)
Page 11
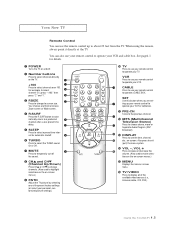
... . ´ Number buttons Press to select channels directly on -screen menu. ı TV/VIDEO Press to display all of the preset factory settings (or select your personal, customized picture settings). ˝ TV Press to use your remote control to operate your TV. SET Use this button when you are Normal screen, Zoom screen or Wide screen. ¨ R.SURF Press the R.SURF button to automatically return to a preferred channel after a user-preset time delay. ˆ SLEEP Press...
... . ´ Number buttons Press to select channels directly on -screen menu. ı TV/VIDEO Press to display all of the preset factory settings (or select your personal, customized picture settings). ˝ TV Press to use your remote control to operate your TV. SET Use this button when you are Normal screen, Zoom screen or Wide screen. ¨ R.SURF Press the R.SURF button to automatically return to a preferred channel after a user-preset time delay. ˆ SLEEP Press...

User Manual (user Manual) (ver.1.0) (English)
Page 12
.... STOP Press to rewind a tape. PAUSE Press to cycle through this button to play or pause the tape. ¯ PIP Controls (For models CL-29A5P/CL-29A6P/ CL-29A7P/CL-29M6P/CL-34M9P) SWAP Exchanges the video signal that is currently displayed on the main screen with small window, and PIP OFF. YOUR NEW TV Remote Control ˜ VCR controls REW (Rewind) Press to stop a tape in your VCR.
.... STOP Press to rewind a tape. PAUSE Press to cycle through this button to play or pause the tape. ¯ PIP Controls (For models CL-29A5P/CL-29A6P/ CL-29A7P/CL-29M6P/CL-34M9P) SWAP Exchanges the video signal that is currently displayed on the main screen with small window, and PIP OFF. YOUR NEW TV Remote Control ˜ VCR controls REW (Rewind) Press to stop a tape in your VCR.
User Manual (user Manual) (ver.1.0) (English)
Page 14
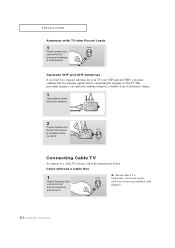
... of the back panel. w Because this TV is cable-ready, you must combine the two antenna signals before connecting the antennas to view unscrambled cable channels. 2.2 CHAPTER TWO: INSTALLATION Separate VHF and UHF Antennas If you have two separate antennas for your TV (one VHF and one UHF), you do not need a cable box to the TV. INSTALLATION Antennas with 75-ohm Round Leads 1 Plug the antenna lead into...
... of the back panel. w Because this TV is cable-ready, you must combine the two antenna signals before connecting the antennas to view unscrambled cable channels. 2.2 CHAPTER TWO: INSTALLATION Separate VHF and UHF Antennas If you have two separate antennas for your TV (one VHF and one UHF), you do not need a cable box to the TV. INSTALLATION Antennas with 75-ohm Round Leads 1 Plug the antenna lead into...
User Manual (user Manual) (ver.1.0) (English)
Page 15
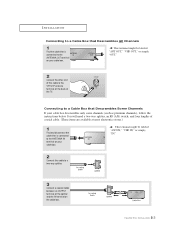
INSTALLATION Connecting to a Cable Box that Descrambles All Channels 1 Find the cable that is connected to the ANTENNA IN terminal on the cable box. 2.3 CHAPTER TWO: INSTALLATION w This terminal might be labeled "ANT IN," "VHF IN," or simply, "IN." 2 Connect this cable to the ANTENNA OUT terminal on your cable box descrambles only some channels (such as premium channels), follow the instructions below. w This terminal might be labeled "ANT OUT...
INSTALLATION Connecting to a Cable Box that Descrambles All Channels 1 Find the cable that is connected to the ANTENNA IN terminal on the cable box. 2.3 CHAPTER TWO: INSTALLATION w This terminal might be labeled "ANT IN," "VHF IN," or simply, "IN." 2 Connect this cable to the ANTENNA OUT terminal on your cable box descrambles only some channels (such as premium channels), follow the instructions below. w This terminal might be labeled "ANT OUT...

User Manual (user Manual) (ver.1.0) (English)
Page 16
... TV to the cable box's output channel, which is usually channel 3 or 4.) Connecting a VCR These instructions assume that you 've made this connection, set the A/B switch to "B," you will need to tune your TV to an antenna or a cable TV system (according to the instructions on the rear of the TV. After you have not yet connected to an antenna or a cable system. 1 Unplug the cable or antenna from the...
... TV to the cable box's output channel, which is usually channel 3 or 4.) Connecting a VCR These instructions assume that you 've made this connection, set the A/B switch to "B," you will need to tune your TV to an antenna or a cable TV system (according to the instructions on the rear of the TV. After you have not yet connected to an antenna or a cable system. 1 Unplug the cable or antenna from the...
User Manual (user Manual) (ver.1.0) (English)
Page 19
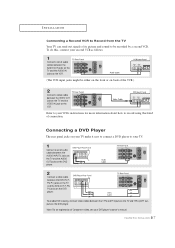
... can send out signals of Component video, see your DVD player's owner's manual. 2.7 CHAPTER TWO: INSTALLATION To enable DVD viewing, connect video cables between the VIDEO OUT jack on the TV and the VIDEO IN jack on the VCR. Note: For an explanation of its picture and sound to be either on the front or on back of the VCR.) 2 Connect a video cable between the Y, Pb and Pr inputs on the...
... can send out signals of Component video, see your DVD player's owner's manual. 2.7 CHAPTER TWO: INSTALLATION To enable DVD viewing, connect video cables between the VIDEO OUT jack on the TV and the VIDEO IN jack on the VCR. Note: For an explanation of its picture and sound to be either on the front or on back of the VCR.) 2 Connect a video cable between the Y, Pb and Pr inputs on the...
User Manual (user Manual) (ver.1.0) (English)
Page 22
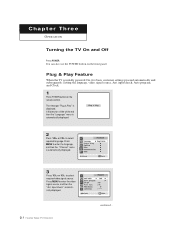
... select required video signal source. input check, Auto program, and Clock. 1 Press POWER button on the front panel. You can also use the POWER button on the remote control. to enter the video signal source, and then the "Ant. Press MENU to select required language. It flickers for a little while and then the "Language" menu is displayed. C h a pOtPEeRArTIOTN h r e e OPERATION Turning the TV On and Off Press POWER. The message "Plug & Play" is automatically displayed. 2 Press VOL...
... select required video signal source. input check, Auto program, and Clock. 1 Press POWER button on the front panel. You can also use the POWER button on the remote control. to enter the video signal source, and then the "Ant. Press MENU to select required language. It flickers for a little while and then the "Language" menu is displayed. C h a pOtPEeRArTIOTN h r e e OPERATION Turning the TV On and Off Press POWER. The message "Plug & Play" is automatically displayed. 2 Press VOL...
User Manual (user Manual) (ver.1.0) (English)
Page 24
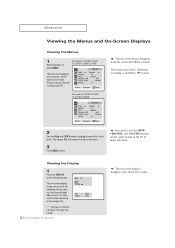
... use the MENU, CHANNEL, and VOLUME buttons on the control panel of the TV to highlight one of the following: Active channel, the channel label, video source, the time, and the time remaining on the sleep timer. ("*" indicates a channel has been manually fine tuned.) 3.3 CHAPTER THREE: TV OPERATION w The on -screen display shows any or all of the 5 (or 4) icons. Viewing the Display 1 Press the DISPLAY on the screen. For models CL-29A5P/CL-29A6P/ CL-29A7P/CL-29M6P/CL-34M9P...
... use the MENU, CHANNEL, and VOLUME buttons on the control panel of the TV to highlight one of the following: Active channel, the channel label, video source, the time, and the time remaining on the sleep timer. ("*" indicates a channel has been manually fine tuned.) 3.3 CHAPTER THREE: TV OPERATION w The on -screen display shows any or all of the 5 (or 4) icons. Viewing the Display 1 Press the DISPLAY on the screen. For models CL-29A5P/CL-29A6P/ CL-29A7P/CL-29M6P/CL-34M9P...
User Manual (user Manual) (ver.1.0) (English)
Page 52
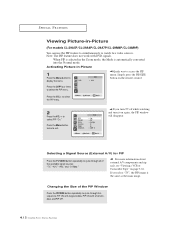
w Quick way to access the PIP menu: Simply press the PIP/SIZE button on the remote control: Press the CHw four times to display the menu. w If you select "TV", the PIP image is automatically converted into the Normal mode. Activating Picture-in-Picture 1 Press the Menu button to select the PIP menu. w For more information about external A/V components and signals, see "Viewing a VCR or Camcorder Tape" on again, the PIP window will disappear. Press the...
w Quick way to access the PIP menu: Simply press the PIP/SIZE button on the remote control: Press the CHw four times to display the menu. w If you select "TV", the PIP image is automatically converted into the Normal mode. Activating Picture-in-Picture 1 Press the Menu button to select the PIP menu. w For more information about external A/V components and signals, see "Viewing a VCR or Camcorder Tape" on again, the PIP window will disappear. Press the...


