
User Manual
Page 1
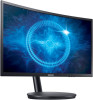
... visit is carried out. where you bring the unit to improve the performance. USER MANUAL Gaming Monitor CFG7* The color and the appearance may be advised to improve quality. © Samsung Electronics Samsung Electronics owns the copyright for this user manual). ‒‒ (b) you have failed to read... this manual. Trademarks other than that of Samsung Electronics are owned by their respective owners. •• An administration fee may differ depending on the product, and the specifications ...
... visit is carried out. where you bring the unit to improve the performance. USER MANUAL Gaming Monitor CFG7* The color and the appearance may be advised to improve quality. © Samsung Electronics Samsung Electronics owns the copyright for this user manual). ‒‒ (b) you have failed to read... this manual. Trademarks other than that of Samsung Electronics are owned by their respective owners. •• An administration fee may differ depending on the product, and the specifications ...
User Manual
Page 2
... Sharpness settings 13 Changing the Volume setting 13 Reverse Side 14 Adjusting the Product Tilt and Height 14 Rotating the Monitor Screen 15 Anti-theft Lock 16 Precautions for moving the monitor 16 Installation 17 Assembling the Stand base 17 Removing the Stand (For Attaching the BRACKET WALL) 18 Attaching the BRACKET...
... Sharpness settings 13 Changing the Volume setting 13 Reverse Side 14 Adjusting the Product Tilt and Height 14 Rotating the Monitor Screen 15 Anti-theft Lock 16 Precautions for moving the monitor 16 Installation 17 Assembling the Stand base 17 Removing the Stand (For Attaching the BRACKET WALL) 18 Attaching the BRACKET...
User Manual
Page 5
... plug and do not touch the cable with wet hands. Otherwise, an electric shock may result. 3 Wipe the monitor with a clean, soft and dry cloth. ‒‒ Do not apply a cleaning agent that contains alcohol, solvent, or surfactant to... the monitor. ‒‒ Do not spray water or detergent directly on the product. 4 Wet a soft and dry cloth in so it...; Hold the plug when disconnecting the power cord from the product. ――Hold the power cable by Samsung.
... plug and do not touch the cable with wet hands. Otherwise, an electric shock may result. 3 Wipe the monitor with a clean, soft and dry cloth. ‒‒ Do not apply a cleaning agent that contains alcohol, solvent, or surfactant to... the monitor. ‒‒ Do not spray water or detergent directly on the product. 4 Wet a soft and dry cloth in so it...; Hold the plug when disconnecting the power cord from the product. ――Hold the power cable by Samsung.
User Manual
Page 10
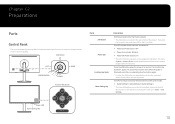
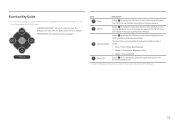
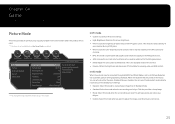
... Key Return 10 Chapter 02 Preparations Parts Control Panel ――The color and shape of parts may vary depending on the front of the monitor. The button can be used to improve quality. Press the JOG button when the screen is located on . Please refer to Game → Save Settings...
... Key Return 10 Chapter 02 Preparations Parts Control Panel ――The color and shape of parts may vary depending on the front of the monitor. The button can be used to improve quality. Press the JOG button when the screen is located on . Please refer to Game → Save Settings...
User Manual
Page 11
...input signal has been changed. A message will be different. 11 PRESS(ENTER): The selected item will appear on the top left corner of your Monitor's feature appears. The items below are not available if the Eye Saver Mode function is enable. •• Game → Picture Mode,... •• Picture → Picture Mode, Brightness, Color •• System → Eco Saving Plus Power Off Selects to turn the Monitor off by moving the JOG button in the function key guide screen. Source Selects to enable or disable Eye Saver Mode. Function Key Guide ―...
...input signal has been changed. A message will be different. 11 PRESS(ENTER): The selected item will appear on the top left corner of your Monitor's feature appears. The items below are not available if the Eye Saver Mode function is enable. •• Game → Picture Mode,... •• Picture → Picture Mode, Brightness, Color •• System → Eco Saving Plus Power Off Selects to turn the Monitor off by moving the JOG button in the function key guide screen. Source Selects to enable or disable Eye Saver Mode. Function Key Guide ―...
User Manual
Page 12
.... JOG Button UP Power saving/Non-signal mode Source Change Down PRESS(ENTER) for control source and power could be used as below . When the monitor displays nothing (i.e. Move to next depth. Power saving mode or Non-signal mode), 2 direct keys for 2 seconds Power Off When the...
.... JOG Button UP Power saving/Non-signal mode Source Change Down PRESS(ENTER) for control source and power could be used as below . When the monitor displays nothing (i.e. Move to next depth. Power saving mode or Non-signal mode), 2 direct keys for 2 seconds Power Off When the...

User Manual
Page 14
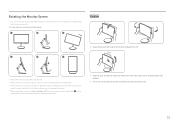
... cable. SERVICE Dedicated to an audio output device such as headphones. 140 mm (0, +10 mm) -2° (±2°) - 17° (±2°) •• The monitor tilt and height can be adjusted. •• When adjusting the tilt and height, hold both sides of the product. 14 DP IN Connects to...
... cable. SERVICE Dedicated to an audio output device such as headphones. 140 mm (0, +10 mm) -2° (±2°) - 17° (±2°) •• The monitor tilt and height can be adjusted. •• When adjusting the tilt and height, hold both sides of the product. 14 DP IN Connects to...
User Manual
Page 15
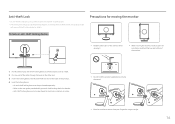
...Hold the bezel at the maximum can also damage the product. ――When rotating the monitor, set Arena Lighting to improve quality. Rotating the Monitor Screen ――The color and shape of parts may cause your monitor as shown below. 1 2 3 Caution 4 5 6 •• Grasp the left....) •• The screen can damage the product. Direct eye exposure to the bright light ( ) on the bottom front of the monitor and adjust the tilt. 90˚ ――Adjust the screen following the arrow direction. ――Rotate the screen in clockwise direction...
...Hold the bezel at the maximum can also damage the product. ――When rotating the monitor, set Arena Lighting to improve quality. Rotating the Monitor Screen ――The color and shape of parts may cause your monitor as shown below. 1 2 3 Caution 4 5 6 •• Grasp the left....) •• The screen can damage the product. Direct eye exposure to the bright light ( ) on the bottom front of the monitor and adjust the tilt. 90˚ ――Adjust the screen following the arrow direction. ――Rotate the screen in clockwise direction...
User Manual
Page 16
... to ensure that your anti-theft locking device for moving the monitor •• Hold the lower part of the monitor when moving it. •• When moving the monitor, rotate to portrait orientation and hold the top and bottom of the monitor. 1 Fix the cable of the cable through the loop on the...
... to ensure that your anti-theft locking device for moving the monitor •• Hold the lower part of the monitor when moving it. •• When moving the monitor, rotate to portrait orientation and hold the top and bottom of the monitor. 1 Fix the cable of the cable through the loop on the...
User Manual
Page 18
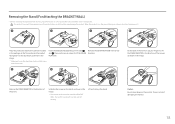
...REAR TOP in the direction of the arrow. A Remove the COVER REAR SUB in the arrow direction. 5 6 7 On the back of the monitor, use your fingers to lift the COVER REAR SUB. Be careful to attach the BRACKET WALL. Caution Do not press down on a flat surface ...4 Place the protective Styrofoam (cushion) included in the package on the floor and place the product facing down . : The product is a risk of damaging the monitor. 18 Placing pressure on the product when on the monitor. Removing the Stand (For Attaching the BRACKET WALL) ――Before removing the stand from the...
...REAR TOP in the direction of the arrow. A Remove the COVER REAR SUB in the arrow direction. 5 6 7 On the back of the monitor, use your fingers to lift the COVER REAR SUB. Be careful to attach the BRACKET WALL. Caution Do not press down on a flat surface ...4 Place the protective Styrofoam (cushion) included in the package on the floor and place the product facing down . : The product is a risk of damaging the monitor. 18 Placing pressure on the product when on the monitor. Removing the Stand (For Attaching the BRACKET WALL) ――Before removing the stand from the...
User Manual
Page 19
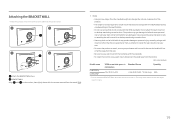
...Quantity C24FG70FQ* C27FG70FQ* 75 x 75 (3.0 x 3.0) 4 mm Φ, 0.7 pitch * 10 mm long 4 EA ――Do not attach the BRACKET WALL when the monitor is turned on a wall, ensure you purchase a wall-mount kit that can damage the internal components of the product. ‒‒ The length of screws... a wall mount, disconnect the stand base from the monitor. A A 19 Do not attach the wall-mount kit or desktop stand using excessive force. This may get damaged or fall and cause personal injury. Samsung shall not be held liable for any damage or injury caused by using improper ...
...Quantity C24FG70FQ* C27FG70FQ* 75 x 75 (3.0 x 3.0) 4 mm Φ, 0.7 pitch * 10 mm long 4 EA ――Do not attach the BRACKET WALL when the monitor is turned on a wall, ensure you purchase a wall-mount kit that can damage the internal components of the product. ‒‒ The length of screws... a wall mount, disconnect the stand base from the monitor. A A 19 Do not attach the wall-mount kit or desktop stand using excessive force. This may get damaged or fall and cause personal injury. Samsung shall not be held liable for any damage or injury caused by using improper ...

User Manual
Page 20
...not press down on the Styrofoam, as shown in the direction of the arrow. Attach the stand to tightly fasten. 5 6 7 On the back of the monitor, align and push the COVER REAR TOP in the groove in the image. ――Make sure to use the styrofoam (cushion) that the screen... in an upright position. After attaching the stand, place the product in the package on the floor and place the product facing down on the monitor. Placing pressure on the product when on a flat surface may damage the product. Attaching the Stand ――Before assembling the product, place the ...
...not press down on the Styrofoam, as shown in the direction of the arrow. Attach the stand to tightly fasten. 5 6 7 On the back of the monitor, align and push the COVER REAR TOP in the groove in the image. ――Make sure to use the styrofoam (cushion) that the screen... in an upright position. After attaching the stand, place the product in the package on the floor and place the product facing down on the monitor. Placing pressure on the product when on a flat surface may damage the product. Attaching the Stand ――Before assembling the product, place the ...
User Manual
Page 22
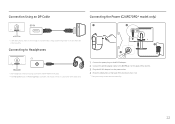
.... 2 Connect the AC/DC adapter cable to the DC 19V port on the back of the monitor. 3 Plug the AC/DC adapter into the power outlet. 4 Press the JOG button on the back of the monitor to Headphones 3 4 ――Use headphones when activating sound with a HDMI-HDMI or DP cable. ―...
.... 2 Connect the AC/DC adapter cable to the DC 19V port on the back of the monitor. 3 Plug the AC/DC adapter into the power outlet. 4 Press the JOG button on the back of the monitor to Headphones 3 4 ――Use headphones when activating sound with a HDMI-HDMI or DP cable. ―...
User Manual
Page 23
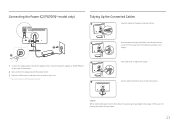
... port on the back of the product. 2 Next, connect the power cable to the power outlet. 3 Press the JOG button on the back of the monitor to the AC/DC adapter. DC 19V HDMI IN 1 HDMI IN 2 DP IN SERVICE 1 2 2 3 3 1 Connect the power cable to turn it on the holder, the...
... port on the back of the product. 2 Next, connect the power cable to the power outlet. 3 Press the JOG button on the back of the monitor to the AC/DC adapter. DC 19V HDMI IN 1 HDMI IN 2 DP IN SERVICE 1 2 2 3 3 1 Connect the power cable to turn it on the holder, the...
User Manual
Page 25
...: Select this mode to an optimum picture quality suitable for enjoying video and DVD content. This also provides a sharp image. •• Movie: Select this monitor. •• Cinema: Obtain the brightness and sharpness of the RTS screen and minimap. •• RPG: This mode is optimized for 3D graphics and...
...: Select this mode to an optimum picture quality suitable for enjoying video and DVD content. This also provides a sharp image. •• Movie: Select this monitor. •• Cinema: Obtain the brightness and sharpness of the RTS screen and minimap. •• RPG: This mode is optimized for 3D graphics and...
User Manual
Page 27
...8226;• The response rate during the game may fluctuate depending on the monitor model and compatibility with the latest one . •• While you encounter any issues when using the function, contact the Samsung Service Center. ――When the resolution is only enabled in HDMI1...) is applied, the screen may have malfunction. Use the HDMI/DisplayPort cable provided by the manufacturer when using the function, contact the Samsung Service Center. ――If you enable FreeSync? 1 Set FreeSync to Standard Engine or Ultimate Engine in the OSD menu. 2 ...
...8226;• The response rate during the game may fluctuate depending on the monitor model and compatibility with the latest one . •• While you encounter any issues when using the function, contact the Samsung Service Center. ――When the resolution is only enabled in HDMI1...) is applied, the screen may have malfunction. Use the HDMI/DisplayPort cable provided by the manufacturer when using the function, contact the Samsung Service Center. ――If you enable FreeSync? 1 Set FreeSync to Standard Engine or Ultimate Engine in the OSD menu. 2 ...

User Manual
Page 29
... displayed. •• 22" Wide (16:10): Use a 16:10 aspect ratio on a 22-inch wide screen. Pictures with an aspect ratio of the monitor to suit your favorite custom game mode. ――If you edit and save a custom game mode, the previous settings will be displayed. ••... 29 Pictures with the original aspect ratio without using the HDMI/DP cable. ――The input signal is 480p, 576p, 720p, or 1080p and monitor can display normally (Not every model can support all of 16:9. •• Screen Fit: Display the picture with a different aspect ratio will not ...
... displayed. •• 22" Wide (16:10): Use a 16:10 aspect ratio on a 22-inch wide screen. Pictures with an aspect ratio of the monitor to suit your favorite custom game mode. ――If you edit and save a custom game mode, the previous settings will be displayed. ••... 29 Pictures with the original aspect ratio without using the HDMI/DP cable. ――The input signal is 480p, 576p, 720p, or 1080p and monitor can display normally (Not every model can support all of 16:9. •• Screen Fit: Display the picture with a different aspect ratio will not ...

User Manual
Page 30
... for the AOS game screen. •• sRGB: Adjust the color system to view a sharper image than in Standard mode. •• Standard: Select this monitor. •• Cinema: Obtain the brightness and sharpness of the FPS game screen. This also provides a sharp image. •• Movie: Select this mode when...
... for the AOS game screen. •• sRGB: Adjust the color system to view a sharper image than in Standard mode. •• Standard: Select this monitor. •• Cinema: Obtain the brightness and sharpness of the FPS game screen. This also provides a sharp image. •• Movie: Select this mode when...

User Manual
Page 32
... adjust the image quality. In such case, HDMI Black Level can display normally, select Screen Fit to adjust horizontal position in AV mode and the monitor can be compatible with some source devices. ――The HDMI Black Level feature is connected to the product via HDMI, image quality degradation (contrast...
... adjust the image quality. In such case, HDMI Black Level can display normally, select Screen Fit to adjust horizontal position in AV mode and the monitor can be compatible with some source devices. ――The HDMI Black Level feature is connected to the product via HDMI, image quality degradation (contrast...

User Manual
Page 34
.... •• Interactive: Automatically change the LED brightness according to the sound from the computer. ――This mode changes the illumination level by the monitor.
.... •• Interactive: Automatically change the LED brightness according to the sound from the computer. ――This mode changes the illumination level by the monitor.


