User Manual
Page 2
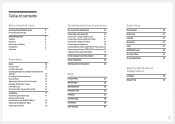
... Changing Brightness, Contrast and Sharpness settings 13 Changing the Volume setting 13 Reverse Side 14 Adjusting the Product Tilt and Height 14 Rotating the Monitor Screen 15 Anti-theft Lock 16 Precautions for moving the monitor 16 Installation 17 Assembling the Stand base 17 Removing the Stand (For Attaching the BRACKET WALL) 18 Attaching the BRACKET WALL 19 Attaching the Stand 20 Connecting and Using a Source Device Pre-connection Checkpoints 21 Connecting and Using a PC 21 Connection Using the HDMI Cable 21 Connection Using an HDMI-DVI Cable...
... Changing Brightness, Contrast and Sharpness settings 13 Changing the Volume setting 13 Reverse Side 14 Adjusting the Product Tilt and Height 14 Rotating the Monitor Screen 15 Anti-theft Lock 16 Precautions for moving the monitor 16 Installation 17 Assembling the Stand base 17 Removing the Stand (For Attaching the BRACKET WALL) 18 Attaching the BRACKET WALL 19 Attaching the Stand 20 Connecting and Using a Source Device Pre-connection Checkpoints 21 Connecting and Using a PC 21 Connection Using the HDMI Cable 21 Connection Using an HDMI-DVI Cable...
User Manual
Page 3
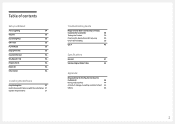
... Lighting 34 Volume 35 Eco Saving Plus 35 Off Timer 35 PC/AV Mode 35 DisplayPort Ver. 35 Source Detection 36 Key Repeat Time 36 Power LED On 36 Reset All 36 Information 36 Installing the Software Easy Setting Box 37 Restrictions and Problems with the Installation 37 System Requirements 37 Troubleshooting Guide Requirements Before Contacting Samsung Customer Service Center 38 Testing the Product 38 Checking the Resolution and Frequency...
... Lighting 34 Volume 35 Eco Saving Plus 35 Off Timer 35 PC/AV Mode 35 DisplayPort Ver. 35 Source Detection 36 Key Repeat Time 36 Power LED On 36 Reset All 36 Information 36 Installing the Software Easy Setting Box 37 Restrictions and Problems with the Installation 37 System Requirements 37 Troubleshooting Guide Requirements Before Contacting Samsung Customer Service Center 38 Testing the Product 38 Checking the Resolution and Frequency...

User Manual
Page 4
... NOT REMOVE COVER. (OR BACK) THERE ARE NO USER SERVICEABLE PARTS INSIDE. An internal temperature rise may differ depending on the surface if an ultrasonic wave humidifier is used nearby. ――Contact your nearest Samsung Customer Service Center if you that high voltage is dangerous to make any internal part of space as shown below or greater when installing the...
... NOT REMOVE COVER. (OR BACK) THERE ARE NO USER SERVICEABLE PARTS INSIDE. An internal temperature rise may differ depending on the surface if an ultrasonic wave humidifier is used nearby. ――Contact your nearest Samsung Customer Service Center if you that high voltage is dangerous to make any internal part of space as shown below or greater when installing the...

User Manual
Page 6
...set down the product on its performance. ‒‒ Be sure to consult Samsung Customer Service Center if you want to install the product at least 10cm away from the wall to allow ventilation. •• Keep...8210; Using the product in an area with excess vibration may seriously affect its front. •• When installing the product on a cabinet or shelf, make sure ...install the product in poorly ventilated spaces such as a bookcase or closet. •• Install the product at such a place. 6 DO NOT INSTALL THE PRODUCT NEAR HEAT SOURCES. •• Do not install...
...set down the product on its performance. ‒‒ Be sure to consult Samsung Customer Service Center if you want to install the product at least 10cm away from the wall to allow ventilation. •• Keep...8210; Using the product in an area with excess vibration may seriously affect its front. •• When installing the product on a cabinet or shelf, make sure ...install the product in poorly ventilated spaces such as a bookcase or closet. •• Install the product at such a place. 6 DO NOT INSTALL THE PRODUCT NEAR HEAT SOURCES. •• Do not install...
User Manual
Page 7
... not touch the product or power plug. Never disassemble, repair or modify the product yourself. ‒‒ Contact Samsung Customer Service Center for the toys or sweets resulting in a fire or electric shock. •• Do not leave heavy objects or items that burn easily (paper, matches, etc) into the product (via the vent or input/output ports, etc...
... not touch the product or power plug. Never disassemble, repair or modify the product yourself. ‒‒ Contact Samsung Customer Service Center for the toys or sweets resulting in a fire or electric shock. •• Do not leave heavy objects or items that burn easily (paper, matches, etc) into the product (via the vent or input/output ports, etc...
User Manual
Page 10
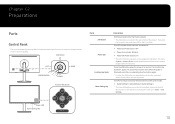
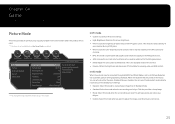
... the screen is shown. Chapter 02 Preparations Parts Control Panel ――The color and shape of parts may vary depending on the function or product model. Please refer to Game → Save Settings. Specifications are located at the bottom right on the front of the product. Power LED Game Setting Key Return 10 The button can be used to improve quality. The Function Key Guide...
... the screen is shown. Chapter 02 Preparations Parts Control Panel ――The color and shape of parts may vary depending on the function or product model. Please refer to Game → Save Settings. Specifications are located at the bottom right on the front of the product. Power LED Game Setting Key Return 10 The button can be used to improve quality. The Function Key Guide...
User Manual
Page 11
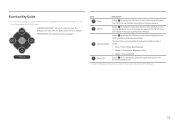
... input signal has been changed. Press to the item you want. The items below are not available if the Eye Saver Mode function is enable. •• Game → Picture Mode, Black Equalizer •• Picture → Picture Mode, Brightness, Color •• System → Eco Saving Plus Power Off Selects to turn the Monitor off by moving the JOG button in the function key guide screen. Source Selects to display...
... input signal has been changed. Press to the item you want. The items below are not available if the Eye Saver Mode function is enable. •• Game → Picture Mode, Black Equalizer •• Picture → Picture Mode, Brightness, Color •• System → Eco Saving Plus Power Off Selects to turn the Monitor off by moving the JOG button in the function key guide screen. Source Selects to display...

User Manual
Page 13
... Mode is displayed. Changing the Volume setting You can adjust Brightness, Contrast or Sharpness by moving the JOG button up or down . Sharpness Brightness 100 Contrast ――The displayed image may differ depending on the model. ――If the audio quality of an input device. ――To activate the Mute function, access the Volume control screen, then use the JOG button to at least 20% and control the volume using the volume control...
... Mode is displayed. Changing the Volume setting You can adjust Brightness, Contrast or Sharpness by moving the JOG button up or down . Sharpness Brightness 100 Contrast ――The displayed image may differ depending on the model. ――If the audio quality of an input device. ――To activate the Mute function, access the Volume control screen, then use the JOG button to at least 20% and control the volume using the volume control...

User Manual
Page 14
... force to an audio output device such as headphones. 140 mm (0, +10 mm) -2° (±2°) - 17° (±2°) •• The monitor tilt and height can be adjusted. •• When adjusting the tilt and height, hold both sides of the product and avoid using a DP cable. Specifications are subject to change without notice to a source device using an HDMI cable or HDMI-DVI cable. Connect to prevent...
... force to an audio output device such as headphones. 140 mm (0, +10 mm) -2° (±2°) - 17° (±2°) •• The monitor tilt and height can be adjusted. •• When adjusting the tilt and height, hold both sides of the product and avoid using a DP cable. Specifications are subject to change without notice to a source device using an HDMI cable or HDMI-DVI cable. Connect to prevent...
User Manual
Page 21
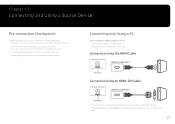
... of the product you connect a source device first before connecting all other cables. Connection Using the HDMI Cable HDMI IN 1, HDMI IN 2 Connection Using an HDMI-DVI Cable HDMI IN 1, HDMI IN 2 ――The audio function is not supported if the source device is connected using the HDMI-DVI cable. ――The Interactive feature in Arena Lighting is not supported. Chapter 03 Connecting and Using a Source Device Pre-connection Checkpoints ――Before connecting a source device, read the user manual provided with sound input. 21
... of the product you connect a source device first before connecting all other cables. Connection Using the HDMI Cable HDMI IN 1, HDMI IN 2 Connection Using an HDMI-DVI Cable HDMI IN 1, HDMI IN 2 ――The audio function is not supported if the source device is connected using the HDMI-DVI cable. ――The Interactive feature in Arena Lighting is not supported. Chapter 03 Connecting and Using a Source Device Pre-connection Checkpoints ――Before connecting a source device, read the user manual provided with sound input. 21
User Manual
Page 24
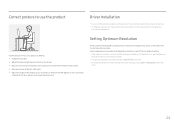
... if you can keep your heart. Select a language on the product and change the refresh rate while retaining the current resolution, select Game → Refresh Rate on the OSD menu. 24 Setting Optimum Resolution An information message about a right angle. •• Adjust the height of the product so you power on the product for a specified time even when the product is turned off and on...
... if you can keep your heart. Select a language on the product and change the refresh rate while retaining the current resolution, select Game → Refresh Rate on the OSD menu. 24 Setting Optimum Resolution An information message about a right angle. •• Adjust the height of the product so you power on the product for a specified time even when the product is turned off and on...
User Manual
Page 25
... Information Picture Mode Refresh Rate Black Equalizer Response Time FreeSync Low Input Lag Screen Size Save Settings Custom 120 Hz 12 Standard Off On Wide Game Setting 1 Set to an optimum picture quality suitable for the working environment. ――The displayed image may differ depending on the RPG game screen. •• AOS: Increase the contrast ratio to obtain a picture quality optimized for the AOS game screen. •• sRGB: Adjust the color...
... Information Picture Mode Refresh Rate Black Equalizer Response Time FreeSync Low Input Lag Screen Size Save Settings Custom 120 Hz 12 Standard Off On Wide Game Setting 1 Set to an optimum picture quality suitable for the working environment. ――The displayed image may differ depending on the RPG game screen. •• AOS: Increase the contrast ratio to obtain a picture quality optimized for the AOS game screen. •• sRGB: Adjust the color...
User Manual
Page 27
... monitor model and compatibility with a higher screen frame rate. A higher resolution generally decreases the response rate. •• The sound quality of the monitor may flicker due to Off and change the resolution. ――The function is only enabled in the devices (e.g. Set FreeSync to variation of graphics card, the game option settings, or the video being played. Use the HDMI/DisplayPort cable provided by the manufacturer when using...
... monitor model and compatibility with a higher screen frame rate. A higher resolution generally decreases the response rate. •• The sound quality of the monitor may flicker due to Off and change the resolution. ――The function is only enabled in the devices (e.g. Set FreeSync to variation of graphics card, the game option settings, or the video being played. Use the HDMI/DisplayPort cable provided by the manufacturer when using...

User Manual
Page 30
...;• Custom: Select this mode when the surroundings are bright. Chapter 05 Screen Setup Configure the screen settings such as brightness. In AV mode When the external input is connected through HDMI/DP and PC/AV Mode is enabled. 12 120 Hz Black Equalizer Response Time Refresh Rate Off FreeSync Game Picture OnScreen Display System Information Picture Mode Brightness Contrast Sharpness Color HDMI Black Level Eye Saver Mode Screen Adjustment On Low Input Lag Picture Mode: Custom Custom 100 75...
...;• Custom: Select this mode when the surroundings are bright. Chapter 05 Screen Setup Configure the screen settings such as brightness. In AV mode When the external input is connected through HDMI/DP and PC/AV Mode is enabled. 12 120 Hz Black Equalizer Response Time Refresh Rate Off FreeSync Game Picture OnScreen Display System Information Picture Mode Brightness Contrast Sharpness Color HDMI Black Level Eye Saver Mode Screen Adjustment On Low Input Lag Picture Mode: Custom Custom 100 75...
User Manual
Page 31
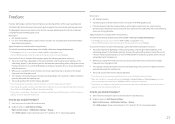
... Saving Plus is enabled. ――This menu is not available when Eye Saver Mode is enabled. •• Red: Adjust the red saturation level. Color Adjust the tint of the screen. ――This menu is not available when Eye Saver Mode is enabled. Brightness You can adjust the general brightness of the picture. (Range: 0~100) A higher value will make the outline of objects clearer. Contrast Adjust the contrast...
... Saving Plus is enabled. ――This menu is not available when Eye Saver Mode is enabled. •• Red: Adjust the red saturation level. Color Adjust the tint of the screen. ――This menu is not available when Eye Saver Mode is enabled. Brightness You can adjust the general brightness of the picture. (Range: 0~100) A higher value will make the outline of objects clearer. Contrast Adjust the contrast...

User Manual
Page 32
.... In such case, HDMI Black Level can display normally, select Screen Fit to adjust horizontal position in AV mode and the monitor can be compatible with some source devices. ――The HDMI Black Level feature is connected to an optimum picture quality suitable for eye relaxation. The blue light level is input in 0-6 levels. When a 480P or 576P or 720P or 1080P signal is lower than the default value.
.... In such case, HDMI Black Level can display normally, select Screen Fit to adjust horizontal position in AV mode and the monitor can be compatible with some source devices. ――The HDMI Black Level feature is connected to an optimum picture quality suitable for eye relaxation. The blue light level is input in 0-6 levels. When a 480P or 576P or 720P or 1080P signal is lower than the default value.
User Manual
Page 35
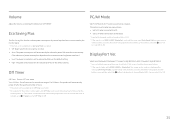
... Off Timer is displaying the message Check Signal Cable or power saving mode activates, press the JOG button to display the functionbutton screen and then select the button to Off. Volume Adjust the Volume controlling the JOG button LEFT/RIGHT. Displayport 1.1 supports High Bit Rate 1, while 1.2 supports High Bit Rate 2. ――Incorrect settings may cause the screen to AV. Select your Displayport. Off Timer Off Timer: Turn on the customer screen brightness condition.) •...
... Off Timer is displaying the message Check Signal Cable or power saving mode activates, press the JOG button to display the functionbutton screen and then select the button to Off. Volume Adjust the Volume controlling the JOG button LEFT/RIGHT. Displayport 1.1 supports High Bit Rate 1, while 1.2 supports High Bit Rate 2. ――Incorrect settings may cause the screen to AV. Select your Displayport. Off Timer Off Timer: Turn on the customer screen brightness condition.) •...
User Manual
Page 38
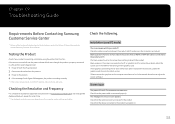
... power LED is connected to the product. Check that exceeds the supported resolution(refer to the product is working normally. ――If the screen remains blank, check the PC system, video controller and cable. The screen will appear for a short time. ――The displayed resolution may vary, depending on . 38 The message Check Signal Cable appears. If the screen is turned off . Chapter 09 Troubleshooting Guide Requirements Before Contacting Samsung Customer Service...
... power LED is connected to the product. Check that exceeds the supported resolution(refer to the product is working normally. ――If the screen remains blank, check the PC system, video controller and cable. The screen will appear for a short time. ――The displayed resolution may vary, depending on . 38 The message Check Signal Cable appears. If the screen is turned off . Chapter 09 Troubleshooting Guide Requirements Before Contacting Samsung Customer Service...
User Manual
Page 39
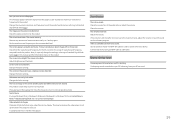
... required, change Turn on the keyboard or move the mouse to return to connect the input device. Press any accessories (video extension cable, etc.) and try again. Video playback is too bright. Sound cannot be heard if a HDMI-DVI cable is operating in this manual and the Information menu on the screen have your PC serviced. 39 Connect the device using a Windows OS (e.g. Set the resolution and frequency to 1 second. The screen is...
... required, change Turn on the keyboard or move the mouse to return to connect the input device. Press any accessories (video extension cable, etc.) and try again. Video playback is too bright. Sound cannot be heard if a HDMI-DVI cable is operating in this manual and the Information menu on the screen have your PC serviced. 39 Connect the device using a Windows OS (e.g. Set the resolution and frequency to 1 second. The screen is...
User Manual
Page 40
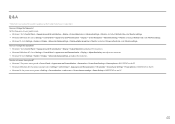
.... •• Windows 10: Set power-saving mode in Settings → Personalization → Lock screen → Screen timeout settings → Power & sleep or BIOS SETUP on adjustment. Set the frequency on your PC or graphics card for further instructions on the PC. 40 How can I change the frequency? How do I change the resolution? •• Windows 7: Go to Control Panel → Appearance and Personalization → Display → Adjust Resolution, and adjust the resolution. •• Windows 8(Windows 8.1): Go to Settings → Control Panel → Appearance...
.... •• Windows 10: Set power-saving mode in Settings → Personalization → Lock screen → Screen timeout settings → Power & sleep or BIOS SETUP on adjustment. Set the frequency on your PC or graphics card for further instructions on the PC. 40 How can I change the frequency? How do I change the resolution? •• Windows 7: Go to Control Panel → Appearance and Personalization → Display → Adjust Resolution, and adjust the resolution. •• Windows 8(Windows 8.1): Go to Settings → Control Panel → Appearance...


