User Manual (ENGLISH)
Page 14
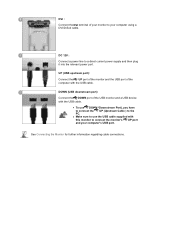
z To use the USB cable supplied with this monitor to connect the monitor's UP port and your computer using a DVI/D-Sub cable. DC 12V : Connect a power line to a direct current power supply and then plug it into the relevant power port. See Connecting the Monitor for further information regarding cable connections. DOWN (USB downstream port): Connect the DOWN port...
z To use the USB cable supplied with this monitor to connect the monitor's UP port and your computer using a DVI/D-Sub cable. DC 12V : Connect a power line to a direct current power supply and then plug it into the relevant power port. See Connecting the Monitor for further information regarding cable connections. DOWN (USB downstream port): Connect the DOWN port...
User Manual (ENGLISH)
Page 15
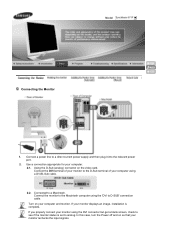
...direct current power supply and then plug it into the relevant power port. 2. Using the D-Sub (analog) connector on your monitor displays an image, installation is set to analog. Connect a power line to D-SUB' connection cable. Connect the monitor to the... Macintosh computer using a DVI/D-Sub cable. 2-2. Connect the DVI terminal of your monitor rechecks the input signals. If your computer and monitor. Turn on the video card. Connected to the D-Sub terminal of your monitor to a Macintosh. Model SyncMaster 971P...
...direct current power supply and then plug it into the relevant power port. 2. Using the D-Sub (analog) connector on your monitor displays an image, installation is set to analog. Connect a power line to D-SUB' connection cable. Connect the monitor to the... Macintosh computer using a DVI/D-Sub cable. 2-2. Connect the DVI terminal of your monitor rechecks the input signals. If your computer and monitor. Turn on the video card. Connected to the D-Sub terminal of your monitor to a Macintosh. Model SyncMaster 971P...

User Manual (ENGLISH)
Page 42
... located on the front of the monitor, or try moving the mouse or pressing a key on the screen. Note: If the initial screen (the login screen) does not appear, contact the Service Center or your dealer. Press any problems yourself. Model SyncMaster 971P Check List Before calling for Windows ... image on the screen. Symptom No images on the keyboard again. Check the power cord connection and supply. There is no image on the front panel of the monitor by using the Power button on the screen. The monitor is set to Analog. Can you do need assistance, please call the phone...
... located on the front of the monitor, or try moving the mouse or pressing a key on the screen. Note: If the initial screen (the login screen) does not appear, contact the Service Center or your dealer. Press any problems yourself. Model SyncMaster 971P Check List Before calling for Windows ... image on the screen. Symptom No images on the keyboard again. Check the power cord connection and supply. There is no image on the front panel of the monitor by using the Power button on the screen. The monitor is set to Analog. Can you do need assistance, please call the phone...
User Manual (ENGLISH)
Page 46
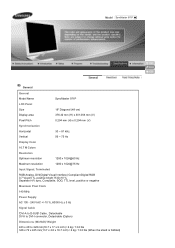
Model SyncMaster 971P General General Model Name SyncMaster 971P LCD Panel Size Display area Pixel Pitch Synchronization Horizontal Vertical Display Color 16.7 M Colors 19" Diagonal (48 cm) 376.32 mm (H) x 301.056 mm (V) 0.294 mm (H) x 0.294 mm (V) 30 ~ 81 kHz 56 ~ 75 Hz Resolution ... Digital RGB 0.7 Vp-p±5 %, positive bright 75 Ω±10 % Separate H/V sync, Composite, SOG, TTL level, positive or negative Maximum Pixel Clock 140 MHz Power Supply AC 100 - 240 VAC +/-10 %, 60/50 Hz ± 3 Hz Signal Cable 'DVI-A to D-SUB' Cable , Detachable DVI-I to DVI-I connector, Detachable...
Model SyncMaster 971P General General Model Name SyncMaster 971P LCD Panel Size Display area Pixel Pitch Synchronization Horizontal Vertical Display Color 16.7 M Colors 19" Diagonal (48 cm) 376.32 mm (H) x 301.056 mm (V) 0.294 mm (H) x 0.294 mm (V) 30 ~ 81 kHz 56 ~ 75 Hz Resolution ... Digital RGB 0.7 Vp-p±5 %, positive bright 75 Ω±10 % Separate H/V sync, Composite, SOG, TTL level, positive or negative Maximum Pixel Clock 140 MHz Power Supply AC 100 - 240 VAC +/-10 %, 60/50 Hz ± 3 Hz Signal Cable 'DVI-A to D-SUB' Cable , Detachable DVI-I to DVI-I connector, Detachable...

User Manual (ENGLISH)
Page 15
... downstream port): Connect the DOWN port of the USB monitor and a USB device with this monitor to a direct current power supply and then plug it into the relevant power port. See Connecting the Monitor for further information regarding cable connections. DC 12V : Connect a power line to connect the monitor's UP port and your computer using a DVI/D-Sub cable...
... downstream port): Connect the DOWN port of the USB monitor and a USB device with this monitor to a direct current power supply and then plug it into the relevant power port. See Connecting the Monitor for further information regarding cable connections. DC 12V : Connect a power line to connect the monitor's UP port and your computer using a DVI/D-Sub cable...

User Manual (ENGLISH)
Page 16
...a Macintosh. Connecting the Monitor 1. At this time, press the Power button at the left so that it into the relevant power port. 2-1. If your monitor displays an image, installation is set to analog. Using the D-Sub (analog) connector on your monitor to a direct current power supply and then plug it ...checks the input signals again. If you need to see if the monitor status is complete. Connect the DVI terminal of your monitor or the Custom button at the right of ...
...a Macintosh. Connecting the Monitor 1. At this time, press the Power button at the left so that it into the relevant power port. 2-1. If your monitor displays an image, installation is set to analog. Using the D-Sub (analog) connector on your monitor to a direct current power supply and then plug it ...checks the input signals again. If you need to see if the monitor status is complete. Connect the DVI terminal of your monitor or the Custom button at the right of ...

User Manual (ENGLISH)
Page 42
Check List Solutions Is the power cord connected properly? Can you can remedy any key on the Information section or contact your dealer. The monitor is no image on the screen. Make sure that your monitor checks the input signals again by using the input source functionalities provided on the ... restore the image on , reboot the computer to see if you see if the monitor status is set to analog. There is in PowerSaver mode. Symptom No images on the monitor. Check the power cord connection and supply. If the initial screen (the login screen) appears, boot the computer in the ...
Check List Solutions Is the power cord connected properly? Can you can remedy any key on the Information section or contact your dealer. The monitor is no image on the screen. Make sure that your monitor checks the input signals again by using the input source functionalities provided on the ... restore the image on , reboot the computer to see if you see if the monitor status is set to analog. There is in PowerSaver mode. Symptom No images on the monitor. Check the power cord connection and supply. If the initial screen (the login screen) appears, boot the computer in the ...


