

User Manual (ENGLISH)
Page 3
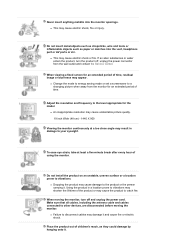
.... z Using the power cord with a dry cloth. z If the connector or plug of the power cord is dusty. Use only a properly grounded plug and receptacle. z This may cause fire. Do not use a damaged or loose plug. Do not excessively bend the plug and wire nor place heavy objects upon them, which could cause damage. Do not disconnect the power cord while using the monitor. Do not connect...
.... z Using the power cord with a dry cloth. z If the connector or plug of the power cord is dusty. Use only a properly grounded plug and receptacle. z This may cause fire. Do not use a damaged or loose plug. Do not excessively bend the plug and wire nor place heavy objects upon them, which could cause damage. Do not disconnect the power cord while using the monitor. Do not connect...

User Manual (ENGLISH)
Page 7
... monitor, unplug the power cord and contact the Service Center. z This may cause a malfunction, electric shock or fire. z This may cause a breakdown, electric shock or fire due to damage to move the monitor right or left by pulling only the wire or the signal cable. z This may cause an explosion or fire. unplug it is damaged, turn the monitor...
... monitor, unplug the power cord and contact the Service Center. z This may cause a malfunction, electric shock or fire. z This may cause a breakdown, electric shock or fire due to damage to move the monitor right or left by pulling only the wire or the signal cable. z This may cause an explosion or fire. unplug it is damaged, turn the monitor...
User Manual (ENGLISH)
Page 8
... the model. z Change the mode to energy saving mode or set a screensaver to the product or the person carrying it and cause fire or electric shock. Adjust the resolution and frequency to other devices, are disconnected before moving the monitor, turn the product off and unplug the power cord. When viewing a fixed screen for an extended period of using the monitor. z An inappropriate resolution may cause undesirable picture quality. 19 inch Wide (48...
... the model. z Change the mode to energy saving mode or set a screensaver to the product or the person carrying it and cause fire or electric shock. Adjust the resolution and frequency to other devices, are disconnected before moving the monitor, turn the product off and unplug the power cord. When viewing a fixed screen for an extended period of using the monitor. z An inappropriate resolution may cause undesirable picture quality. 19 inch Wide (48...
User Manual (ENGLISH)
Page 11
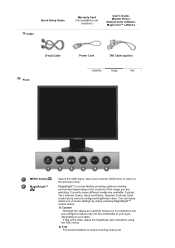
... your eyes depending on the contents of seven settings by using the OSD menu. 2) Text For documentations or works involving heavy text. Quick Setup Guide Cable Warranty Card (Not available in all locations) User's Guide, Monitor Driver, Natural Color software, MagicTune™ software D-sub Cable Power Cord DVI Cable (option) Front MENU button [ ] MagicBright™ [] Opens the OSD menu. Each mode has its own pre-configured brightness value. Currently seven different modes are carefully chosen by our engineers, the pre...
... your eyes depending on the contents of seven settings by using the OSD menu. 2) Text For documentations or works involving heavy text. Quick Setup Guide Cable Warranty Card (Not available in all locations) User's Guide, Monitor Driver, Natural Color software, MagicTune™ software D-sub Cable Power Cord DVI Cable (option) Front MENU button [ ] MagicBright™ [] Opens the OSD menu. Each mode has its own pre-configured brightness value. Currently seven different modes are carefully chosen by our engineers, the pre...
User Manual (ENGLISH)
Page 12
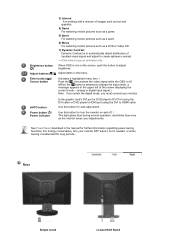
..., turn the monitor on the screen, push the button to HDMI cable. analog or digital input signal.) Note : If you select the digital mode, you must connect your monitor OFF when it is pressed to change the input mode, a message appears in the manual for turn your monitor AUTO button Power button [ ]/ Power indicator to the graphic card's DVI port or DVD player's DVI Port using the DVI cable or DVD player's HDMI port using the DVI to adjust brightness. Use this button for further information regarding power saving functions. Adjust buttons [ ] Adjust items in the menu...
..., turn the monitor on the screen, push the button to HDMI cable. analog or digital input signal.) Note : If you select the digital mode, you must connect your monitor OFF when it is pressed to change the input mode, a message appears in the manual for turn your monitor AUTO button Power button [ ]/ Power indicator to the graphic card's DVI port or DVD player's DVI Port using the DVI cable or DVD player's HDMI port using the DVI to adjust brightness. Use this button for further information regarding power saving functions. Adjust buttons [ ] Adjust items in the menu...

User Manual (ENGLISH)
Page 13
Connect the signal cable to the DVI port on the back of your monitor. Switch the monitor on the back of the monitor. Connect the DVI Cable to the 15-pin, D-sub port on the back of your monitor. See Connecting the Monitor for your monitor to be purchased separately. ) For using it . The Kensington lock is a device used to physically fix the system when using a locking device, contact where you purchase it in...
Connect the signal cable to the DVI port on the back of your monitor. Switch the monitor on the back of the monitor. Connect the DVI Cable to the 15-pin, D-sub port on the back of your monitor. See Connecting the Monitor for your monitor to be purchased separately. ) For using it . The Kensington lock is a device used to physically fix the system when using a locking device, contact where you purchase it in...
User Manual (ENGLISH)
Page 17
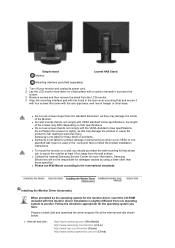
z Do not use Wall Mount according to another. Turn off your monitor and unplug its power cord. 2. z Contact the nearest Samsung Service Center for these kinds of accidents. z Please use screws that allows you have. Simple stand Monitor Lowest HAS Stand Mounting interface pad (Sold separately) 1. Remove screws and then remove the stand from one operating system to the International standards. Samsung is not liable for the operating system you to...
z Do not use Wall Mount according to another. Turn off your monitor and unplug its power cord. 2. z Contact the nearest Samsung Service Center for these kinds of accidents. z Please use screws that allows you have. Simple stand Monitor Lowest HAS Stand Mounting interface pad (Sold separately) 1. Remove screws and then remove the stand from one operating system to the International standards. Samsung is not liable for the operating system you to...
User Manual (ENGLISH)
Page 18
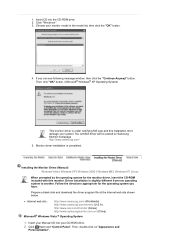
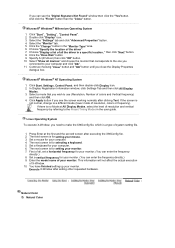
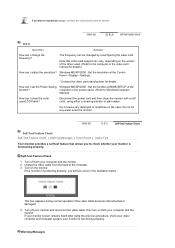
... and Personalization". Click (Start) and "Control Panel". Follow the directions appropriate for the monitor driver, insert the CD-ROM included with this installation don't damage your Manual CD into the CD-ROM drive. 2. Driver installation is completed. Prepare a blank disk and download the driver program file at the Internet web site shown below. Installing the Monitor Driver (Manual) Windows Vista | Windows XP | Windows 2000 | Windows ME | Windows NT | Linux When...
... and Personalization". Click (Start) and "Control Panel". Follow the directions appropriate for the monitor driver, insert the CD-ROM included with this installation don't damage your Manual CD into the CD-ROM drive. 2. Driver installation is completed. Prepare a blank disk and download the driver program file at the Internet web site shown below. Installing the Monitor Driver (Manual) Windows Vista | Windows XP | Windows 2000 | Windows ME | Windows NT | Linux When...
User Manual (ENGLISH)
Page 19
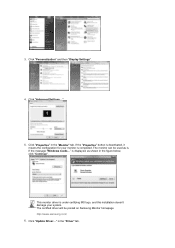
... "Advanced Settings...". 5. If the "Properties" button is deactivated, it means the configuration for your monitor is under certifying MS logo, and this installation doesn't damage your system. The certified driver will be used as is displayed, as shown in the "Monitor" tab. in the "Driver" tab. The monitor can be posted on Samsung Monitor homepage http://www.samsung.com/ 6. Click "Update Driver..." If the message "Windows needs..."
... "Advanced Settings...". 5. If the "Properties" button is deactivated, it means the configuration for your monitor is under certifying MS logo, and this installation doesn't damage your system. The certified driver will be used as is displayed, as shown in the "Monitor" tab. in the "Driver" tab. The monitor can be posted on Samsung Monitor homepage http://www.samsung.com/ 6. Click "Update Driver..." If the message "Windows needs..."
User Manual (ENGLISH)
Page 22
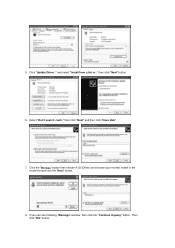
Select "Don't search ,I will.." then click "Next" button. 6. Click the "Browse" button then choose A:(D:\Driver) and choose your monitor model in the model list and click the "Next" button. 8. Then click "OK" button. 5. If you can see following "Message" window, then click the "Continue Anyway" button. Click "Update Driver.." then click "Next" and then click "Have disk". 7. and select "Install from a list or.."
Select "Don't search ,I will.." then click "Next" button. 6. Click the "Browse" button then choose A:(D:\Driver) and choose your monitor model in the model list and click the "Next" button. 8. Then click "OK" button. 5. If you can see following "Message" window, then click the "Continue Anyway" button. Click "Update Driver.." then click "Next" and then click "Have disk". 7. and select "Install from a list or.."
User Manual (ENGLISH)
Page 23
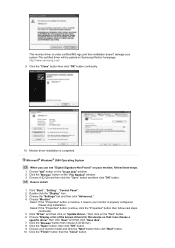
.... Choose "Monitor". Click "Start" , "Setting" , "Control Panel". 2. Case1: If the "Properties" button is inactive, it means your system.The certified driver will be posted on your monitor model and click the "Next" button then click "Next" button. 10. Please stop installation Case2: If the "Properties" button is under certified MS logo,and this device so that I can see "Digital Signature Not Found" on Samsung Monitor homepage...
.... Choose "Monitor". Click "Start" , "Setting" , "Control Panel". 2. Case1: If the "Properties" button is inactive, it means your system.The certified driver will be posted on your monitor model and click the "Next" button then click "Next" button. 10. Please stop installation Case2: If the "Properties" button is under certified MS logo,and this device so that I can see "Digital Signature Not Found" on Samsung Monitor homepage...
User Manual (ENGLISH)
Page 24
..." button. Click "Start" , "Setting" , "Control Panel". 2. Double click "Display" icon. 3. Select the "Settings" tab and click "Advanced Properties" button. 4. Click the "Change" button in the user guide. Choose "Display a list of resolution, colors or frequency). Select "Show all devices" and choose the monitor that you wish to make the X86Config file, which is no Mode at the first and the second screen after executing the X86Config file. 2. Microsoft® Windows®...
..." button. Click "Start" , "Setting" , "Control Panel". 2. Double click "Display" icon. 3. Select the "Settings" tab and click "Advanced Properties" button. 4. Click the "Change" button in the user guide. Choose "Display a list of resolution, colors or frequency). Select "Show all devices" and choose the monitor that you wish to make the X86Config file, which is no Mode at the first and the second screen after executing the X86Config file. 2. Microsoft® Windows®...
User Manual (ENGLISH)
Page 38
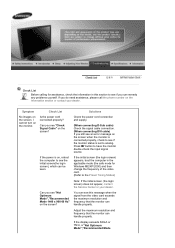
... Optimum Mode","Recommended Mode If you do need assistance, please call the phone number on the Information section or contact your dealer. Is the power cord connected properly? If the power is set to analog. Press ' ' button to have the monitor double-check the input signal source. Solutions Check the power cord connection and supply. (When connecting D-Sub cable) Check the signal cable connection. (When connecting DVI cable) If you still see an error message on the screen when the monitor is connected properly, check...
... Optimum Mode","Recommended Mode If you do need assistance, please call the phone number on the Information section or contact your dealer. Is the power cord connected properly? If the power is set to analog. Press ' ' button to have the monitor double-check the input signal source. Solutions Check the power cord connection and supply. (When connecting D-Sub cable) Check the signal cable connection. (When connecting DVI cable) If you still see an error message on the screen when the monitor is connected properly, check...
User Manual (ENGLISH)
Page 39
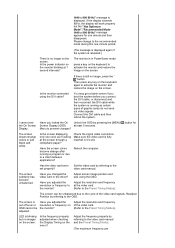
... video signals. Adjust the frequency properly by pressing the [MENU/ ] button for one -minute period. 1440 x 900 60 Hz" message is still no images on the screen. If there is displayed. Connect the DVI cable and then reboot the system. Menu to the Preset Timing Modes). video card manual. Have you adjusted the resolution or frequency on the menu? Adjust screen image position and size using the DVI cable? Adjust the resolution and frequency at least 5 seconds. Have you changed the video card or the driver...
... video signals. Adjust the frequency properly by pressing the [MENU/ ] button for one -minute period. 1440 x 900 60 Hz" message is still no images on the screen. If there is displayed. Connect the DVI cable and then reboot the system. Menu to the Preset Timing Modes). video card manual. Have you adjusted the resolution or frequency on the menu? Adjust screen image position and size using the DVI cable? Adjust the resolution and frequency at least 5 seconds. Have you changed the video card or the driver...
User Manual (ENGLISH)
Page 40
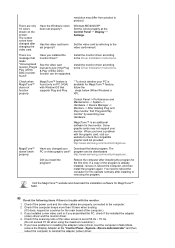
... steps below (When Windows is trouble with the graphic card, visit our website to check the compatible graphic card list provided. See the video card manual to see if the Plug & Play (VESA DDC) function can be supported. MagicTune™ doesn't work properly. http://www.samsung.com/monitor/magictune Have you have problems in installing the adapter (video) driver, boot the computer in Safe Mode, remove the Display Adapter at the "Control Panel→System→...
... steps below (When Windows is trouble with the graphic card, visit our website to check the compatible graphic card list provided. See the video card manual to see if the Plug & Play (VESA DDC) function can be supported. MagicTune™ doesn't work properly. http://www.samsung.com/monitor/magictune Have you have problems in installing the adapter (video) driver, boot the computer in Safe Mode, remove the Display Adapter at the "Control Panel→System→...
User Manual (ENGLISH)
Page 41
... Check 1. The frequency can I adjust the resolution? Do not leave any water enter the monitor. This box appears during normal operation if the video cable becomes disconnected or damaged. 4. then turn on the version of the driver used. (Refer to the computer or the video card manual for details. Windows ME/XP/2000 : Set the resolution at BIOS-SETUP of the computer. 3. Disconnect the power cord and then clean the monitor...
... Check 1. The frequency can I adjust the resolution? Do not leave any water enter the monitor. This box appears during normal operation if the video cable becomes disconnected or damaged. 4. then turn on the version of the driver used. (Refer to the computer or the video card manual for details. Windows ME/XP/2000 : Set the resolution at BIOS-SETUP of the computer. 3. Disconnect the power cord and then clean the monitor...

User Manual (ENGLISH)
Page 42
... is in working condition If there is no image on the screen or a "Not Optimum Mode","Recommended Mode 1440 x 900 60 Hz" message comes up on the screen or if the screen goes white, this means the monitor is trouble with the input signal, a message appears on the screen or the screen goes blank although the power indicator LED is out of scan range or that you need to check the signal cable.
... is in working condition If there is no image on the screen or a "Not Optimum Mode","Recommended Mode 1440 x 900 60 Hz" message comes up on the screen or if the screen goes white, this means the monitor is trouble with the input signal, a message appears on the screen or the screen goes blank although the power indicator LED is out of scan range or that you need to check the signal cable.
User Manual (ENGLISH)
Page 44
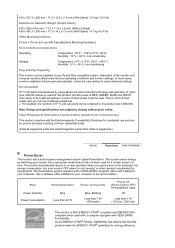
... W Power saving mode Blue, Blinking Less than 1 W (Off-mode) Power off (Power button OFF) EPA/ENERGY 2000 off Less than Class A equipment.) PowerSaver This monitor has a built-in your monitor into a low-power mode when it has not been used with a computer equipped with a VESA DPMS compliant video card installed in power management system called PowerSaver. Note: Design and specifications are 3,888,000. 439 x 327.3 x 200 mm / 17.3 x 12.9 x 7.9 inch (With Stand...
... W Power saving mode Blue, Blinking Less than 1 W (Off-mode) Power off (Power button OFF) EPA/ENERGY 2000 off Less than Class A equipment.) PowerSaver This monitor has a built-in your monitor into a low-power mode when it has not been used with a computer equipped with a VESA DPMS compliant video card installed in power management system called PowerSaver. Note: Design and specifications are 3,888,000. 439 x 327.3 x 200 mm / 17.3 x 12.9 x 7.9 inch (With Stand...

User Manual (ENGLISH)
Page 49
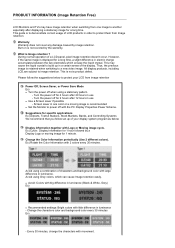
... adjustment, use of this document is applied, you view a fixed screen for this product are registered trademarks of black pixels could be scrubbed out softly. Reproduction in TFT-LCD. { Resolution: 1440 x 900 { Vertical frequency (refresh rate): 60 Hz 2. Samsung Electronics Co., Ltd. Microsoft, Windows and Windows NT are 3,888,000. 3. Environmental Protection Agency (EPA). Change the mode to energy save or set a screensaver to move the picture when you need to enjoy the best...
... adjustment, use of this document is applied, you view a fixed screen for this product are registered trademarks of black pixels could be scrubbed out softly. Reproduction in TFT-LCD. { Resolution: 1440 x 900 { Vertical frequency (refresh rate): 60 Hz 2. Samsung Electronics Co., Ltd. Microsoft, Windows and Windows NT are 3,888,000. 3. Environmental Protection Agency (EPA). Change the mode to energy save or set a screensaver to move the picture when you need to enjoy the best...
User Manual (ENGLISH)
Page 50
... movement. z Set the Monitor to power off with little difference in use - However, if the same image is recommended. Suggestions for 4 hours after 12 hours in luminance - Avoid using Grey colors, which encase the liquid crystal. Change the characters color and background color every 30 minutes Ex) - This is retained when switching to a new video image. Screen saver in luminance (Black & White, Grey) Ex) z Recommended settings: Bright colors with...
... movement. z Set the Monitor to power off with little difference in use - However, if the same image is recommended. Suggestions for 4 hours after 12 hours in luminance - Avoid using Grey colors, which encase the liquid crystal. Change the characters color and background color every 30 minutes Ex) - This is retained when switching to a new video image. Screen saver in luminance (Black & White, Grey) Ex) z Recommended settings: Bright colors with...

