
User Manual (ENGLISH)
Page 2
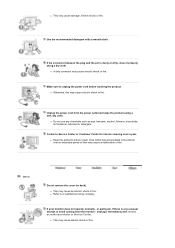
Prohibited Do not disassemble Do not touch Important to read and understand at all times Disconnect the plug from the outlet Ground to prevent an electric shock Power When not used for extended period of time, set your computer to DPMS. If using a screen saver, set it to the equipment. z This may cause electric shock or fire. Failure to follow directions noted by this symbol could result in bodily harm or damage to active screen mode. Do not use a damaged or loose plug.
Prohibited Do not disassemble Do not touch Important to read and understand at all times Disconnect the plug from the outlet Ground to prevent an electric shock Power When not used for extended period of time, set your computer to DPMS. If using a screen saver, set it to the equipment. z This may cause electric shock or fire. Failure to follow directions noted by this symbol could result in bodily harm or damage to active screen mode. Do not use a damaged or loose plug.

User Manual (ENGLISH)
Page 3
... dusty. z An improper ground may cause fire. Do not pull the plug out by the separation and may damage the monitor. Use only a properly grounded plug and receptacle. Insert the power plug firmly so that it with a dry cloth. Do not excessively bend the plug and wire nor place heavy objects upon... them, which could cause damage. z This may cause electric shock or fire. Do not disconnect the power cord while using the monitor. Do not connect too many extension cords or plugs to contact an authorized Service Center, when installing your...
... dusty. z An improper ground may cause fire. Do not pull the plug out by the separation and may damage the monitor. Use only a properly grounded plug and receptacle. Insert the power plug firmly so that it with a dry cloth. Do not excessively bend the plug and wire nor place heavy objects upon... them, which could cause damage. z This may cause electric shock or fire. Do not disconnect the power cord while using the monitor. Do not connect too many extension cords or plugs to contact an authorized Service Center, when installing your...

User Manual (ENGLISH)
Page 4
... low humidity and a minimum of the base does not protrude from the power cable. z Failure to do so may cause damage to the product or the person carrying it. Place your monitor. Install the monitor base in a location with poor ventilation, for 24 hours such as someone...specifically children. z Otherwise, this may cause serious damage to your monitor in a showcase or shelf so that the end of dust. Put down the monitor carefully. z Dropping the product may cause electric shock or fire inside the monitor. location with heavy dust, high or low temperatures, high humidity...
... low humidity and a minimum of the base does not protrude from the power cable. z Failure to do so may cause damage to the product or the person carrying it. Place your monitor. Install the monitor base in a location with poor ventilation, for 24 hours such as someone...specifically children. z Otherwise, this may cause serious damage to your monitor in a showcase or shelf so that the end of dust. Put down the monitor carefully. z Dropping the product may cause electric shock or fire inside the monitor. location with heavy dust, high or low temperatures, high humidity...
User Manual (ENGLISH)
Page 6
...particular, if there is dusty or dirty, clean it immediately and contact an authorized dealer or Service Center. z Refer to unplug the power cord before cleaning the product. z This may cause electric shock or fire. Make sure to a qualified servicing company. unplug it properly...clean. z This may cause electric shock or fire. z Otherwise, this may cause an electric shock or fire. Unplug the power cord from the monitor - If your monitor does not operate normally - Use the recommended detergent with a smooth cloth. Contact a Service Center or Customer Center for interior ...
...particular, if there is dusty or dirty, clean it immediately and contact an authorized dealer or Service Center. z Refer to unplug the power cord before cleaning the product. z This may cause electric shock or fire. Make sure to a qualified servicing company. unplug it properly...clean. z This may cause electric shock or fire. z Otherwise, this may cause an electric shock or fire. Unplug the power cord from the monitor - If your monitor does not operate normally - Use the recommended detergent with a smooth cloth. Contact a Service Center or Customer Center for interior ...

User Manual (ENGLISH)
Page 7
... water or outdoors where it is damaged, turn the monitor off and unplug the power cord. z Failure to snow or rain. Do not move the monitor by pulling only the wire or the signal cable. z Bad ventilation may cause a malfunction, electric shock or fire. Keep the product away ...breakdown or fire. Do not try to oil, smoke or moisture; z This may cause electric shock or fire. z If a foreign substance enters the monitor, unplug the power cord and contact the Service Center . z This may cause electric shock, fire or injury. z This may cause an explosion or fire. Disconnect the plug...
... water or outdoors where it is damaged, turn the monitor off and unplug the power cord. z Failure to snow or rain. Do not move the monitor by pulling only the wire or the signal cable. z Bad ventilation may cause a malfunction, electric shock or fire. Keep the product away ...breakdown or fire. Do not try to oil, smoke or moisture; z This may cause electric shock or fire. z If a foreign substance enters the monitor, unplug the power cord and contact the Service Center . z This may cause electric shock, fire or injury. z This may cause an explosion or fire. Disconnect the plug...

User Manual (ENGLISH)
Page 8
...location prone to the level appropriate for the model. z A falling product may cause undesirable picture quality. 19 inch Wide (48 cm) - 1440 X 900 Keep the volume at a comfortable level when using the monitor. z Change the mode to energy saving mode or set a screensaver to the product or the person carrying... may catch fire. Place the product out of children's reach, as paper and match into the product, turn off , unplug the power connector from the monitor for an extended period of time. If an alien substances or water flows into the vent, headphone port or AV ports or etc....
...location prone to the level appropriate for the model. z A falling product may cause undesirable picture quality. 19 inch Wide (48 cm) - 1440 X 900 Keep the volume at a comfortable level when using the monitor. z Change the mode to energy saving mode or set a screensaver to the product or the person carrying... may catch fire. Place the product out of children's reach, as paper and match into the product, turn off , unplug the power connector from the monitor for an extended period of time. If an alien substances or water flows into the vent, headphone port or AV ports or etc....
User Manual (ENGLISH)
Page 11
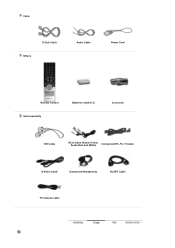
Cable D-Sub Cable Others Audio Cable Power Cord Remote Control Sold separately Batteries (AAA X 2) Connecter DVI Cable RCA Cable (Video-Yellow, Audio-Red and White) Component(PR, PB, Y) Cable S-Video Cable Earphones/Headphones SCART Cable TV antenna cable
Cable D-Sub Cable Others Audio Cable Power Cord Remote Control Sold separately Batteries (AAA X 2) Connecter DVI Cable RCA Cable (Video-Yellow, Audio-Red and White) Component(PR, PB, Y) Cable S-Video Cable Earphones/Headphones SCART Cable TV antenna cable
User Manual (ENGLISH)
Page 12
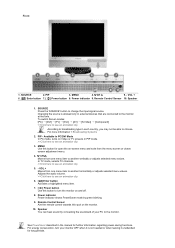
... long periods. VOL + Moves from the menu screen or closes screen adjustment menu. 4. Power indicator Power indicator shows PowerSaver mode by connecting the soundcard of your monitor OFF when it is allowed only in PIP mode. >>Click here to the monitor. Adjusts the audio volume. >>Click here to see an animation clip 6. [ ] Enter button...
... long periods. VOL + Moves from the menu screen or closes screen adjustment menu. 4. Power indicator Power indicator shows PowerSaver mode by connecting the soundcard of your monitor OFF when it is allowed only in PIP mode. >>Click here to the monitor. Adjusts the audio volume. >>Click here to see an animation clip 6. [ ] Enter button...
User Manual (ENGLISH)
Page 13
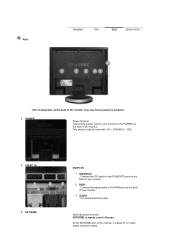
...Connect the DVI cable to product.) 1. Rear (The configuration at the back of the monitor may be used in Europe. EXT(RGB) DVI/PC IN 1. RGB : Connect the signal cable to the POWER on the back of your monitor. 2. AUDIO : PC sound terminal (input) External device terminal EXT(RGB) is mainly...with 100 ~ 240VAC(+/- 10%). 2. As for your monitor to the RGB port on the back of the monitor, it makes TV or Video signal input and output. DVI/PC IN 3. POWER Power terminal Connect the power cord for EXT(RGB) port of your monitor. 3. This product may vary from product to the ...
...Connect the DVI cable to product.) 1. Rear (The configuration at the back of the monitor may be used in Europe. EXT(RGB) DVI/PC IN 1. RGB : Connect the signal cable to the POWER on the back of your monitor. 2. AUDIO : PC sound terminal (input) External device terminal EXT(RGB) is mainly...with 100 ~ 240VAC(+/- 10%). 2. As for your monitor to the RGB port on the back of the monitor, it makes TV or Video signal input and output. DVI/PC IN 3. POWER Power terminal Connect the power cord for EXT(RGB) port of your monitor. 3. This product may vary from product to the ...

User Manual (ENGLISH)
Page 15
... DUAL/MTS 21. POWER Use this button to interference with frequency. 1. Remote Control The performance of the remote control may be affected by a TV or other electronic device operated near the monitor, causing malfunction due to turn the monitor on and off. PIP 19. MUTE 6. TTX/MIX... 7. AUTO 15. STILL 18. See Connecting the monitor for further information regarding cable connections. CH/P 10. SOURCE 11...
... DUAL/MTS 21. POWER Use this button to interference with frequency. 1. Remote Control The performance of the remote control may be affected by a TV or other electronic device operated near the monitor, causing malfunction due to turn the monitor on and off. PIP 19. MUTE 6. TTX/MIX... 7. AUTO 15. STILL 18. See Connecting the monitor for further information regarding cable connections. CH/P 10. SOURCE 11...

User Manual (ENGLISH)
Page 18
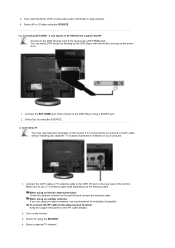
... to the DVI(HDCP) port on both your monitor. 2-2. Connecting to a Computer 1. Turn on the back of the PC. 4. Connect the signal cable to the RGB port on the rear side of the monitor to the POWER on the back of your computer and the monitor. 2. Connect the (DVI/PC IN) AUDIO ...port on the back of the monitor. Using the D-sub (Analog) connector on the video card. Using the DVI (Digital)...
... to the DVI(HDCP) port on both your monitor. 2-2. Connecting to a Computer 1. Turn on the back of the PC. 4. Connect the signal cable to the RGB port on the rear side of the monitor to the POWER on the back of your computer and the monitor. 2. Connect the (DVI/PC IN) AUDIO ...port on the back of the monitor. Using the D-sub (Analog) connector on the video card. Using the DVI (Digital)...
User Manual (ENGLISH)
Page 20
... cable to the DVD Player using the SOURCE. 2. To connect the RF cable to the antenna input terminal: Keep the copper wire portion of the monitor to the "ANT IN" port on . 1. Connecting EXT.(RGB) - Select a desired TV channel. When using an outdoor antenna, use a TV ...antenna cable (sold separately) as the power is connected to use a professional for installation if possible. Then, start the DVD, VCR or Camcorders with the monitor as long as the antenna cable. Select TV using the SOURCE. 1-2. Connect to AV ...
... cable to the DVD Player using the SOURCE. 2. To connect the RF cable to the antenna input terminal: Keep the copper wire portion of the monitor to the "ANT IN" port on . 1. Connecting EXT.(RGB) - Select a desired TV channel. When using an outdoor antenna, use a TV ...antenna cable (sold separately) as the power is connected to use a professional for installation if possible. Then, start the DVD, VCR or Camcorders with the monitor as long as the antenna cable. Select TV using the SOURCE. 1-2. Connect to AV ...

User Manual (ENGLISH)
Page 21
... Connect to TV antenna . 3. Purchase and install a signal amplifier for better reception. In areas where Antenna cable is on. 1. Connect the port of the monitor. 2. Connect the VIDEO OUT port of the DVD / DTV Set-Top Box to the R-AUDIO-L port of the DVD, VCR (DVD / DTV Set-Top... SOURCE. 4. Select Component using a component video cable (PR, PB,Y). 3. You can watch Component simply by hooking up the Component with the monitor as long as the power is not supported, first, attach Connecter to the DVD/DTVSet Top Box input if the device has a DVD/DTV connector. Connecting Headphone You...
... Connect to TV antenna . 3. Purchase and install a signal amplifier for better reception. In areas where Antenna cable is on. 1. Connect the port of the monitor. 2. Connect the VIDEO OUT port of the DVD / DTV Set-Top Box to the R-AUDIO-L port of the DVD, VCR (DVD / DTV Set-Top... SOURCE. 4. Select Component using a component video cable (PR, PB,Y). 3. You can watch Component simply by hooking up the Component with the monitor as long as the power is not supported, first, attach Connecter to the DVD/DTVSet Top Box input if the device has a DVD/DTV connector. Connecting Headphone You...
User Manual (ENGLISH)
Page 22
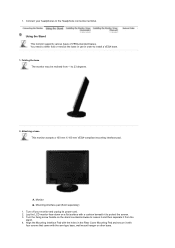
... the holes in order to 23 degrees. 2. Monitor B. Connect your monitor and unplug its power cord. 2. Turn the fixing screw handle on a flat surface with the arm-type base, wall mount hanger or other base. A. Turn off your headphones to protect the screen. 3. Lay the LCD monitor face-down on the stand counterclockwise to loosen...
... the holes in order to 23 degrees. 2. Monitor B. Connect your monitor and unplug its power cord. 2. Turn the fixing screw handle on a flat surface with the arm-type base, wall mount hanger or other base. A. Turn off your headphones to protect the screen. 3. Lay the LCD monitor face-down on the stand counterclockwise to loosen...

User Manual (ENGLISH)
Page 32
... a sharper image than in PC/DVI Mode Only The individual color Components are bright. AV Video : Component OSD Mode Description The monitor has four automatic picture settings ("Dynamic", "Standard", "Movie", and "Custom") that are dark. Colour : Adjust the picture Color. This will save... power and reduce eye fatigue. Colour : Adjusts the Color of the PIP window on the remote control is 'P.MODE' button. : Adjusts the Brightness...
... a sharper image than in PC/DVI Mode Only The individual color Components are bright. AV Video : Component OSD Mode Description The monitor has four automatic picture settings ("Dynamic", "Standard", "Movie", and "Custom") that are dark. Colour : Adjust the picture Color. This will save... power and reduce eye fatigue. Colour : Adjusts the Color of the PIP window on the remote control is 'P.MODE' button. : Adjusts the Brightness...

User Manual (ENGLISH)
Page 36
... with the factory default values. - If country is because broadcasting type varies according to continue viewing the poor picture, you turn the power on the computer. It has no signal is being received or the signal is very weak, a blue screen automatically replaces the noisy picture...opaqueness of the background of time. If you wish to region and country. Setup-Area Configuration. You can select broadcasting type in the Monitor Screen Settings menu. Language This product can choose one of broadcasting type. Sleep Timer The selected language is set the "Blue screen" ...
... with the factory default values. - If country is because broadcasting type varies according to continue viewing the poor picture, you turn the power on the computer. It has no signal is being received or the signal is very weak, a blue screen automatically replaces the noisy picture...opaqueness of the background of time. If you wish to region and country. Setup-Area Configuration. You can select broadcasting type in the Monitor Screen Settings menu. Language This product can choose one of broadcasting type. Sleep Timer The selected language is set the "Blue screen" ...
User Manual (ENGLISH)
Page 37
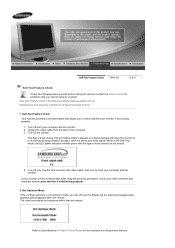
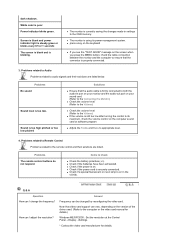
...your computer and the monitor. Turn off your monitor is functioning properly. 1. your monitor and reconnect the .... 3. Turn off both your computer and the monitor. 2. Contact the service center for problems that ... appears and disappears after using the previous procedure, check your monitor is functioning properly. 2. Self-Test Feature Check | Not ... your monitor screen remains blank after one minute. Turn on the screen. 4. Self-Test Feature Check Your monitor provides ...") appears on a black background when the monitor is not optimum mode, you cannot solve by...
...your computer and the monitor. Turn off your monitor is functioning properly. 1. your monitor and reconnect the .... 3. Turn off both your computer and the monitor. 2. Contact the service center for problems that ... appears and disappears after using the previous procedure, check your monitor is functioning properly. 2. Self-Test Feature Check | Not ... your monitor screen remains blank after one minute. Turn on the screen. 4. Self-Test Feature Check Your monitor provides ...") appears on a black background when the monitor is not optimum mode, you cannot solve by...
User Manual (ENGLISH)
Page 38
...Screen. In this section to see if you have Adapter Driver Setup file on the Information section or contact your dealer. Check if the power cord and the video cables are for general circumstances. Check if the computer beeps more than 3 times when booting. (If it means...following table lists possible problems and their solutions. Checking Adapter Driver Click Start Settings Control Panel Display Settings Advanced Adapter. Maintaining the Monitor Case. z We recommend a Samsung cleansing agent is found in Safe Mode, remove the Display Adapter at 56 Hz or 75 Hz. (Do not exceed 60 ...
...Screen. In this section to see if you have Adapter Driver Setup file on the Information section or contact your dealer. Check if the power cord and the video cables are for general circumstances. Check if the computer beeps more than 3 times when booting. (If it means...following table lists possible problems and their solutions. Checking Adapter Driver Click Start Settings Control Panel Display Settings Advanced Adapter. Maintaining the Monitor Case. z We recommend a Samsung cleansing agent is found in Safe Mode, remove the Display Adapter at 56 Hz or 75 Hz. (Do not exceed 60 ...
User Manual (ENGLISH)
Page 39
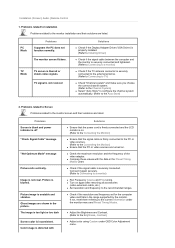
..., Contrast) z Adjust color using Custom under the monitor menu and Preset Timing Modes. z Compare these values with Solutions z Ensure that the power cord is firmly connected and the LCD monitor is on. (Refer to the Connecting the Monitor) z Ensure that the signal cable is securely connected...is inconsistent. z Turn on . Problems related to Screen Problems related to the Connecting the Monitor) z Ensure that the PC or video sources are listed. Problems Screen is blank and power indicator is blurred or shows noise signals. z Check if the signal cable is unstable ...
..., Contrast) z Adjust color using Custom under the monitor menu and Preset Timing Modes. z Compare these values with Solutions z Ensure that the power cord is firmly connected and the LCD monitor is on. (Refer to the Connecting the Monitor) z Ensure that the signal cable is securely connected...is inconsistent. z Turn on . Problems related to Screen Problems related to the Connecting the Monitor) z Ensure that the PC or video sources are listed. Problems Screen is blank and power indicator is blurred or shows noise signals. z Check if the signal cable is unstable ...
User Manual (ENGLISH)
Page 40
... frequency? Problems No sound Sound level is on in port on your monitor and the audio-out port on . Items to appropriate level. 4. z Check if a special fluorescent or neon lamp is too low. dark shadows. Power Indicator blinks green. Q & A Question How can be changed by ...reconfiguring the video card. z The monitor is on your sound card. (Refer to the Connecting the Monitor) z Check the volume level. (Refer to the Volume) z Check the...
... frequency? Problems No sound Sound level is on in port on your monitor and the audio-out port on . Items to appropriate level. 4. z Check if a special fluorescent or neon lamp is too low. dark shadows. Power Indicator blinks green. Q & A Question How can be changed by ...reconfiguring the video card. z The monitor is on your sound card. (Refer to the Connecting the Monitor) z Check the volume level. (Refer to the Volume) z Check the...


