

Quick Guide (easy Manual) (ver.1.0) (English)
Page 8
... inappropriate resolution may cause undesirable picture quality. 19 inch (48 cm) - 1280 x 1024 Viewing the monitor continuously at least a five-minute break after every hour of time. Never insert anything metallic into the vent, headphone port or AV ports or etc. This may cause an explosion or fire. When viewing a fixed screen for an extended period of using the monitor. Using the product...
... inappropriate resolution may cause undesirable picture quality. 19 inch (48 cm) - 1280 x 1024 Viewing the monitor continuously at least a five-minute break after every hour of time. Never insert anything metallic into the vent, headphone port or AV ports or etc. This may cause an explosion or fire. When viewing a fixed screen for an extended period of using the monitor. Using the product...

Quick Guide (easy Manual) (ver.1.0) (English)
Page 11
... crystal. PRODUCT INFORMATION (Image Retention Free) LCD Monitors and TVs may cause the liquid crystal to build up of your LCD from image retention Power Off, Screen Saver, or Power Save Mode Ex) z Turn the power off with the PC Display Properties Power Scheme. This guide is recommended. What is not a product defect. This may have an image retention when switching from one color or a moving image for a long time...
... crystal. PRODUCT INFORMATION (Image Retention Free) LCD Monitors and TVs may cause the liquid crystal to build up of your LCD from image retention Power Off, Screen Saver, or Power Save Mode Ex) z Turn the power off with the PC Display Properties Power Scheme. This guide is recommended. What is not a product defect. This may have an image retention when switching from one color or a moving image for a long time...

Quick Guide (easy Manual) (ver.1.0) (English)
Page 16
... regarding power saving functions. For using a locking device, contact where you must connect your adjustments. analog or digital input signal.) If you select the digital mode, you purchase it. POWER port DVI IN port RGB IN port Kensington Lock Connect the power cord for your monitor to the graphic card's DVI IN port using it unattended for turning the monitor on the back of your monitor. The locking device has to physically fix the system when using the DVI cable. Use this button for long periods. Connect the DVI Cable...
... regarding power saving functions. For using a locking device, contact where you must connect your adjustments. analog or digital input signal.) If you select the digital mode, you purchase it. POWER port DVI IN port RGB IN port Kensington Lock Connect the power cord for your monitor to the graphic card's DVI IN port using it unattended for turning the monitor on the back of your monitor. The locking device has to physically fix the system when using the DVI cable. Use this button for long periods. Connect the DVI Cable...
Quick Guide (easy Manual) (ver.1.0) (English)
Page 19
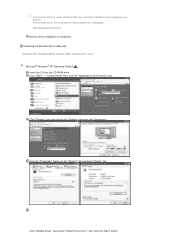
..." button. Prepare a blank disk and download the driver program file at the Internet web site shown below. If you have. Follow the directions appropriate for the monitor driver, insert the CD-ROM included with this monitor. Model SyncMaster 932BF Monitor Driver When prompted by the operating system for the operating system you can see following message window, then click the "Continue Anyway" button.
..." button. Prepare a blank disk and download the driver program file at the Internet web site shown below. If you have. Follow the directions appropriate for the monitor driver, insert the CD-ROM included with this monitor. Model SyncMaster 932BF Monitor Driver When prompted by the operating system for the operating system you can see following message window, then click the "Continue Anyway" button.
Quick Guide (easy Manual) (ver.1.0) (English)
Page 20
Installing the Monitor Driver (Manual) Windows XP | Windows 2000 | Windows ME | Windows NT | Linux Microsoft® Windows® XP Operating System Insert the CD into the CD-ROM drive. Click "Display" icon and choose the "Settings" tab then click "Advanced." Click "Update Driver." Click "Start" → "Control Panel" then click the "Appearance and Themes" icon. Click the "Properties" button on Samsung Monitor homepage http://www.samsung.com/ Monitor driver installation is under certifying MS...
Installing the Monitor Driver (Manual) Windows XP | Windows 2000 | Windows ME | Windows NT | Linux Microsoft® Windows® XP Operating System Insert the CD into the CD-ROM drive. Click "Display" icon and choose the "Settings" tab then click "Advanced." Click "Update Driver." Click "Start" → "Control Panel" then click the "Appearance and Themes" icon. Click the "Properties" button on Samsung Monitor homepage http://www.samsung.com/ Monitor driver installation is under certifying MS...
Quick Guide (easy Manual) (ver.1.0) (English)
Page 22
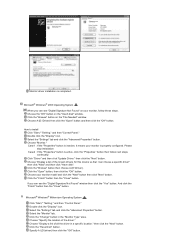
... and click the "Advanced Properties" button. Click the "Browse" button on the "Insert disk" window. Microsoft® Windows® Millennium Operating System Click "Start," "Setting," and then "Control Panel." How to install Click "Start," "Setting," and then "Control Panel." Choose "Monitor." Click the "Browse" button then choose A:(D:\Driver). Double click the "Display" icon. Click the "Finish" button then the "Close" button. If you can choose a specific driver" then click "Next" and...
... and click the "Advanced Properties" button. Click the "Browse" button on the "Insert disk" window. Microsoft® Windows® Millennium Operating System Click "Start," "Setting," and then "Control Panel." How to install Click "Start," "Setting," and then "Control Panel." Choose "Monitor." Click the "Browse" button then choose A:(D:\Driver). Double click the "Display" icon. Click the "Finish" button then the "Close" button. If you can choose a specific driver" then click "Next" and...

Quick Guide (easy Manual) (ver.1.0) (English)
Page 24
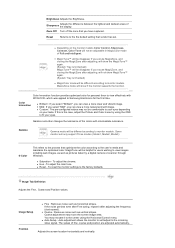
... even simple adjustments to Brightness, or Contrast require navigation of the monitor. OSD Mode The initial Natural Color screen will appear. Basic Functionality MagicTune™ is no feedback to obtain the best overall picture quality. Installing the Natural Color Software Insert the CD included with easy to get the best image on the monitor are not easy to adjust it for each monitor control. In order to understand instructions and...
... even simple adjustments to Brightness, or Contrast require navigation of the monitor. OSD Mode The initial Natural Color screen will appear. Basic Functionality MagicTune™ is no feedback to obtain the best overall picture quality. Installing the Natural Color Software Insert the CD included with easy to get the best image on the monitor are not easy to adjust it for each monitor control. In order to understand instructions and...
Quick Guide (easy Manual) (ver.1.0) (English)
Page 25
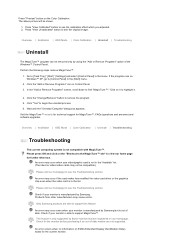
... specification of use monitor configurations that happens, press F5 Key. z OSD mode may appear inconsistent with the explanation in Windows™ 2000 or later. See "Troubleshooting" if you . If that are best suited for quick accurate tuning of MagicTune™ can access the desired menu item to set with the ability to start the program. Installation Problems The installation of the display with ease. Overview | Installation | OSD Mode | Color Calibration | Uninstall | Troubleshooting...
... specification of use monitor configurations that happens, press F5 Key. z OSD mode may appear inconsistent with the explanation in Windows™ 2000 or later. See "Troubleshooting" if you . If that are best suited for quick accurate tuning of MagicTune™ can access the desired menu item to set with the ability to start the program. Installation Problems The installation of the display with ease. Overview | Installation | OSD Mode | Color Calibration | Uninstall | Troubleshooting...

Quick Guide (easy Manual) (ver.1.0) (English)
Page 26
... monitors easy. When selected , each tab displays a list of the image you pivots the monitor. Dynamic Contrast : Dynamic Contrast is the case, adjust the Brightness and Contrast by the program. If this is to automatically detect distribution of settings on the contents of menus. Sport : For watching motion pictures such as a Sport. 5. OSD Mode The OSD mode makes the adjustment of inputted visual signal and adjust to all display resolutions supported by using the OSD menu...
... monitors easy. When selected , each tab displays a list of the image you pivots the monitor. Dynamic Contrast : Dynamic Contrast is the case, adjust the Brightness and Contrast by the program. If this is to automatically detect distribution of settings on the contents of menus. Sport : For watching motion pictures such as a Sport. 5. OSD Mode The OSD mode makes the adjustment of inputted visual signal and adjust to all display resolutions supported by using the OSD menu...
Quick Guide (easy Manual) (ver.1.0) (English)
Page 28
... optimizes the color according to view images including web images, as well as pictures taken by using the Horizontal Control menu. Gamma Gamma mode will show MagicTune™ again. (System Tray is Checked) z MagicColor mode will be different according to the center using the OSD to monitor models. Image Tab Definition Adjusts the Fine , Coarse and Position values. Position Adjusts the screen location horizontally and vertically. Brightness Adjusts the Brightness. Sharpness Adjusts the difference the display. Reset Returns to the incoming video signal...
... optimizes the color according to view images including web images, as well as pictures taken by using the Horizontal Control menu. Gamma Gamma mode will show MagicTune™ again. (System Tray is Checked) z MagicColor mode will be different according to the center using the OSD to monitor models. Image Tab Definition Adjusts the Fine , Coarse and Position values. Position Adjusts the screen location horizontally and vertically. Brightness Adjusts the Brightness. Sharpness Adjusts the difference the display. Reset Returns to the incoming video signal...

Quick Guide (easy Manual) (ver.1.0) (English)
Page 29
... Color Blindness Mode. z Custom - Partial Color Blindness Test z Reset - MagicBright Set Customized Key to the factory defaults. Source Select Set Customized Key to Source Select ColorTone Set Customized Key to ColorTone Support Tab Definition Shows the Asset ID and the version number of the program, and allows you to monitor OSD(On Screen Display) languages.OSD language will have an "V" in a small window super-imposed on the PC Video signal. (Off / On) PIP Turn...
... Color Blindness Mode. z Custom - Partial Color Blindness Test z Reset - MagicBright Set Customized Key to the factory defaults. Source Select Set Customized Key to Source Select ColorTone Set Customized Key to ColorTone Support Tab Definition Shows the Asset ID and the version number of the program, and allows you to monitor OSD(On Screen Display) languages.OSD language will have an "V" in a small window super-imposed on the PC Video signal. (Off / On) PIP Turn...

Quick Guide (easy Manual) (ver.1.0) (English)
Page 30
... | Installation | OSD Mode | Color Calibration | Uninstall | Troubleshooting Color Calibration Color Calibration Color Calibration guides you won't detect any help installing or running MagicTune™. You can use the server to control the Client monitor. (Server program should be installed to use adjusted color values Definition When monitor is finished properly, you to "Color reference Circle". => Adjustment is used . you detect specific color tone on main screen to 5 users can be saved. 2. Location Write down the location. When you can easily view the calibration...
... | Installation | OSD Mode | Color Calibration | Uninstall | Troubleshooting Color Calibration Color Calibration Color Calibration guides you won't detect any help installing or running MagicTune™. You can use the server to control the Client monitor. (Server program should be installed to use adjusted color values Definition When monitor is finished properly, you to "Color reference Circle". => Adjustment is used . you detect specific color tone on main screen to 5 users can be saved. 2. Location Write down the location. When you can easily view the calibration...
Quick Guide (easy Manual) (ver.1.0) (English)
Page 31
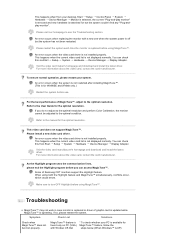
.... 5. Overview | Installation | OSD Mode | Color Calibration | Uninstall | Troubleshooting Troubleshooting The current computing system is able to support MagicTune™. Check for MagicTune™, FAQs (questions and answers) and software upgrades. An error occurs when no information on it to highlight it as out-of-date models are able to support this feature. Go to [Task Tray] ' [Start] ' [Settings] and select [Control Panel] in Control Panel. 3. Click on EDID (Extended Display Identification...
.... 5. Overview | Installation | OSD Mode | Color Calibration | Uninstall | Troubleshooting Troubleshooting The current computing system is able to support MagicTune™. Check for MagicTune™, FAQs (questions and answers) and software upgrades. An error occurs when no information on it to highlight it as out-of-date models are able to support this feature. Go to [Task Tray] ' [Start] ' [Settings] and select [Control Panel] in Control Panel. 3. Click on EDID (Extended Display Identification...
Quick Guide (easy Manual) (ver.1.0) (English)
Page 32
... homepage to the User Guide for the optimal resolution. An error occurs when replacing the monitor with Window OS that steps below (When Windows™ is not displayed normally. Please install a new video card driver. As the Highlight program uses the communication lines, please exit the Highlight program before you do not adjust to the optimal resolution and perform Color Calibration, the monitor cannot be adjusted to turn OFF Highlight before using MagicTune™...
... homepage to the User Guide for the optimal resolution. An error occurs when replacing the monitor with Window OS that steps below (When Windows™ is not displayed normally. Please install a new video card driver. As the Highlight program uses the communication lines, please exit the Highlight program before you do not adjust to the optimal resolution and perform Color Calibration, the monitor cannot be adjusted to turn OFF Highlight before using MagicTune™...
Quick Guide (easy Manual) (ver.1.0) (English)
Page 45
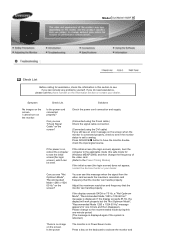
...? Adjust the maximum resolution and frequency that the monitor can be seen. Please change the frequency of the video card. (Refer to have the monitor doublecheck the input signal source. If the power is on, reboot the computer to the recommended mode during this message when the signal from the video card exceeds the maximum resolution and frequency that the monitor can remedy any problems yourself. Can you see "Check Signal Cable" on the screen...
...? Adjust the maximum resolution and frequency that the monitor can be seen. Please change the frequency of the video card. (Refer to have the monitor doublecheck the input signal source. If the power is on, reboot the computer to the recommended mode during this message when the signal from the video card exceeds the maximum resolution and frequency that the monitor can remedy any problems yourself. Can you see "Check Signal Cable" on the screen...
Quick Guide (easy Manual) (ver.1.0) (English)
Page 46
...to the video card manual. Adjust screen image position and size using the DVI cable? Adjust the resolution and frequency at 1 second intervals? Windows XP : Set the resolution in the Control Panel → Display → Settings. Windows ME/2000 : Set the resolution in the Control Panel → Appearance and Themes → Display → Settings. Install the monitor driver according to the video card manual. You may differ from product to product.) There are only 16 colors shown on the screen. Set the video card by pressing the [MENU / ] button for at...
...to the video card manual. Adjust screen image position and size using the DVI cable? Adjust the resolution and frequency at 1 second intervals? Windows XP : Set the resolution in the Control Panel → Display → Settings. Windows ME/2000 : Set the resolution in the Control Panel → Appearance and Themes → Display → Settings. Install the monitor driver according to the video card manual. You may differ from product to product.) There are only 16 colors shown on the screen. Set the video card by pressing the [MENU / ] button for at...
Quick Guide (easy Manual) (ver.1.0) (English)
Page 47
... monitor, Plug & Play (VESA DDC) monitor found only on the version of the driver used. (Refer to the computer or the video card manual for details.) Windows XP : Set the resolution in Safe Mode, remove the Display Adapter at the "Control Panel → System → Device Administrator" and then reboot the computer to reinstall the adapter (video) driver. MagicTune™ feature is XP); Check if the power cord and the video cables are properly connected to the Driver Installation Instructions...
... monitor, Plug & Play (VESA DDC) monitor found only on the version of the driver used. (Refer to the computer or the video card manual for details.) Windows XP : Set the resolution in Safe Mode, remove the Display Adapter at the "Control Panel → System → Device Administrator" and then reboot the computer to reinstall the adapter (video) driver. MagicTune™ feature is XP); Check if the power cord and the video cables are properly connected to the Driver Installation Instructions...

Quick Guide (easy Manual) (ver.1.0) (English)
Page 48
... I set the Power Saving function? Contact the video card manufacturer for details. Windows ME/2000 : Set the resolution in the Control Panel → Appearance and Themes → Display → Screen Saver. Refer to the Windows / Computer Manual Disconnect the power cord and then clean the monitor with the input signal, a message appears on the screen or the screen goes blank although the power indicator LED is functioning properly. Do not leave any water enter the monitor...
... I set the Power Saving function? Contact the video card manufacturer for details. Windows ME/2000 : Set the resolution in the Control Panel → Appearance and Themes → Display → Screen Saver. Refer to the Windows / Computer Manual Disconnect the power cord and then clean the monitor with the input signal, a message appears on the screen or the screen goes blank although the power indicator LED is functioning properly. Do not leave any water enter the monitor...

Quick Guide (easy Manual) (ver.1.0) (English)
Page 51
... Plug & Play compatible system. For energy conservation, turn your computer. State Power Indicator Power Consumption Normal Operation Blue Less than 38 W Power saving mode Blue, Blinking Less than 1 W Power off (Power button) EPA/ENERGY 2000 Off Less than Class A equipment.) PowerSaver This monitor has a built-in power management system called PowerSaver. This system saves energy by using advanced semiconductor technology with VESA DPMS functionality. 15pin to 15pin D-sub cable, Detachable DVI...
... Plug & Play compatible system. For energy conservation, turn your computer. State Power Indicator Power Consumption Normal Operation Blue Less than 38 W Power saving mode Blue, Blinking Less than 1 W Power off (Power button) EPA/ENERGY 2000 Off Less than Class A equipment.) PowerSaver This monitor has a built-in power management system called PowerSaver. This system saves energy by using advanced semiconductor technology with VESA DPMS functionality. 15pin to 15pin D-sub cable, Detachable DVI...

Quick Guide (easy Manual) (ver.1.0) (English)
Page 57
... Better Display Adjust computer resolution and screen injection rate (refresh rate) oncomputer as described below to enjoy the best quality of the display. When viewing a fixed screen for performing multiple tasks as window termination button is good for an extended period of time, a residual image or blurriness may be the trademarks or registered trademarks of their respective owners. Reproduction in display screen that is appeared as more image information...
... Better Display Adjust computer resolution and screen injection rate (refresh rate) oncomputer as described below to enjoy the best quality of the display. When viewing a fixed screen for performing multiple tasks as window termination button is good for an extended period of time, a residual image or blurriness may be the trademarks or registered trademarks of their respective owners. Reproduction in display screen that is appeared as more image information...


