

Quick Guide (easy Manual) (ver.1.0) (English)
Page 6
...fire. If the monitor is dropped or the casing is not used for interior cleaning once a year. Contact the Service Center or Customer Center for a long period of time may cause an electric shock or fire. z Keep the product's interior clean. If your monitor does not operate... the monitor could be exposed to qualified service personnel. Unplug the power cord from the outlet during storms or lightening or if it is damaged, turn the monitor off and unplug the power cord. Others Do not remove cover (or back). Disconnect the plug from the power outlet and wipe the product using a...
...fire. If the monitor is dropped or the casing is not used for interior cleaning once a year. Contact the Service Center or Customer Center for a long period of time may cause an electric shock or fire. z Keep the product's interior clean. If your monitor does not operate... the monitor could be exposed to qualified service personnel. Unplug the power cord from the outlet during storms or lightening or if it is damaged, turn the monitor off and unplug the power cord. Others Do not remove cover (or back). Disconnect the plug from the power outlet and wipe the product using a...

Quick Guide (easy Manual) (ver.1.0) (English)
Page 10
Quick Setup Guide Cable Warranty Card (Not available in all locations) User's Guide, Monitor Driver, Natural Color software, MagicTune™ software D-Sub Cable Sold separately Power Cord DVI Cable Front Menu button [ ] MagicBright button [] Opens the OSD menu. MagicBright is a new feature providing optimum viewing environment depending on the contents of the image you are Also use to exit the OSD menu or return to the previous menu.
Quick Setup Guide Cable Warranty Card (Not available in all locations) User's Guide, Monitor Driver, Natural Color software, MagicTune™ software D-Sub Cable Sold separately Power Cord DVI Cable Front Menu button [ ] MagicBright button [] Opens the OSD menu. MagicBright is a new feature providing optimum viewing environment depending on the contents of the image you are Also use to exit the OSD menu or return to the previous menu.

Quick Guide (easy Manual) (ver.1.0) (English)
Page 11
..., adjust the brightness and contrast by using the DVI cable. Power indicator This light glows green during normal operation, and blinks green once as a DVD or Video CD. >>Click here to your monitor to adjust brightness. See PowerSaver described in the menu. Each mode has its own pre-configured brightness value. Power button Use this button for auto adjustment. For energy conservation, turn the monitor on your monitor OFF when it unattended for further information regarding power saving functions. Adjust buttons [ ] Adjust...
..., adjust the brightness and contrast by using the DVI cable. Power indicator This light glows green during normal operation, and blinks green once as a DVD or Video CD. >>Click here to your monitor to adjust brightness. See PowerSaver described in the menu. Each mode has its own pre-configured brightness value. Power button Use this button for auto adjustment. For energy conservation, turn the monitor on your monitor OFF when it unattended for further information regarding power saving functions. Adjust buttons [ ] Adjust...
Quick Guide (easy Manual) (ver.1.0) (English)
Page 14
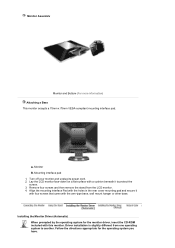
Remove four screws and then remove the stand from one operating system to protect the screen. 3. Align the mounting interface Pad with the holes in the rear cover mounting pad and secure it with four screws that came with a cushion beneath it to another. Monitor B. Mounting interface pad 1. Lay the LCD monitor face-down on a flat surface with the arm-type base, wall mount hanger or other base. Follow...
Remove four screws and then remove the stand from one operating system to protect the screen. 3. Align the mounting interface Pad with the holes in the rear cover mounting pad and secure it with four screws that came with a cushion beneath it to another. Monitor B. Mounting interface pad 1. Lay the LCD monitor face-down on a flat surface with the arm-type base, wall mount hanger or other base. Follow...
Quick Guide (easy Manual) (ver.1.0) (English)
Page 16
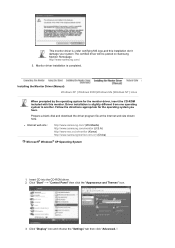
.... Follow the directions appropriate for the monitor driver, insert the CD-ROM included with this installation don't damage your system.The certified driver will be posted on Samsung Monitor Homepage http://www.samsung.com/. 5. Click "Display" icon and choose the "Settings" tab then click "Advanced..". This monitor driver is under certifying MS logo,and this monitor. Click "Start" -> "Control Panel" then click the "Appearance and...
.... Follow the directions appropriate for the monitor driver, insert the CD-ROM included with this installation don't damage your system.The certified driver will be posted on Samsung Monitor Homepage http://www.samsung.com/. 5. Click "Display" icon and choose the "Settings" tab then click "Advanced..". This monitor driver is under certifying MS logo,and this monitor. Click "Start" -> "Control Panel" then click the "Appearance and...
Quick Guide (easy Manual) (ver.1.0) (English)
Page 17
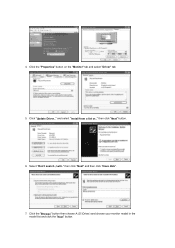
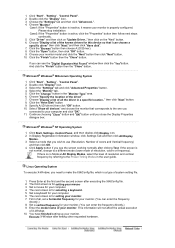
then click "Next" and then click "Have disk". 7. Select "Don't search ,I will.." then click "Next" button. 6. Click the "Browse" button then choose A:(D:\Driver) and choose your monitor model in the model list and click the "Next" button. and select "Install from a list or.." 4. Click "Update Driver.." Click the "Properties" button on the "Monitor" tab and select "Driver" tab. 5.
then click "Next" and then click "Have disk". 7. Select "Don't search ,I will.." then click "Next" button. 6. Click the "Browse" button then choose A:(D:\Driver) and choose your monitor model in the model list and click the "Next" button. and select "Install from a list or.." 4. Click "Update Driver.." Click the "Properties" button on the "Monitor" tab and select "Driver" tab. 5.
Quick Guide (easy Manual) (ver.1.0) (English)
Page 18
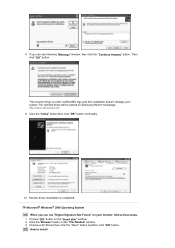
.... 1. Choose A:(D:\Driver) then click the "Open" button and then click "OK" button. 8. This monitor driver is completed. Click the "Browse" button on the "Insert disk" window. 2. http://www.samsung.com/ 9. Microsoft® Windows® 2000 Operating System When you can see following "Message" window, then click the "Continue Anyway" button. Choose "OK" button on the "File Needed" window. 3. How to install If you can see "Digital Signature...
.... 1. Choose A:(D:\Driver) then click the "Open" button and then click "OK" button. 8. This monitor driver is completed. Click the "Browse" button on the "Insert disk" window. 2. http://www.samsung.com/ 9. Microsoft® Windows® 2000 Operating System When you can see following "Message" window, then click the "Continue Anyway" button. Choose "OK" button on the "File Needed" window. 3. How to install If you can see "Digital Signature...
Quick Guide (easy Manual) (ver.1.0) (English)
Page 19
... X-Window, you can enter the frequency directly.) 8. Click "Start" , "Setting" , "Control Panel". 2. Double click the "Display" Icon. 3. If you need to make the X86Config file, which is not normal, change to a different mode (lower mode of resolution and vertical frequency by referring to use (Resolution, Number of the known drivers for setting your monitor. (You can see the screen working normally after setting other requested hardware. Double click "Display" icon. 3. Set a keyboard for setting your monitor. Choose the "Settings...
... X-Window, you can enter the frequency directly.) 8. Click "Start" , "Setting" , "Control Panel". 2. Double click the "Display" Icon. 3. If you need to make the X86Config file, which is not normal, change to a different mode (lower mode of resolution and vertical frequency by referring to use (Resolution, Number of the known drivers for setting your monitor. (You can see the screen working normally after setting other requested hardware. Double click "Display" icon. 3. Set a keyboard for setting your monitor. Choose the "Settings...

Quick Guide (easy Manual) (ver.1.0) (English)
Page 31
... display are best suited for your unique setting. Unfortunately, the manual controls available to tune the image often prove to be saved, providing an easy way to adjust it for you to select display characteristics in a multiuser environment, or having a single user have multiple defined presets based on a monitor requires you . Color Overview | Installation | OSD Mode | | Uninstall | Troubleshooting Calibration Overview What is a software utility that allows monitor adjustment and color tuning using the Display...
... display are best suited for your unique setting. Unfortunately, the manual controls available to tune the image often prove to be saved, providing an easy way to adjust it for you to select display characteristics in a multiuser environment, or having a single user have multiple defined presets based on a monitor requires you . Color Overview | Installation | OSD Mode | | Uninstall | Troubleshooting Calibration Overview What is a software utility that allows monitor adjustment and color tuning using the Display...
Quick Guide (easy Manual) (ver.1.0) (English)
Page 36
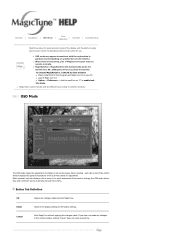
... on top of the control window displays the general descriptions of the sub-menu items for adjustment. z MagicTune control mode will automatically pivots the monitor to easily save and use monitor configurations that are best suited for you pivots the monitor. Cancel Exits MagicTune without applying the changes made any changes made and exits MagicTune. OSD Mode The OSD mode makes the adjustment of settings on specification of each monitor. z Please install both of Pivot...
... on top of the control window displays the general descriptions of the sub-menu items for adjustment. z MagicTune control mode will automatically pivots the monitor to easily save and use monitor configurations that are best suited for you pivots the monitor. Cancel Exits MagicTune without applying the changes made any changes made and exits MagicTune. OSD Mode The OSD mode makes the adjustment of settings on specification of each monitor. z Please install both of Pivot...
Quick Guide (easy Manual) (ver.1.0) (English)
Page 37
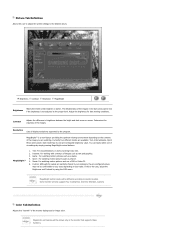
... graphics. 3. Adjust the brightness for best viewing conditions. MagicBright™ is the case, adjust the Brightness and Contrast by the program. Internet: For working with a mixture of the monitor background or image color. Currently four different modes are watching. MagicBright control mode will only support Four modes(Text, Internet, Entertain, Custom) Color Tab Definition Adjusts the "warmth" of images such as a DVD or Video CD. 6. Game : For watching motion pictures such...
... graphics. 3. Adjust the brightness for best viewing conditions. MagicBright™ is the case, adjust the Brightness and Contrast by the program. Internet: For working with a mixture of the monitor background or image color. Currently four different modes are watching. MagicBright control mode will only support Four modes(Text, Internet, Entertain, Custom) Color Tab Definition Adjusts the "warmth" of images such as a DVD or Video CD. 6. Game : For watching motion pictures such...
Quick Guide (easy Manual) (ver.1.0) (English)
Page 42
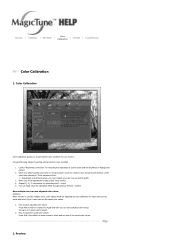
Color Overview | Installation | OSD Mode | Calibration | Uninstall | Troubleshooting Color Calibration 1. When you won't detect any color tone on Control patch. 3. Up to get optimal color condition for each users can use adjusted color values Definition When monitor is finished properly, you finish adjustment for remaining step2 ~ step5. 5. As many as 5 values can easily view the calibration effect through clicking "Preview " button! How to apply the saved color values: Press Multi User button on "Control patch", move the...
Color Overview | Installation | OSD Mode | Calibration | Uninstall | Troubleshooting Color Calibration 1. When you won't detect any color tone on Control patch. 3. Up to get optimal color condition for each users can use adjusted color values Definition When monitor is finished properly, you finish adjustment for remaining step2 ~ step5. 5. As many as 5 values can easily view the calibration effect through clicking "Preview " button! How to apply the saved color values: Press Multi User button on "Control patch", move the...
Quick Guide (easy Manual) (ver.1.0) (English)
Page 46
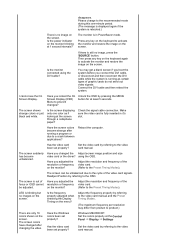
I cannot turn on the screen. Is the power cord connected properly? Solutions Check the power cord connection and supply. (When connecting D-Sub cable) Check the signal cable connection. (When connecting DVI cabel) If you still see an error message on the screen? If the display exceeds 85Hz, the display will work properly but the "Not Optimum Mode", "Recommended mode : 1280 x 1024 60Hz" message appears for Windows ME/XP/2000) and then change the frequency of the video card. (Refer to the...
I cannot turn on the screen. Is the power cord connected properly? Solutions Check the power cord connection and supply. (When connecting D-Sub cable) Check the signal cable connection. (When connecting DVI cabel) If you still see an error message on the screen? If the display exceeds 85Hz, the display will work properly but the "Not Optimum Mode", "Recommended mode : 1280 x 1024 60Hz" message appears for Windows ME/XP/2000) and then change the frequency of the video card. (Refer to the...
Quick Guide (easy Manual) (ver.1.0) (English)
Page 47
.... Have you adjusted the focus or OSD cannot resolution or frequency be unbalanced due to the Preset Timing Modes). using the DVI cable? Adjust the resolution and frequency of the video card. (Refer to the cycle of graphic cards do not send out video signals. The screen can be adjusted. The screen colors have changed the Adjust screen image position and size video card or the driver? Has the video card been set properly? Set the video card by referring to activate the monitor and restore...
.... Have you adjusted the focus or OSD cannot resolution or frequency be unbalanced due to the Preset Timing Modes). using the DVI cable? Adjust the resolution and frequency of the video card. (Refer to the cycle of graphic cards do not send out video signals. The screen can be adjusted. The screen colors have changed the Adjust screen image position and size video card or the driver? Has the video card been set properly? Set the video card by referring to activate the monitor and restore...
Quick Guide (easy Manual) (ver.1.0) (English)
Page 48
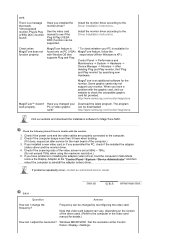
... be changed your Download the latest program. See the video card manual to the computer. 2. Install the monitor driver according to the Driver Installation Instructions. MagicTune is a message that reads "Unrecognized monitor, Plug & Play (VESA DDC) monitor found only on the version of the driver used. (Refer to check the compatible graphic card list provided. Check the following items if there is set at the Control Panel→Display→Settings. Windows ME/XP/2000 : Set the resolution at...
... be changed your Download the latest program. See the video card manual to the computer. 2. Install the monitor driver according to the Driver Installation Instructions. MagicTune is a message that reads "Unrecognized monitor, Plug & Play (VESA DDC) monitor found only on the version of the driver used. (Refer to check the compatible graphic card list provided. Check the following items if there is set at the Control Panel→Display→Settings. Windows ME/XP/2000 : Set the resolution at...
Quick Guide (easy Manual) (ver.1.0) (English)
Page 49
... the woofer to check the signal cable. If your monitor screen remains blank after using either a cleaning solution or plain water. computer or the screen saver. (Refer to go inside the monitor. How can I set the Power Saving Windows ME/XP/2000 : Set the function at BIOS-SETUP of the monitor. 1. Turn off both your computer and the monitor. 2. How can I clean the outer case/LCD Panel? Turn off your video controller and computer...
... the woofer to check the signal cable. If your monitor screen remains blank after using either a cleaning solution or plain water. computer or the screen saver. (Refer to go inside the monitor. How can I set the Power Saving Windows ME/XP/2000 : Set the function at BIOS-SETUP of the monitor. 1. Turn off both your computer and the monitor. 2. How can I clean the outer case/LCD Panel? Turn off your video controller and computer...
Quick Guide (easy Manual) (ver.1.0) (English)
Page 52
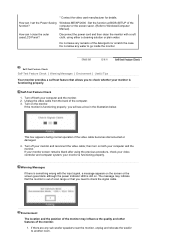
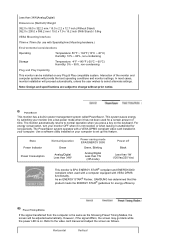
.... Horizontal Vertical Interaction of time. Use a software utility installed on any Plug & Play compatible system. Preset Timing Modes If the signal transferred from the computer is the same as follows. State Power Indicator Power Consumption Normal Operation Green Analog/Digital Less than 34W Power saving mode EPA/ENERGY 2000 Green, Blinking Analog/Digital Less than 1W (Off-mode) Power off Black Less than 34W(Analog/Digital) Dimensions (WxDxH)/ Weight 382.0 x 56.0 x 322.2 mm / 15.0 x 2.2 x 12.7 inch (Without Stand...
.... Horizontal Vertical Interaction of time. Use a software utility installed on any Plug & Play compatible system. Preset Timing Modes If the signal transferred from the computer is the same as follows. State Power Indicator Power Consumption Normal Operation Green Analog/Digital Less than 34W Power saving mode EPA/ENERGY 2000 Green, Blinking Analog/Digital Less than 1W (Off-mode) Power off Black Less than 34W(Analog/Digital) Dimensions (WxDxH)/ Weight 382.0 x 56.0 x 322.2 mm / 15.0 x 2.2 x 12.7 inch (Without Stand...

Quick Guide (easy Manual) (ver.1.0) (English)
Page 55
... when used for energy efficiency. State Power Indicator Power Consumption Normal Operation Green Analog/Digital Less than 38W Power saving mode EPA/ENERGY 2000 Green, Blinking Analog/Digital Less than 1W (Off-mode) Power off Black Less than 38W(Analog/Digital) Dimensions (WxDxH)/ Weight 422.7 x 59.6 x 356.1 mm / 16.6 x 2.3 x 14.0 inch (Without Stand) 422.7 x 217.0 x 427.7 mm / 16.6 x 8.5 x 16.8 inch (With Stand) / 5.1 kg VESA Mounting Interface 75mm x 75mm (for long periods. Note: Design and specifications...
... when used for energy efficiency. State Power Indicator Power Consumption Normal Operation Green Analog/Digital Less than 38W Power saving mode EPA/ENERGY 2000 Green, Blinking Analog/Digital Less than 1W (Off-mode) Power off Black Less than 38W(Analog/Digital) Dimensions (WxDxH)/ Weight 422.7 x 59.6 x 356.1 mm / 16.6 x 2.3 x 14.0 inch (Without Stand) 422.7 x 217.0 x 427.7 mm / 16.6 x 8.5 x 16.8 inch (With Stand) / 5.1 kg VESA Mounting Interface 75mm x 75mm (for long periods. Note: Design and specifications...
Quick Guide (easy Manual) (ver.1.0) (English)
Page 61
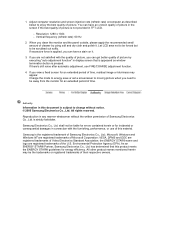
... Co., Ltd.; If you can have an uneven quality of picture in the screen if the best quality of Video Electronics Standard Association; Reproduction in TFT-LCD. { Resolution: 1280 x 1024 { Vertical frequency (refresh rate): 60 Hz 2. Microsoft, Windows and Windows NT are registered trademarks of picture is pressed. Adjust computer resolution and screen injection rate (refresh rate) oncomputer as window termination button is not provided in any manner whatsoever without notice. ©...
... Co., Ltd.; If you can have an uneven quality of picture in the screen if the best quality of Video Electronics Standard Association; Reproduction in TFT-LCD. { Resolution: 1280 x 1024 { Vertical frequency (refresh rate): 60 Hz 2. Microsoft, Windows and Windows NT are registered trademarks of picture is pressed. Adjust computer resolution and screen injection rate (refresh rate) oncomputer as window termination button is not provided in any manner whatsoever without notice. ©...

Quick Guide (easy Manual) (ver.1.0) (English)
Page 62
... power off when using a combination of your LCD from image retention Power Off, Screen Saver, or Power Save Mode Ex) z Turn the power off for 4 hours after displaying a stationary image for a long time. Avoid using a stationary pattern. - Every 30 minutes, change the characters with 2 colors every 30 minutes. Ex) However, if the same image is not a product defect. z Avoid: Colors with big difference in luminance (Black & White, Grey) Ex) z Recommended settings: Bright colors...
... power off when using a combination of your LCD from image retention Power Off, Screen Saver, or Power Save Mode Ex) z Turn the power off for 4 hours after displaying a stationary image for a long time. Avoid using a stationary pattern. - Every 30 minutes, change the characters with 2 colors every 30 minutes. Ex) However, if the same image is not a product defect. z Avoid: Colors with big difference in luminance (Black & White, Grey) Ex) z Recommended settings: Bright colors...


