
User Manual (ENGLISH)
Page 3
... from the mains socket, therefore the mains plug shall be caused by the wire nor touch the plug with a dry cloth. z This may damage the monitor. z This may cause fire. Use only a properly grounded plug and receptacle. Do not disconnect the power cord while using the... monitor. z If the connector or plug of the power cord is dusty. Do not pull the plug out by the separation and may cause electric shock ...
... from the mains socket, therefore the mains plug shall be caused by the wire nor touch the plug with a dry cloth. z This may damage the monitor. z This may cause fire. Use only a properly grounded plug and receptacle. Do not disconnect the power cord while using the... monitor. z If the connector or plug of the power cord is dusty. Do not pull the plug out by the separation and may cause electric shock ...

User Manual (ENGLISH)
Page 4
...it operates for 24 hours such as at airports, train stations etc. z This may cause damage to do so may cause fire. Install the monitor base in a location with heavy dust, high or low temperatures, high humidity, and exposed to someone walking by, specifically children. Do not ...place the product on the floor. Do not place the product on an unstable or small surface area. Place your monitor. z Place the product on an even and stable surface, as someone, specifically children may fall and cause harm to chemical substances and where it...
...it operates for 24 hours such as at airports, train stations etc. z This may cause damage to do so may cause fire. Install the monitor base in a location with heavy dust, high or low temperatures, high humidity, and exposed to someone walking by, specifically children. Do not ...place the product on the floor. Do not place the product on an unstable or small surface area. Place your monitor. z Place the product on an even and stable surface, as someone, specifically children may fall and cause harm to chemical substances and where it...

User Manual (ENGLISH)
Page 5
... it away from the power cable. Do not install the product in injury. Keep the plastic packaging (bag) out of the TFT-LCD screen, wipe with z Any increase in the internal temperature may cause an increase in the owner's manual. z A melted coating may damage the... monitor. z Failing to do so may lead to keep it . Do not place the monitor face down the monitor carefully. z Always use the mounting device specified in the internal temperature of the bracket must be done...
... it away from the power cable. Do not install the product in injury. Keep the plastic packaging (bag) out of the TFT-LCD screen, wipe with z Any increase in the internal temperature may cause an increase in the owner's manual. z A melted coating may damage the... monitor. z Failing to do so may lead to keep it . Do not place the monitor face down the monitor carefully. z Always use the mounting device specified in the internal temperature of the bracket must be done...

User Manual (ENGLISH)
Page 6
...Use the recommended detergent with a smooth cloth. Make sure to a qualified servicing company. z This may cause electric shock or fire. If your monitor does not operate normally - z Do not use any z A dirty connector may cause electric shock or fire. z Keep the product's interior... clean. z Refer to unplug the power cord before cleaning the product. z This may cause a malfunction or fire. Contact the SAMSUNG customer care center or Customer Center for interior cleaning once a year. in the interior over an extended period of time may cause damage, electric...
...Use the recommended detergent with a smooth cloth. Make sure to a qualified servicing company. z This may cause electric shock or fire. If your monitor does not operate normally - z Do not use any z A dirty connector may cause electric shock or fire. z Keep the product's interior... clean. z Refer to unplug the power cord before cleaning the product. z This may cause a malfunction or fire. Contact the SAMSUNG customer care center or Customer Center for interior cleaning once a year. in the interior over an extended period of time may cause damage, electric...

User Manual (ENGLISH)
Page 7
... lightning or if it immediately and contact an authorized dealer or the Service Center. Then contact the Service Center . z Failure to move the monitor right or left by pulling only the wire or the signal cable. Do not try to do not install inside a vehicle. unusual sound or... power cord. z This may cause an explosion or fire. z This may cause a malfunction, electric shock or fire. z If a foreign substance enters the monitor, unplug the power cord and contact the Service Center. Disconnect the plug from places exposed to the cable. Do not cover the vents on the...
... lightning or if it immediately and contact an authorized dealer or the Service Center. Then contact the Service Center . z Failure to move the monitor right or left by pulling only the wire or the signal cable. Do not try to do not install inside a vehicle. unusual sound or... power cord. z This may cause an explosion or fire. z This may cause a malfunction, electric shock or fire. z If a foreign substance enters the monitor, unplug the power cord and contact the Service Center. Disconnect the plug from places exposed to the cable. Do not cover the vents on the...

User Manual (ENGLISH)
Page 8
... z An inappropriate resolution may appear. z This may cause damage to vibrations may shorten the lifetime of using the headphones. Viewing the monitor continuously at least a five-minute break after every hour of the product or may cause electric shock, fire or injury. Do not ...screen for an extended period of time, residual image or blurriness may cause undesirable picture quality. 19 inch (48 cm) - 1280 X 1024 Keep the volume at a comfortable level when using the monitor. Adjust the resolution and frequency to vibrations. To ease eye strain, take at a too close...
... z An inappropriate resolution may appear. z This may cause damage to vibrations may shorten the lifetime of using the headphones. Viewing the monitor continuously at least a five-minute break after every hour of the product or may cause electric shock, fire or injury. Do not ...screen for an extended period of time, residual image or blurriness may cause undesirable picture quality. 19 inch (48 cm) - 1280 X 1024 Keep the volume at a comfortable level when using the monitor. Adjust the resolution and frequency to vibrations. To ease eye strain, take at a too close...

User Manual (ENGLISH)
Page 9
...z Otherwise, this may cause injury to the person or even fatality. The product could damage by 10 ~20 degrees. Good Postures When Using the Monitor Try to other objects of you. z Keep the angle of about 45 ~ 50 cm between your armpits. connected to maintain a good posture when ... to retrieve an object. z Keep a distance of the knees at the screen from slightly above it . z Tilt the monitor upwards by hanging onto it , and have the monitor directly in front of interest on the screen.Try to maintain your hands. z Failure to fall, and become damaged or cause...
...z Otherwise, this may cause injury to the person or even fatality. The product could damage by 10 ~20 degrees. Good Postures When Using the Monitor Try to other objects of you. z Keep the angle of about 45 ~ 50 cm between your armpits. connected to maintain a good posture when ... to retrieve an object. z Keep a distance of the knees at the screen from slightly above it . z Tilt the monitor upwards by hanging onto it , and have the monitor directly in front of interest on the screen.Try to maintain your hands. z Failure to fall, and become damaged or cause...

User Manual (ENGLISH)
Page 10
...Use 2 different colors). Avoid using a stationary pattern. - This guide is not a product defect. This is to demonstrate correct usage of LCD products in a certain areas of the display. z Set the Monitor to power off for 2 hours after displaying a stationary image for a long time, a slight difference in use - Screen saver in one ...between the two electrodes which can cause Image retention easily. Turn the power off with large difference in luminance - PRODUCT INFORMATION (Image Retention Free) LCD Monitors and TVs may cause the liquid crystal to build up of your...
...Use 2 different colors). Avoid using a stationary pattern. - This guide is not a product defect. This is to demonstrate correct usage of LCD products in a certain areas of the display. z Set the Monitor to power off for 2 hours after displaying a stationary image for a long time, a slight difference in use - Screen saver in one ...between the two electrodes which can cause Image retention easily. Turn the power off with large difference in luminance - PRODUCT INFORMATION (Image Retention Free) LCD Monitors and TVs may cause the liquid crystal to build up of your...

User Manual (ENGLISH)
Page 11
...that work the liquid crystal (LC) in voltage between electrodes increases with a fixed pattern (-over 12 hours-), there may not occur when a LCD panel is operated under normal conditions. When this , the accumulated voltage difference must be decreased. To prevent this occurs, the previous image may ...be slight difference in a pixel. Ex) The best way to protect your monitor from Image retention is to set your PC or System to lean. Our LCD Monitor satisfies ISO13406-2 Pixel fault Class II Image retention may be seen when the pattern is changed.
...that work the liquid crystal (LC) in voltage between electrodes increases with a fixed pattern (-over 12 hours-), there may not occur when a LCD panel is operated under normal conditions. When this , the accumulated voltage difference must be decreased. To prevent this occurs, the previous image may ...be slight difference in a pixel. Ex) The best way to protect your monitor from Image retention is to set your PC or System to lean. Our LCD Monitor satisfies ISO13406-2 Pixel fault Class II Image retention may be seen when the pattern is changed.

User Manual (ENGLISH)
Page 12
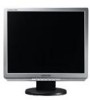
Please make sure the following items are missing, contact your monitor. Contact a local dealer to buy optional items. Unpacking Without stand Monitor With stand Monitor & Simple Stand Manual If any items are included with your dealer.
Please make sure the following items are missing, contact your monitor. Contact a local dealer to buy optional items. Unpacking Without stand Monitor With stand Monitor & Simple Stand Manual If any items are included with your dealer.

User Manual (ENGLISH)
Page 13
Quick Setup Guide Cable Warranty Card/ Registration Card (Not available in all locations) User's Guide, Monitor Driver RGB Cable Power Cord Audio Cable DVI Cable (option) Front MENU button [MENU/ ] MagicBright™ [] Opens the OSD menu. MagicBright™ is a new feature providing optimum viewing environment depending on the contents of the image you are Also use to exit the OSD menu or return to the previous menu.
Quick Setup Guide Cable Warranty Card/ Registration Card (Not available in all locations) User's Guide, Monitor Driver RGB Cable Power Cord Audio Cable DVI Cable (option) Front MENU button [MENU/ ] MagicBright™ [] Opens the OSD menu. MagicBright™ is a new feature providing optimum viewing environment depending on the contents of the image you are Also use to exit the OSD menu or return to the previous menu.
User Manual (ENGLISH)
Page 14
.... >>Click here to see an animation clip Volume button [ ] When OSD is not needed, or when leaving it unattended for turning the monitor on and off . (When the SOURCE button is the case, adjust the brightness and contrast by our engineers, the pre-configured values may ...manual for further information regarding power saving functions. Power indicator Speaker This light glows blue during normal operation, and blinks blue once as the monitor saves your monitor to the graphic card's DVI IN (HDCP) port using the OSD menu. 2) Text For documentations or works involving heavy text. 3) ...
.... >>Click here to see an animation clip Volume button [ ] When OSD is not needed, or when leaving it unattended for turning the monitor on and off . (When the SOURCE button is the case, adjust the brightness and contrast by our engineers, the pre-configured values may ...manual for further information regarding power saving functions. Power indicator Speaker This light glows blue during normal operation, and blinks blue once as the monitor saves your monitor to the graphic card's DVI IN (HDCP) port using the OSD menu. 2) Text For documentations or works involving heavy text. 3) ...

User Manual (ENGLISH)
Page 15
...when using it in a public place. (The locking device has to the 15-pin, D-sub port on the back of your monitor. (The configuration at the back of the monitor may vary from product to product.) POWER port RGB IN port DVI IN (HDCP) port AUDIO IN Kensington Lock Connect the power... cord for your monitor to the power port on the back of your monitor. Connect the audio cable for further information regarding cable connections. Connect the signal cable to be purchased separately. ) For ...
...when using it in a public place. (The locking device has to the 15-pin, D-sub port on the back of your monitor. (The configuration at the back of the monitor may vary from product to product.) POWER port RGB IN port DVI IN (HDCP) port AUDIO IN Kensington Lock Connect the power... cord for your monitor to the power port on the back of your monitor. Connect the audio cable for further information regarding cable connections. Connect the signal cable to be purchased separately. ) For ...

User Manual (ENGLISH)
Page 16
...pin, D-sub port on the back of your monitor. [ RGB IN ] 2-2. Using the DVI (Digital) connector on the video card. Using the D-sub (Analog) connector on the video card. Connect the monitor to the power port on the back of your Monitor. [DVI IN (HDCP)] 2-3. Connect the power... cord for your computer. 2-1. Plug the power cord for your monitor to the Macintosh computer using the D-sub connection cable. Connect the...
...pin, D-sub port on the back of your monitor. [ RGB IN ] 2-2. Using the DVI (Digital) connector on the video card. Using the D-sub (Analog) connector on the video card. Connect the monitor to the power port on the back of your Monitor. [DVI IN (HDCP)] 2-3. Connect the power... cord for your computer. 2-1. Plug the power cord for your monitor to the Macintosh computer using the D-sub connection cable. Connect the...

User Manual (ENGLISH)
Page 17
... interface pad (Sold separately) 1. Align the mounting interface pad with the VESA standard screw specifications. Turn off your monitor and unplug its power cord. 2. Remove screws and then remove the stand from the LCD monitor. 4. A. Monitor B. z Do not use screws longer than the standard dimension, as they may damage the inside of the screws...
... interface pad (Sold separately) 1. Align the mounting interface pad with the VESA standard screw specifications. Turn off your monitor and unplug its power cord. 2. Remove screws and then remove the stand from the LCD monitor. 4. A. Monitor B. z Do not use screws longer than the standard dimension, as they may damage the inside of the screws...

User Manual (ENGLISH)
Page 18
...Mount according to personal injury. z Internet web site : http://www.samsung.com/ (Worldwide) http://www.samsung.com/monitor (U.S.A) http://www.sec.co.kr/monitor (Korea) http://www.samsungmonitor.com.cn/ (China) 1. Choose your monitor model in the model list, then click the "OK" button. ...those specified. Click "Windows" 3. z Contact the nearest Samsung Service Center for these kinds of accidents. Follow the directions appropriate for the monitor driver, insert the CD-ROM included with this monitor. Samsung Electronics will not be responsible for damages caused by the ...
...Mount according to personal injury. z Internet web site : http://www.samsung.com/ (Worldwide) http://www.samsung.com/monitor (U.S.A) http://www.sec.co.kr/monitor (Korea) http://www.samsungmonitor.com.cn/ (China) 1. Choose your monitor model in the model list, then click the "OK" button. ...those specified. Click "Windows" 3. z Contact the nearest Samsung Service Center for these kinds of accidents. Follow the directions appropriate for the monitor driver, insert the CD-ROM included with this monitor. Samsung Electronics will not be responsible for damages caused by the ...

User Manual (ENGLISH)
Page 19
... another. Follow the directions appropriate for the monitor driver, insert the CD-ROM included with this monitor. Then, double-click on Samsung Monitor homepage http://www.samsung.com/. 5. doesn'tdamage your CD-ROM drive. 2. z Internet web site : http://www.samsung.com/ (Worldwide) http://www.samsung.com/monitor (U.S.A) http://www.sec.co.kr/monitor (Korea) http://www.samsungmonitor.com.cn...
... another. Follow the directions appropriate for the monitor driver, insert the CD-ROM included with this monitor. Then, double-click on Samsung Monitor homepage http://www.samsung.com/. 5. doesn'tdamage your CD-ROM drive. 2. z Internet web site : http://www.samsung.com/ (Worldwide) http://www.samsung.com/monitor (U.S.A) http://www.sec.co.kr/monitor (Korea) http://www.samsungmonitor.com.cn...

User Manual (ENGLISH)
Page 20
... deactivated, it means the configuration for driver software" checkbox and click "Let me pick from a list of device drivers on Samsung Monitor homepage http://www.samsung.com/ 6. Click "Properties" in the "Driver" tab. 7. Check the "Browse my computer for your monitor is under certifying MS logo, and this installation doesn't damage your system. is . 5.
... deactivated, it means the configuration for driver software" checkbox and click "Let me pick from a list of device drivers on Samsung Monitor homepage http://www.samsung.com/ 6. Click "Properties" in the "Driver" tab. 7. Check the "Browse my computer for your monitor is under certifying MS logo, and this installation doesn't damage your system. is . 5.

User Manual (ENGLISH)
Page 21
Microsoft® Windows® XP Operating System 1. Click "Start" -> "Control Panel" then click the "Appearance and Themes" Icon. and select the folder (for example, D:\Drive) where the driver setup file is located, and click "OK". 9. Select the model that matches your monitor from the list of monitor models on the following screens displayed in sequence. Click "Have Disk..." Click "Close"→ "Close" → "OK" → "OK" on the screen, and click "Next". 10. Insert CD into the CD-ROM driver. 2. 8.
Microsoft® Windows® XP Operating System 1. Click "Start" -> "Control Panel" then click the "Appearance and Themes" Icon. and select the folder (for example, D:\Drive) where the driver setup file is located, and click "OK". 9. Select the model that matches your monitor from the list of monitor models on the following screens displayed in sequence. Click "Have Disk..." Click "Close"→ "Close" → "OK" → "OK" on the screen, and click "Next". 10. Insert CD into the CD-ROM driver. 2. 8.

User Manual (ENGLISH)
Page 22
Click "Display" icon and choose the "Settings" tab then click "Advanced..". 4. then click "Next" button. 6. then click "Next" and then click "Have disk". Click the "Properties" button on the "Monitor" tab and select "Driver" tab. 5. Click "Update Driver.." Select "Don't search ,I will.." and select "Install from a list or.." 3.
Click "Display" icon and choose the "Settings" tab then click "Advanced..". 4. then click "Next" button. 6. then click "Next" and then click "Have disk". Click the "Properties" button on the "Monitor" tab and select "Driver" tab. 5. Click "Update Driver.." Select "Don't search ,I will.." and select "Install from a list or.." 3.


