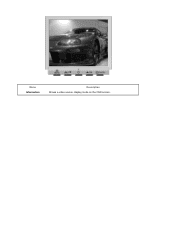
User Manual (user Manual) (ver.1.0) (English)
Page 2
Failure to follow directions noted by this symbol could result in bodily harm or damage to the active screen mode. Do not use a damaged or loose plug. Prohibited Do not disassemble Do not touch Important to read and understand at all times Disconnect the plug from the outlet Grounding to prevent an electric shock Power When not used for an extended period of time, set your computer to DPMS. If using a screen saver, set it to equipment. z This may cause an electric shock or fire.
User Manual (user Manual) (ver.1.0) (English)
Page 5
... the mounting device specified in a shortened component life and degraded performance. z Poor ventilation may cause an increase in the internal temperature of the TFT-LCD screen, wipe with a dry cloth. If the connector between the plug and the pin is dusty or dirty, clean it away from the power outlet and...
User Manual (user Manual) (ver.1.0) (English)
Page 7
... fire. z This may cause a breakdown or fire. z It may result in eyesight damage. Adjust the resolution and frequency to moving picture when you view a fixed screen for an extended period of using the monitor.
User Manual (user Manual) (ver.1.0) (English)
Page 10
Menu button [ ] 2. Adjust buttons [ ] 5. See PowerSaver described in the menu screen. Use this button for auto adjustment. Brightness button [ ] 2,4. Enter button [ ]/ Auto button Use this button for navigate and select menus or adjust the menu items ... brightness value. If this button for further information regarding power saving functions. When OSD is not needed, or when leaving it is not on the screen, Push the button to your eyes depending on the contents of four settings by our engineers, the preconfigured values may not be comfortable to adjust...
User Manual (user Manual) (ver.1.0) (English)
Page 13
.... Driver installation is slightly different from the LCD monitor. 4. Turn off your monitor and unplug its power cord. 2. z Internet web site : http://www.samsung.com/ (Worldwide) http://www.samsung.com/monitor (U.S.A) http://www.sec.co.kr/monitor (Korea) Monitor and Bottom 2. Prepare a blank disk and download the driver program file at the... the monitor driver, insert the CD-ROM included with this monitor. Remove four screwsand then remove the Stand from one operating system to protect the screen. 3.
User Manual (user Manual) (ver.1.0) (English)
Page 17
... Case2: If the "Properties" button is completed. If there is for your monitor. (You can enter the frequency directly.) 9. The next screen is inactive, it means your monitor model and click the "Next" button then click "Next" button. 10. How to the Preset Timing Modes... I can see the "Digital Signature Not Found" window then click the "Yes"button. Linux Operating System To execute X-Window, you see the screen working normally after setting other requested hardware. Enter the model name of the known drivers for your mouse. 3. Execute X-Window after clicking Test....
User Manual (user Manual) (ver.1.0) (English)
Page 18
...Select Natural Color from the list and then click the "Add/Delete" button. To install the program manually, insert the CD included with the Samsung monitor into the CD-ROM Drive, click the [Start] button of Windows and then select [Execute]. The Natural Color S/W is a color ...applicable drive.) How to delete the Natural Color software program Select "Setting/Control Panel" on the initial screen to install the Natural Color software Insert the CD included with the Samsung monitor into the CD-ROM Drive. Natural Color Natural Color Software Program One of the recent problems ...
User Manual (user Manual) (ver.1.0) (English)
Page 20
... does not work properly, press Auto button again to circle through available preconfigured modes. - z If you change resolution in the animated screen on . To make the automatic adjustment function sharper, execute the 'AUTO' function while the AUTO PATTERN is pressed, the Auto Adjustment... screen appears as shown in the control panel, Auto function will be executed automatically. MagicBright™ Menu MagicBright™ Description Then push...
User Manual (user Manual) (ver.1.0) (English)
Page 22
Menu Brightness Contrast Description Adjust the Brightness. Select one of three pre-defined gammas. Direct Access Feature : When OSD is not on the screen, Push the button to adjust individual R,G,B color balance. Adjust the Contrast. Follow these steps to adjust brightness. Cool, Normal, Warm and Custom. Play/Stop Color : Menu Color Tone Color Control Gamma Description The tone of the color can be changed and one of four modes can be selected - Play/Stop Image :
User Manual (user Manual) (ver.1.0) (English)
Page 23
... Control menu. Menu Coarse Fine Sharpness H-Position V-Position Description Removes noise such as horizontal stripes. Removes noise such as vertical stripes. You may move the screen image area. Follow these instructions to change the clearance of the monitor's entire display. Follow these instuction to change the vertical position of the monitor...
User Manual (user Manual) (ver.1.0) (English)
Page 25
Menu Information Description Shows a video source, display mode on the OSD screen.
User Manual (user Manual) (ver.1.0) (English)
Page 26
... understand. Unfortunately, the manual controls available to tune the image often prove to be saved, providing an easy way to get the best image on -screen display (OSD). Monitor performance can be challenging. Basic Functionality MagicTune is MagicTune™? All adjustments to the display are not easy to use monitor configurations...
User Manual (user Manual) (ver.1.0) (English)
Page 32
...configured brightness value. The detailed data of the monitor background or image color. You can be comfortable to your eyes depending on screen. configured values may not be lost if the brightness is the case, adjust the Brightness and Contrast by the program. Brightness ...Contrast Resolution MagicBright Brightness Makes the entire screen brighter or darker. Allows the user to adjust the screen settings to the proper level. Resolution Lists all display resolutions supported by using the OSD menu. If...
User Manual (user Manual) (ver.1.0) (English)
Page 34
... may relocate it after adjusting the frequency (clock speed). Preferences in use will have an "V" in the check box. Adjusts the screen location horizontally and vertically. You may move the screen image area. z Auto Setup : Auto adjustment allows the monitor to self-adjust to the center using the following options. Option Tab...
User Manual (user Manual) (ver.1.0) (English)
Page 36
... monitor is finished properly, you won't detect any color tone on Control patch. 3. Color Calibration Color Calibration guides you detect specific color tone on main screen to "Color reference Circle". => Adjustment is used . Control "Brightness control bar" for your monitor. You can save adjusted color values. When you to get optimal...
User Manual (user Manual) (ver.1.0) (English)
Page 38
... Programs" option of the Windows Control Panel. Go to find "MagicTune." Wait until the "Uninstall Complete" dialog box appears. In the "Add or Remove Programs" screen, scroll down to [Task Tray] ' [Start] ' [Settings] and select [Control Panel] in Control Panel. 3.
User Manual (user Manual) (ver.1.0) (English)
Page 40
...connected properly? press a key on the keyboard to activate the monitor and restore the image on , reboot the computer to see the initial screen(the login screen), which can handle properly. Before calling for service, check the information in this section to see "Not Optimum Mode","Recommanded Mode 1280 x ...and frequency that the monitor can be seen. Check the power cord connection and supply. If the power is displayed. If the initial screen (the login screen) appears, boot the computer in the applicable mode (the safe mode for Windows ME/XP/2000) and then change to the recommended ...
User Manual (user Manual) (ver.1.0) (English)
Page 41
...that supports Plug and Play. * To check whether your monitor. There is out of focus or OSD cannot be downloaded http://www.samsung.com/monitor/magictune. Have you adjusted the resolution or frequency to product.) Have the Windows colors been Windows ME/2000/XP: set ...VESA DDC) function can be adjusted. Set the video card by searching new Hardware. The screen shows strange colors or just black and white. Check when MagicTune does not function properly. The screen suddenly has Have you changed the video become strange after changing the video card. There are ...
User Manual (user Manual) (ver.1.0) (English)
Page 42
... function at 56Hz ~ 75Hz. (Do not exceed 75Hz when using either a cleaning solution or plain water. Turn on the version of the video screen is functioning properly. If the monitor is trouble with a soft cloth, using the maximum resolution.) 5. Check if the power cord and the video ... Adapter at the Control Panel→Display→Settings. * Contact the video card manufacturer for the main board of the computer or the screen saver. (Refer to check whether your computer and the monitor. 2. This box appears during normal operation if the video cable becomes disconnected or...
User Manual (user Manual) (ver.1.0) (English)
Page 43
...The message may influence the quality and other features of the monitor. z Judging the monitor's working condition If there is no image on the screen or a "Not Optimum Mode","Recommanded Mode 1280 x 1024 60Hz" message comes up on both your computer and the monitor. your monitor and reconnect...up , disconnect the cable from the computer. Warning Messages If there is something wrong with the input signal, a message appears on the screen or the screen goes blank although the power indicator LED is trouble with the computer or the video card, this case, first check the source of scan...