

User Manual (user Manual) (ver.1.0) (English)
Page 2
Windows 2000 - Other Operating System Base Installation User's Manual 2 On-Screen Display General Highlight Zone MouScreen™ S/W Troubleshooting Check List Q & A Self-Test Feature Check Specifications General Specifications Preset Display Modes PowerSaver Information Service Terms Regulatory Natural Color MouScreen™ S/W Authority Index Main Page Safety Instructions Natational Power Installation Cleaning Other Introduction Unpacking Front Rear Bottom Setup Connecting Your Monitor Installing the Monitor Driver -
Windows 2000 - Other Operating System Base Installation User's Manual 2 On-Screen Display General Highlight Zone MouScreen™ S/W Troubleshooting Check List Q & A Self-Test Feature Check Specifications General Specifications Preset Display Modes PowerSaver Information Service Terms Regulatory Natural Color MouScreen™ S/W Authority Index Main Page Safety Instructions Natational Power Installation Cleaning Other Introduction Unpacking Front Rear Bottom Setup Connecting Your Monitor Installing the Monitor Driver -

User Manual (user Manual) (ver.1.0) (English)
Page 8
... can damage (color change) or crack the monitor case. Use a water-diluted mild detergent. (Some detergents contain significant amounts of the CDT, wipe with a slightly moistened, soft fabric. Safety Instructions User's Manual 8 Clean When cleaning the monitor case or the surface of alcohol-based solvents, which can buy a recommended detergent at any Samsung Service Center. • If the connector between the plug and the pin...
... can damage (color change) or crack the monitor case. Use a water-diluted mild detergent. (Some detergents contain significant amounts of the CDT, wipe with a slightly moistened, soft fabric. Safety Instructions User's Manual 8 Clean When cleaning the monitor case or the surface of alcohol-based solvents, which can buy a recommended detergent at any Samsung Service Center. • If the connector between the plug and the pin...

User Manual (user Manual) (ver.1.0) (English)
Page 12
... is not needed, or when leaving it unattended for further information regarding power saving functions. Adjust buttons These buttons allow you to open the OSD and activate a highlighted menu item. 5. Note: See PowerSaver described in the menu. 4. Exit button Use this button to highlight and adjust items in the manual for long periods. Menu button Use this button to turn your adjustments. 6. For energy conservation, turn the monitor on the screen. 2. Introduction Front User's Manual 12 1.
... is not needed, or when leaving it unattended for further information regarding power saving functions. Adjust buttons These buttons allow you to open the OSD and activate a highlighted menu item. 5. Note: See PowerSaver described in the menu. 4. Exit button Use this button to highlight and adjust items in the manual for long periods. Menu button Use this button to turn your adjustments. 6. For energy conservation, turn the monitor on the screen. 2. Introduction Front User's Manual 12 1.

User Manual (user Manual) (ver.1.0) (English)
Page 18
... monitor driver, insert the CD-ROM included with this monitor. Prepare a blank disk and download the driver program file at the Internet web site shown here. Setup When prompted by the operating system for the operating system you have. Click "Start" -> "Control Panel" then click the "Appearance and Themes" Icon. 3. Click the "Properties" button on the "Monitor" tab and select "Driver" tab. Driver installation...
... monitor driver, insert the CD-ROM included with this monitor. Prepare a blank disk and download the driver program file at the Internet web site shown here. Setup When prompted by the operating system for the operating system you have. Click "Start" -> "Control Panel" then click the "Appearance and Themes" Icon. 3. Click the "Properties" button on the "Monitor" tab and select "Driver" tab. Driver installation...
User Manual (user Manual) (ver.1.0) (English)
Page 19
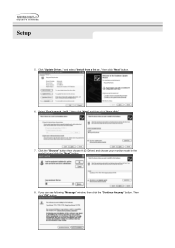
Click "Update Driver.." then click "Next" button. 6. If you can see following "Message" window, then click the "Continue Anyway" button. Setup 5. Select "Don't search ,I will.." Then click "OK" button. and select "Install from a list or.." Click the "Browse" button then choose A:(D:\Driver) and choose your monitor model in the model list and click the "Next" button. 8. then click "Next" and then click "Have disk". 7.
Click "Update Driver.." then click "Next" button. 6. If you can see following "Message" window, then click the "Continue Anyway" button. Setup 5. Select "Don't search ,I will.." Then click "OK" button. and select "Install from a list or.." Click the "Browse" button then choose A:(D:\Driver) and choose your monitor model in the model list and click the "Next" button. 8. then click "Next" and then click "Have disk". 7.

User Manual (user Manual) (ver.1.0) (English)
Page 20
... the "Digital Signature Not Found" window then click the "Yes"button. Click "Start" , "Setting" , "Control Panel". 2. Double click the "Display" Icon. 3. Click the "Browse" button then choose A:(D:\Driver). 8. Click the "Close" button then click "OK" button continually. 10. Click the "Browse" button on Samsung Monitor Homepage http://www.samsung-monitor.com/. 9. Click the "Open" button, then click "OK" button. 9. How to install 1. And click the "Finish" button then the "Close" button. Setup This monitor driver is...
... the "Digital Signature Not Found" window then click the "Yes"button. Click "Start" , "Setting" , "Control Panel". 2. Double click the "Display" Icon. 3. Click the "Browse" button then choose A:(D:\Driver). 8. Click the "Close" button then click "OK" button continually. 10. Click the "Browse" button on Samsung Monitor Homepage http://www.samsung-monitor.com/. 9. Click the "Open" button, then click "OK" button. 9. How to install 1. And click the "Finish" button then the "Close" button. Setup This monitor driver is...

User Manual (user Manual) (ver.1.0) (English)
Page 21
... "Change" button in the "Monitor Type" area. 6. button and specify A:\(D:\driver) and click "OK". 6. Click "Start" , "Setting" , "Control Panel". 2. Continue choosing "Close" button and "OK" button until you connected to the one you close the "Display Properties" dialogue box. Click "Start" , "Setting" , "Control Panel". 2. button. 8. Click "browse.." then click "Next" button. 8. In the "Advanced Display Properties" window, click the "Monitor" tab and then click "Change" button. 4. In the Select Device window, click the appropriate monitor model and...
... "Change" button in the "Monitor Type" area. 6. button and specify A:\(D:\driver) and click "OK". 6. Click "Start" , "Setting" , "Control Panel". 2. Continue choosing "Close" button and "OK" button until you connected to the one you close the "Display Properties" dialogue box. Click "Start" , "Setting" , "Control Panel". 2. button. 8. Click "browse.." then click "Next" button. 8. In the "Advanced Display Properties" window, click the "Monitor" tab and then click "Change" button. 4. In the Select Device window, click the appropriate monitor model and...

User Manual (user Manual) (ver.1.0) (English)
Page 22
... of colors and Vertical frequency) and then click OK. 4. Click Start, Settings, Control Panel, and then double-click Display icon. 2. The next screen is a type of all, set a horizontal frequency for your mouse. 3. Execute X-Window after clicking Test. Setup 7. Set a mouse for setting your computer. 6. You have finished setting up your computer. 4. If the screen is for your monitor. The third screen is not normal, change to the Preset Display Modes in the user guide. Set...
... of colors and Vertical frequency) and then click OK. 4. Click Start, Settings, Control Panel, and then double-click Display icon. 2. The next screen is a type of all, set a horizontal frequency for your mouse. 3. Execute X-Window after clicking Test. Setup 7. Set a mouse for setting your computer. 6. You have finished setting up your computer. 4. If the screen is for your monitor. The third screen is not normal, change to the Preset Display Modes in the user guide. Set...
User Manual (user Manual) (ver.1.0) (English)
Page 28
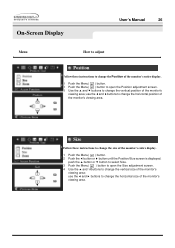
...change the horizontal size of the monitor's viewing area. Size Follow these instructions to change the Position of the monitor's entire display. 1 Push the Menu( ) button. 2 Push the Menu( ) button to open the Size adjustment screen. 4 Use the ▲ and °Âbuttons to change the size of the monitor's entire display. 1 Push the Menu( ) button. 2 Push the ◀ button or ▶ button until the Position/Size screen is displayed. use the ◀ and ▶ buttons to change the vertical position of the monitor's viewing area; On-Screen Display User's Manual 26 Menu...
...change the horizontal size of the monitor's viewing area. Size Follow these instructions to change the Position of the monitor's entire display. 1 Push the Menu( ) button. 2 Push the Menu( ) button to open the Size adjustment screen. 4 Use the ▲ and °Âbuttons to change the size of the monitor's entire display. 1 Push the Menu( ) button. 2 Push the ◀ button or ▶ button until the Position/Size screen is displayed. use the ◀ and ▶ buttons to change the vertical position of the monitor's viewing area; On-Screen Display User's Manual 26 Menu...
User Manual (user Manual) (ver.1.0) (English)
Page 29
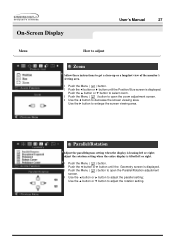
...; button until the Position/Size screen is displayed. Push the ▲ button or ▼ button to select zoom. 3 Push the Menu ( ) button to open the Parallel/Rotation adjustment screen. 4 Use the ◀ button or ▶ button to adjust the parallel setting; Use the ▲ button or ▼ button to enlarge the screen viewing area. On-Screen Display User's Manual 27 Menu How to adjust Zoom Follow these instructions to get a close-up or a longshot view of the monitor's viewing area. 1 Push the Menu ( ) button...
...; button until the Position/Size screen is displayed. Push the ▲ button or ▼ button to select zoom. 3 Push the Menu ( ) button to open the Parallel/Rotation adjustment screen. 4 Use the ◀ button or ▶ button to adjust the parallel setting; Use the ▲ button or ▼ button to enlarge the screen viewing area. On-Screen Display User's Manual 27 Menu How to adjust Zoom Follow these instructions to get a close-up or a longshot view of the monitor's viewing area. 1 Push the Menu ( ) button...

User Manual (user Manual) (ver.1.0) (English)
Page 40
... to move the Highlight Zone horizontally or vertically. 1 Push the Highlight ( ) button. 2 Push theÚbutton orÜbutton to select the Screen Position Adjustment and then push the Menu ( ) button. 3 Push the Ú button or Ü button to move the position of the Highlight Zone horizontally and use it vertically. User's Manual 38 On-Screen Display The Highlight Zone function can be optimized with a moving image screen. Position This function is to execute...
... to move the Highlight Zone horizontally or vertically. 1 Push the Highlight ( ) button. 2 Push theÚbutton orÜbutton to select the Screen Position Adjustment and then push the Menu ( ) button. 3 Push the Ú button or Ü button to move the position of the Highlight Zone horizontally and use it vertically. User's Manual 38 On-Screen Display The Highlight Zone function can be optimized with a moving image screen. Position This function is to execute...

User Manual (user Manual) (ver.1.0) (English)
Page 49
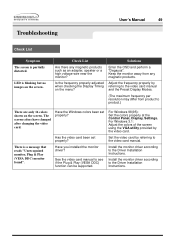
... a service center or your dealer. There is in PowerSaver mode. Solutions Check the power cord connection and supply. Adjust the maximum resolution and frequency that the monitor can properly handle. The monitor is no image on the screen. Can you locked the On Screen Display (OSD) Menu to prevent changes? Symptom No images on the screen. Is the power indicator on the screen? Unlock the OSD by pressing the MENU button for Windows 98/95) and then change the frequency of Range...
... a service center or your dealer. There is in PowerSaver mode. Solutions Check the power cord connection and supply. Adjust the maximum resolution and frequency that the monitor can properly handle. The monitor is no image on the screen. Can you locked the On Screen Display (OSD) Menu to prevent changes? Symptom No images on the screen. Is the power indicator on the screen? Unlock the OSD by pressing the MENU button for Windows 98/95) and then change the frequency of Range...

User Manual (user Manual) (ver.1.0) (English)
Page 50
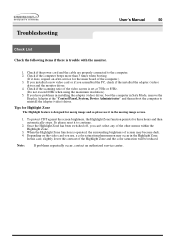
... video card signals. magnetic field. Reboot the computer. Troubleshooting User's Manual 48 Check List Symptom The image on the monitor? The screen image can be adjusted. Has the video card been set properly? Have you adjusted the resolution or frequency on the screen is a problem with the video card or the computer's main board. Readjust Position by referring to the Preset Display Modes). The screen image can create a strong or a high voltage wire near by? Check the signal cable connection. Have the screen colors...
... video card signals. magnetic field. Reboot the computer. Troubleshooting User's Manual 48 Check List Symptom The image on the monitor? The screen image can be adjusted. Has the video card been set properly? Have you adjusted the resolution or frequency on the screen is a problem with the video card or the computer's main board. Readjust Position by referring to the Preset Display Modes). The screen image can create a strong or a high voltage wire near by? Check the signal cable connection. Have the screen colors...
User Manual (user Manual) (ver.1.0) (English)
Page 51
... Plug & Play (VESA DDC) function can be supported. Has the video card been set properly? Troubleshooting User's Manual 49 Check List Symptom The screen is a message that reads "Unrecognized monitor, Plug & Play (VESA DDC) monitor found". For Windows 98(95): Set the colors properly at the Control Panel, Display, Settings. Install the monitor driver according to the Driver Installation Instructions. Check List Are there any magnetic products. Keep the monitor away from product to the video card manual and the Preset Display Modes. (The maximum frequency per resolution...
... Plug & Play (VESA DDC) function can be supported. Has the video card been set properly? Troubleshooting User's Manual 49 Check List Symptom The screen is a message that reads "Unrecognized monitor, Plug & Play (VESA DDC) monitor found". For Windows 98(95): Set the colors properly at the Control Panel, Display, Settings. Install the monitor driver according to the Driver Installation Instructions. Check List Are there any magnetic products. Keep the monitor away from product to the video card manual and the Preset Display Modes. (The maximum frequency per resolution...
User Manual (user Manual) (ver.1.0) (English)
Page 52
... on the video card you assembled the PC, check if the installed the adapter (video) driver and the monitor driver. 4. Note: If problems repeatedly occur, contact an authorized service center. Check if the computer beeps more than 3 times when booting. (If it to continue. 2. If you installed a new video card or if you use it in the moving image screen. 1. When the Highlight Zone function is set at the "Control Panel, System...
... on the video card you assembled the PC, check if the installed the adapter (video) driver and the monitor driver. 4. Note: If problems repeatedly occur, contact an authorized service center. Check if the computer beeps more than 3 times when booting. (If it to continue. 2. If you installed a new video card or if you use it in the moving image screen. 1. When the Highlight Zone function is set at the "Control Panel, System...

User Manual (user Manual) (ver.1.0) (English)
Page 53
... clean the monitor with each other. Frequency can I change the frequency? This is turned on the version of the driver used. (Refer to the computer or the video card manual for details. Do not leave any water to Windows/ Computer Manual). Do not allow any remains of the computer or the screen saver. (Refer to go inside the monitor. Windows 95/98: Set the function at the Control Panel, Display, Settings. Windows 3.1: Set...
... clean the monitor with each other. Frequency can I change the frequency? This is turned on the version of the driver used. (Refer to the computer or the video card manual for details. Do not leave any water to Windows/ Computer Manual). Do not allow any remains of the computer or the screen saver. (Refer to go inside the monitor. Windows 95/98: Set the function at the Control Panel, Display, Settings. Windows 3.1: Set...

User Manual (user Manual) (ver.1.0) (English)
Page 56
... the computer. 3. If your monitor. If your monitor screen remains blank after using the previous procedure, check your computer and the monitor. 2. Turn off your monitor is functioning properly. Self-Test Feature Check 1. Turn off both your monitor is functioning properly. Troubleshooting User's Manual 54 Self-Test Feature Check Your monitor provides a self test feature that allows you to appear indicates a problem with your monitor works normally, the following...
... the computer. 3. If your monitor. If your monitor screen remains blank after using the previous procedure, check your computer and the monitor. 2. Turn off your monitor is functioning properly. Self-Test Feature Check 1. Turn off both your monitor is functioning properly. Troubleshooting User's Manual 54 Self-Test Feature Check Your monitor provides a self test feature that allows you to appear indicates a problem with your monitor works normally, the following...
User Manual (user Manual) (ver.1.0) (English)
Page 63
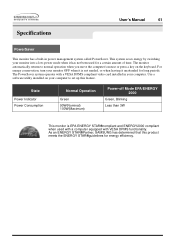
... of time. Specifications User's Manual 61 PowerSaver This monitor has a built-in your monitor into a low-power mode when it unattended for long periods. Use a software utility installed on the keyboard. This system saves energy by switching your computer. The monitor automatically returns to set up this product meets the ENERGY STAR®guidelines for energy efficiency. State Power Indicator Power Consumption Normal Operation Green 90W(Nominal...
... of time. Specifications User's Manual 61 PowerSaver This monitor has a built-in your monitor into a low-power mode when it unattended for long periods. Use a software utility installed on the keyboard. This system saves energy by switching your computer. The monitor automatically returns to set up this product meets the ENERGY STAR®guidelines for energy efficiency. State Power Indicator Power Consumption Normal Operation Green 90W(Nominal...

User Manual (user Manual) (ver.1.0) (English)
Page 65
... and then even lines in TVs. • Plug & Play This is called Vertical Frequency or Refresh Rate. It uses a mouse to the left button on the mouse. • USB(Universal Serial Bus) USB is a connectivity specification for performing multiple tasks as 60 Hz. High resolution is called the 'Dot Pitch'. Unit: Hz Example: If the same light repeats itself 60 times per second is...
... and then even lines in TVs. • Plug & Play This is called Vertical Frequency or Refresh Rate. It uses a mouse to the left button on the mouse. • USB(Universal Serial Bus) USB is a connectivity specification for performing multiple tasks as 60 Hz. High resolution is called the 'Dot Pitch'. Unit: Hz Example: If the same light repeats itself 60 times per second is...

User Manual (user Manual) (ver.1.0) (English)
Page 73
... clicking the left button on the screen.To operate the OSD menu, please first end the USB program. USER Controls Not Available" on the mouse. Notice When Changing Modes When changing the vertical frequency or resolution, make sure you close and re-execute the program, it will work properly as it will appear and you cannot control it is a software program that have a USB port as MouScreen utilizes the...
... clicking the left button on the screen.To operate the OSD menu, please first end the USB program. USER Controls Not Available" on the mouse. Notice When Changing Modes When changing the vertical frequency or resolution, make sure you close and re-execute the program, it will work properly as it will appear and you cannot control it is a software program that have a USB port as MouScreen utilizes the...


