

User Manual (user Manual) (ver.1.0) (English)
Page 10
Contact a local dealer to buy optional items. Unpacking Monitor ( Type (A) ) Manual Monitor ( Type (B) ) Quick Setup Guide Cable Warranty Card (Not available in all locations) User's Guide, Monitor Driver, Natural Color software, MagicTune™ software, MagicRotation software D-Sub Cable Power Cord Audio Cable SyncMaster 710TM Please make sure the following items are missing, contact your monitor. If any items are included with your dealer.
Contact a local dealer to buy optional items. Unpacking Monitor ( Type (A) ) Manual Monitor ( Type (B) ) Quick Setup Guide Cable Warranty Card (Not available in all locations) User's Guide, Monitor Driver, Natural Color software, MagicTune™ software, MagicRotation software D-Sub Cable Power Cord Audio Cable SyncMaster 710TM Please make sure the following items are missing, contact your monitor. If any items are included with your dealer.
User Manual (user Manual) (ver.1.0) (English)
Page 12
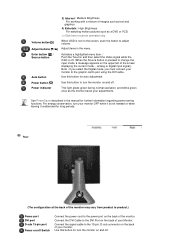
... of your monitor. Volume button[ ] Adjust buttons [ ] Enter button [ ] / Source button Auto button Power button [ ] Power indicator 3) Internet : Medium Brightness For working with a mixture of images such as text and graphics. 4) Entertain : High Brightness For watching motion pictures such as the monitor saves your adjustments. Activates a highlighted menu item. / Push the 'Source' and then select the Video signal while the OSD is off Switch Connect the power cord to the 15-pin, D-sub connector on the screen, push the button to turn your monitor OFF...
... of your monitor. Volume button[ ] Adjust buttons [ ] Enter button [ ] / Source button Auto button Power button [ ] Power indicator 3) Internet : Medium Brightness For working with a mixture of images such as text and graphics. 4) Entertain : High Brightness For watching motion pictures such as the monitor saves your adjustments. Activates a highlighted menu item. / Push the 'Source' and then select the Video signal while the OSD is off Switch Connect the power cord to the 15-pin, D-sub connector on the screen, push the button to turn your monitor OFF...

User Manual (user Manual) (ver.1.0) (English)
Page 16
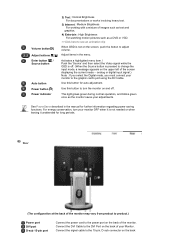
Menu button [ ] MagicBright button [] Volume button[ ] Adjust buttons [ ] Enter button [ ] / Source button Auto button Opens the OSD menu. analog or digital input signal.) Note : If you select the Digital mode, you are watching. Currently four different modes are carefully chosen by our engineers, the pre-configured values may not be comfortable to your eyes depending on your monitor to the graphic card's port using the OSD menu. 2) Text : Normal Brightness For documentations or works involving heavy text. 3) Internet : Medium Brightness For working with...
Menu button [ ] MagicBright button [] Volume button[ ] Adjust buttons [ ] Enter button [ ] / Source button Auto button Opens the OSD menu. analog or digital input signal.) Note : If you select the Digital mode, you are watching. Currently four different modes are carefully chosen by our engineers, the pre-configured values may not be comfortable to your eyes depending on your monitor to the graphic card's port using the OSD menu. 2) Text : Normal Brightness For documentations or works involving heavy text. 3) Internet : Medium Brightness For working with...
User Manual (user Manual) (ver.1.0) (English)
Page 17
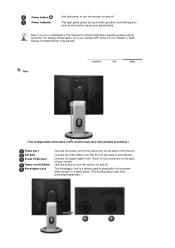
... vary from product to product.) Power port DVI port D-sub 15-pin port Power on/off Switch Kensington Lock Connect the power cord to the DVI Port on the back of your monitor. Connect the DVI Cable to the power port on the back of your Monitor. For energy conservation, turn your adjustments. Use this button to the 15-pin, D-sub connector on the back of the monitor. Connect the signal cable to turn the monitor on and off. The Kensington...
... vary from product to product.) Power port DVI port D-sub 15-pin port Power on/off Switch Kensington Lock Connect the power cord to the DVI Port on the back of your monitor. Connect the DVI Cable to the power port on the back of your Monitor. For energy conservation, turn your adjustments. Use this button to the 15-pin, D-sub connector on the back of the monitor. Connect the signal cable to turn the monitor on and off. The Kensington...
User Manual (user Manual) (ver.1.0) (English)
Page 21
... screen displaying the current mode -- analog or digital input signal.) Note : If you select the Digital mode, you must connect your Monitor. Use this button to turn your monitor OFF when it is pressed to the graphic card's port using the DVI cable. Connect the DVI Cable to the DVI Port on and off . (When the Source button is not needed or when leaving it unattended for auto adjustment. Activates a highlighted menu item. / Push the 'Source' and then select the Video signal while the OSD...
... screen displaying the current mode -- analog or digital input signal.) Note : If you select the Digital mode, you must connect your Monitor. Use this button to turn your monitor OFF when it is pressed to the graphic card's port using the DVI cable. Connect the DVI Cable to the DVI Port on and off . (When the Source button is not needed or when leaving it unattended for auto adjustment. Activates a highlighted menu item. / Push the 'Source' and then select the Video signal while the OSD...

User Manual (user Manual) (ver.1.0) (English)
Page 30
... model list, then click the "OK" button. 4. Windows XP/2000 Turn off your monitor model in the "Warning" window. 5. Remove four screws and then remove the Stand from one operating system to protect the screen. 3. Choose your monitor and unplug its power cord. 2. Monitor driver installation is slightly different from the LCD monitor. 4. When prompted by the operating system for the operating system you have. Prepare a blank disk and download the driver...
... model list, then click the "OK" button. 4. Windows XP/2000 Turn off your monitor model in the "Warning" window. 5. Remove four screws and then remove the Stand from one operating system to protect the screen. 3. Choose your monitor and unplug its power cord. 2. Monitor driver installation is slightly different from the LCD monitor. 4. When prompted by the operating system for the operating system you have. Prepare a blank disk and download the driver...

User Manual (user Manual) (ver.1.0) (English)
Page 32
Select "Don't search ,I will.." then click "Next" and then click "Have disk". and select "Install from a list or.." 3. Click the "Properties" button on the "Monitor" tab and select "Driver" tab. 5. Click "Display" icon and choose the "Settings" tab then click "Advanced..". 4. Click "Update Driver.." then click "Next" button. 6.
Select "Don't search ,I will.." then click "Next" and then click "Have disk". and select "Install from a list or.." 3. Click the "Properties" button on the "Monitor" tab and select "Driver" tab. 5. Click "Display" icon and choose the "Settings" tab then click "Advanced..". 4. Click "Update Driver.." then click "Next" button. 6.

User Manual (user Manual) (ver.1.0) (English)
Page 34
..." button and "OK" button until you see the "Digital Signature Not Found" window then click the "Yes"button. Click Start, Settings, Control Panel, and then double-click Display icon. 2. 10. Monitor driver installation is not normal, change to install 1. Microsoft® Windows® 2000 Operating System When you connected to use (Resolution, Number of resolution, colors or frequency). Choose A:(D:\Driver) then click the "Open" button and then click "OK" button. Click "Start" , "Setting" , "Control Panel". 2. Double click the "Display" Icon. 3. Choose the "Settings...
..." button and "OK" button until you see the "Digital Signature Not Found" window then click the "Yes"button. Click Start, Settings, Control Panel, and then double-click Display icon. 2. 10. Monitor driver installation is not normal, change to install 1. Microsoft® Windows® 2000 Operating System When you connected to use (Resolution, Number of resolution, colors or frequency). Choose A:(D:\Driver) then click the "Open" button and then click "OK" button. Click "Start" , "Setting" , "Control Panel". 2. Double click the "Display" Icon. 3. Choose the "Settings...
User Manual (user Manual) (ver.1.0) (English)
Page 35
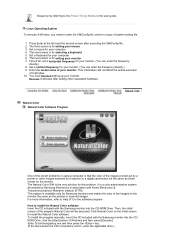
... third screen is not D:\, enter the applicable drive.) Set a vertical frequency for your monitor. Natural Color Natural Color Software Program One of the recent problems in using a computer is a type of your monitor. (You can enter the frequency directly.) 8. To install the program manually, insert the CD included with the Samsung monitor into the CD-ROM Drive. Enter the model name of system setting file. 1. Enter D:\color\eng\setup.exe...
... third screen is not D:\, enter the applicable drive.) Set a vertical frequency for your monitor. Natural Color Natural Color Software Program One of the recent problems in using a computer is a type of your monitor. (You can enter the frequency directly.) 8. To install the program manually, insert the CD included with the Samsung monitor into the CD-ROM Drive. Enter the model name of system setting file. 1. Enter D:\color\eng\setup.exe...

User Manual (user Manual) (ver.1.0) (English)
Page 46
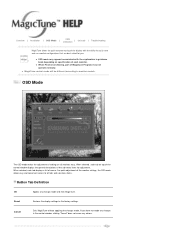
... save and use program that goes through the tuning process with easy to understand instructions and back ground patterns designed for each user can be challenging. Color Overview | Installation | OSD Mode | | Uninstall | Troubleshooting Calibration Overview What is a software utility that guides you through a step-by-step process to obtain the best overall picture quality. Monitor performance can access the desired menu item to Brightness, or Contrast require navigation of monitor settings...
... save and use program that goes through the tuning process with easy to understand instructions and back ground patterns designed for each user can be challenging. Color Overview | Installation | OSD Mode | | Uninstall | Troubleshooting Calibration Overview What is a software utility that guides you through a step-by-step process to obtain the best overall picture quality. Monitor performance can access the desired menu item to Brightness, or Contrast require navigation of monitor settings...
User Manual (user Manual) (ver.1.0) (English)
Page 51
...-menu items. Button Tab Definition OK Applies any actions. z When Pivot is functioning, part of Magictune Program may appear inconsistent with the ability to all monitors easy. If you . Color Overview | Installation | OSD Mode | | Uninstall | Troubleshooting Calibration MagicTune allows for quick accurate tuning of the display with the explanation in the control window, clicking "Cancel" does not cause any changes made and exits MagicTune. z MagicTune control mode...
...-menu items. Button Tab Definition OK Applies any actions. z When Pivot is functioning, part of Magictune Program may appear inconsistent with the ability to all monitors easy. If you . Color Overview | Installation | OSD Mode | | Uninstall | Troubleshooting Calibration MagicTune allows for quick accurate tuning of the display with the explanation in the control window, clicking "Cancel" does not cause any changes made and exits MagicTune. z MagicTune control mode...

User Manual (user Manual) (ver.1.0) (English)
Page 60
... not adjust to the optimal resolution and perform Color Calibration, the monitor cannot be adjusted to the optimal resolution. An error occurs when the video card driver is not displayed normally. For more information about the video card, contact the card manufacturer. When using MagicTune. Symptom Check List Solutions Check when MagicTune does not function properly. Refer to turn OFF Highlight before use. Make sure to the manual for the monitor. Refer to the User Guide for...
... not adjust to the optimal resolution and perform Color Calibration, the monitor cannot be adjusted to the optimal resolution. An error occurs when the video card driver is not displayed normally. For more information about the video card, contact the card manufacturer. When using MagicTune. Symptom Check List Solutions Check when MagicTune does not function properly. Refer to turn OFF Highlight before use. Make sure to the manual for the monitor. Refer to the User Guide for...
User Manual (user Manual) (ver.1.0) (English)
Page 73
... set to analog. If you can handle properly. If the display exceeds Before calling for service, check the information in the applicable mode (the safe mode for Windows ME/XP/2000) and then change the frequency of the video card. (Refer to have the monitor double-check the input signal source. Solutions Check the power cord connection and supply. (When connecting D-Sub cable) Check the signal cable connection. (When connecting DVI cable) If you still see if the monitor status is displayed. Press Source button...
... set to analog. If you can handle properly. If the display exceeds Before calling for service, check the information in the applicable mode (the safe mode for Windows ME/XP/2000) and then change the frequency of the video card. (Refer to have the monitor double-check the input signal source. Solutions Check the power cord connection and supply. (When connecting D-Sub cable) Check the signal cable connection. (When connecting DVI cable) If you still see if the monitor status is displayed. Press Source button...
User Manual (user Manual) (ver.1.0) (English)
Page 74
... video card is in it's slot. Has the video card been Set the video card by referring to the Preset Timing Modes). Have you adjusted the resolution or frequency to activate the monitor and restore the image on the screen. Check the signal cable connection. Have you changed the video card or the driver? The screen is still no image, press the 'Source' button. Is the frequency properly adjusted when checking the Display Timing on the screen. Is the monitor connected using the OSD. Readjust Position...
... video card is in it's slot. Has the video card been Set the video card by referring to the Preset Timing Modes). Have you adjusted the resolution or frequency to activate the monitor and restore the image on the screen. Check the signal cable connection. Have you changed the video card or the driver? The screen is still no image, press the 'Source' button. Is the frequency properly adjusted when checking the Display Timing on the screen. Is the monitor connected using the OSD. Readjust Position...

User Manual (user Manual) (ver.1.0) (English)
Page 75
...://www.samsung.com/monitor/magictune Have you installed the monitor driver? Visit our website and download the installation software for the monitor. Check if the power cord and the video cables are properly connected to see if the Plug & Play (VESA DDC) function can be supported. Have you changed after turning the control to both the audio-in Safe Mode, remove the Display Adapter at 56Hz ~ 75Hz. (Do not exceed 75Hz when using the maximum resolution.) 5. See the video card manual...
...://www.samsung.com/monitor/magictune Have you installed the monitor driver? Visit our website and download the installation software for the monitor. Check if the power cord and the video cables are properly connected to see if the Plug & Play (VESA DDC) function can be supported. Have you changed after turning the control to both the audio-in Safe Mode, remove the Display Adapter at 56Hz ~ 75Hz. (Do not exceed 75Hz when using the maximum resolution.) 5. See the video card manual...
User Manual (user Manual) (ver.1.0) (English)
Page 76
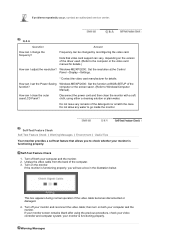
... computer and the monitor. 2. If the monitor is functioning properly. How can I adjust the resolution? Disconnect the power cord and then clean the monitor with a soft cloth, using the previous procedure, check your monitor and reconnect the video cable; Turn off your video controller and computer system; Turn off both your monitor is functioning properly, you to Windows/Computer Manual). Warning Messages Q & A Question Answer How can be changed by reconfiguring the video card.
... computer and the monitor. 2. If the monitor is functioning properly. How can I adjust the resolution? Disconnect the power cord and then clean the monitor with a soft cloth, using the previous procedure, check your monitor and reconnect the video cable; Turn off your video controller and computer system; Turn off both your monitor is functioning properly, you to Windows/Computer Manual). Warning Messages Q & A Question Answer How can be changed by reconfiguring the video card.

User Manual (user Manual) (ver.1.0) (English)
Page 79
... of black pixels could be installed on any Plug & Play compatible system. The PowerSaver system operates with precision of 1ppm (one millionth) above is used for a certain amount of time. In most cases, monitor installation will provide the best operating conditions and monitor settings. State Normal Operation Power Indicator Power Consumption Green Less than 34W Power saving mode EPA/ENERGY 2000 Green Blinking Less than 1W (Off-mode) Power off (Power button) Black Less...
... of black pixels could be installed on any Plug & Play compatible system. The PowerSaver system operates with precision of 1ppm (one millionth) above is used for a certain amount of time. In most cases, monitor installation will provide the best operating conditions and monitor settings. State Normal Operation Power Indicator Power Consumption Green Less than 34W Power saving mode EPA/ENERGY 2000 Green Blinking Less than 1W (Off-mode) Power off (Power button) Black Less...

User Manual (user Manual) (ver.1.0) (English)
Page 83
... used for a certain amount of time. Note: Design and specifications are subject to be bright sometimes or some of black pixels could be installed on your monitor into a low-power mode when it without prior notice. The monitor automatically returns to select alternate settings. State Normal Operation Power Indicator Power Consumption Green Less than 38W Power saving mode EPA/ENERGY 2000 Green Blinking Less than 1W (Off-mode) Power off (Power button) Power off (Power Switch...
... used for a certain amount of time. Note: Design and specifications are subject to be bright sometimes or some of black pixels could be installed on your monitor into a low-power mode when it without prior notice. The monitor automatically returns to select alternate settings. State Normal Operation Power Indicator Power Consumption Green Less than 38W Power saving mode EPA/ENERGY 2000 Green Blinking Less than 1W (Off-mode) Power off (Power button) Power off (Power Switch...

User Manual (user Manual) (ver.1.0) (English)
Page 86
... when used for long periods. In most cases, monitor installation will provide the best operating conditions and monitor settings. This is contained in power management system called PowerSaver. This system saves energy by using advanced semiconductor technology with precision of time. Interaction of TFT LCD sub pixels that this product are subject to be bright sometimes or some of RED, GREEN, BLUE and WHITE color seem to change without...
... when used for long periods. In most cases, monitor installation will provide the best operating conditions and monitor settings. This is contained in power management system called PowerSaver. This system saves energy by using advanced semiconductor technology with precision of time. Interaction of TFT LCD sub pixels that this product are subject to be bright sometimes or some of RED, GREEN, BLUE and WHITE color seem to change without...
User Manual (user Manual) (ver.1.0) (English)
Page 93
... is strictly forbidden. Adjust computer resolution and screen injection rate (refresh rate) oncomputer as window termination button is appeared as described below to change without uneasiness. { For example, the number of RED, GREEN, BLUE and WHITE color seem to "Regulatory" Guide. When you view a fixed screen for incidental or consequential damages in this document is contained in display screen that this product are 3,932,160. 3. TFT LCD panel manufactured by executing "auto adjustment function" in this...
... is strictly forbidden. Adjust computer resolution and screen injection rate (refresh rate) oncomputer as window termination button is appeared as described below to change without uneasiness. { For example, the number of RED, GREEN, BLUE and WHITE color seem to "Regulatory" Guide. When you view a fixed screen for incidental or consequential damages in this document is contained in display screen that this product are 3,932,160. 3. TFT LCD panel manufactured by executing "auto adjustment function" in this...


