User Manual
Page 11
Manuals Introduction LCD Display Quick Setup Guide Warranty Card (Not available in all locations) User's Guide MagicInfo Software CD, MagicInfo Manual CD (Applicable to the DXN-2 model only) Cables Power Cord Others D-Sub Cable Remote Control (BP59-00138A) Sold separately Batteries (AAA X 2) BNC to RCA Adaptor Jack (Not available in all locations) BNC to BNC Cable DVI Cable 10 LAN Cable (Applicable to the DXN-2 model only)
Manuals Introduction LCD Display Quick Setup Guide Warranty Card (Not available in all locations) User's Guide MagicInfo Software CD, MagicInfo Manual CD (Applicable to the DXN-2 model only) Cables Power Cord Others D-Sub Cable Remote Control (BP59-00138A) Sold separately Batteries (AAA X 2) BNC to RCA Adaptor Jack (Not available in all locations) BNC to BNC Cable DVI Cable 10 LAN Cable (Applicable to the DXN-2 model only)

User Manual
Page 13
... the LCD Display. Power indicator Shows PowerSaver mode by blinking green Note See PowerSaver described in the manual for turning the LCD Display on screen as BNC and the component use the same terminal. • PC : DVI / AV / HDMI • BNC : DVI / AV / HDMI • DVI / AV : PC / BNC • Component : PC • HDMI : PC / BNC Power button [ ] Use this spot on the LCD Display model. 12 For energy conservation, turn the PIP screen On / Off. Remote Control...
... the LCD Display. Power indicator Shows PowerSaver mode by blinking green Note See PowerSaver described in the manual for turning the LCD Display on screen as BNC and the component use the same terminal. • PC : DVI / AV / HDMI • BNC : DVI / AV / HDMI • DVI / AV : PC / BNC • Component : PC • HDMI : PC / BNC Power button [ ] Use this spot on the LCD Display model. 12 For energy conservation, turn the PIP screen On / Off. Remote Control...

User Manual
Page 17
... menu display - POWER 2. SOURCE 7. Adjusts the audio volume. This function does not work for this LCD Display. DEL ton / GUIDE but- 5. + VOL 6. Turns the product Off. This function does not work for this LCD Display. Changing the SOURCE is used functions. 16 Press the button to select Digital channels. Number Buttons 4. The "-" button is only allowed for external devices that are connected to change the input signal SOURCE. Electronic Program Guide (EPG) display. - Use to quickly select frequently used to change the channel. TOOLS Turns...
... menu display - POWER 2. SOURCE 7. Adjusts the audio volume. This function does not work for this LCD Display. DEL ton / GUIDE but- 5. + VOL 6. Turns the product Off. This function does not work for this LCD Display. Changing the SOURCE is used functions. 16 Press the button to select Digital channels. Number Buttons 4. The "-" button is only allowed for external devices that are connected to change the input signal SOURCE. Electronic Program Guide (EPG) display. - Use to quickly select frequently used to change the channel. TOOLS Turns...
User Manual
Page 32
... remote control. • For an explanation of the LCD Display or on the DVD player. Note • Select Component for the connection to a DVD player using the SOURCE button on the front of Component video, consult your Set Top Box owner's manual. 31 Connect a Component cable between the BNC/COMPONENT IN [R/Y, G/PB, B/PR] port on the LCD Display and the PR, Y, PB jacks on the remote control. • Then, start...
... remote control. • For an explanation of the LCD Display or on the DVD player. Note • Select Component for the connection to a DVD player using the SOURCE button on the front of Component video, consult your Set Top Box owner's manual. 31 Connect a Component cable between the BNC/COMPONENT IN [R/Y, G/PB, B/PR] port on the LCD Display and the PR, Y, PB jacks on the remote control. • Then, start...
User Manual
Page 35
... a blank disk and download the driver program file at the Internet web site shown here. Click "Windows". 3. If you have. Choose your monitor model in the model list, then click the "OK" button. 4. Internet web site : http://www.samsung.com/ Installing the Monitor Driver (Automatic) 1. Follow the directions appropriate for the monitor driver, insert the CDROM included with this monitor. Driver installation is slightly different from...
... a blank disk and download the driver program file at the Internet web site shown here. Click "Windows". 3. If you have. Choose your monitor model in the model list, then click the "OK" button. 4. Internet web site : http://www.samsung.com/ Installing the Monitor Driver (Automatic) 1. Follow the directions appropriate for the monitor driver, insert the CDROM included with this monitor. Driver installation is slightly different from...
User Manual
Page 36
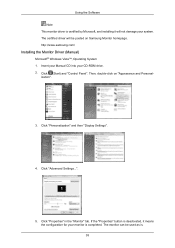
... "Properties" button is deactivated, it will be used as is. 35 Then, double-click on Samsung Monitor homepage. Click "Advanced Settings...". 5. The monitor can be posted on "Appearance and Personal- Click "Properties" in the "Monitor" tab. Click (Start) and "Control Panel". Click "Personalization" and then "Display Settings". 4. ization". 3. http://www.samsung.com/ Installing the Monitor Driver (Manual) Microsoft® Windows Vista™, Operating System 1. Using the Software Note This monitor driver is...
... "Properties" button is deactivated, it will be used as is. 35 Then, double-click on Samsung Monitor homepage. Click "Advanced Settings...". 5. The monitor can be posted on "Appearance and Personal- Click "Properties" in the "Monitor" tab. Click (Start) and "Control Panel". Click "Personalization" and then "Display Settings". 4. ization". 3. http://www.samsung.com/ Installing the Monitor Driver (Manual) Microsoft® Windows Vista™, Operating System 1. Using the Software Note This monitor driver is...

User Manual
Page 37
...". 36 Using the Software If the message "Windows needs..." Note This monitor driver is displayed, as shown in the "Driver" tab. 7. in the figure below, click "Continue". and select the folder (for driver software" checkbox and click "Let me pick from a list of device drivers on Samsung Monitor homepage. 6. is under certifying MS logo, and this installation will be posted on my computer". 8. Click "Update Driver...
...". 36 Using the Software If the message "Windows needs..." Note This monitor driver is displayed, as shown in the "Driver" tab. 7. in the figure below, click "Continue". and select the folder (for driver software" checkbox and click "Let me pick from a list of device drivers on Samsung Monitor homepage. 6. is under certifying MS logo, and this installation will be posted on my computer". 8. Click "Update Driver...
User Manual
Page 39
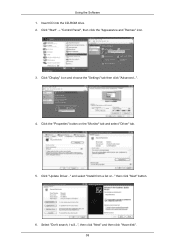
Using the Software 1. Click "Start" → "Control Panel", then click the "Appearance and Themes" icon. 3. Click the "Properties" button on the "Monitor" tab and select "Driver" tab. 5. and select "Install from a list or..." then click "Next" button. 6. Click "Update Driver..." Insert CD into the CD-ROM drive. 2. Select "Don't search, I will...", then click "Next" and then click "Have disk". 38 Click "Display" icon and choose the "Settings" tab then click "Advanced...". 4.
Using the Software 1. Click "Start" → "Control Panel", then click the "Appearance and Themes" icon. 3. Click the "Properties" button on the "Monitor" tab and select "Driver" tab. 5. and select "Install from a list or..." then click "Next" button. 6. Click "Update Driver..." Insert CD into the CD-ROM drive. 2. Select "Don't search, I will...", then click "Next" and then click "Have disk". 38 Click "Display" icon and choose the "Settings" tab then click "Advanced...". 4.
User Manual
Page 41
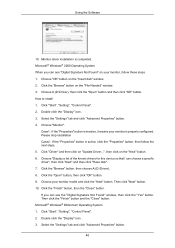
... : If the "Properties" button is inactive, it means your monitor model and click the "Next" button. Then click "Next" button. 10. Monitor driver installation is properly configured. Click "Start", "Setting", "Control Panel". 2. Double click the "Display" icon. 3. Choose "Display a list of the known drivers for this device so that I can see "Digital Signature Not Found" on the "File Needed" window. 3. Click the "Open" button, then click "OK" button. 9. If you can...
... : If the "Properties" button is inactive, it means your monitor model and click the "Next" button. Then click "Next" button. 10. Monitor driver installation is properly configured. Click "Start", "Setting", "Control Panel". 2. Double click the "Display" icon. 3. Choose "Display a list of the known drivers for this device so that I can see "Digital Signature Not Found" on the "File Needed" window. 3. Click the "Open" button, then click "OK" button. 9. If you can...
User Manual
Page 42
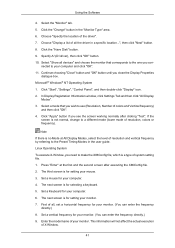
... you wish to use (Resolution, Number of colors and Vertical frequency) and then click "OK". 4. Click "Start", "Settings", "Control Panel", and then double-click "Display" icon. 2. Set a Keyboard for your computer. 6. Select the "Monitor" tab. 5. Click the "Have Disk" button. 9. If the screen is no Mode at the first and the second screen after clicking "Test". Choose "Display a list of resolution and vertical frequency by referring to make the X86Config file, which...
... you wish to use (Resolution, Number of colors and Vertical frequency) and then click "OK". 4. Click "Start", "Settings", "Control Panel", and then double-click "Display" icon. 2. Set a Keyboard for your computer. 6. Select the "Monitor" tab. 5. Click the "Have Disk" button. 9. If the screen is no Mode at the first and the second screen after clicking "Test". Choose "Display a list of resolution and vertical frequency by referring to make the X86Config file, which...
User Manual
Page 54
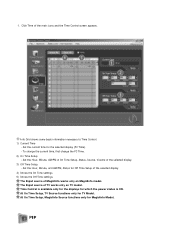
... Time Setup, Status, Source, Volume of the selected display. 4) Shows the On Time settings. 5) Shows the Off Time settings. The Input source of MagicInfo works only on TV model. At On Time Setup, MagicInfo Source functions only for which the power status is ON. To change the current time, first change the PC Time. 2) On Time Setup - Time Control is available only for the displays for MagicInfo Model. PIP...
... Time Setup, Status, Source, Volume of the selected display. 4) Shows the On Time settings. 5) Shows the Off Time settings. The Input source of MagicInfo works only on TV model. At On Time Setup, MagicInfo Source functions only for which the power status is ON. To change the current time, first change the PC Time. 2) On Time Setup - Time Control is available only for the displays for MagicInfo Model. PIP...
User Manual
Page 67
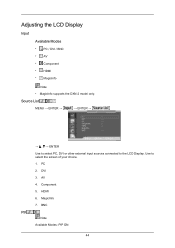
Use to the LCD Display. DVI 3. MagicInfo 7. BNC PIP Note Available Modes: PIP ON 44 Adjusting the LCD Display Input Available Modes • PC / DVI / BNC • AV • Component • HDMI • MagicInfo Note • MagicInfo supports the DXN-2 model only. Source List MENU → ENTER → → ENTER → → , → ENTER Use to select PC, DVI or other external input sources connected to select the screen of your choice. 1. PC 2. Component 5. AV 4. HDMI 6.
Use to the LCD Display. DVI 3. MagicInfo 7. BNC PIP Note Available Modes: PIP ON 44 Adjusting the LCD Display Input Available Modes • PC / DVI / BNC • AV • Component • HDMI • MagicInfo Note • MagicInfo supports the DXN-2 model only. Source List MENU → ENTER → → ENTER → → , → ENTER Use to select PC, DVI or other external input sources connected to select the screen of your choice. 1. PC 2. Component 5. AV 4. HDMI 6.

User Manual
Page 85
... if PC signal is received while in DVI or HDMI mode. 5. Contrast MENU → → ENTER → → ENTER→ ENTER → → , → ENTER Adjusts the Contrast of the PIP window on the screen. 2. Color MENU → → ENTER → ENTER → ENTER→ → , → ENTER Adjusts the Color of the PIP window on the screen. Adjusting the LCD Display → , → ENTER Adjusts the PIP Screen Settings. Sharpness MENU →...
... if PC signal is received while in DVI or HDMI mode. 5. Contrast MENU → → ENTER → → ENTER→ ENTER → → , → ENTER Adjusts the Contrast of the PIP window on the screen. 2. Color MENU → → ENTER → ENTER → ENTER→ → , → ENTER Adjusts the Color of the PIP window on the screen. Adjusting the LCD Display → , → ENTER Adjusts the PIP Screen Settings. Sharpness MENU →...

User Manual
Page 104
... works only if the LCD Display's power is restarted. Please make sure not to the MagicInfo Server Help. If you must Commit them. • By selecting Disable, Enable or Commit, the system is com- Otherwise, the program (MagicInfo) may cause system errors on the LCD Display. • In the OSD image of up external devices only if the LCD Display turns on a Windows screen, refer to use the Power...
... works only if the LCD Display's power is restarted. Please make sure not to the MagicInfo Server Help. If you must Commit them. • By selecting Disable, Enable or Commit, the system is com- Otherwise, the program (MagicInfo) may cause system errors on the LCD Display. • In the OSD image of up external devices only if the LCD Display turns on a Windows screen, refer to use the Power...
User Manual
Page 108
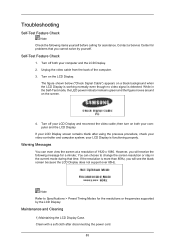
... the LCD Display If your LCD Display screen remains blank after disconnecting the power cord. 85 If the resolution is more than 85Hz, you will see the black screen because the LCD Display does not support over 85Hz. Self-Test Feature Check 1. Contact a Service Center for the resolutions or frequencies supported by yourself. Warning Messages You can choose to Specifications > Preset Timing Modes for problems that time. Note Refer to change the screen resolution...
... the LCD Display If your LCD Display screen remains blank after disconnecting the power cord. 85 If the resolution is more than 85Hz, you will see the black screen because the LCD Display does not support over 85Hz. Self-Test Feature Check 1. Contact a Service Center for the resolutions or frequencies supported by yourself. Warning Messages You can choose to Specifications > Preset Timing Modes for problems that time. Note Refer to change the screen resolution...

User Manual
Page 111
.... 88 A: Adjust color using its maximum, check the volume control on the computer sound card or software program. Q: The color white is blank and the power indicator light blinks every 0.5 or 1 seconds. A: Adjust color using Custom under OSD Color Adjustment menu. Q: The screen is poor. Press any key on the screen when you pressing the MENU button, check the cable connection between the LCD Display and the computer to audio signals and their solutions are listed below. Problems related to Audio Note Problems related to...
.... 88 A: Adjust color using its maximum, check the volume control on the computer sound card or software program. Q: The color white is blank and the power indicator light blinks every 0.5 or 1 seconds. A: Adjust color using Custom under OSD Color Adjustment menu. Q: The screen is poor. Press any key on the screen when you pressing the MENU button, check the cable connection between the LCD Display and the computer to audio signals and their solutions are listed below. Problems related to Audio Note Problems related to...

User Manual
Page 112
... the driver used. (Refer to the Windows / Computer Manual). Q & A Q: How can I change the frequency? Set the function in the vicinity. Q: How can I play the video. Note That video card support can be incompatible. 89 A: The video supports the MPEG1 and WMV codecs only. A: The frequency can vary, depending on . A: Windows XP: Set the resolution in the Control Panel → Appearance and Themes → Display → Screen Saver. A: Check if the power is securely connected. A: Windows...
... the driver used. (Refer to the Windows / Computer Manual). Q & A Q: How can I change the frequency? Set the function in the vicinity. Q: How can I play the video. Note That video card support can be incompatible. 89 A: The video supports the MPEG1 and WMV codecs only. A: The frequency can vary, depending on . A: Windows XP: Set the resolution in the Control Panel → Appearance and Themes → Display → Screen Saver. A: Check if the power is securely connected. A: Windows...
User Manual
Page 120
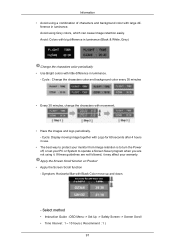
...: Display moving image together with large dif- Symptom: Horizontal Bar with movement. • Have the images and logo periodically. - Information • Avoid using a combination of characters and background color with Logo for 60 seconds after 4 hours in use. • The best way to protect your monitor from Image retention is to turn the Power off, or set your warranty. Select method • Instruction Guide : OSD Menu -> Set Up...
...: Display moving image together with large dif- Symptom: Horizontal Bar with movement. • Have the images and logo periodically. - Information • Avoid using a combination of characters and background color with Logo for 60 seconds after 4 hours in use. • The best way to protect your monitor from Image retention is to turn the Power off, or set your warranty. Select method • Instruction Guide : OSD Menu -> Set Up...
User Manual
Page 121
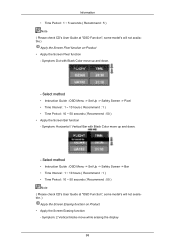
... ) • Apply the Screen Bar function - Select method • Instruction Guide : OSD Menu -> Set Up -> Safety Screen -> Bar • Time Interval : 1 ~ 10 hours ( Recommend : 1 ) • Time Period : 10 ~ 50 seconds ( Recommend : 50 ) Note ( Please check CD's User Guide at "OSD Function", some model's will not available ) Apply the Screen Pixel function on Product • Apply the Screen Erasing function - Symptom: Horizontal / Vertical Bar with Black Color move up and...
... ) • Apply the Screen Bar function - Select method • Instruction Guide : OSD Menu -> Set Up -> Safety Screen -> Bar • Time Interval : 1 ~ 10 hours ( Recommend : 1 ) • Time Period : 10 ~ 50 seconds ( Recommend : 50 ) Note ( Please check CD's User Guide at "OSD Function", some model's will not available ) Apply the Screen Pixel function on Product • Apply the Screen Erasing function - Symptom: Horizontal / Vertical Bar with Black Color move up and...

User Manual
Page 122
Information - Select method • Instruction Guide : OSD Menu -> Set Up -> Safety Screen -> Eraser • Time Interval : 1 ~ 10 hours ( Recommend : 1 ) • Time Period : 10 ~ 50 seconds ( Recommend : 50 ) Note ( Please check CD's User Guide at "OSD Function", some model's will not available ) 99
Information - Select method • Instruction Guide : OSD Menu -> Set Up -> Safety Screen -> Eraser • Time Interval : 1 ~ 10 hours ( Recommend : 1 ) • Time Period : 10 ~ 50 seconds ( Recommend : 50 ) Note ( Please check CD's User Guide at "OSD Function", some model's will not available ) 99


