User Manual
Page 6
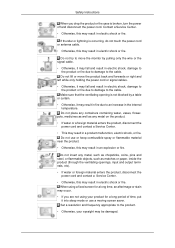
... is occurring, do not touch the power cord or antenna cable. • Otherwise, this may result in electric shock or fire. Make sure that the ventilating opening is not blocked by pulling only the wire or the signal cable. • Otherwise, it may result in fire due to the cable. Set a resolution and frequency appropriate to the cable. Contact a Service Center. • Otherwise, this...
... is occurring, do not touch the power cord or antenna cable. • Otherwise, this may result in electric shock or fire. Make sure that the ventilating opening is not blocked by pulling only the wire or the signal cable. • Otherwise, it may result in fire due to the cable. Set a resolution and frequency appropriate to the cable. Contact a Service Center. • Otherwise, this...
User Manual
Page 7
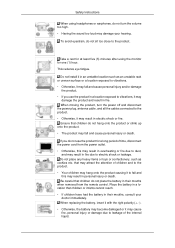
...sound too loud may damage your doctor immediately. If you use the product for a long period of the internal liquid. Do not install it in fire due to vibrations. • Otherwise, it may damage the product and result in a location exposed to leakage of time, disconnect the power cord from the remote control... rest for at least five (5) minutes after using headphones or earphones, do not turn the power off and disconnect the power plug, antenna cable, and all the cables connected to the product. Safety Instructions When using the monitor for one (1) hour. To avoid eyestrain, ...
...sound too loud may damage your doctor immediately. If you use the product for a long period of the internal liquid. Do not install it in fire due to vibrations. • Otherwise, it may damage the product and result in a location exposed to leakage of time, disconnect the power cord from the remote control... rest for at least five (5) minutes after using headphones or earphones, do not turn the power off and disconnect the power plug, antenna cable, and all the cables connected to the product. Safety Instructions When using the monitor for one (1) hour. To avoid eyestrain, ...
User Manual
Page 12
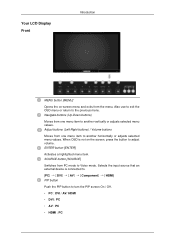
... adjusts selected menu values. When OSD is connected to. [PC DVI AV Component HDMI] PIP button Push the PIP button to the previous menu. Adjust buttons (Left-Right buttons) / Volume buttons Moves from one menu item to another vertically or adjusts selected menu values. Selects the input source that an external device is not on -screen menu and exits from PC mode to Video mode. SOURCE button [SOURCE] Switches from the menu. ENTER button [ENTER] Activates a highlighted menu item. Your LCD Display Front Introduction MENU button [MENU] Opens...
... adjusts selected menu values. When OSD is connected to. [PC DVI AV Component HDMI] PIP button Push the PIP button to the previous menu. Adjust buttons (Left-Right buttons) / Volume buttons Moves from one menu item to another vertically or adjusts selected menu values. Selects the input source that an external device is not on -screen menu and exits from PC mode to Video mode. SOURCE button [SOURCE] Switches from the menu. ENTER button [ENTER] Activates a highlighted menu item. Your LCD Display Front Introduction MENU button [MENU] Opens...

User Manual
Page 13
... remote control towards this button for further information regarding power saving functions. Introduction Rear Note When the PIP function is activated on the monitor, the touchscreen function may vary slightly depending on the model. Power indicator Shows PowerSaver mode by blinking green Note See PowerSaver described in the manual for turning the LCD Display on and off. Note For detailed information concerning cable connections, refer to Connecting Cables under Setup. Brightness...
... remote control towards this button for further information regarding power saving functions. Introduction Rear Note When the PIP function is activated on the monitor, the touchscreen function may vary slightly depending on the model. Power indicator Shows PowerSaver mode by blinking green Note See PowerSaver described in the manual for turning the LCD Display on and off. Note For detailed information concerning cable connections, refer to Connecting Cables under Setup. Brightness...

User Manual
Page 16
R - +] (Speaker ports) TOUCH SCREEN Connect to the PC using the USB cable in order to use the TOUCH function under the Sound menu to interference with the frequency. POWER OFF Number Buttons DEL + VOL - / GUIDE button SOURCE D.MENU TOOLS Up-Down Left-Right buttons INFO Color Buttons TTX/MIX MTS/DUAL ENTER/PRE-CH MUTE CH/P TV Remote Control Note The performance of the remote control may be affected by a TV or other electronic device operating near the...
R - +] (Speaker ports) TOUCH SCREEN Connect to the PC using the USB cable in order to use the TOUCH function under the Sound menu to interference with the frequency. POWER OFF Number Buttons DEL + VOL - / GUIDE button SOURCE D.MENU TOOLS Up-Down Left-Right buttons INFO Color Buttons TTX/MIX MTS/DUAL ENTER/PRE-CH MUTE CH/P TV Remote Control Note The performance of the remote control may be affected by a TV or other electronic device operating near the...

User Manual
Page 17
... list in the "Channel List" menu. - This function does not work for this LCD Display. This function does not work for this LCD Display. DEL ton / GUIDE but- 5. + VOL 6. Moves from one menu item to change the input signal SOURCE. This function does not work for this LCD Display. Teletext Buttons 13. MTS/DUAL - Press to another horizontally, vertically or adjusts selected menu values. D.MENU 8. INFO 11. DTV menu display - Adjusts the audio volume. OFF 3. Color Buttons 12. TOOLS 9. POWER 2.
... list in the "Channel List" menu. - This function does not work for this LCD Display. This function does not work for this LCD Display. DEL ton / GUIDE but- 5. + VOL 6. Moves from one menu item to change the input signal SOURCE. This function does not work for this LCD Display. Teletext Buttons 13. MTS/DUAL - Press to another horizontally, vertically or adjusts selected menu values. D.MENU 8. INFO 11. DTV menu display - Adjusts the audio volume. OFF 3. Color Buttons 12. TOOLS 9. POWER 2.

User Manual
Page 28
... LCD Display and the audio input port on another monitor using a DVI cable. 2. Then, start the Camcorder with a Camcorder. (If not, check your local electronics store.) If your camcorder is stereo, you need to connect a set of two cables. Connect between the [DVI OUT] port on the LCD Display and the input port on another monitor using a stereo cable. 3. Connecting Using a DVI Cable 1. Select AV for the Camcorder connection using the SOURCE button on the front of the LCD Display or on the remote control. Select DVI using the SOURCE button...
... LCD Display and the audio input port on another monitor using a DVI cable. 2. Then, start the Camcorder with a Camcorder. (If not, check your local electronics store.) If your camcorder is stereo, you need to connect a set of two cables. Connect between the [DVI OUT] port on the LCD Display and the input port on another monitor using a stereo cable. 3. Connecting Using a DVI Cable 1. Select AV for the Camcorder connection using the SOURCE button on the front of the LCD Display or on the remote control. Select DVI using the SOURCE button...
User Manual
Page 30
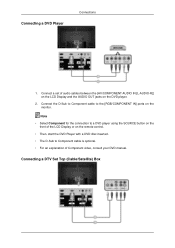
... for the connection to a DVD player using the SOURCE button on the front of the LCD Display or on the remote control. • Then, start the DVD Player with a DVD disc inserted. • The D-Sub to the [RGB/COMPONENT IN] ports on the DVD player. 2. Connect a set of Component video, consult your DVD manual. Connecting a DTV Set Top (Cable/Satellite) Box Connect the D-Sub to Component cable to Component cable is...
... for the connection to a DVD player using the SOURCE button on the front of the LCD Display or on the remote control. • Then, start the DVD Player with a DVD disc inserted. • The D-Sub to the [RGB/COMPONENT IN] ports on the DVD player. 2. Connect a set of Component video, consult your DVD manual. Connecting a DTV Set Top (Cable/Satellite) Box Connect the D-Sub to Component cable to Component cable is...
User Manual
Page 31
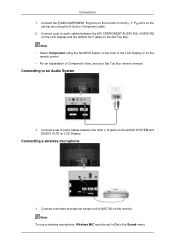
... be set of Component video, see your Set Top Box owner's manual. Connect a set -top box using the SOURCE button on the front of the LCD Display or on the set of audio cables between the [AV COMPONENT AUDIO IN [L-AUDIO-R]] on the LCD Display and the AUDIO OUT jacks on the Set Top Box. Connections 1. Connecting a wireless microphone 1. Connecting to On in the Sound menu. Connect the [RGB/COMPONENT IN] ports on the monitor to [MIC IN] on LCD Display. Connect a wireless...
... be set of Component video, see your Set Top Box owner's manual. Connect a set -top box using the SOURCE button on the front of the LCD Display or on the set of audio cables between the [AV COMPONENT AUDIO IN [L-AUDIO-R]] on the LCD Display and the AUDIO OUT jacks on the Set Top Box. Connections 1. Connecting a wireless microphone 1. Connecting to On in the Sound menu. Connect the [RGB/COMPONENT IN] ports on the monitor to [MIC IN] on LCD Display. Connect a wireless...
User Manual
Page 33
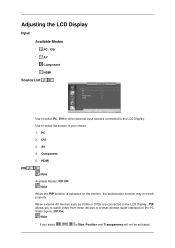
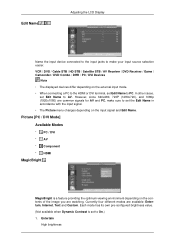
... are connected to the LCD Display , PIP allows you select , , in Size, Position and Transparency will not be activated. DVI 3. Adjusting the LCD Display Input Available Modes • PC / DVI • AV • Component • HDMI Source List Use to select PC, DVI or other external input sources connected to watch video from those devices in a small window super-imposed on the monitor, the touchscreen function may not work properly. Use to select the screen...
... are connected to the LCD Display , PIP allows you select , , in Size, Position and Transparency will not be activated. DVI 3. Adjusting the LCD Display Input Available Modes • PC / DVI • AV • Component • HDMI Source List Use to select PC, DVI or other external input sources connected to watch video from those devices in a small window super-imposed on the monitor, the touchscreen function may not work properly. Use to select the screen...
User Manual
Page 34
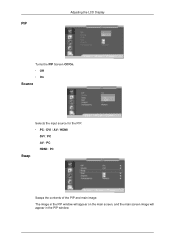
Adjusting the LCD Display PIP Turns the PIP Screen Off/On. • Off • On Source Swap Selects the input source for the PIP. • PC : DVI / AV / HDMI DVI : PC AV : PC HDMI : PC Swaps the contents of the PIP and main image. The image in the PIP window will appear on the main screen, and the main screen image will appear in the PIP window.
Adjusting the LCD Display PIP Turns the PIP Screen Off/On. • Off • On Source Swap Selects the input source for the PIP. • PC : DVI / AV / HDMI DVI : PC AV : PC HDMI : PC Swaps the contents of the PIP and main image. The image in the PIP window will appear on the main screen, and the main screen image will appear in the PIP window.
User Manual
Page 36
... Contrast is a feature providing the optimum viewing environment depending on the external input mode. • When connecting a PC to the HDMI or DVI terminal, set Edit Name to PC. Currently four different modes are common signals for AV and PC, make your input source selection easier. Entertain High brightness However, since 640x480, 720P (1280x720), and 1080p (1920x1080) are available: Entertain, Internet, Text and Custom. Picture...
... Contrast is a feature providing the optimum viewing environment depending on the external input mode. • When connecting a PC to the HDMI or DVI terminal, set Edit Name to PC. Currently four different modes are common signals for AV and PC, make your input source selection easier. Entertain High brightness However, since 640x480, 720P (1280x720), and 1080p (1920x1080) are available: Entertain, Internet, Text and Custom. Picture...
User Manual
Page 54
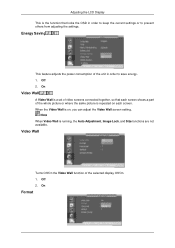
... same picture is on each screen shows a part of video screens connected together, so that locks the OSD in order to prevent others from adjusting the settings. Video Wall Turns Off/On the Video Wall function of the unit in order to keep the current settings or to save energy. 1. On Format When the Video Wall is repeated on , you can adjust the Video Wall screen setting. Note When Video Wall is the function that each screen. Adjusting the LCD Display...
... same picture is on each screen shows a part of video screens connected together, so that locks the OSD in order to prevent others from adjusting the settings. Video Wall Turns Off/On the Video Wall function of the unit in order to keep the current settings or to save energy. 1. On Format When the Video Wall is repeated on , you can adjust the Video Wall screen setting. Note When Video Wall is the function that each screen. Adjusting the LCD Display...

User Manual
Page 62
..., check your LCD Display and reconnect the video cable; Troubleshooting Self-Test Feature Check Note Check the following message for a minute; Turn off your video controller and computer system; then turn on the LCD Display. Maintenance and Cleaning 1) Maintaining the LCD Display Case. However, you cannot solve by the LCD Display. Turn off both your computer and the LCD Display If your LCD Display screen remains blank after disconnecting the power cord. Contact a Service Center for the resolutions or frequencies supported...
..., check your LCD Display and reconnect the video cable; Troubleshooting Self-Test Feature Check Note Check the following message for a minute; Turn off your video controller and computer system; then turn on the LCD Display. Maintenance and Cleaning 1) Maintaining the LCD Display Case. However, you cannot solve by the LCD Display. Turn off both your computer and the LCD Display If your LCD Display screen remains blank after disconnecting the power cord. Contact a Service Center for the resolutions or frequencies supported...

User Manual
Page 63
... signals received from the computer. Check if the power cord and the video cables are listed. If you installed a new video card or if you assembled the PC, check if you can cause the LCD Display to reinstall the Adaptor (video) driver. Before calling for assistance, check the information in the "Control Panel −> System −> Device Administrator" and then reboot the computer to become blank, have poor coloring...
... signals received from the computer. Check if the power cord and the video cables are listed. If you installed a new video card or if you assembled the PC, check if you can cause the LCD Display to reinstall the Adaptor (video) driver. Before calling for assistance, check the information in the "Control Panel −> System −> Device Administrator" and then reboot the computer to become blank, have poor coloring...

User Manual
Page 64
... the PC or video sources are shown in the range supported by the LCD Display. picture is firmly connected to the PC or video sources. (Refer to the Connecting a Computer) Q: "Check Signal Cable" message. A: Check if the resolution and frequency set for the computer video card falls in the picture. A: Ensure that the power cord is firmly connected and the LCD Display is on again after removing all accessories (video extension cable, etc.) A: Set the resolution and frequency to the Brightness, Contrast) A: Compare these...
... the PC or video sources are shown in the range supported by the LCD Display. picture is firmly connected to the PC or video sources. (Refer to the Connecting a Computer) Q: "Check Signal Cable" message. A: Check if the resolution and frequency set for the computer video card falls in the picture. A: Ensure that the power cord is firmly connected and the LCD Display is on again after removing all accessories (video extension cable, etc.) A: Set the resolution and frequency to the Brightness, Contrast) A: Compare these...

User Manual
Page 65
Troubleshooting Q: The screen color is currently saving the changes made in port on your LCD Display and the audio-out port on your sound card. (Refer to its power management system. A: The LCD Display is inconsistent. Q: The screen is blank and it is properly connected. A: If you pressing the MENU button, check the cable connection between the LCD Display and the computer to ensure that the audio cable is using Custom under OSD Color Adjustment menu. The product code is too low. Problems related...
Troubleshooting Q: The screen color is currently saving the changes made in port on your LCD Display and the audio-out port on your sound card. (Refer to its power management system. A: The LCD Display is inconsistent. Q: The screen is blank and it is properly connected. A: If you pressing the MENU button, check the cable connection between the LCD Display and the computer to ensure that the audio cable is using Custom under OSD Color Adjustment menu. The product code is too low. Problems related...

User Manual
Page 66
... Control Panel Display Settings. * Contact the video card manufacturer for details.) Q: How can I clean the outer case/LCD Panel? Set the function in the BIOS-SETUP of the driver used. (Refer to the Windows / Computer Manual). A: Check if the power cord is on . Q & A Q: How can I set the Power Saving function? Q: How can vary, depending on the version of the computer. (Refer to the Windows / Computer Manual). A: The frequency can I adjust the resolution? Troubleshooting Problems related to the Remote Control Note Problems...
... Control Panel Display Settings. * Contact the video card manufacturer for details.) Q: How can I clean the outer case/LCD Panel? Set the function in the BIOS-SETUP of the driver used. (Refer to the Windows / Computer Manual). A: Check if the power cord is on . Q & A Q: How can I set the Power Saving function? Q: How can vary, depending on the version of the computer. (Refer to the Windows / Computer Manual). A: The frequency can I adjust the resolution? Troubleshooting Problems related to the Remote Control Note Problems...
User Manual
Page 69
... energy conservation, turn your LCD Display to low-power mode when it is registered for EMC requirements for long periods. In most cases, the LCD Display installation will provide the best operating conditions and LCD Display settings. Note Design and specifications are 6,220,800. Dot Acceptable TFT-LCD panels manufactured by switching your LCD Display OFF when it has not been used for a certain amount of RED, GREEN, BLUE and WHITE color appear to our...
... energy conservation, turn your LCD Display to low-power mode when it is registered for EMC requirements for long periods. In most cases, the LCD Display installation will provide the best operating conditions and LCD Display settings. Note Design and specifications are 6,220,800. Dot Acceptable TFT-LCD panels manufactured by switching your LCD Display OFF when it has not been used for a certain amount of RED, GREEN, BLUE and WHITE color appear to our...

User Manual
Page 72
.... Information For a Better Display Adjust the computer resolution and screen injection rate (refresh rate) on screen if the best picture quality is not provided for TFTLCD. • Resolution: 1920 x 1080 • Vertical frequency (refresh rate): 60 Hz TFT-LCD panels manufactured by performing the "Auto Adjustment function" in display screen that work the liquid crystal (LC) in a pixel. Image retention may stain it without any problems. • For example, the number of time, a residual image or blurriness may...
.... Information For a Better Display Adjust the computer resolution and screen injection rate (refresh rate) on screen if the best picture quality is not provided for TFTLCD. • Resolution: 1920 x 1080 • Vertical frequency (refresh rate): 60 Hz TFT-LCD panels manufactured by performing the "Auto Adjustment function" in display screen that work the liquid crystal (LC) in a pixel. Image retention may stain it without any problems. • For example, the number of time, a residual image or blurriness may...


